review: The Knook
You may remember my knooking experiment from last year. Knooking (or knitting with a crochet hook) is a clever way to form real knitted stitches, by passing the live stitches onto a cord at the ‘wrong’ end of the crochet hook and then working back into them. The finished fabric is indistinguishable from a knitted fabric.
The main obstacle to knooking was the lack of proper equipment available. I used a locker hook, which worked well enough, but is only available in one size (approx G equivalent). The only other alternatives were to buy an expensive circular crochet hook set, or to hack a crochet hook into a knook yourself.
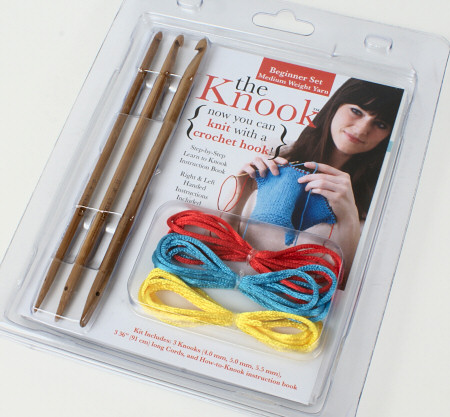
Now, finally, LeisureArts have come to the rescue with their new knooking kit, called simply The Knook. I should mention that LeisureArts kindly sent me a kit to review, but I’m not being compensated for this review in any other way, and the following is based on my honest opinions!
If you’d like to buy one, The Knook is currently available from Walmart stores. If you’re looking for it, don’t assume, as I did from the pictures online, that this is a full-sized book: the knook hooks are the same length as a standard crochet hook (about 6″/15cm), and the booklet is the same height, so you’ll have to keep your eyes peeled to find the kit (it should be located with the other knitting and crochet tools), as it’s fairly small.
UPDATE 20 Sep 2011: Great news! The Knook kit is now available for pre-order on Amazon, and will be released on October 1st 🙂
UPDATE 6 January 2012: Even better news: LeisureArts have now released more knooking books! Here’s what’s currently available:
- The Knook kit (that’s what I’ve reviewed here; includes 3 knook hooks and basic instructions)
- Learn to Knook (includes instructions for decreases and increases, finishing seams, changing colors, making cables, knitting in the round, and more)
- Several knooking pattern books for hats and other items (although you can use any knitting patterns once you’ve learnt how to make the knitted stitches with your knook!).
The Equipment
The kit comes with 3 knooks, in sizes G/4mm, H/5mm, and I/5.5mm, and three coloured cords (there’s no difference between the cords except the colours, btw). The knooks themselves are made from bamboo, so they are very light and look quite stylish. There’s a slight depression for the thumbrest, which makes it more pleasant to hold than the locker hook I used for my previous knooking attempt. The hook tapers towards the bottom, to allow the doubled cord to pass through your stitches more easily, and the cords are smooth and shiny, which should make them ideal to slide through your stitches.
The ends of the cords are melted (so they won’t fray), and that rigidity made it slightly tricky to thread through the eye of the knook, but I found that by gently twisting the cord as I pushed, it slid through the eye easily enough.
The Book
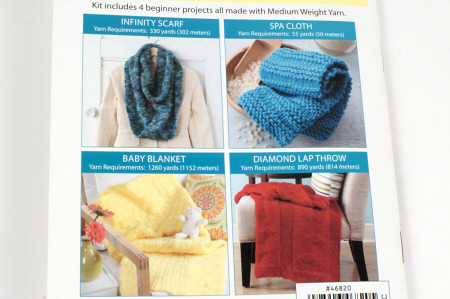
The provided booklet includes step by step instructions for casting on and off, knit and purl stitches, and includes both right-handed and left-handed photos for every step (I heartily approve!). At the end of the book are 4 patterns (a scarf, washcloth, and two blankets.)
When I learnt to knook previously, I had obviously misunderstood something, because knitters looked at my Shaun the Sheep case and told me that my stitches were twisted. (I don’t mind – it still looks good!) I haven’t touched a knook since then and really don’t remember how to do it, so I can test these instructions as a beginner, and hopefully learn the correct method in the process…
The Instructions
I only had internet on my phone when I was testing the instructions, so I couldn’t access the accompanying YouTube videos. If you’re learning to knook, I suggest you use the videos in addition to the booklet to help you learn.
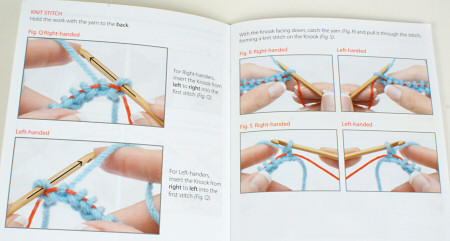
To knit, “insert the Knook from right to left into the first stitch”. What?! This motion felt entirely alien to me: it’s like working backwards (I’m left-handed), and the photo didn’t help. After watching the video later, I see that they inserted the hook under the cord too (not shown in the book), which is far easier than the clumsy way I did it to try to match the book’s photo – I had to hold the cord vertically (as you would a knitting needle) to get my hook into the stitch. So, watch the video too if you’re going to learn using this booklet; it really helps. After trying the video method, my knooking speed is now much faster.
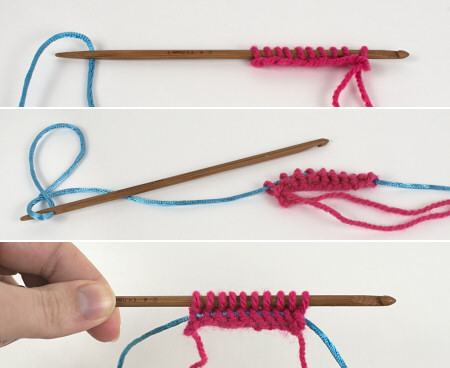
My first steps: stitches picked up along the chain; stitches slid onto the cord; working back into the stitches
After a few rows of awkwardness, I moved onto the purl instructions. This was much easier than the knit stitch for me and I conquered it in no time.
I did a few rows in stockinette and then checked my swatch, only to find that I was twisting the stitches of every other row. I checked back with the book and noticed a very important highlighted box right at the beginning of the instructions:
If you already know how to crochet, please study the photos closely. From this point on, you will NOT be using the same yarn over typically used in crochet.
Oops… I read the instructions again and realised I’d been twisting the knit stitches by yarning over in my usual crochet way. I re-learned the knit stitch properly, then finished my swatch using the supplied bind-off method (although I had to do it twice because it didn’t mention that you have to bind off loosely and so my stitches ended up being too tight on my first attempt).
Using the Knooks
With my stitches down, I was ready to put the knooks and cords through their paces with a test project. The patterns in the booklet were all too large for impatient me (except the washcloth, which I knew I’d never use) so I decided to improvise. I used the H hook and teal Bernat Satin yarn to knook up a mug cosy of my own improvised design.
One of my knook hooks was slightly rough around the notch cut to make the hook shape, but I polished the bamboo smooth by rubbing it against my jeans so it wouldn’t catch on the yarn. (If you had a very rough knook tip, I’d recommend sanding it with fine sandpaper first.)
After smoothing, the knooks themselves worked very well – the non-hook end was far easier to pull through completed rows than the bulkier locker hook had been, and the silky cords slid through my stitches easily too.
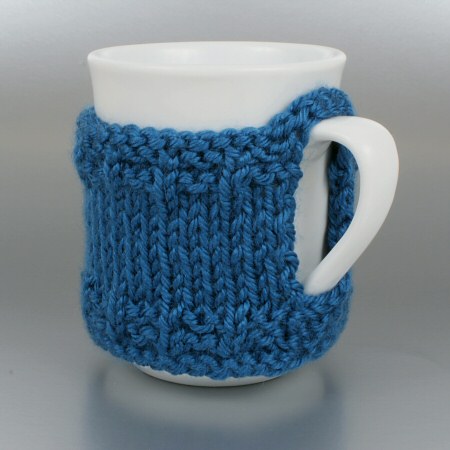
I completed my mug cozy in the time it took to watch a Lord of the Rings movie (so, 3 hours or so), and I’m happy with the result. It’s all knooked apart from the cord over the top of the mug handle, which I foundation single crocheted (still using the knook hook though – you can crochet with a knook too, of course). I expect I could make another mug cozy in about half the time now I’ve seen the video and know to knit by inserting my hook under the cord – live and learn!
Verdict
I highly recommend this kit for the knook hooks and cords. If you want to knook, this is definitely a worthwhile purchase and very inexpensive (people have reported paying around $7 for one at Walmart – well worth it). The booklet is useful too, and the inclusion of left-handed instruction earns it bonus points from me, although I’d recommend that you use the videos too (also available for left-handers). I found that the book photos are very useful to keep on hand as an instant reference for the yarn over directions (I had to check a few times to make sure I hadn’t reverted back to my crochet-style yarn overs, but it worked: no more twisted knit stitches for me).
The Knook kit gets a definite thumbs up from me.
What Next?
 Once you have the equipment, the world is your knooking oyster! If you have any questions about knooking, I always recommend the Knooking group on Ravelry, which is full of knooking experts and newcomers alike.
LeisureArts are publishing more knooking patterns on their website, but I understand you can also knook (almost?) any knitting pattern.
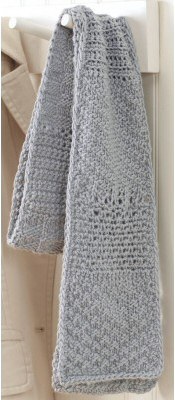
On the LeisureArts site, I’m most excited about the Sampler Scarf pattern pictured to the right note: it’s free, but you do have to register and provide a billing address in order to download it. It includes instructions for combining (knooked) knitted sections with crocheted stitches, which isn’t as easy at it sounds, because crochet stitches are wider than knit stitches. The pattern has sections worked in Knit Check, Knit Diagonal Rib, Knit Basketweave, and Knit Pennant, with instructions for each, so that’s another 4 knooked stitch patterns I’m looking forward to trying out.
I’ll definitely be knooking more often now that I have a set of proper knooks! What do you think: are you tempted to try knitting the crochet way?


