Plumeria crochet pattern
© June Gilbank 2011
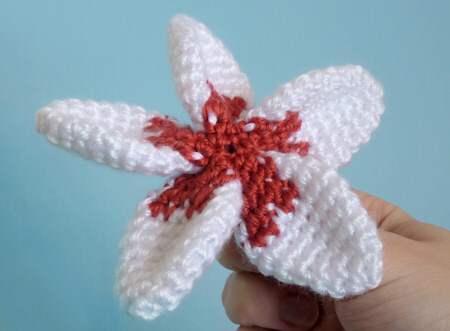
Crochet a touch of the tropics with these exotic plumeria blossoms. Use a plumeria flower to make a beautiful pin or hair accessory, or to embellish anything!
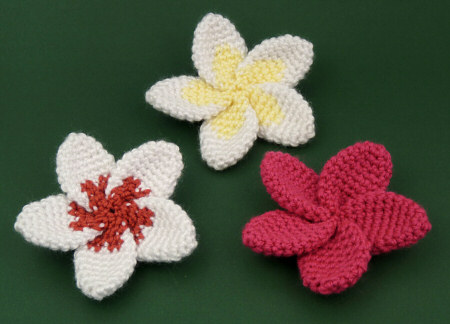
The pattern includes three different petal designs – choose your own colours to make custom blooms.
L-R: Design 3 (ragged centres), Design 1 (solid colour), Design 2 (smooth centres)
This pattern is Donationware – the pattern is available for free, but if you like it please consider sending me a donation to show your appreciation:
Send me a donation and receive the easy-to-print PDF version of the pattern as a thank you!
Donations of any size are much appreciated. Just add the amount you wish to donate, and, once you have checked out and paid, your pattern will instantly be available to download from your PlanetJune account.
The complete pattern and instructions are available below, regardless of whether or not you choose to pay for them 🙂 As it’s such a long pattern, if you plan to print it I highly recommend the PDF version – it’s nicely formatted to print neatly onto 7 pages, with captioned figures etc – but the choice is yours.
This is a PlanetJune original crochet pattern. Feel free to use items made from this pattern however you wish, but I’d appreciate credit as the pattern designer. Please do not reproduce the pattern anywhere else; instead post a link to www.planetjune.com/plumeria
Not ready to make it yet? Add it to your Ravelry queue: 
Terminology
| ch | chain |
| invdec | invisible decrease Note: If you prefer, you may use a standard sc2tog decrease in place of each invdec. |
| sc | single crochet (double crochet for UK/Aus) |
| sl st | slip stitch |
| st | stitch |
Notes
- Do not join at the end of each round; rounds are worked in continuous spirals.
- Use a stitch marker to mark the beginning of each round. Move the marker up each time you start a new round.
You will need…
- E US/3.5mm crochet hook
- Small amount of worsted weight yarn in one or two colours (e.g. white, pink, yellow)
- Yarn needle
- Stitch marker
I used worsted weight yarn and a size E hook, which produced a large 3.5″ diameter flower. Try using a finer yarn or crochet thread with a correspondingly smaller hook to give a more compact flower.
Crochet Instructions
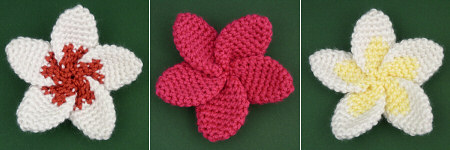
For each flower, you will need 5 matching petals. There are three petal designs to choose from: all have the same shape, but different colour patterns (in order of difficulty from easiest):
1. Solid colour
2. Smooth centres
3. Ragged centres
Colour code
A main colour
B contrast colour (centres of petals, Designs 2 and 3 only)

Petal Design 1 (solid colour)
worked from tip to centre
With A, make a magic ring, ch 1.
Rnd 1: 4 sc in magic ring. (4 st)
Rnd 2: 2 sc in each st around. (8 st)
Rnd 3: (2 sc in next st, sc in next st) four times. (12 st)
Rnd 4: sc in each st around. (12 st)
Rnd 5: (2 sc in next st, sc in next 5 st) twice. (14 st)
Rnd 6: (2 sc in next st, sc in next 6 st) twice. (16 st)
Rnds 7-8: sc in each st around. (16 st)
Rnd 9: (invdec, sc in next 6 st) twice. (14 st)
Rnd 10: (invdec, sc in next 5 st) twice. (12 st)
Rnd 11: invdec, sc in next 4 st, invdec, sc in next 3 st, sl st in next st. (10 st)
Fasten off.
Note: You may either weave in the yarn end so it is hidden inside the petal, or, for less work, leave it dangling for now and hide it later at the back of the flower.

Petal Design 2 (smooth centres)
worked from tip to centre
With A, make a magic ring, ch 1.
Rnd 1: 4 sc in magic ring. (4 st)
Rnd 2: 2 sc in each st around. (8 st)
Rnd 3: (2 sc in next st, sc in next st) four times. (12 st)
Rnd 4: sc in each st around. (12 st)
Rnd 5: (2 sc in next st, sc in next 5 st) twice. (14 st)
| Rnd 6: | A: 2 sc in next st, sc in next 6 st, 2 sc in next st, sc in next st, B: sc in next 2 st, A: sc in next 3 st. (16 st) |
Rnd 7: sc in each st around as follows: 10A, 4B, 2A. (16 st)
Rnd 8: sc in each st around as follows: 10A, 5B, 1A. (16 st)
| Rnd 9: | A: invdec, sc in next 6 st, invdec, sc in next st, B: sc in next 4 st, A: sc in next st. (14 st) |
| Rnd 10: | A: invdec, sc in next 5 st, invdec, B: sc in next 5 st. (12 st) |
| Rnd 11: | A: invdec, sc in next 4 st, B: invdec, sc in next 3 st, sl st in next st. (10 st) |
Fasten off.
Note: You may either weave in the yarn ends so they are hidden inside the petal, or, for less work, leave them dangling for now and hide them later at the back of the flower.
Petal Design 3 (ragged centres)
worked from tip to centre
With A, make a magic ring, ch 1.
Rnd 1: 4 sc in magic ring. (4 st)
Rnd 2: 2 sc in each st around. (8 st)
Rnd 3: (2 sc in next st, sc in next st) four times. (12 st)
Rnd 4: sc in each st around. (12 st)
Rnd 5: (2 sc in next st, sc in next 5 st) twice. (14 st)
Rnd 6: (2 sc in next st, sc in next 6 st) twice. (16 st)
Rnd 7: sc in each st around. (16 st)
Rnd 8: sc in each st around as follows: 10A, 2B, 1A, 2B, 1A. (16 st)
| Rnd 9: | A: invdec, sc in next 6 st, invdec, sc in next st, B: sc in next 4 st, A: sc in next st. (14 st) |
| Rnd 10: | A: invdecg, sc in next 5 st, invdec, B: sc in next 5 st. (12 st) |
| Rnd 11: | A: invdec, sc in next 4 st, B: invdec, sc in next 3 st, sl st in next st. (10 st) |
Fasten off.
Note: You may either weave in the yarn ends so they are hidden inside the petal, or, for less work, leave them dangling for now and hide them later at the back of the flower.
Backing (optional)
With A, make a magic ring, ch 1.
Rnd 1: 6 sc in magic ring. (6 st)
Rnd 2: 2 sc in each st around. (12 st)
Join with sl st to next stitch. Fasten off, leaving a long end of yarn.
Assembly Instructions
The petals of a plumeria flower are arranged in a distinctive spiral. It’s not difficult to do, provided you follow my assembly instructions. This assembly is a little time-consuming because it has several steps, but I think it’s worth it to make the petals spiral beautifully!
Step 1
Flatten out each petal.

Design 1: the increases and decreases should lie along the edges of each petal.
Designs 2 & 3: centre the contrasting inner colour on the top of each petal.
Step 2
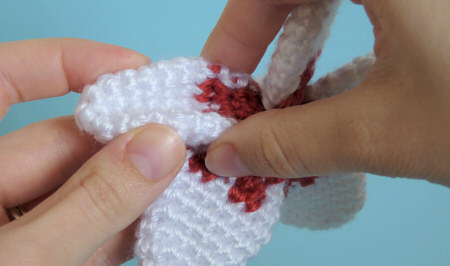
Thread a yarn needle with a 12” length of yarn (Designs 2 & 3: use colour B). Place one petal directly on top of another, with the fronts of both petals facing towards you. Offset the top petal by shifting it very slightly to the right.
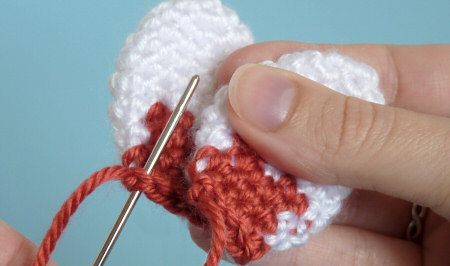
Using the length of yarn, stitch through the lower left corner of the top petal, through the lower left corner of the bottom petal, and back through the same corner of the top petal. Draw the stitch tight to minimise the offset between the petals. Note: The smaller you can make the offset, the smaller the hole remaining in the centre of the flower will be.
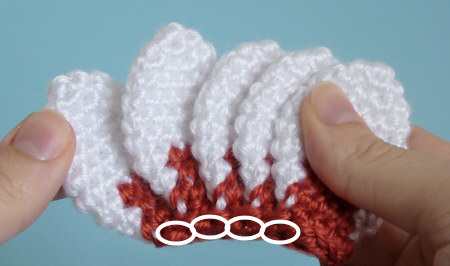
Repeat this three more times: each time add one more petal on top of the group, offset it very slightly to the right, and stitch the lower left corner to the same corner of the petal below. When you’ve finished, the 5 petals should all be stacked together in a row. Note: Do not fasten off yet!
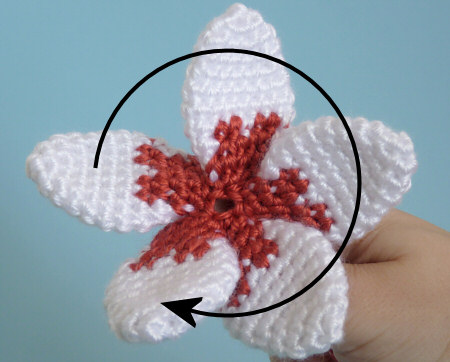
Fan the petals out clockwise around the joined centre, to form a flower shape. Arrange the first (bottom) petal so its left corner is above the left corner of the last (top) petal, and stitch this final petal corner in place. Fasten off and weave in the ends.
Step 3
Turn the flower over. As it is only held together by one corner of each petal, you’ll see that the remaining corner at the base of each petal is still free to flap about. In this step, you’ll stitch those corners together to complete the spiral effect and lock the petals together.
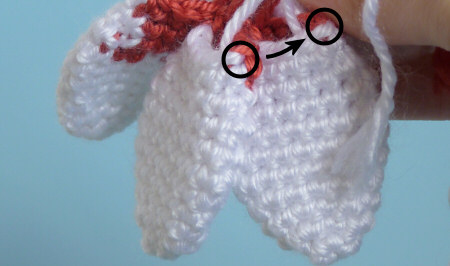
Thread a yarn needle with a 12” length of yarn (Designs 2 & 3: use colour A). Stitch through the free corner of the first petal, through the free corner of the second petal, and back through the same corner of the first petal, and draw tight. Repeat for the remaining petals, until all 5 corners are stitched together at the back of the flower. Fasten off and weave in the ends.
Step 4
Use your finger to curve each petal along its length by pushing up both sides, so the middle is indented.
Don’t worry if your flower looks more like a propellor than a pretty blossom at this stage – there’s still one more step needed to complete the assembly magic!
Step 5
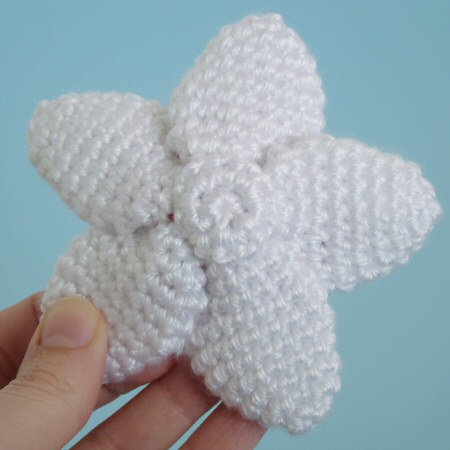
Draw your hands up around the base of the flower and squeeze gently so the petals are forced to spiral upwards and together.
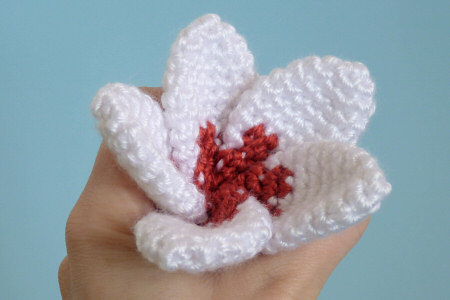
When you release the flower, the petals will spring back, but should still overlap. You’ll lock them into this overlapping configuration to make the separate petals into one complete blossom.
Turn the flower over to the back. Thread a yarn needle with an 18” length of yarn (Designs 2 & 3: use colour A). You’ll be stitching the petals together a few rounds out from the centre, just below the middle of the petal (dotted line in the picture below the following paragraph).
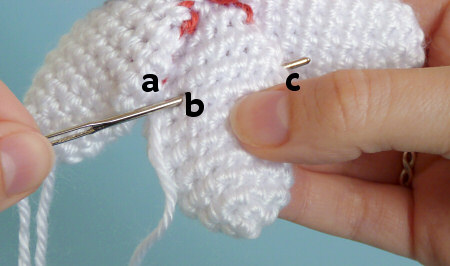
Points a, b, c are shown on both pictures (above and below). Bring the yarn up at the right edge of one petal (point a), enter the next petal a couple of stitches in from the left edge (point b) and then exit that petal at its right edge (point c). Make sure your stitch only passes through the back layer of the petal, so it won’t be visible from the front.
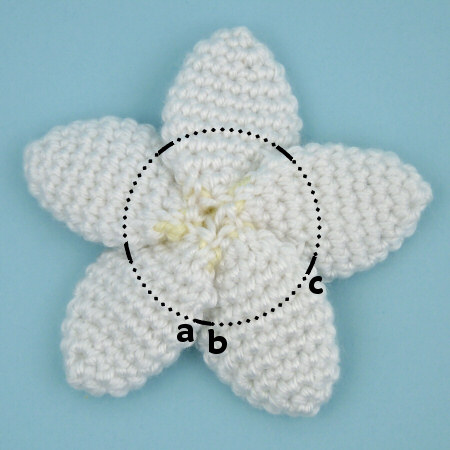
Repeat all the way around the circle, passing the needle from a couple of stitches in from the left edge (b) to the right edge (c) of each petal. When you’ve stitched through all five petals, draw the length of yarn taut so the stitches disappear, and then tie the ends together so the petals will stay together in this position. Lose the ends inside one of the petals.
Backing (optional)
Depending on what you’d like to use your blossoms for, the back of the flowers may be visible. The middle of the back may look a little messy, especially if you’ve made a dual-coloured flower. To neaten it up, you can cover that middle part with a crocheted backing, if desired.
Place the backing circle over the middle of the back of the flower. Using a yarn needle and the long yarn end from the backing, stitch the backing to the back of the petals, all around the edge of the backing.
Enjoy your plumeria flowers!
I hope you enjoy this pattern. Please leave me a comment below if you do, and consider leaving me a donation. Thanks!


Janice bell said
I need pdf to print for the flowers,how do i get it
June said
Of course, Janice – just click the ‘make a donation’ above and you can donate whatever you feel the pattern is worth and receive the PDF pattern in return 🙂
lilochris said
lovely flowers. and thank you for the free pattern. I love all your creations
Carol said
Pattern is cute. Hope to get around to it soon. Thank you.
Jade said
This pattern is amazing! I’ve been searching everywhere for something like this!
Rosie said
Thank you for this pattern! My DIL is Hawaiian and now living in NM. These will be a sweet reminder for her of home!
Itiba said
I’m learning a lot with you! Thank you! I did this pattern!!! It’s so cool to see how the flower take it’s form. Thank you! I love your work!!!!
Louis said
Thanks for this pattern. I admire your passion in creating nature-inspired crochet crafts.
Marilyn said
Thank you for all the time you spent creating this pattern and making the instructions with photos! With Christmas approaching, I decided to try and make a poinsettia instead of the plumeria, arranging the petals right up against each other instead of overlapping them, and making a center with yellow French knots. I wish I could show it to you, but can’t figure out how to attach a photo in this comment area.
Thanks again 🙂
Sabrina said
hey June
i absolutely love your plumerias. When i was sewing the petals together i thought ´how on earth are they going to stay in shape?´ but i was positively surprised to see that my first plumeria ended up beautifully. I´m going to make lots more, thank you very much for your amazing pattern 🙂
Sabrina
Kate said
I love this beautiful pattern. It is very simple to follow and the flower holds its shape very well. I just made one for my grandmother for Mother’s Day. I linked to your pattern in my blog. Thank you for such a wonderful, lifelike pattern!
Sherry said
Thanks for posting! Really appreciate you great crocheter’s sharing your patterns with us!
Aim said
I just finished the petals from the design 1 instructions. They turned out perfect. But i cannot, for the life of me, assemble this. Have been trying for over an hour now… Maybe I just cant sew…. Thanks for the pattern I’ll come back to this later.
Rey said
Thank you so much for the pattern! I’m hoping to make a few blankets for myself and my daughter and these are absolutely perfect for what I had in mind!
Abby said
Thank you for this pattern! I am using it to make a hair peice for my chorus show. We are doing a hawiian (if that’s how you spell it…) song from Lilo and Stitch and I have been elected to be Lilo. I was looking for hours upon hours for a perfect flower to use when I came across this pattern. You are a life saver… well, more like a costume saver! 🙂
Iin Wibisono said
You made such a wonderful things June, and the instructions is very clear. Thanks for sharing…
Iin
NOELIA said
me encantan las cosas en crochet y me gustaria que lo traduscan en castellano…gracias
Saralyn said
Just finished my 1st one its a lovely patter
GracieCain said
Your patterns are so cute i am doing your hearts my mom loves them they will be a life long memory
Katie said
Thanks for this pattern! I’ve had it marked in my Ravelry favorites for quite some time and I just started making one for my sister who has a deep love affair with Hawaii. She is going to love this!
Kristin said
Fantastic!! You did an excellent job writing this pattern. I had the pattern memorized by the third petal and assembly was super easy as well. I’m not sure why others were confused. Not only will I be making these to sew onto all the purses I’m making as gifts for Christmas, but each petal (solid color) makes an excellent Christmas light bulb shape when grey or black is crocheted onto the bottom rather than joining. Attach bulbs (petals) a foot apart on a long crochet chain and you’ve got yourself a holiday “lights” garland!! LOVE IT!!! And if anyone asks where I got the pattern for the garland (and the flowers, of course), I will surely refer them to your plumeria pattern 🙂
Ann M said
Very Cute Gonna give it a try…:O)
Avie said
its so awesome..
in my country,we named this flower “Kamboja”…so many varietas in these flower..
But..U R the one who can make it in crochet…awesome..two tumbs
den-w said
hahaha! so IT DOES!! man oh man my face is red!!! yep right there in BOLD PRINT no less jeez!! so sorry
READ FIRST———-HOOK SECOND words to live by i guess!!
i like mine—– although stitching the second part of the petals threw me but i liked the last part kind of saved my butt!! still going with it though!! check it out on my ravelry page !!
thanks for your time june i love lots of your stuff maybe i will try another soon!! denise
den-w said
thanks june these are great!! after finishing my first one i started to read the “comments” and ran into the bill,denise,nicole segment !! and how they were having “problems” maybe i can help out a bit. (i know they get it now but for the future….) whenever i start a new pattern i just try to begin at the beginning reading what special stitches hook size yarn type etc……..and not read ahead…just follow the directions and sometimes i am surprized at what i get!! this flower for example…i did not realize at first that it was double sided (i thought it was just flat stiching) and that i would have to make 5 petals (just like them) but as soon as the first one was finished i understood i guess i was thinking that it would be all worked at one time as one piece! surprize!! MAYBE at the intro to your directions you could mention that it is done in 5 seperate pieces and then assembled?? thsi may help the “lost and confused” before they get there!!
anyhow it was just a thought!! i love the one i finished and i hate the sewing at the end but it is way worth it gonna put a pearl in the middle or something and its going to my great niece who turned 10 yesterday and her party tomorrow is “hula party” type thing!! i will also put mine on my raveley page under den-w!! thanks again denise
June said
Thanks for the suggestion, Denise. It does already say “For each flower, you will need 5 matching petals” at the very beginning (before the pattern begins) 🙂
muna nana said
Hello June,
Thank you again for a wonderful pattern!
I was wondering if the people who are getting bowl shapes are working by joining the rounds instead of working in a spiral? is that a possibility for why this is happening?
Also have photos of the Adult and Baby Emperor Penguins from the pattern I bought from you. should i email them to you or add them to ravelry and post a link here?
June said
Actually, Muna, that shouldn’t make much of a difference 🙂 I’ve yet to have anyone show me a photo of this mythical bowl shape, and nobody has had a problem for ages now, so I think my previous comments and suggestions have done the trick.
Please add your penguin pics to Ravelry and then post them in the PlanetJune crochet designs group so everyone can enjoy them! 😀
Mary Peterson said
I am making baby stuff for the daughter of a friend. She has given me free reign to make whatever I want. I have been looking for a plumaria pattern because the daughter prefers them to the roses so many patterns have. Your plumerias are gorgeous, I cant wait to try the pattern. Thank you for sharing this pattern.
Alejandra said
Te felicito!!! HAces cosas hermosas. Hoy te encontre y estoy muy feliz por aprender esta hermosa flor.
Ahora soy jubilada y me entretengo tejiendo flores. Me encanta este blog. Yo no tengo blog solo soy seguidora de maestras como tu. Besitos desde Buenos Aires ( Quilmes)
bassima saab said
very nice simply beautiful. i am very happy that there is whom who works in this old but very nice kind of crafts. from one crochet maker to the other your work is amazing… thank you
kate said
beautiful.Thank you.
Shannon said
I think your pattern is perfect. These flowers are lovely!
Laura said
Hi June!!
Thank you a lot for your pattern!!
I’ve done the flower and it looks stunning!!!
I linked this post in my blog!
laubao.wordpress.com/2012/04/18/giardino-puccini-puccini-garden/
Greetings!
Laura
Ellen said
Awesome Pattern!! Adding it to a baby hat I am making for a co-worker!!
Sue said
Hi there! Thanks for the beautiful pattern! I just started crocheting 2 months ago and am so happy to have found your plumeria pattern, as it is my favorite flower =D
Honestly, I don’t think there’s anything wrong with your pattern because I’m still an amateur and managed to make my first crochet plumeria…just wished I could attach a picture to show you =P
Today, I’m planning to make Design #2. =D
Thanks June!!!!!
Britt said
This is great! I’ve been looking for a plumeria pattern, and these directions are perfect and so easy to follow. Thanks!
Nicole said
I just figured out what I’ve been doing wrong, I get it now
Nicole said
I’m having the same trouble as everyone else – I’m getting the bowl shape 🙁 It curls around like as if i were making a hat… I’m trying to use DK weight yarn and a 4mm crochet hook. Ive tried both the single and coloured ones and i still get the same thing.
June said
Hi Nicole, I’m sorry to hear that, but it really isn’t “everyone else” – only a very small percentage of people are having this problem, but, as nobody has sent me a photo showing this bowl shape, the only advice I can offer is what I’ve offered in reply to the previous commenters, as I assume you must all be misreading the pattern directions in the same way. (You’re using a slightly thinner yarn and slightly larger hook than I recommend, but that won’t change the overall shape you end up with, it’ll just make your petals a little floppier than mine.)
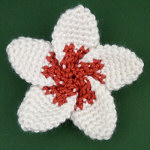
To everyone who’s having this problem: this is what the petal shape should look like after you complete the crocheting, before you flatten it – a sort of long oval shape, open at the bottom:
If this isn’t the shape you’re getting, you’ve misunderstood the pattern. I am very happy to help with that, but I can’t unless I can see where you’re make the mistake – I’d need more info! As I’ve said before, please count your stitches at the end of each round to make sure you have the right number (give in parentheses at the end of each round), and make sure you repeat everything inside the (…)s the required number of times.
If that, and my advice in the previous comments, doesn’t help and you’re still getting a bowl shape, please email me with a photo so I can see what you’re doing wrong! I guarantee that there is no mistake in the pattern, but I don’t know what else I can do to help you – I can’t give any more advice than I’ve given already without seeing where you’re going wrong, and I can’t do that unless I can see this “bowl shape” you’re getting.
Nicole said
Thats what i’m getting… but just one big one rather than all of them…
June said
That’s great, Nicole – it means you don’t have a problem! Just make 4 more petals and then follow the Assembly instructions, and it’ll come out beautifully 🙂
I wonder if that’s the problem Denise, Bill and Monica had too – that they haven’t read down to the Assembly part and make only one petal, thinking they should have a whole flower..?
Nell said
This are simply beautiful! Thank you so much for the wonderful site and patterns!
Melanie said
I’m just replying to say that I am working on this flower right now and I found nothing wrong with the pattern. the petals seem to be working out for me and I’m doing the red and white version. Will be posting pics on my ravelry profile when I’m done! lets just hope the joining goes as well!! ;P Thanks for a cute flower pattern!!!
Melanie
Denise said
Sorry, one more thing. You said these are worked in rounds and not to turn or join. If you work it in a round, you end up with a big circle that is lopsided because of the sc2tog. Sorry to complain, I’m just trying to follow the pattern and incorporate the notes you have already provided.
June said
It sounds from your description like you’ve ended up with too many stitches in each round before you reach the decrease rounds, and that’s why it’s going lopsided when you decrease. The decreases should be spaced at opposite sides of the petal (symmetrically). As I said above, please try again, using a stitch marker to verify that you’ve made the correct number of stitches in each round before you progress to the next round, and I’m sure that will show you how you’ve misunderstood the pattern instructions to make it come out wrongly!
Denise said
These look so lovely and the instructions seem clear enough. With that being said, I have to agree with Bill and Monica. I also end up with something that looks like the side of a bowl.
I don’t really need to download the pattern b/c each line is seperate in my browser and I can follow line by line or round by round as the case may be. I guess I’ll try again but again, I’m with Bill and a bit frustrated….
June said
Denise, I can guarantee that there are no errors in the pattern that would make it turn out as a bowl shape. You must be misinterpreting the pattern instructions. Make sure you are repeating everything in the parentheses the number of times specified.
To see where you’re going wrong, use a stitch marker to mark the first stitch of each round:
– When you get back to the stitch with the stitch marker, you should have reached the end of the instructions for that round.
– Count around and see if the number of stitches you have matches the number given in parentheses at the end of each round.
– If the number of stitches doesn’t match, you’ve misunderstood the instructions or crocheted them incorrectly.
– If you don’t reach the stitch marker by the time you get to the end of the round, you’re doing something wrong.
– If you meet the stitch marker and haven’t finished the instructions for that round, you’re doing something wrong.
If the stitch count matches up on every round, you will definitely end up with a petal shape, not a bowl shape! You can read the reviews of my pattern or look at finished projects by other people on Ravelry to confirm this.
You’re more than welcome to email me a photo of your petal so I can see where you’re going wrong and advise how to correct it.
Tara said
This pattern looks Great! I have finished one petal… Sort of. Everything seemed okay except that when i switched to the contrast color there was the extra yarn strand from where i left off on the previous round. Are you supposed to turn the piece inside out? If not, how will I get the yarn strands covered?
Thanks.
June said
Tara, there are two things you need to check:
1) Are you crocheting inside out to begin with? See my tutorial Which is the ‘Right’ Side? to check.
2) When you change colour, make sure you leave all the yarn tails on the back side of your work (which will be the inside of the petal and therefore hidden!) each time you switch colours. For more info see my tutorial Colour Changing in Amigurumi 🙂
Tara said
Thankyou!!!
nassim said
thannk you !
its nice.
i’ll try to make it !
monica h. said
I guess Billy isn’t the only one who can’t figure out this pattern. Something is definitely written wrong. I come out with a half curved piece of something that looks far from your petals. I’ve tried it over 4 times now exactly how its written. Can you maybe look over it. It almost seems if the pattern was cut in half it would work. Well thanks hope to figure out this beautiful pattern with your help.
June said
Monica (and Bill), I can promise you that there is nothing wrong with the pattern! I’ve followed it myself close to 20 times, and here’s a photo from someone else who has made one following the pattern: www.flickr.com/photos/61833893@N04/5840599278/
The only thing I can think of is that in the dual-coloured patterns, in the rounds that use both colours, the text may be mis-formatted on some browsers so that (e.g.) “Rnd 6” breaks onto 2 lines. Make sure you aren’t reading the “6” as part of the crochet instructions! (And the same applies for Rnds 9, 10 and 11.) Another reason to donate for the PDF version where I can control the formatting you see – sadly I can’t control your web browser (although I’ll try to fix that layout thing now that I’ve noticed there’s a possibility of confusion).
If that isn’t the problem, you should use a stitch marker to mark the first stitch of each round, and count your stitches at the end of each round to make sure you haven’t gained or lost any over the course of the round – if you’ve done it right, you should have crocheted back around to the stitch marker by the end of the round.
If that doesn’t help, please feel free, either/both of you, to email me a photo of your petal so I can see where you’re going wrong and advise how to correct it.
monica h. said
Thanks! Will try downloanding flie instead. I’m making hats for my newborn babygirl, and would really like to put this flower on one of her hats. I still have a little time she’s due July 21st. Will send u a pic if I still don’t get it after I download it lol thank you so much for replying back! I really appreciate that!
Bill S. said
This pattern makes no sense. I follow it exactly as it’s written and I end up with a cap or half a hollow ball; nothing like that your photos show. You don’t indicate if the magic circle should be closed. I’ve tried it closed and opened, and neither works. You also never indicate turns. If the circle is meant to be open, how are you meant to move onto step two without turning?
Maybe I’m the only one having difficulty, but regardless I’m still very, very frustrated and wishing you had a video tutorial to accompany it.
Bill S. said
Replying in order to check the “notify me” box.
June said
Bill, I’m sorry to hear you’re having such troubles with my pattern! I assume you’r not familiar with the amigurumi style of crochet. I’ll try to help:
Creating quality videos is very time-consuming. Creating an accompanying video for each of my patterns would be impractical – I do have close to 100 patterns now! – but I will be creating more technique video tutorials (for example, for the magic ring) in future, as time permits.
Please feel free to email me if you have any further questions – I’m always happy to help 🙂
Bill S. said
Thank you for your wonderful reply. It just seems so easy, and something isn’t clicking. I’ll keep persevering though, I have to eventually get it…
Pam said
Ah how pretty! I can see this being my new addiction (other than granny square slippers lol)
I’ll have to purchase the pattern because you’re right, it is long!
Can’t wait to get started on them 🙂
Thanks for sharing and I hope that you get well soon!
Pam in Sewickley, PA
Elise said
These are beautiful! I’ll be purchasing your pattern, I hope I can make them as beautiful as yours.
Thank you for sharing!
Millasew said
What lovely flowers! Thanks for sharing!
Julie said
Ooh I love this! I’m gonna have to make some since my real plumeria hardly makes any flowers! hehe!
Carolyn VanOstran said
Your flowers are beautiful. Thank you so much for sharing your pattern. I can already envision many projects that will be enhanced by the addition of this gorgeous flower. Thanks again!