PlanetJune Craft Blog
Latest news and updates from June

PlanetJune Blog: Latest News, Patterns and Tutorials

‘Worms’ in polymer clay

As I’m a bit of a perfectionist (you may have noticed!) I really struggle with quick crafts, because I want everything to be as good as I can possibly make it. Sometimes that’s not healthy: when even my relaxation time is spent being very careful and striving for excellence, I put a lot of pressure on myself. So one of the things I’d like to do this year is to spend more time making ‘fun’ things without caring as much about how ‘good’ they are. And this is my first attempt at that.

Many years ago, I used to love making teeny tiny things with polymer clay – I once made a complete set of Teenage Mutant Hero Turtles (and Splinter the rat) that were each about 1cm tall! I thought it would be fun to try something more like that again – something quick and fun and colourful; almost the antithesis of my 3-years-in-the-making R2-D2 sculpture.

A bit of background for the non-gamers: in the late 1990s, there was a series of multiplayer games called Worms (Worms 2, Worms Armageddon, etc etc). Each player controlled a team of cute worms and took turns to try to annihilate each other by arming their own worms with a selection of outlandish and hilarious weapons. Crazy cartoon carnage ensued. Worms has recently made a comeback with new releases for consoles and iPhone, but 1999’s Worms Armageddon on PC is still a great game too.

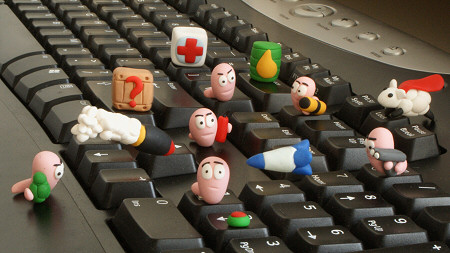
Okay, enough talk! Here’s the action shot as the Worms go into battle on my computer keyboard:

Worms (polymer clay) by planetjune
Click through for the bigger pic at Flickr!

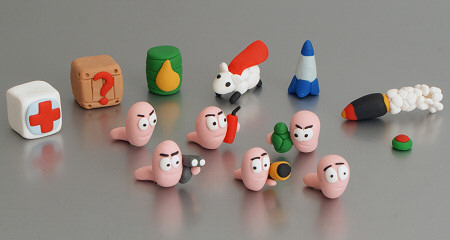
And because some of the details don’t show up too well against the black keys, here’s a posed shot of all the pieces:

Worms (polymer clay) by planetjune
Click through for the bigger pic at Flickr!

Worms L-R: no weapon, shotgun, dynamite, bazooka, grenade, no weapon
Back: health crate, mystery crate, oil barrel, super sheep (it’s a weapon!), homing missile, bazooka, mine

A couple of hours well-spent, I think – they just crack me up, especially their little expressions, and the super sheep with his billowing cape 😀

Comments (28)

2009: year in review

It’s hard to believe that 2009 has ended and I’ve been self-employed for a whole year already! My resolution from last year was “to give myself the chance to succeed, but to not beat myself up about it if things don’t go as well as I hope”, and I think that was a good resolution to have. Taking the leap into self-employment was not an easy decision, and this year has definitely been an eye-opener for me. My original plan was to spend my extra time designing more crochet patterns, and see if I could build my business that way, but, in the end, that wasn’t what happened at all…

The very next day after I made the decision to quit my job, I was approached to write a papercraft book (as a result of my work on Folding Trees). As it was my first book, I was totally unprepared for the amount of hard work this would entail – designing projects, shopping for materials, making project samples, giving myself a crash course in Adobe Illustrator so I could create quality illustrations for the book… oh yeah, and actually writing the book! But it all came together in the end, after 3 months of very hard work, and the end result, Paper Chains and Garlands, is out now to buy from Barnes & Noble stores and online.

After that, I came up with the bright idea of self-publishing a punchneedle embroidery eBook, so I spent a couple of months writing and photographing that, and designing patterns to go along with it. The result was The Punchneedle Handbook and a range of (currently) nine patterns.

2009 books by June Gilbank
Two books in one year!

I also had two sewing patterns published in the book One Yard Wonders. I taught three crochet classes at two Creativ Festivals, plus gave an online class at Crochetville. I gave a talk on designing amigurumi animals, and I was interviewed for two podcasts: Getting Loopy (about my crochet designs) and CraftyPod (about my experiences with print and eBook publishing). I finally finished my crocheted baby orang utan and was interviewed about it for an online art magazine. I did some web design contract work. And, for the past few months, I’ve also been working on 2 secret projects which I can’t reveal quite yet.

So really, it’s a wonder I had time to crochet at all, let alone follow my original plan of increasing my rate of producing new patterns! But I did manage to publish 16 new crochet patterns in 2009, some of which (African Violets, Alpaca, Dinosaurs, Christmas Trees) are now among my bestsellers, and I bought a special notebook that’s now filled with ideas that I haven’t had a chance to make yet, so I’m in good shape to start 2010.

Here’s a visual roundup of most of what I’ve made this year:

PlanetJune 2009 roundup

All in all, I will count 2009 as a very successful first self-employed year. There are a lot of things I was hoping to accomplish that I just haven’t had a chance to do yet, but I’ve worked very hard all year and I think I have a lot to show for it. Having said that, my resolution for the coming year is to learn to say “no” to some things – there are only so many hours in the day, and it’s not healthy to work all the time! Setting priorities is key, and this is why Eve and I made the difficult decision to close Folding Trees last week – we both have too many other things to juggle and something had to give so that we could save our sanity and spend some time with our families once in a while…

As for 2010: bring it on! I already have enough ideas to fill the entire year, but I’m not going to write a list of plans and goals here: I’ve learned to expect the unexpected and be flexible with my plans so I can seize new opportunities when they arise. I’m looking forward to continuing my journey, wherever it leads me.

On a personal level, 2009 has been a difficult year for many of us, myself included, so let’s cast all that off and move forward into a new decade and a new adventure! Don’t be afraid to try new things: shrug off the things that don’t work out and be encouraged by your successes. I wish you all a very Happy New Year, my friends!

Comments (5)

polymer clay R2-D2 sculpture

…a project 3 years in the making.

Way back in January 2007, I posted a cryptic wip (work-in-progress) of a FIMO sculpture I’d started:

polymer clay stulpture... in progress!
Can you tell what it is yet? 😉

Yes, I’m a lifelong Star Wars geek, and I was making a model R2-D2. I finished and baked the head, and then… nothing. I’d actually intimidated myself – the head was so detailed and so good that I didn’t think I’d be able to make a body to do justice to it! Also, I really wanted the head to be jointed so that it could rotate, and I wasn’t quite sure how to accomplish that. I filled a page in my notebook with sketches and ideas, but I never got any further than that. And the  longer I waited, the less likely it became that I’d ever finish my R2 project 🙁

This Christmas, I decided that after working myself so hard for an entire year (never work for me – I am a demanding boss!) I’d take a week off to spend time with Dave and just relax. And relaxing, for me, involves making stuff, so I got out the FIMO and set to work. A week and many baking sessions in the toaster oven later, here is the finished R2-D2:

polymer clay R2-D2 by planetjune
I strongly suggest you click through to see the larger picture! You can’t really see the detail at this scale.

I am so happy with how he turned out! He is perfectly hand-sized at 8cm (just over 3″) tall, and he comes with a secret special feature: yep, I managed to get that rotating head working! I embedded a rare earth magnet into his body, and stuck a second magnet to the base of his head. This lets the head rotate smoothly and freely. Not sure what I’m talking about? Here’s a shot of the inside:

polymer clay R2-D2 by planetjune - head rotation mechanism

(The purple clay inside the body is just a core I made by smushing all my leftover unbaked scraps from past FIMO projects together. As it doesn’t show in the finished piece, there’s no point in wasting a huge lump of new clay, so I made a cylinder from the scrap clay, baked it, and then covered it in a sheet of white clay to form the torso.)

The head magnet fits perfectly inside the recessed hole. There’s a second magnet just beneath the surface of the clay at the bottom of the hole, so the head doesn’t fall off the body but can swivel freely. The rare earth magnets are so strong that, even when separated by a thin layer of clay, you can safely lift R2 by his head and his body will stay firmly attached. Here’s a little animation of his head moving:

polymer clay R2-D2 by planetjune

This project was a great break from my normal life. I love the enforced calm that comes with my polymer clay work.  It’s so detailed and precise that I have to empty my mind and just concentrate on slicing off that sliver of clay, or smoothing out that fingerprint – it’s almost meditative. My batteries are recharged and I’m ready to tackle 2010!

Comments (28)

happy christmas!

Happy Christmas from PlanetJune.com

Comments (2)

chocolate truffles recipe

Ahh, it’s Christmas! I made a batch of chocolate truffles yesterday, and mmmmm, they are so good! I wish I could give one to each of you, but as that’s a little unfeasible, my gift to you is the recipe so you can make your own. They only take a few minutes to make (plus time to set) and make lovely gifts, if you can bear to part with any! I think they are out-of-this-world delicious with Tia Maria, but you can use your favourite spirit instead – rum, Kahlua, etc – or even omit the alcohol and substitute with the same volume of milk for a teetotal version.

Happy Christmas!

chocolate truffles by planetjune

Chocolate Truffles (makes approx 30)

Ingredients

  • 4 oz / 120 g chocolate (semi-sweet or unsweetened)
  • 10 oz / 300 g / 2 ¼ cups icing sugar (aka powdered/confectioners’ sugar), sifted
  • 2 oz / 60 g / ¼ cup unsalted butter
  • 1 tbsp Tia Maria (or alcohol of choice)
  • Optional: chocolate sprinkles, cocoa powder or icing sugar for decoration

Method

  1. Melt chocolate and butter in a heatproof bowl over a saucepan of simmering water.
  2. Add alcohol and stir to blend.
  3. Gradually add the sifted sugar and stir until all the sugar has been incorporated.
  4. Divide the mixture into approx 30 pieces and roll each piece into a ball in your hands.
  5. Roll each ball in chocolate sprinkles, cocoa powder or more icing sugar (or leave plain if preferred).
  6. Place each truffle into a paper case and leave to set for 4-5 hours.

Store any leftovers in an airtight container – they will keep for weeks, but I doubt they’ll last that long!

chocolate truffles by planetjune

Bon appetit, and happy holidays!

Comments (7)

holiday sale and clear eyes!

I guess you like the idea of clear eyes to use for amigurumi etc: 77% of you who voted in my poll said that you’d definitely be interested if I started selling them. Well, your wish is my command – I now have clear eyes available in the PlanetJune store in 9mm, 10mm, 12mm and 15mm sizes! (I’ve just ordered these sizes as a trial run, so if you’re looking for different sizes please let me know.)

clear animal eyes for amigurumi

As I mentioned in my previous post, clear eyes have several advantages:

  • You can paint the flat back of the eye with acrylic paint to get the exact shade you want.
  • Feeling artistic? Create customized eyes with paint effects – paint spots, stripes, starbursts etc on the back of the eye first, let it dry, then coat the entire back of the eye with the base colour.
  • Don’t like painting? No problem! Just cut a square of felt a little larger than the eye, snip a little cross shape in the middle to poke the shaft of the eye through, then trim the felt so it is the same size as the eye – easy! (Blue and pink felt eyes pictured below)

clear animal eyes with felt colours for amigurumi

By the way, the prices of all my eyes (clear and solid black) are now automatically discounted if you buy 10 or more pairs of a single size and type 🙂

And now onto the holiday sale…

From now until December 24th, all patterns (crochet patterns, punchneedle patterns, and The Punchneedle Handbook) will be automatically discounted by 10% in the shop. You don’t need a voucher code – this sale is available to everyone! This is your last chance to buy patterns at 2009 prices, and the last sale of this year, so you’ll never see prices lower than these. Multipack sets are also discounted, so you can get an even better deal there!

some PlanetJune patterns!
A small sampling of the crochet patterns you’ll find in the PlanetJune Shop

Happy Holidays from PlanetJune! I hope you’ll enjoy the pattern sale and take this opportunity to try out some clear eyes too. And don’t forget: PlanetJune Gift Certificates would make a great Christmas present for the crocheters on your list!

Comments (2)

which is the ‘right’ side?

Amigurumi are typically crocheted in the round, in a continuous spiral, which means that the two sides of the crocheted fabric that is produced will look completely different. You can choose which side faces out by flipping the piece inside out at any stage before closing up the piece, and then continuing to spiral around. It doesn’t really matter which side faces out, unless you want to use the invisible decrease technique, in which the ‘right side’ of the fabric has to face outward for the decreases to be invisible.

I keep getting asked which side is the ‘right side’, so I thought I’d put this side-by-side comparison together to show you the differences between the two sides.

UPDATED: See also my video tutorial (right- and left-handed versions) to see the ‘right’ and ‘wrong’ sides forming as I work, and watch how I can switch between them.

The ‘Right’ Side

the 'right' side of a spiral-crocheted piece

  • Each stitch looks like a V shape (I’ve highlighted one in white for you).
  • Note also that you can see the sideways V shapes around the edge that you will crochet into to form the next round.

The ‘Wrong’ Side

the 'wrong' side of a spiral-crocheted piece

  • Each stitch looks (to me, at least) like a pi symbol (π) – but maybe that’s just my geek side coming out again! Otherwise, you could say it looks like a little table – an upside down V with a bar on the top – again, I’ve highlighted one stitch in white for you. You won’t see any of those horizontal bars if you look at the right side – that’s a big clue.
  • Also, the sideways V shapes around the edge of your piece will be facing to the other side, so you won’t be able to see them.

Also, if you’re working ‘inside out’, you’ll be working around the inside rim of the piece – see my Worked inside out section for an illustration of what I mean by that. You’ll probably find that when you start crocheting an amigurumi piece, this is the way the piece will naturally want to curve. You can just flip it inside out so it faces the ‘right’ way after you’ve crocheted a few rounds, and then continue to work around the outside rim after that.

I hope this has helped you to be able to tell the difference between the ‘right’ and ‘wrong’ sides – and once again I’d like to stress that I’m only calling them ‘right’ and ‘wrong’ by convention: there is nothing wrong in having the ‘wrong’ side face out if you prefer the look of the stitches that way, or it’s just what you’re used to. Just remember, if you want to use invisible decreases (which I do recommend; they’ll make your pieces look soo much neater!) you’ll have to crochet with the ‘right’ side facing out 🙂

UPDATE It just occurred to me to add this: If you’re following a pattern that includes complex colour changes (not just simple stripes), or with some stitches worked in back loops or front loops only, you should make sure you’re working the piece the same way out as the designer intended – it will make a difference to the finished appearance!


The Essential Guide to Amigurumi book by June Gilbank

Loved this tutorial? I have so many more amigurumi tips and tricks to share with you!

Boost your amigurumi skills with my latest book, The Essential Guide to Amigurumi, your comprehensive guide to amigurumi techniques and tips.


Do you find my tutorials helpful? If so, please consider making a contribution towards my time so I can continue to create clear and concise tutorials for you:

Thank you so much for your support! Now click below for loads more crochet video and photo tutorials (and do let me know what else you’d like me to cover in future tutorials…)

See more helpful PlanetJune crochet tips and technique tutorials

Comments (23)

accusation of plagiarism

I’ve just been accused of plagiarism and I’d like to address the issue directly and in public to lay the matter to rest. I’m obviously very upset by this: an allegation like this could destroy my business, and I want to make it very clear that there is absolutely no truth in the matter. A commenter calling him/herself Internet Police left me this message:

From the looks of things you modify the patterns found in Japanese Craft Pattern Book / Crochet Amigurumi Dog 2 , you do not design these dog patterns.

Here is my response:

Internet Police: I don’t think you’re looking carefully enough 🙂

  • Firstly, my patterns are all 100% original. I have designed over 60 patterns and I have never copied anyone else.
  • Secondly, my AmiDogs are not that similar to the Japanese patterns – if you compare mine with theirs I have a different style; they are only similar in that they are both amigurumi patterns for dog breeds.
  • And thirdly, I have been designing AmiDogs patterns since early 2007. The Japanese books were released in Sep 2008 and Feb 2009. It would take a very special talent to copy patterns from a book over a year before its release!

Please be more cautious before throwing around accusations of plagiarism. I am a designer and these allegations are damaging to my business.

While I was composing this response, Internet Police then left me a second comment on my Jack Russell Terrier post (my post dates from November 25th, 2007), saying I had “copied this pattern from a book” and giving a link to an eBay auction for the book in question. Let’s just look at this more closely, in case you aren’t yet convinced:

Here’s the Jack Russell in the book I allegedly copied from:

Image copied from eBay auction, taken from this book

And here’s my Jack Russell Terrier pattern:
AmiDogs Jack Russell Terrier amigurumi crochet pattern by PlanetJune

  1. They are clearly not the same pattern (although there are similarities, like the folded ears)
  2. My design was made public in November 2007. The book was released in February 2009. I clearly could not copy a book 15 months before it even existed!

Even if the dates didn’t prove my innocence, I would hope that my body of work and my distinctive style would speak for itself! I have integrity: I did not and will never copy another person’s design and pass it off as my own. It feels horrible to be unjustly accused, and I hope this post has set the record straight.

Comments (37)

    navigation: arrow

    buy crochet patterns and accessories from my online store

    'Everyday Crochet' and 'The Essential Guide to Amigurumi' crochet books by June Gilbank

    Crochet video tutorials and step-by-step photo tutorials

    Free PlanetJune crochet patterns

    Frequently Asked Questions

    navigation: arrow

    Punchneedle Embroidery information, ebook & patterns

    Papercraft ebook & tutorials

    Free PlanetJune craft projects & tutorials

    Ravellenic Games: Team PlanetJune
    PlanetJune Reindeer Games
    PlanetJune Temperature Snake CAL

    June Gilbank

    Hi, I'm June. Welcome to my world of nature-inspired crochet and crafting. I hope you enjoy your visit!

    If you'd like to get in touch, you can contact me here.
    crocheted Canadian flag by PlanetJune
    Proudly made in Canada!
    A fanned-out pile of the books Everyday Crochet and The Essential Guide to Amigurumi, with text 'The answers to all your crochet questions at your fingertips - find out more'

    Want to say thanks? You can send me money in seconds at paypal.me/planetjune (over $20) or paypal.me/planetjune2 (under $20) or send me a donation through my shop.

    Or simply click through from my links before you shop at Amazon, Etsy, KnitPicks, LoveCrafts and more, and I'll make a small commission on your purchase, at no cost to you! Start here:

    ♥ Support PlanetJune ♥

    Tip: This link is also in the footer of every page!

    Thank you so much for your support!