PlanetJune Craft Blog
Latest news and updates from June

PlanetJune Blog: Latest News, Patterns and Tutorials

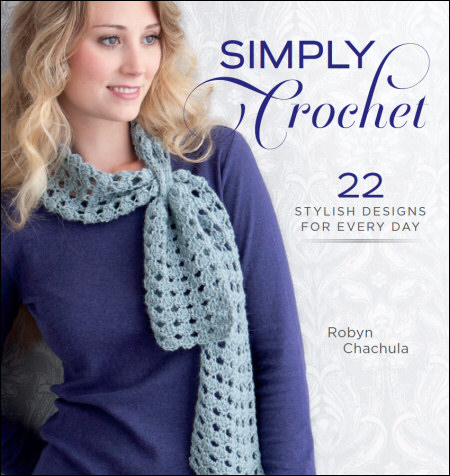
book review: Simply Crochet

I won the eBook version of this book through its blog tour, so I decided to review it for you. The following, as always, is based on my honest opinions!

Overview

Simply Crochet: 22 Stylish Designs for Every Day by Robyn Chachula is a crochet project book built around an unusual but useful premise: stash-busting! The 22 projects are split by the number of balls of yarn each uses: eight 1 ball projects, seven 2-3 ball projects, and seven 4-5 ball projects.

Simply Crochet review by PlanetJune

Partly because it includes patterns contributed by 15 crochet designers, there’s a real variety of projects in this book, including garments for women and children, and wearable and home accessories. This means that, while you probably won’t want to make all the included designs, there’s something for everyone here, and you’re bound to find some projects that you’d like to make. And you’ll also find a variety of techniques: thread crochet, tapestry crochet, tunisian crochet, motif-based designs, felting.

Here’s a selection of the designs that most appealed to me:

Simply Crochet review by PlanetJune
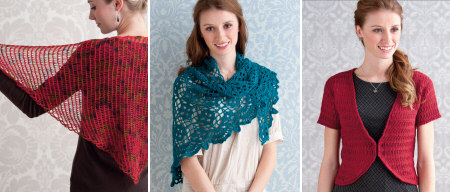
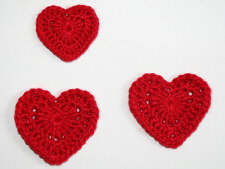
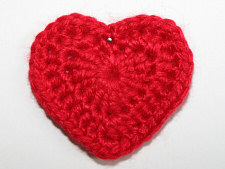
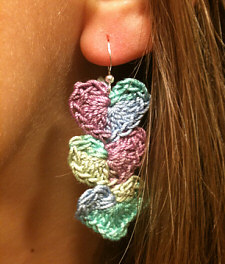
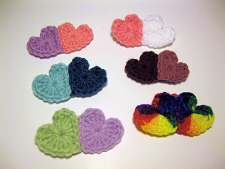
L-R: Tunisian Neck Lattice by Vashti Braha; Annabel Shawl by Kristin Omdahl; Linked Jacket by Robyn Chachula

And, as I clearly gravitate towards a certain style, here are some of the other designs, to give you a more complete picture of the variety of patterns:

Simply Crochet review by PlanetJune
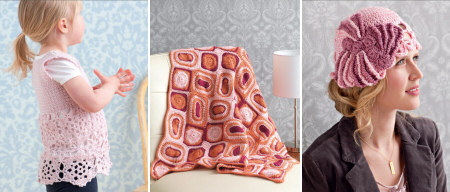
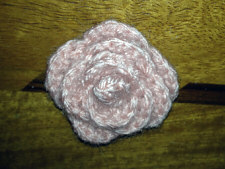
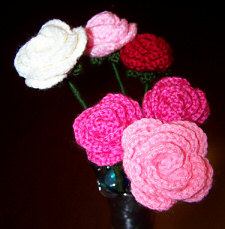
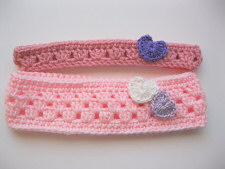
L-R: Tallula Baby Top by Marlaina Bird; Dots and Dashes Baby Blanket by Ellen Gormley; Flapper Hat by Margaret Hubert

As with all Interweave books, it looks elegant and is clearly laid out. The patterns are easy to follow and all include Robyn’s excellent stitch diagrams and schematics. Tips from each of the featured designers on making the most of your yarn stash and crocheting on a budget are also scattered throughout the book.

As the book is intended to be used for stash-busting, the yarn requirements for each project give the weight of the yarn used in the design e.g. ‘Sportweight (#3 Light)’ as well as the specific yarn used for the sample. (I think this is a very useful addition that should be included in all crochet books, to make it easier for you to substitute yarns.)

Although there is a short section at the back of the book with descriptions of the stitches used, I wouldn’t choose this as a learn-to-crochet book. But, as a project-based book for crocheters, I think it works very well.

My Experience

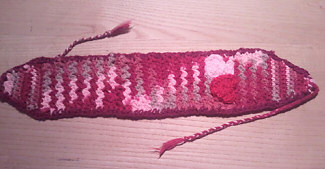
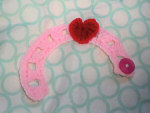
Being short on time and looking for something I’m not too familiar with, I decided to test out Robyn Chachula’s Mystic Cuff (p27). I don’t dabble in thread crochet often, as gripping the work tightly enough to force my hook into the tiny spaces plays havoc with my hands, so I’ve never made anything doily-like before.

Simply Crochet review by PlanetJune
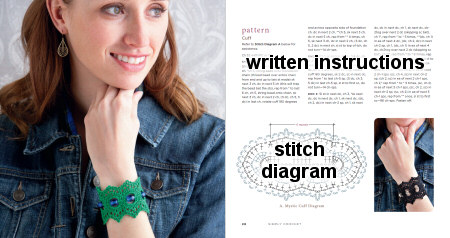
Mystic Cuff by Robyn Chachula (large text added by me to obscure the pattern!)

I have tiny wrists so I figured I’d need to adapt the pattern so the cuff wouldn’t fall off my hand. Here, I ran into a little problem: the gauge section only gives the finished cuff measurement, which means I’d have to complete the entire cuff to find out if my gauge matched Robyn’s, and then adjust the pattern (or my hook) and restart accordingly. It would have been helpful to have a gauge measurement as the size after Rnd 1, or even a guide as to what wrist size it fits (the cuff overlaps itself, so the finished measurement is larger than the wrist size) so I’d know much earlier if I needed to start over to match the gauge.

As my hands wouldn’t tolerate crocheting two cuffs in thread, I decided to assume my gauge was close enough and make my cuff smaller by dropping one repeat. My only other change was to substitute a larger crochet hook (2.25mm) for the foundation chain, as I knew I’d have problems working back into those chains if I made them with the recommended 1.5mm hook. And then I got to crocheting…

I found Robyn’s stitch diagram to be so clear that you could easily complete the cuff without reading a word (apart from how and when to attach the beads). I always prefer to check the written instructions too as I go, to make sure I haven’t misunderstood anything in the diagram, and I did find a couple of errors here in the way the repeats were structured (an extra dc2tog at the end of Rnd 3, and a missing ch 2 at the end of Rnd 4). However, the stitch diagram was correct in both cases, and is clear enough that I doubt many people would use the written instructions anyway. (I notified Interweave about the errors, so I expect Simply Crochet will be added to their Crochet Book Corrections page shortly.)

Aside from those minor glitches, which were easy to fix with a glance at the stitch diagram, the cuff came together very smoothly. I’d never seen beads attached in this way before – it was a very elegant method (although a bit tricky to guess how many chains were covered by each bead, so I made my starting chain too long, just in case, and unravelled the extra chains later). I finished the cuff easily. It took me 4 days because I didn’t want to risk giving myself longer-term hand pain, but it would be a very fast project if you don’t have hand problems like mine!
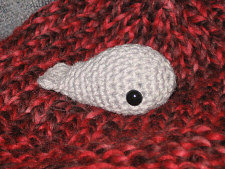
Simply Crochet review by PlanetJune
Isn’t it lovely?

Now for the bad news. It turns out that my gauge was way off: 20% smaller! That means that I could have made the cuff with no modifications, and it probably would have been only slightly too large for me… As it is, my modified cuff barely meets around my wrist, let alone has the overlap needed for the clasp. This is the only pattern in the book that doesn’t give a gauge swatch measurement, probably because the finished project is smaller than a typical swatch size, but it would have been helpful to know sooner that my gauge was so much tighter than Robyn’s. Even after blocking, it was still far too small, so I had to come up with a different method to affix the cuff around my wrist (I bent an eye pin into a tiny hook shape and stitched it to one end of the cuff):

Simply Crochet review by PlanetJune
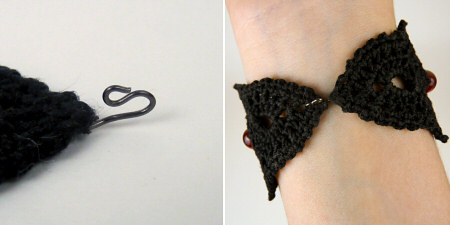
I think my bent-pin solution for my too-small cuff is quite elegant!

The Mystic Cuff is a very pretty design. For most people, it’d be a quick enough project to whip up another one if your gauge was off – and you could give the original ‘gauge swatch’ (i.e. finished cuff) to a friend with a smaller or larger wrist. My complaint with the gauge is really only because of my own difficulties with thread crochet and hand pain, so making it once was enough for me, but now I have a solution for my sizing error, I’m very happy with my modified version:

Simply Crochet review by PlanetJune
My finished Mystic Cuff

Peeves

There’s not much to criticise here! Aside from the small errors I noted above (which I’m sure will be fixed with errata shortly) I only noted a couple of things:

  • The Billows of Baubles scarf (p19) is worked in stainless steel yarn, which isn’t something that’s commonly available, so I doubt it figures in many people’s stashes. As this is supposed to be a ‘use up your stash’ book, it would have been nice if there was a note about how the scarf might look if crocheted with a non-steel yarn of the same weight – it obviously wouldn’t be “an elegant sculptural accessory” as described.
  • The Linked Jacket (p129) mentions 2 hooks and eyes in the materials list. In one photo, it shows each side of the hooks and eyes attached to some sort of backing fabric or ribbon, however there’s no mention in the instructions of attaching the hooks and eyes. A little guidance as to placement of the fastenings, and whether that backing fabric is required (and if so what to use for it) would have been helpful.

Final Thoughts

Simply Crochet is a stylish book of crochet patterns featuring a nice variety of modern designs. The instructions are all clearly written and charted, the photos are clear and elegant, and the yarn weight and yardage info make it much easier to substitute yarns than in many other crochet books.

Sometimes pattern books can be very focused: all hats; all afghans; all one weight of yarn; all using one technique. If you’re looking for a project-based book featuring many different options for size, style, technique, and yarn weight, Simply Crochet will definitely fit the bill. Although it’s unlikely that every project in the book will appeal to you, there’s plenty of variety here to keep any crocheter interested!

Comments (6)

Cape Town wildlife IX

This is the ninth post in my monthly series on the fascinating nature I encounter here in South Africa.

This post should be subtitled What I Did On My Holidays: over the Christmas holiday, we decided to have a stay-cation and explore the area around Cape Town with a few day trips. There’s really no point in paying to go away when we have beautiful weather and such a variety of wonders yet to experience within an hour or two of home! Here are some edited highlights of the wildlife we saw, with a few scenic shots for context…

First, we paid a visit to Kirstenbosch National Botanical Garden. Nestled against the side of Table Mountain, it is vast and spectacular (and impossible to capture in one photo):
kirstenbosch

Although we saw lizards and a mongoose, they were too fast for my camera. But I did manage to snap this pic of a strange large bee in flight. It looked like a bumblebee, except the colour markings were all wrong – you can see it’s all black with just one wide yellow band:
kirstenbosch

On Christmas Eve, we went to Rondevlei Nature Reserve. We’ve been here before, but this time we managed to spot some different wildlife, although the hippos still eluded us! These Three-banded Plovers were constantly flying overhead, calling, and diving at us – presumably trying to distract us so we wouldn’t find their nests:
rondevlei

And I saw my first ever wild antelope! Our best attempt at identification is that it’s a Grysbok, but we’re not quite sure – it doesn’t look much like the Grysbok photos on Google. It was cute anyway, and quite small (about the size of a large dog):
rondevlei

After Christmas, we followed the Cape Peninsula all the way down to the Cape of Good Hope, the most south-westerly tip of Africa. This area is part of the Table Mountain National Park. It was a beautiful day:
cape point

We picnicked by those lichen-covered rocks, under the watchful gaze of lots of sunbathing Black Girdled Lizards, like this one:
cape point

We stopped briefly at a beautiful white-sand beach:
cape point

And we were floored by this sight – wild ostriches!
cape point

There were a whole family of them, casually crossing the road and pecking through the succulents along the sand dunes by the ocean. Don’t miss the baby ostrich in this picture, visible between Daddy’s legs:
cape point

And here’s how unconcerned these completely wild birds were at our presence: this is a juvenile ostrich stopping to drink from a puddle at the edge of the road, barely a metre away from our car (you can see the edge of the car in this photo):
cape point

We didn’t think we’d see anything to rival that and were taking a scenic drive along a completely deserted road in the park before heading home, when I had to brake for this:
cape point

Yes, that’s a tortoise crossing the road, right in front of our car! We stopped the car to take a better look – here’s a close-up (it’s an Angulate Tortoise):
cape point

We stopped for several more tortoises along the same road. This one looks from its shell like a different species, but I haven’t been able to identify it (yet):
cape point

And, as if that wasn’t enough excitement, we squeezed in one more 2011 adventure: cherry picking in the fruit region near Ceres. To get there, we had to cross a vast mountain range. On the way there, we took the 4.4km tunnel under the mountains (a bit scary) and on the way back we took the longer, more scenic route across the mountain pass. The mountains are huge and imposing up close, but don’t look like such a big deal from a long way away:
ceres

Cherries galore at Klondyke Cherry Farm! Hundreds of trees, laden with thousands of sweet and juicy cherries, with more varieties than I knew existed. My favourites were the sweet black cherries, but these bright red ones were more photogenic:
ceres

So that was our Christmas break – nothing like any Christmas I’ve ever experienced, but I think you’ll agree it was pretty amazing! And the crazy thing is that we’re nowhere near exhausting the local sights we can see with a day trip, let alone if we ventured further afield. We still haven’t even been up Table Mountain yet – you can expect a wildlife report from there some time this year 🙂

I hope you’ve enjoyed this month’s photos! Please leave me a comment if you did.

Comments (19)

Valentine’s CAL roundup

We had a little bonus crochet-along this month, for V-day. The Valentine’s CAL used my free Love Hearts and Basic Rose patterns:

Valentine's CAL at PlanetJune

So here are some beautiful crocheted hearts and flowers for you, courtesy of the PlanetJune Ravelry group members!

(For speed, I just give credit with participants’ Ravelry usernames.)

PlanetJune Valentine's CAL PlanetJune Valentine's CAL
Veggie & camaharet

PlanetJune Valentine's CAL PlanetJune Valentine's CAL
Lightblue & BiologyJAP

PlanetJune Valentine's CAL PlanetJune Valentine's CAL
CraftinMama05 & rchlsrsly

PlanetJune Valentine's CAL PlanetJune Valentine's CAL
sweetiii2 & CrochtColorJunkie

PlanetJune Valentine's CAL PlanetJune Valentine's CAL
both by CrochtColorJunkie

PlanetJune Valentine's CAL PlanetJune Valentine's CAL
both by Foxtrot400

PlanetJune Valentine's CAL PlanetJune Valentine's CAL
both by JennHanus

PlanetJune Valentine's CAL PlanetJune Valentine's CAL
CrochetChrisie & yaney (heart fridge magnets)

PlanetJune Valentine's CAL PlanetJune Valentine's CAL
Luna1130 & petrOlly (heart-embellished rug)

PlanetJune Valentine's CAL PlanetJune Valentine's CAL
heart-embellished headband by ChefTerror

PlanetJune Valentine's CAL PlanetJune Valentine's CAL
Valentine’s Dachshund (it’s a PlanetJune pattern, so it counts!) by AliciaLee418

PlanetJune Valentine's CAL PlanetJune Valentine's CAL
rose ring by klopferli

PlanetJune Valentine's CAL PlanetJune Valentine's CAL
both by AKmtnnymph

PlanetJune Valentine's CAL PlanetJune Valentine's CAL
both by AKmtnnymph (I especially love the thread heart earrings)

PlanetJune Valentine's CAL PlanetJune Valentine's CAL
PlanetJune Valentine's CAL PlanetJune Valentine's CAL PlanetJune Valentine's CAL PlanetJune Valentine's CAL
all by theMarkofSMB

PlanetJune Valentine's CAL PlanetJune Valentine's CAL PlanetJune Valentine's CAL
all by CranberryAmi

PlanetJune Valentine's CAL PlanetJune Valentine's CAL
all by Fatals-attraction (and the white roses are felted – beautiful!)

PlanetJune Valentine's CAL PlanetJune Valentine's CAL
both by saudistitcher – with close-up of embroidery-floss-crocheted edging

Fabulous work by everyone! I wasn’t expecting such a great response to this mini-CAL. I’m sure the recipients of all these handmade hearts and flowers will really know they are appreciated today – a handmade gift says so much more than a store-bought card.

If this has tempted you to make some roses (or any of my other plant/flower designs), the Plant-Along runs until the end of the month, so you still have plenty of time to make some crocheted greenery to brighten up your windowsills…

Plant-Along CAL at PlanetJune

If you’d like to join in, click through to the PlanetJune Ravelry group and you’ll be given a warm welcome!

Comments (1)

Pricing Amigurumi

Setting prices for amigurumi can be very tricky. I thought I’d offer some pointers that may help you to set reasonable prices if you want to sell the amigurumi you’ve crocheted.

As you may know, I allow people to sell items made from any of my patterns (provided they give me credit as the designer). As my time is more than filled with creating new designs, running my shop and blog, and providing assistance to my customers, I can’t accept crochet commissions any more, so I’ve started a list of people who sell PlanetJune-designed toys for people who want to buy finished PlanetJune items. If you sell items made from my patterns, have an online shop, and would like to be added to the list, please let me know!

Although the following post is geared towards online amigurumi sellers, there’s probably some value in reading it if you sell any kind of handmade goods. Read on for my pricing tips…

Common Handmade Pricing Strategies

Note: I’m ignoring consideration of profit above material and labour costs and the wholesale/retail price factor – these are outside the scope of this post, which isn’t aimed at people who want to sell their handmade work as a serious business, but for hobbyists who’d like to support their yarn- and pattern-buying habit while they enjoy their hobby, and maybe not fill their house to overflowing with all the amigurumi they’ve made!

Very simply, there are two general schools of thought for pricing handmade goods:

  • Set prices based on an hourly ‘wage’ for yourself plus the costs of materials
  • Set prices based on material costs multiplied by 3 (or some other number)

Now, neither of these strategies work at all well for amigurumi:

Hourly wage: Unless you can successfully market yourself as creating ‘art toys’, it’s very difficult to make any sales if you charge a decent hourly wage for everything you crochet. (And if you’re crocheting while you watch TV or chat, should you really be earning the same amount per hour as if you were giving 100% concentration to your task..?)

Costs x3: While this may be an appropriate figure for, e.g. a simple crocheted blanket with a repetitive stitch pattern, the material costs for making an amigurumi are miniscule (typically a fraction of a ball of yarn, a handful of stuffing, and a pair of safety eyes) and it can take just as long to make a toy that uses less than 1/2 a ball of yarn as to crochet a blanket that takes 5 or 6 balls, so the resulting price would be far too low if you use this formula for amigurumi.

So, as an amigurumi seller, you’re looking for some middle ground: a price that covers all your material costs and accounts for both the time taken and the complexity of the project (i.e. the concentration required to complete your item), but still gives you a number that your potential customers will find acceptable.

Know the Market

What do other people charge for similar items? Look at the other shops on my list and see what they charge. You should also look at other Etsy amigurumi sellers to get a broader picture.

Don’t try to beat their prices – it’s not a competition, and doing that will damage the market for both you and the other sellers! But do look critically at your work and theirs:

  • If you think your items look as good as theirs, charge the same (or more, if you want).
  • If you think yours are better, charge more (unless they have no sold items and you think that’s because their prices are unrealistically high).
  • If yours look worse, why is that? Don’t charge less; instead look at this as an opportunity to improve your listings by either improving your crocheting and finishing skills, or by learning to take better photos, as applicable.

Your photos will make a huge difference in what sells and what doesn’t. Is there anything that makes your items more special than other amigurumi sellers? Something that may justify higher prices? Show that in your photos, if possible, but otherwise, make sure it’s clear from your item description. If your prices are the same and your photos are equally appealing, the description may also be the deciding factor for your customer.

If you’re just starting out with your shop, you may decide to start by pricing slightly lower than others, to help you gain some initial sales and positive feedback from customers, and then raise your prices a bit once you’re more established. Please don’t sell yourself too short though, by setting your prices far below what other comparable items sell for. If your items don’t sell as well as you’d hoped, there’s nothing stopping you from lowering your prices, or offering sales and discounts, at a later date.

Hidden costs of selling online

Notes:

  • I’m assuming the most common scenario: you’re selling in USD through Etsy, using PayPal to accept payment, but the general principles apply however you’re selling, although the exact fees and percentages will vary.
  • Etsy selling fees have increased from 3.5% when I first wrote this article to 6.5% as of 2022(!) so I’ve updated the figures below to reflect that. You can also use Etsy’s own payment processing instead of PayPal, but your cost is essentially the same, either way.

If you started out by selling items to friends and family, or at in-person craft shows, you may be tempted to price your online items the same way. But remember you’re paying 20c per listing (whether it sells or not) plus 6.5% (if it sells) to Etsy, and PayPal will take 30c plus 2.9% (or 3.9% from an overseas customer), so your online prices should be higher by that amount, at least.

e.g. on a $20 item you’ll pay:

$0.20 fixed fee to list the item on Etsy
$1.30 to Etsy when it sells (6.5% of $20)
$0.30 fixed fee to PayPal
$0.58 percentage to PayPal (2.9% of $20)

Those small costs start to add up: that’s a total of $2.38 that you’ve lost by selling the same online vs a cash in-person sale. So you should consider charging $22.50 instead of $20 for that item, to cover those costs, unless you want to accept that you’ll only receive the lower amount.

In general, the amount you need to add is:

Amount to raise prices by to cover PayPal and Etsy fees = $0.50 + 0.094 x (in-person sale price)

Notes: If you regularly sell to overseas customers, use 0.104 instead of 0.094 in the above calculation. This also assumes that your item sells within 4 months of listing, otherwise you’d need to pay an additional 20c to Etsy for relisting it.

(If all this seems too complicated, you can use an Etsy Fee calculator and it’ll do the math for you!)

Shipping costs

Do your shipping costs include all your costs? Aside from postage, are you buying a bubble mailer, a box, bubble wrap, tape, mailing labels…? Any of these add to your costs, and you should include them in your shipping charge (or raise all your item prices by that amount, if you want to make your shipping costs look more reasonable), or you’ll end up taking a loss each time you ship a package.

Also, remember that the fee calculation above also applies to shipping costs, so you’ll need to add 9.4% (6.5% selling + 2.9% processing) to your actual shipping costs (e.g. that works out as 47c if you charge $5 for shipping) or you’ll be losing money! Once you’ve worked out the cost of postage plus all your packing and shipping materials, you need to add the fees like this:

Shipping charge = 1.094 x (postage cost plus packaging materials cost)

Note: if you offer shipping to overseas customers, use 1.104 instead of 1.094 in the above calculation.

These little amounts add up, and you don’t want to end up paying for packaging materials out of your own pocket.

Underpricing: Warning Signs

  • Are you selling items faster than you can replace them?
  • Are you crocheting every spare minute of the day to keep your shop filled?
  • Are your hands or wrists starting to hurt?
  • Are you starting to wonder why you’re even doing this?

All these are signs that you need to raise your prices, if you want to keep selling what you’ve made. Yes, you’ll see less sales if you do that, but if you make the same amount of money while selling fewer items, you’ll find it easier to keep up with demand, to avoid giving yourself a repetitive stress injury, and to (hopefully) not lose your love of crochet – which, after all, is why you’re doing this in the first place, isn’t it?

Go Forth and Sell!

I hope this has given you some points to consider, whether you’re setting your prices for the first time, or considering updating your pricing scheme. It’s perfectly okay to crochet for friends and family for the cost of yarn and patterns (or for free), if that’s what you want to do, but do remember not to offer those same bargain prices to all your customers, or you’ll burn yourself out and your hobby will turn into slave labour! You’re worth more than that, but ultimately, only you can decide how much money you need to make in order for it to be worth your while to sell your handmade goods.

Good luck with your selling!

(Please send me your details if you’d like to be added to my list of sellers – see the bottom of the linked page for details – I hope it will send potential customers your way for items you’ve already crocheted, and/or generate custom order requests for you. I’m getting a lot of requests for cacti and succulents at the moment..!)

Do you have any tips to add to mine? Or good (or bad) experiences with selling amigurumi? Please share them in the comments below!

Comments (28)

February update

This past week has been amazing – the response to my succulents has been phenomenal (e.g. well over 600 pins on Pinterest; mentions on Craft, Neatorama and Cheezburger).

succulent collections crochet patterns by planetjune

I hoped all my hard work designing these would pay off, but I didn’t expect them to outsell half my existing pattern catalogue within a week…

It’s Groundhog Day!

crocheted amigurumi groundhog by planetjune

“He comes out. He looks around. He wrinkles up his little nose. He sees his shadow…”

crocheted amigurumi groundhog by planetjune

…and that means we’re in for, what, 6 more weeks of baking hot summer? As (probably) the only groundhog in Africa, my little buddy is justifiably confused! (Note: that scrubby patch he’s sitting on is all that remains of my lawn…)

Happy Groundhog Day, everyone! I’m hoping we’ll have time to watch the movie tonight…

Review and Win contest

January’s ‘Review and Win’ winner is Linda U, with her Emperor Penguin Family review:

emperor penguin family crochet patterns by planetjune

These patterns are a perfect combination, not only as a beautiful penguin family, but also for practicing colour changes. I recommend you start with the baby penguin, since it is only 2 colours to work with, then continue with the adult.

Congrats Linda – I’ll email you to find out which pattern you’d like as your prize 🙂

To be entered into this month’s draw for a free pattern of your choice, just write a review of any product in my shop – thank you!

February CALs

Get all lovey-dovey with crocheted hearts and flowers in the Valentine’s Crochet-Along, with my free (donationware) heart and rose patterns:

Valentine's CAL at PlanetJune

And/or come and work on your succulent garden together with everyone else and join the Plant-Along! We worked out that between the 8 cactus and 8 succulent patterns, there are 1820 possible combinations of “4 different plants in 1 pot” – I wonder how many of those we’ll see in the CAL?

Plant-Along CAL at PlanetJune

I hope you’ll join us…

Comments (3)

AquaAmi CAL roundup

Every month, the PlanetJune CALs get more and more fun, as our Ravelry group grows and our little community strengthens. It’s so nice to see! Let’s look at the roundup for January’s AquaAmi Crochet-Along – and keep reading to the end to find the February themes (Maybe you’d like to join in, if you haven’t before? All welcome!)

AquaAmi Crochet-Along at PlanetJune

(For speed, I’m just giving credit with participants’ Ravelry usernames.) Here’s what happened in the January CAL!

My Sea Turtle pattern is a big time commitment, with 26 separate pieces that make up the turtle, so I’m especially pleased to see how many people tackled it this month. It was really fun to see people’s photos of their piles of pre-assembled pieces, and seeing the lovely colours everyone chose:

PlanetJune AquaAmi CAL PlanetJune AquaAmi CAL
PixyKayte & CrochetChrisie

PlanetJune AquaAmi CAL PlanetJune AquaAmi CAL
camaharet & klopferli

PlanetJune AquaAmi CAL PlanetJune AquaAmi CAL
AKmtnnymph & SunnyStrings (who made a car seat blanket to match her turtle)

PlanetJune AquaAmi CAL PlanetJune AquaAmi CAL
theMarkofSMB & arbitrarily (whose turtle was made with a 1.25mm hook and is only 8cm long!)

I have to give a special mention to Monica (theMarkofSMB) who, after making her sea turtle above, managed to put together another five sea turtles, in assorted colours:

PlanetJune AquaAmi CAL PlanetJune AquaAmi CAL
all 5 by theMarkofSMB – an amazing achievement!

And then we have my Adult and Baby Emperor Penguin patterns:

PlanetJune AquaAmi CAL PlanetJune AquaAmi CAL
CrochetChrisie & Fatals-attraction

PlanetJune AquaAmi CAL PlanetJune AquaAmi CAL
Enphra & CranberryAmi

PlanetJune AquaAmi CAL PlanetJune AquaAmi CAL
rastakt & Fatals-attraction (who made Valentine’s penguins in 2 shades of pink!)

All the non-tiny aquatic mammals:

PlanetJune AquaAmi CAL PlanetJune AquaAmi CAL
adult and baby Beluga Whales, and Dolphin, both by petrOlly

PlanetJune AquaAmi CAL PlanetJune AquaAmi CAL
Sea Lion and a clever mod of my Dolphin into a shark, both by petrOlly

PlanetJune AquaAmi CAL PlanetJune AquaAmi CAL
CrochetChrisie made sweet adult and baby pairs of both my Polar Bear and Sea Lion patterns, by changing the yarn thickness and hook size

PlanetJune AquaAmi CAL
And the only person brave enough to attempt a ‘fuzzy’ pattern this time around was jukatca, with her cute Fuzzy Seal!

And finally, Tiny Whale was very popular this month, as nobody can possibly be too busy to find the time to make this little no-sew pattern. But we didn’t just see plain Tiny Whales: we have colourful whales, catnip-stuffed whales (cat toys), keychain whales, sets of counting whales (for kids), baby toy whales on rings, giant mega-whales, teeny-tiny miniature whales, and even whales modified into Humpbacks and Orcas! This is such a great example of how you can use your creativity to take a pattern, even one as simple as Tiny Whale, and make it your own:

PlanetJune AquaAmi CAL PlanetJune AquaAmi CAL
PixyKayte & yasminlangley

PlanetJune AquaAmi CAL PlanetJune AquaAmi CAL
both by CranberryAmi

PlanetJune AquaAmi CAL PlanetJune AquaAmi CAL
knitwhy & kathykoo

PlanetJune AquaAmi CAL PlanetJune AquaAmi CAL
sunshine1127 & yaney

PlanetJune AquaAmi CAL PlanetJune AquaAmi CAL
CrochetChrisie & theMarkofSMB

PlanetJune AquaAmi CAL PlanetJune AquaAmi CAL
both by petrOlly

PlanetJune AquaAmi CAL
CrochtColorJunkie

PlanetJune AquaAmi CAL
Fatals-attraction

PlanetJune AquaAmi CAL
theMarkofSMB

PlanetJune AquaAmi CAL PlanetJune AquaAmi CAL
both by theMarkofSMB

PlanetJune AquaAmi CAL PlanetJune AquaAmi CAL
theMarkofSMB and AKmtnnymph

PlanetJune AquaAmi CAL
the first 4 of 10 counting whales by saudistitcher

Another amazing roundup! Well done to everyone – they all look great 🙂 (If you’d like to make any of the patterns featured in this CAL, you’ll find them all under Aquatic Animals in my shop.)

If you missed out on the CAL fun, we have two CALs starting on February 1st (tomorrow!):

Firstly, a Valentine’s CAL (using my free Love Hearts and Basic Rose patterns) from Feb 1-14th…

Valentine's CAL at PlanetJune

And secondly, a Plant-Along, which includes all my plant and flower patterns (including the new succulents!) from Feb 1-29th.

Plant-Along CAL at PlanetJune

We’d love it if you’d join in with one or both at the PlanetJune Ravelry group!

Comments (3)

Crinkle Ball Cat Toy

Today is Maui’s birthday! As the most important member of our household, and to celebrate his bravery at coping with a hugely traumatic trans-continental move last year, I wanted to get him an extra-special present. Unfortunately, the pet shops here are lucky to have a ball and a mouse as their cat toy selection, and Maui already has loads of each of those.

maui helping me choose appropriate yarn colours
Maui also likes to supervise when I’m designing – here he makes sure that my yarn ball doesn’t get away from me while I crochet succulents

The balls I crocheted for my Yarn Over vs Yarn Under comparison had a dual purpose – I added some catnip as I stuffed them, so they could double up as new toys for Maui.

crocheted balls
Maui won’t care if I crocheted these with YO or YU, as long as there’s catnip inside!

But that wasn’t good enough – he already has crocheted balls to play with, and I wanted to give him a really special treat. So I put on my creative thinking cap and the result was pretty amazing – I think I may have created the best cat toy ever! It turned my 8-years-young lazypuss into a kitten again, and held his attention for far longer than any store-bought toy has.

crinkle ball cat toy tutorial by planetjune

If you have, or know, a cat, and you like to craft, you must try this. It’s really easy, it only takes 5 minutes, you’ll have a valid excuse for eating chocolates while you craft, and you’ll have the happiest cat in the neighbourhood! The foil makes an irresistible crinkly noise when the ball is played with.

crinkle ball cat toy tutorial by planetjune
The ball on the right has been thoroughly quality-tested by Maui, and after half an hour of kitty football, stalking, pouncing and batting, being carried by mouth, dropped into shoes and being fished out again, you can see that it hasn’t fallen apart at all!

Note: this is my first donationware craft tutorial. As I’ve had requests for PDFs of other tutorials, I’ll also be converting some of my older tutorials to donationware, as I find the time, so there’ll be a handy printable option for them too. As always with my donationware, the full tutorial is available online for free, whether or not you choose to pay for the PDF version!

Go to the Crinkle Ball Cat Toy tutorial >>

Comments (9)

Succulent Collection crochet patterns

I can hardly believe I’ve finally reached this point – this has probably been my longest crochet design process to date – so I’m very happy to present to you my first patterns of 2012: Succulent Collections 1 & 2!

succulent collections crochet patterns by planetjune

I spent weeks (during my break from designing in December) researching all the different types of succulents to try to find a selection that would look interesting and varied, are fairly common, and would work when translated into crochet. I narrowed it down to 10, to give me a little wiggle room if a couple of them didn’t work out the way I was hoping. And here are the final 8:

succulent collection 1 crochet patterns by planetjune
Succulent Collection 1, L-R: Spoon Jade ‘ET Fingers’; Sempervivum ‘Hen & Chicks’; Euphorbia Obesa ‘Baseball Plant’; Adromischus Cooperi ‘Plover Eggs Plant’

succulent collection 2 crochet patterns by planetjune
Succulent Collection 2, L-R: Gasteria ‘Ox Tongue Plant’; Senecio Rowleyanus ‘String of Pearls’; Lithops ‘Living Stones’; Kalanchoe Luciae ‘Flapjack Plant’

While I didn’t know this at the time I began my succulent project, I learned through my research that while cacti are a type of succulent, cacti come from the Americas, but other succulents come from Africa. And, beyond that, it turns out that 7 of the 8 species I ended up making are actually native to South Africa – such a coincidence! I had no idea, although I do see succulents all over the place here; it makes sense to have water-retaining plants in a predominantly hot dry environment.

I’ve come up with all kinds of new crochet tricks and techniques for these patterns, and, as always, they are explained in fully illustrated detail in the patterns, so you can feel confident about tackling these even if you’ve only made very simple amigurumi before. As with the cacti, each Succulent Collection is available separately for $8, or you can get the second collection for almost half price when you buy both together for the ridiculously low price of $12.50.

crocheted succulent and cactus collections by planetjune
Click through to see the super-sized version at Flickr 🙂

Back L-R: Cactus Collection 2, Cactus Collection 1
Front L-R: Succulent Collection 1, Succulent Collection 2

Just to make things even more exciting, as you can see from the picture above, I’ve made the Succulents on the same scale as my Cactus Collections 1 & 2, so now you can mix-and-match between all 4 plant collections to make a completely customized cactus/succulent garden, or a cute selection of mini pots with individual plants! (Or even a mini jungle like mine!)

Handy links to the patterns:
Succulent Collections 1 & 2
Succulent Collection 1
Succulent Collection 2
Cactus Collections 1 & 2
Cactus Collection 1
Cactus Collection 2

And, in a case of excellent timing, the PlanetJune February CAL will be a Plant-Along, so please join us at the PlanetJune Ravelry group if you’d like to participate in the crochet-along and make succulents and cacti (and any of my other plant patterns) with the rest of the group! The CAL officially starts on Feb 1st, but if you want to pick up the patterns now and get a head start, I won’t tell 😉

I’ve spent a huge amount of time making these succulent patterns into something special, so I really hope you’ll enjoy them! Please let me know what you think of them…

Comments (39)

    navigation: arrow

    buy crochet patterns and accessories from my online store

    'Everyday Crochet' and 'The Essential Guide to Amigurumi' crochet books by June Gilbank

    Crochet video tutorials and step-by-step photo tutorials

    Free PlanetJune crochet patterns

    Frequently Asked Questions

    navigation: arrow

    Punchneedle Embroidery information, ebook & patterns

    Papercraft ebook & tutorials

    Free PlanetJune craft projects & tutorials

    Ravellenic Games: Team PlanetJune
    PlanetJune Reindeer Games
    PlanetJune Temperature Snake CAL

    June Gilbank

    Hi, I'm June. Welcome to my world of nature-inspired crochet and crafting. I hope you enjoy your visit!

    If you'd like to get in touch, you can contact me here.
    crocheted Canadian flag by PlanetJune
    Proudly made in Canada!
    A fanned-out pile of the books Everyday Crochet and The Essential Guide to Amigurumi, with text 'The answers to all your crochet questions at your fingertips - find out more'

    Want to say thanks? You can send me money in seconds at paypal.me/planetjune (over $20) or paypal.me/planetjune2 (under $20) or send me a donation through my shop.

    Or simply click through from my links before you shop at Amazon, Etsy, KnitPicks, LoveCrafts and more, and I'll make a small commission on your purchase, at no cost to you! Start here:

    ♥ Support PlanetJune ♥

    Tip: This link is also in the footer of every page!

    Thank you so much for your support!