crocheted gaming dice pattern
Gamers, take note: they’re here! My set of giant crocheted gaming dice, by popular demand:
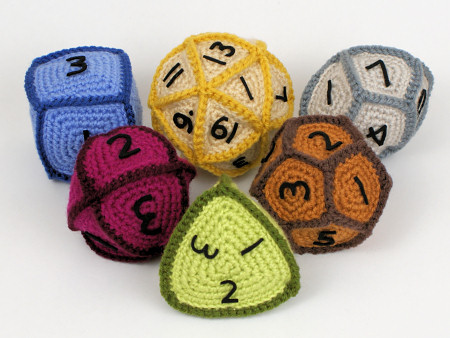
I cut out felt numbers to make my dice, but this is a fiddly and time-consuming technique, so I’m not recommending that you do the same: I give tips in the pattern for using fabric paint or embroidery to create the numbers, in addition to the templates I used to make my felt numbers and full numbering diagrams to create a perfect set of gaming dice.
Of course, the Gaming Dice pattern isn’t just numbering diagrams: it also has the ‘missing’ d10 shape – the only odd-one-out dice shape that isn’t one of the Platonic solids, and hence not part of my original set! I had a real challenge on my hands to create the d10 shape: it’s not formed from regular polygons like other dice, but from 10 kite shapes that combine into a pentagonal trapezohedron.
Not only was I constrained by the limits of making a good pattern (i.e. something that you can follow without tearing your hair out or getting confused) but it had to match the look, style and size of the 5 platonic solids in my Polyhedral Balls pattern, to make a complete matched set. And, after many prototypes, this is the d10 I came up with:
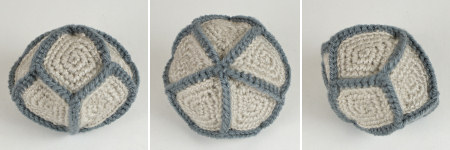
I crocheted it in grey to separate it from the other colourful balls, as it’s not part of the Polyhedral Balls pattern and I’m hoping not to confuse anyone with this addition!
Because of the constraints, the final d10 shape looks slightly less pointed from the side (above, left) than a real d10, but the shape is essentially correct, and it functions perfectly as a die – one side always lands facing up, and all 10 sides are equal, so there’s equal chance of any number coming up.
Gaming Dice is my first Expansion Pack pattern – although I have another 9 in the works, and ideas for even more – so I hope I’ve set everything up clearly in the shop so people will understand what exactly they are buying. (If anything is confusing, or you think may be confusing to someone else who hasn’t read the explanation in this post, please do let me know so I can fix it before I bring out any more Expansion Packs!)
What is an Expansion Pack?
- An Expansion Pack is an add-on to an existing PlanetJune pattern.
- The Expansion Pack lets you modify or add to the original pattern to create something else.
- You cannot use the Expansion Pack alone – you must also purchase the original pattern in order to be able to complete the pictured items in the Expansion Pack pattern.
Gaming Dice, in particular, includes:
- The crochet pattern and assembly diagrams for the pentagonal trapezohedron (aka d10 shape!)
- Full numbering diagrams to accompany the assembly diagrams (for the d10 and all 5 of the original set), in right- and left-handed versions
- Tips and suggestions for numbering the dice with fabric paint or embroidery
- Templates for the felt numerals I used for my sample dice
You can buy the Gaming Dice Expansion Pack for $3 individually from the shop, or, if you haven’t yet bought the Polyhedral Balls pattern, you can select it as an add-on to that pattern before you add it to your shopping cart, and save $1 on the pair.
Launch Discount
Now, as I only just released the Polyhedral Balls a couple of weeks ago, you’re probably wishing you’d waited to buy it so you could get the combined-purchase discount, but don’t worry – I’ve figured out a way for you to get the discount too!
If you’ve already bought Polyhedral Balls, all you need to do is add the Gaming Dice Expansion Pack pattern to your shopping cart, together with anything else ($5 minimum), then use the code GAMERSRULE at checkout to get your discount! (Valid until end of June 2012.)
Note: If you don’t need anything else right now, this also applies to Gift Certificate purchases, so you can pick up a $5 gift certificate now, get your discount, and have $5 in your PlanetJune account ready for your next purchase, or to send to a crocheting friend!
I’ve been planning for a long time to create Expansion Packs that extend the value of patterns you’ve already bought without you having to pay the full price again for something similar. I’m very interested to see how well this first one works out. There’ll be more to come! 😀