The invisible decrease (invdec) is one of the two absolutely essential techniques for making beautifully neat amigurumi (the other being, of course, the magic ring). But invdec is a little tricky to get the hang of, and there are 2 points during the decrease where you can accidentally lengthen your stitch so it isn’t neat and tight, and the resulting decrease will be far more obvious.
Today I’d like to demonstrate these invdec problem points, so you know where the pitfalls are, and how to avoid them. You’ll find this tutorial useful if:
- You’re new to the invisible decrease technique (watch my video tutorial before you continue reading this!)
- You’ve tried invdec but been disappointed by your results
- Your invdecs look inconsistent, gappy, or too prominent
- You want your amigurumi to look as good as possible!
A Note about Tension
Although maintaining consistent tension on your yarn is a skill you need to master in order to crochet anything beautifully, it’s vitally important for amigurumi, as you need your stitches to be tight and even to produce the regular, firm amigurumi fabric that allows us to create complex ami shaping, and hides your stuffing. I’ve seen some people recommend that you tug on your yarn after every stitch to tighten it up, but that isn’t necessary if you maintain consistent tension.
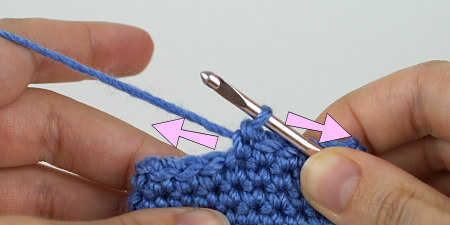
Tensioning your yarn is a balance between the hook pulling forward and your other hand pulling backward.
How do you do that? Well, while your hook is pulling the yarn forward, your non-hook hand is simultaneously pulling back on the yarn, so you use a controlled amount of yarn to form each stitch. (You probably do this without even realising you’re doing it; if the yarn could just slide freely through your fingers with no tension, your hook would pull up large, inconsistent loops, and your crochet would look sloppy.)
When I talk below about pulling back on the yarn so the working loop is tight around your hook, the goal is to bring the tension back to your standard level, so the working loop should be the same size and tightness as it is for all your other stitches. If you go too far and pull it extra-tight, you’ll just make it more difficult to work back into that stitch in the following round.
Perfecting the invdec
If you look at the top of an invdec stitch, you’ll see there’s a ‘V’ at either side of the decrease. (As invisible decreases are practically indistinguishable from the surrounding stitches, I’ve crocheted my samples with the invdecs and the surrounding top loops in a different colour, so you can see what I’m talking about!)
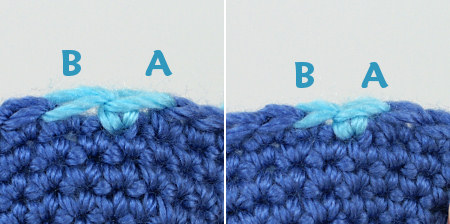
Left: The source of the problems is these extra-long Vs at the top of the stitches surrounding the invdec.
Right: Invdec done right, with the Vs the same length as in the surrounding stitches.
These two Vs (A and B) are the culprits – if either or both of these is lengthened, there’ll be extra space around the invdec and it can look gappy or sloppy.
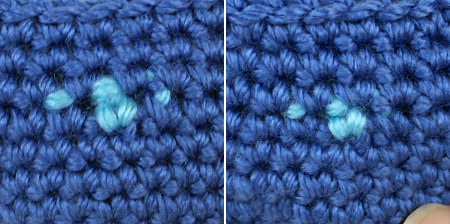
Left: The lengthened Vs have left a larger gap at either side of the invdec.
Right: Invdec is indistinguishable from the surrounding stitches (except for my helpful colour change!)
Loop A
Checkpoint: When you begin an invdec stitch, as you’re swinging the hook around to get the tip through both front loops, the working loop (the one that was already on your hook before you started the stitch) tends to loosen up.
Fix this: Once you’ve inserted your hook under the 2 front loops, and before you yarn over, tug the yarn to make sure the working loop is still tight on your hook and hasn’t lengthened.
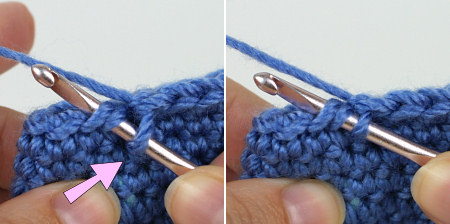
Left: Lengthened working loop on hook will cause a loose stitch.
Right: Tightened loop – perfect!
Loop B
Checkpoint: After you complete the invdec, you’ve just turned 2 stitches into 1 stitch, and your hook is now further back than it usually would be for starting a new stitch. So this is another point where your yarn can make an extra-long loop, as you bring your hook forward over that extra distance to begin the next stitch.
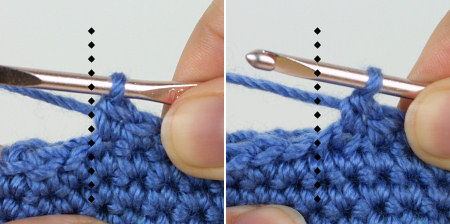
Left: The position of the hook after a sc stitch.
Right: After an invdec, the hook is further back (dotted line marks the usual position), so there’s a greater distance to reach the next stitch.
Fix this: Make sure you keep tension on your yarn, so the loop on your hook doesn’t stretch out as you insert your hook into the stitch after the invdec. (If, after inserting your hook to begin the next stitch, you see the working loop has lengthened, just pull the yarn so the working loop is tight around your hook again, before you yarn over and continue with the stitch.)
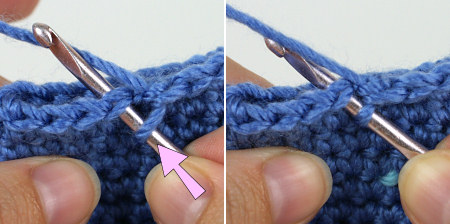
Left: Lengthened working loop after inserting hook into next stitch.
Right: Tightened loop – perfect!
Multiple Decreases
The potential problem is doubled when you’re working 2 invdecs in a row, as you have the ‘too far back’ effect (Checkpoint B) and the ‘swinging the hook’ effect (Checkpoint A) both acting on the same loop, so you should make a little extra effort to be conscious of the size of the loop on your hook, and make sure it stays tight and doesn’t lengthen.
* * *
With a little extra effort to make sure you’re maintaining consistent tension, even while you decrease, your stitches will all stay the same size, and your invdecs will be as invisible as advertised!
Loved this tutorial? I have so many more amigurumi tips and tricks to share with you!
Boost your amigurumi skills with my latest book, The Essential Guide to Amigurumi, your comprehensive guide to amigurumi techniques and tips.
Do you find my tutorials helpful? If so, please consider making a contribution towards my time so I can continue to create clear and concise tutorials for you:
Thank you so much for your support! Now click below for loads more crochet video and photo tutorials (and do let me know what else you’d like me to cover in future tutorials…)

