Warning! Foam blocking mat colour transfer
As I told you in my wet blocking tutorial, children’s play mats make an inexpensive and easy to find alternative to dedicated blocking mats. BUT, I’ve discovered a problem that you need to know about if you use these mats – please read this and learn from my experience!
I’ve blocked all kinds of lace with these mats before with no problems, but my crocheted bamboo cardigan was a different story. My laceweight items felt practically dry by the time I pinned them to the mats, but thicker yarn retains much more moisture, so, even after rolling my cardigan in a towel to squeeze out as much excess moisture as possible, it still felt heavy and noticeably damp to the touch. It was still damp 24 hours later, and when I flipped it over so the underside could dry better, I was horrified to find areas of my beautiful cream cardigan were now bright, shocking pink.
I don’t have a photo, as my priority was trying to fix the disaster, not documenting it. Luckily, my story ended well; I’m not sure if it was because the yarn was still damp when I spotted the problem, or if the pink dye isn’t permanent, but after a few soaks in Soak wash, with some delicate but persistent agitation by hand in the sink, all the pink colour came out of my cardigan (phew). But you don’t want to take a chance that your mats may permanently dye your handiwork!
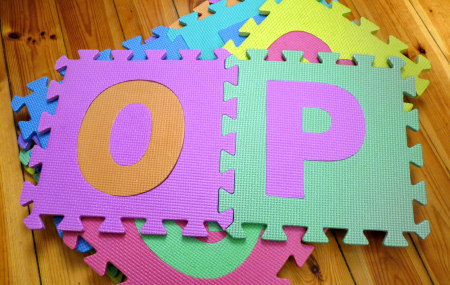
Looking back, I should have suspected that there may be a problem with colour transfer from the pink blocks – if you look at this photo from my blocking tutorial, you can see that some of the bright pink colour from a different mat has transferred onto the lower yellow block, at the right-hand side:

My cream cardigan also had this pink colour transfer before I managed to soak it all out!
Foam Mat Colour Transfer Experiment
Although I assumed this colour came from the bright pink coloured blocks – the same colour as the pink stain – to be safe, I decided to conduct an experiment to figure out which of the blocks are the culprits. (I’m very glad I did, because the results surprised me!)
Method
- Select enough blocks to have a sample of each foam colour: orange, yellow, green, blue-green, blue, purple, light pink, dark pink. (I also tested a solid purple mat I bought from a different source.)
- Lay a piece of paper kitchen towel over each colour of foam. Spray all the blocks with water until the paper towel squares are completely saturated.
- Leave overnight to dry.
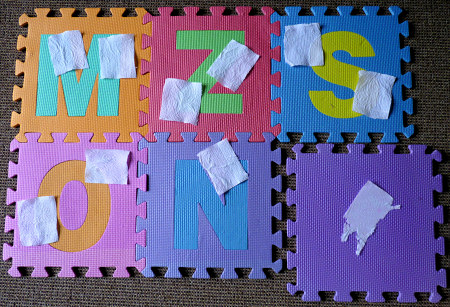
The setup for my experiment – wet paper towel squares on a sample of every foam colour
When the paper towel was completely dry, I numbered each piece as I removed it, so I could compare them with my reference layout photo (top row L-R: samples 1-6; bottom row L-R: samples 7-10).
Results
- Samples 1 and 2 (orange and blue-green) were clear.
- Samples 3 and 4 (dark pink and green) were stained in only the dark pink areas.
- Samples 5 and 6 (blue and yellow) were clear.
- Samples 7 and 8 (light pink and orange) were stained in only the light pink areas.
- Sample 9 (purple and blue) was stained in only the purple areas.
- Sample 10 (all purple) was stained all over.
Example of my results:
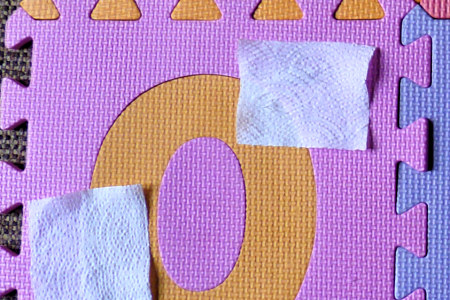
Sample 8 (top right in this photo) is mostly over the light pink foam, except the lower left corner which is over the orange O.
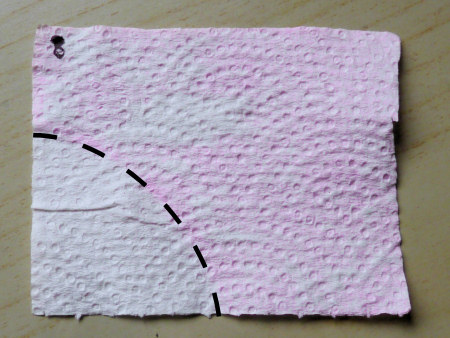
Sample 8 clearly shows that colour has transferred from the background pink foam, but not from the orange O (dotted line added for clarity).
Conclusions
My samples clearly show that pink dye leaches out of light pink, dark pink, and purple foam when wet. The colour transfer seems to be equal between all these colours. All the other foam colours (orange, yellow, green, blue-green, and blue) appear to be colour-fast when wet.
This surprised me – I thought that only dark pink would be the problem, and possibly the light pink. I never even considered that purple foam might also leave pink stains, and equally badly as the over-saturated bright pink blocks! Note: My set didn’t include any red blocks, but I suspect they would suffer from the same problem. UPDATE: see the end of this post.
My Recommendations
If you haven’t bought foam mats yet, you may prefer to look for some that avoid the problem pinks and purples (and, probably, reds). I’ve seen all-grey sets sold as utility mats, and individual coloured blocks sold at dollar stores. Grey, blue, green, yellow and orange should all be safe.
If you already own foam mats, I’d recommend that you replicate my simple kitchen towel experiment – it’s easy to do, and then you’ll know for sure, one way or the other. If you do have the problem, you have some options to get around it:
Prevention Option 1: Only use the blocks with ‘safe’ colours that do not contain pink (safe: orange, yellow, blue, blue-green, green). Do not use light pink, dark pink or purple. Note: If your mats are different colours or types, test them to see which of your colours are affected.
Prevention Option 2: Lay out an old towel over your blocks, so any colour will transfer to the towel, not your precious handiwork. You can pin straight through the towel and into the foam.
If there was any colour transfer when I blocked this cardigan (below), it doesn’t show against the dark grey yarn. Look at all the blocks that could have stained my yarn pink!

Arrows mark ‘dangerous’ colours: light pink, dark pink, and purple.
Below, you can see the second blocking for my miraculously-unscathed bamboo cardigan – now safely protected from any pink transfer by the towel. The underside of the towel was stained pink after this, but it all came out in the wash. (And, in case you’re wondering, the plastic containers at the corners of the towel are filled with water – I used them as weights to stop the towel from blowing away while I dried the cardigan outside!)
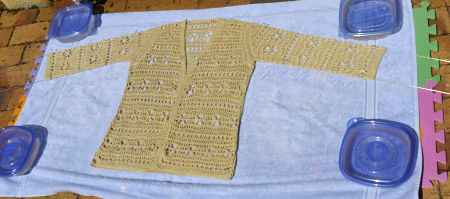
Cardigan protected from colour transfer by a towel on top of the foam mats.
If you’re blocking lightweight yarn and you roll it in a towel before blocking so it feels almost dry when you lay it out to block, you shouldn’t have a problem with colour transfer, but you may wish to err on the side of caution – my results may not always apply. For anything that still feels damp/heavy after a towel squeeze, you should definitely be careful of potential colour transfer, and I’d recommend you test your mats and/or use one of the prevention options above, especially if you’re using light-coloured yarn. Why take the risk?
UPDATE: Thanks to Andrea Giattini (@SpringSplndr) for this update! Andrea has a set of 8 of the larger 2ft square foam mats that come in red, yellow, green and blue, and are sold for use in garages, playrooms etc. She has been using them for 3 years and had never noticed any transfer.
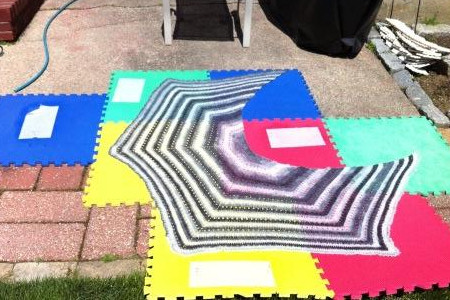
Photo courtesy of Andrea Giattini
Andrea kindly agreed to try my test on her mats. She saturated white paper towels with water and left them to dry in the sun, as you can see above. She reports no colour transfer from any of these mats (even the red one, which I was most concerned about).
It appears that these red/yellow/blue/green mats are more colourfast than the sets that include purples, pinks, etc, which can bleed pink dye. However, I still advise caution – different brands may use different dyes, and manufacturing processes may change with time, so, for your own peace of mind, I’d still suggest you try the test on your mats too, just to be safe.