PlanetJune Craft Blog
Latest news and updates from June

PlanetJune Blog: Latest News, Patterns and Tutorials

June update

A Personal Note

I’m not telling you my current woe-is-me story to ask for sympathy (not that it wouldn’t be welcome!) but to explain what’s going on with PlanetJune, why I’m so quiet lately, why I’ve fallen behind with my design commissions, and why the situation should be improving very soon!

Last week, we suffered a burst pipe leaking through an electrical outlet at home, which threw off my plans for the whole week while the house was filled with first water (well, a flooded kitchen) and then plumbers and electricians, and we had no hot water, shower or stove for the best part of a week.

This couldn’t have come at a worse time, as I now have only one week left on my visa and it’s going to be a mad scramble for the finish to apply for the new one in time. All this stress and worry is affecting me badly, with crippling tension headaches, eczema, and insomnia.

My Red Panda design was actually finished a couple of weeks ago, but I can’t muster the focus I need to complete the pattern to the PlanetJune level of detail and clarity, so the only option I have is to delay – a sub-standard pattern is not an option!

I’ve decided to stop trying to work on the Red Panda until the immigration stuff is out of the way – the added pressure just makes me feel even worse, and I’m really not making any progress on the pattern. Instead, I’m working on several simpler patterns, and making gradual progress on some longer-term design ideas, so there will be more good stuff coming 🙂

And, once the visa applications are in, I won’t have to do anything else except wait, so I should be able to rest and rejuvenate very soon and then get back to business as usual – and a lovely Red Panda pattern! In the meantime, thank you so much for your continued patience.

Review and Win contest

May’s ‘Review and Win’ winner is Kathryn P, with her review of my Baby Cephalopods:

baby cephalopods crochet patterns by planetjune: octopus, squid, cuttlefish, nautilus

I love how quick these work up! I made all four in an evening while watching tv, and they are so cute! Patterns are straightforward and do not require sewing together a crazy number of pieces, plus the end product is cute and realistic. I definitely recommend this set!

Congrats, Kathryn – I’ll email you to find out which pattern you’d like as your prize 🙂

Reptiles & Amphibians CAL

The June CAL is an extended 6-week CAL to take us through to mid-July and give you plenty of time to complete one or more patterns. The Reptiles & Amphibians theme includes all my dinosaur, lizard, turtle and frog designs:

Reptiles & Amphibians CAL at PlanetJune

For easy browsing, you can find all these patterns in one place in my shop by clicking this special link: all PlanetJune Reptile & Amphibian patterns.

Please join us in the PlanetJune group on Ravelry for this 6-week CAL – I think it’s going to be a colourful one!

Comments (11)

May Flowers CAL roundup

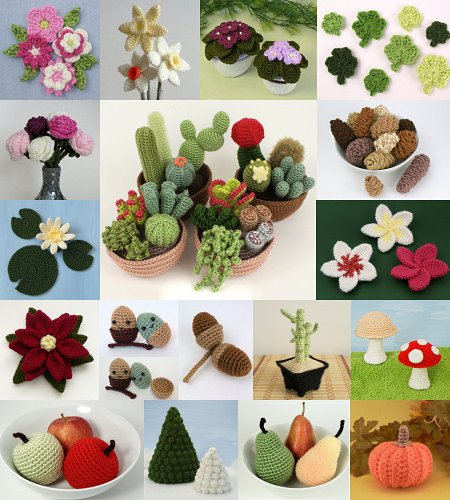
The May Flowers CAL included all my botanical patterns: flowers, plants and fruit. As you’ll see below, the clear winner for ‘most popular pattern’ this month was my African Violets – the first potted plant I ever designed!

Now, roundup time! (And don’t forget to keep reading to the end for the June CAL details…)

Read the rest of this entry »

Comments (6)

pattern re-releases: AquaAmi

I’m updating my entire back catalogue of patterns with extra information and tips and a new space-saving layout, and re-releasing them in batches as they are ready. Please see the Pattern Re-Release FAQ for more information.

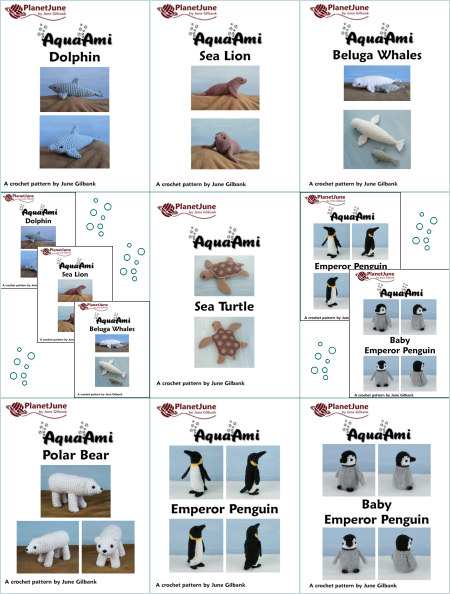
Continuing with my pattern re-release project, all the old-style AquaAmi crochet patterns have been reformatted, and any of these patterns you’ve previously purchased are now ready for you to download in the new format!

Log back into your PlanetJune account at any time in the next 2 weeks and you’ll see the download buttons for all your past AquaAmi pattern purchases have been re-enabled, so you can click and download the new versions.

AquaAmi amigurumi crochet patterns by PlanetJune

Here are the patterns and sets included in this batch:

  • Dolphin
  • Sea Lion
  • Beluga Whales
  • Sea Turtle
  • Polar Bear
  • Emperor Penguin
  • Baby Emperor Penguin

and the multipacks AquaAmi Set 1 and Emperor Penguin Family.

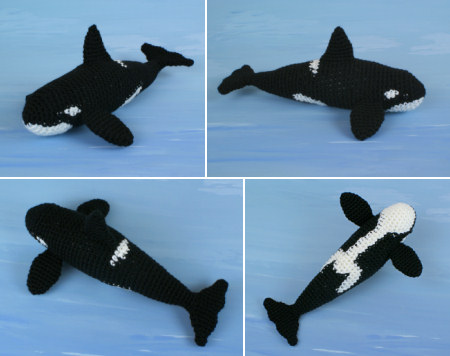
N.B. The 2013 AquaAmi releases (Baby Cephalopods 1 & 2 and Orca/Killer Whale) were published in the new style, so those patterns haven’t been re-enabled in your PJ account as they are unchanged.

If you have any questions about the pattern reformat project, or you received the patterns through a different mechanism (and so don’t have an order for them in the PlanetJune shop) but you’d still like the new versions, check the Pattern Re-Release FAQ for more information. I’ll keep the FAQ updated throughout this project and add any further questions that arise.

Comments

Chains and Slip Stitches in Amigurumi

Link easily to this tutorial in your patterns: www.planetjune.com/tension

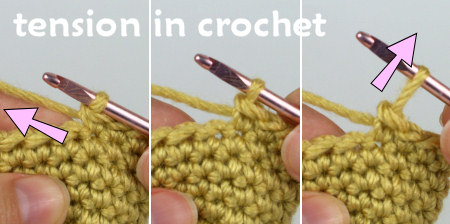
With all crochet, to keep your stitches even, you keep the yarn under tension, so a controlled amount of yarn forms each stitch and all the resulting stitches will be the same size. This is particularly true for amigurumi; if your stitches aren’t consistently tight, it’s very obvious.
tension on yarn when crocheting amigurumi
Tension is created by balancing the forward pull on the yarn from the hook (right) with the backward pull of your other hand on the yarn (left). Consistent tension keeps all your stitches the same size (middle).

Chains and slip stitches are different, though, because each stitch consists of only one loop. If you maintain the same tension as you use for single crocheting amigurumi, as well as tightening the stitch you’re forming, you’ll pull on the previous stitch and make that stitch much smaller and very difficult to work back into.

If you learnt to crochet the traditional way (working in rows to make scarves, afghans, etc) and then progressed to amigurumi, you’ll be familiar with making your starting chain loosely so you can easily work back into it (you can also achieve this by using a larger crochet hook, just for the foundation). But if you began your crocheting adventures with amigurumi, you may never have even made a starting chain foundation!

Problem: Too-Tight Stitches

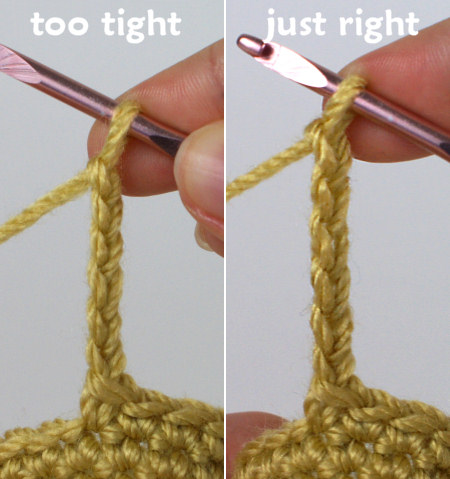
In the examples of chains and slip stitches below, the ‘too tight’ photos show the results of using the same tension I use for single crocheting amigurumi, while the ‘just right’ photos show how your chains and slip stitches should look:

Chains:
tension on yarn when crocheting amigurumi
Each example has 6 chains. The difference may not be clear for each stitch individually, but notice how short the overall length of the tight chain (left) is compared with the correct chain (right).

Slip stitches:
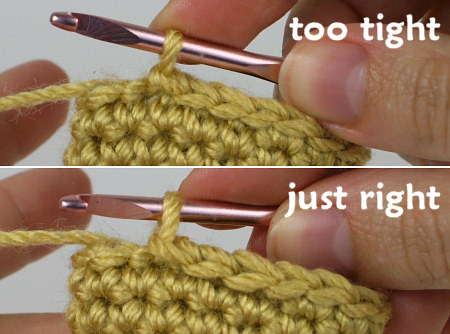
tension on yarn when crocheting amigurumi
Each example has 4 slip stitches. In the tight example (top), the sideways Vs along the top of each stitch are noticeably smaller and stretched more tightly than in the surrounding sc stitches. In the correct example (bottom), the Vs of the 4 sl sts are indistinguishable from those of the surrounding sc stitches.

Not only do these stitches not match the rest of my work visually, but they are very difficult, or even impossible, to work back into: the loops are smaller than the head of my hook and there’s no slack in the yarn. Here I’ll try to work back into the slip stitched examples:
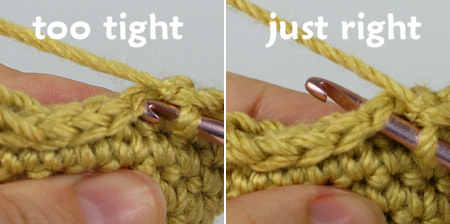
tension on yarn when crocheting amigurumi
I can’t work back into the left slip stitches without a serious struggle! The right slip stitches are almost as easy to work into as a normal sc stitch.

Solution: Reduce Tension

The goal with chains and slip stitches is to have the sideways V shape of each stitch be exactly the same size as the sideways V along the top of a single crochet stitch (see the ‘just right’ examples above). That requires relaxing your tension considerably and may feel strange and wrong if you’re only used to tight amigurumi control. Here are some tips to practice:

  • Slow down and pay attention to your stitches when you make a chain or slip stitch.
  • As you form each stitch, don’t tug on the yarn with your hook; draw it through smoothly.
  • Check the size of your stitch by comparing it with the Vs at the top of your sc stitches.
  • Only draw the yarn back with your non-hook hand if the working loop looks too large; it should sit loosely on the throat of the hook so the hook can move freely within the loop.

Once you get used to it, chaining with low tension should become easy – it just takes a little practice to make your chains evenly sized. Slip stitching with low tension is slightly trickier when you’re used to amigurumi: the stitches are so similar to single crochet stitches that I still have to remind myself with every slip stitch to keep it loose, so my stitches don’t shrink and tighten.

If you’d like to practice these stitches, here are a couple of examples from my amigurumi pattern collection that make great use of chains and slip stitches:
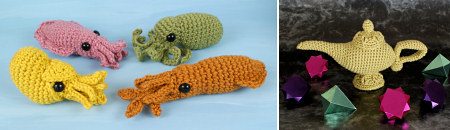
examples of chains and slip stitches in crocheted amigurumi
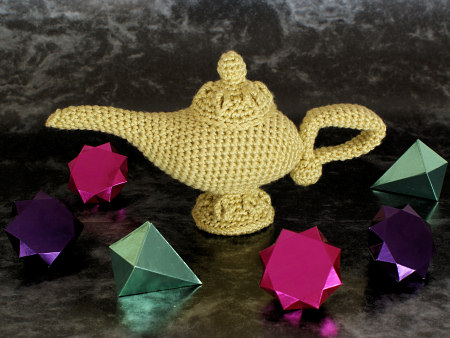
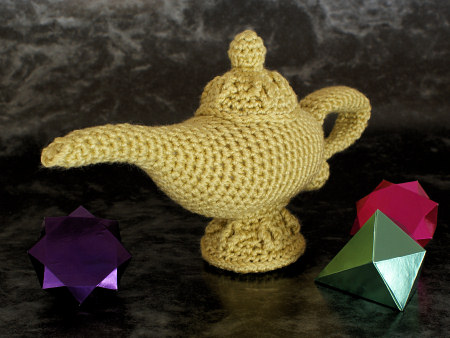
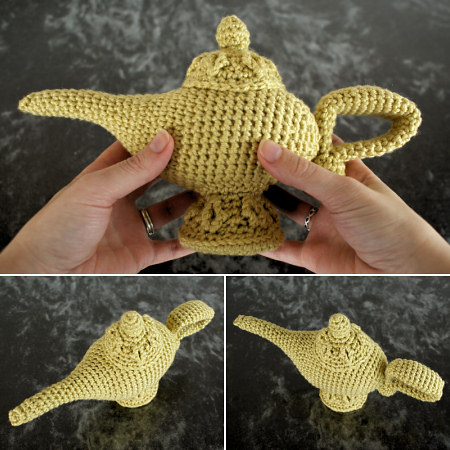
These patterns use chains (Baby Cephalopods, left) and slip stitches (Magic Lamp, right).

With this low tension technique, you’ll no longer have to battle to work back into chains and slip stitches, and your work will look smoother, tidier, and more even. It’s one more step along the road to becoming an amigurumi expert!


The Essential Guide to Amigurumi book by June Gilbank

Loved this tutorial? I have so many more amigurumi tips and tricks to share with you!

Boost your amigurumi skills with my latest book, The Essential Guide to Amigurumi, your comprehensive guide to amigurumi techniques and tips.


Do you find my tutorials helpful? If so, please consider making a contribution towards my time so I can continue to create clear and concise tutorials for you:

Thank you so much for your support! Now click below for loads more crochet video and photo tutorials (and do let me know what else you’d like me to cover in future tutorials…)

See more helpful PlanetJune crochet tips and technique tutorials

Comments (7)

May update

A Personal Note

I’ve been trying to put on a brave face, but I’m really struggling at the moment: my life, especially this immigration-related stuff, has got insanely stressful. I’m still doing what I can for PlanetJune, but stress and creativity don’t mix well, and my progress is frustratingly slow.

This situation won’t last forever (and I have lots of ideas waiting in the wings for when my mojo returns!) – I just wanted to explain why I’ll be unusually quiet for a while, especially on Twitter and Facebook.

Okay, enough about that!

Review and Win contest

April’s ‘Review and Win’ winner is Kim W, with her review of my Orca (Killer Whale):

Orca (Killer Whale) amigurumi crochet pattern by PlanetJune

This pattern is very detailed. The many color changes were very time consuming, but not difficult and the finished product was worth the effort. I appreciated the the tips on exactly where to sew on the flippers. I was able to get them to look right the fist time.

I’m glad you enjoyed it, Kim! Congrats – I’ll email you to find out which pattern you’d like as your prize 🙂

May Flowers CAL

Which of my botanical patterns (flowers, plants and fruit) do you like best? Why not make it for the May Flowers CAL this month? You’ll find all the details in the PlanetJune Ravelry group.

May Flowers CAL at PlanetJune

NB: All the patterns are available in the Flowers & Plants section of my shop, except the Mushroom and Toadstool, which are exclusively available in my book: The Complete Idiot’s Guide to Amigurumi. And if you’re short on cash, 10 of the patterns are donationware, so you can use them for free (or pay what you can)!

Comments (4)

knitted shawl collar pullover

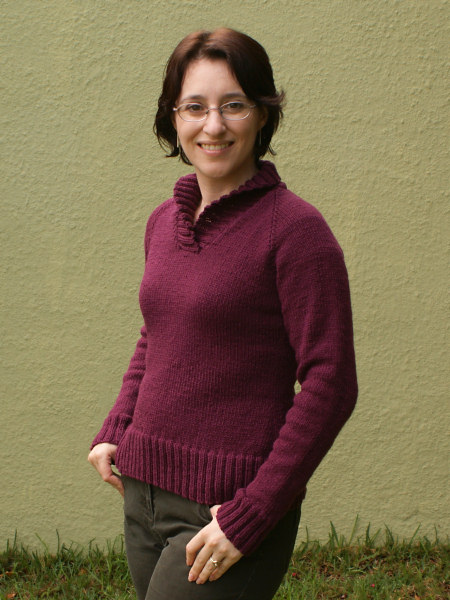
Now I understand how knit and purl stitches look and work, I’ve started examining all the knitted items in my wardrobe to see how the various elements fit together. I decided it’d be interesting to see if I could re-make a store-bought sweater by using it as my ‘pattern’ for my next piece of knitwear (although not for the collar – the original was a zip-up cardigan). I won’t keep you in suspense – here’s the result:

shawl collared knit sweater by planetjune

I used the store-bought sweater to get the basic measurements, but I did make a few modifications so it would fit me better. I decided to create a pattern as I went – well, more of a recipe than a pattern – so I’ll be able to create knitwear for myself more easily in future.

(For example: Make paired decreases at each side, every other row for 24 rows would be a specific pattern instruction, but Decrease by 6″ width over 3″ height means I just need to plug in my gauge and I’ll be able to make the same shape and size of sweater next time, even if I’m using different needles, yarn, stitch pattern, etc – it just takes a quick calculation to work out how many decrease rows I’ll need over how many total rows.)

I know I’m making this sound like it was all easy for me, but it wasn’t! I don’t want to give the impression that I have an amazing natural talent for knitting or knitwear design; as I’m still an (adventurous) beginner, I had to reknit almost every stage of this sweater due to stupid errors on my part. But I actually don’t mind that – I’ve learnt a lot from those mistakes, and really, the knitting is about keeping my hands busy so I can relax in front of the TV instead of being tempted to work on a new crochet design. The finished sweater is just an added bonus.

shawl collared knit sweater by planetjune

Techniques I learnt for this sweater:

  • Cable cast-on
  • 2×2 rib for the collar and cuffs
  • Transitioning from rib to stockinette
  • Basic shaping (paired increases/decreases) at either side of the body
  • 3-needle bind-off for the underarms and at the back of the neck
  • A more subtle raglan decrease for creating the yoke and shoulders
  • Shadow-wrapped short rows to create the shawl collar
  • Stretchy bind-off for the sides of the collar
  • Horizontal-to-vertical grafting to attach the sides of the collar

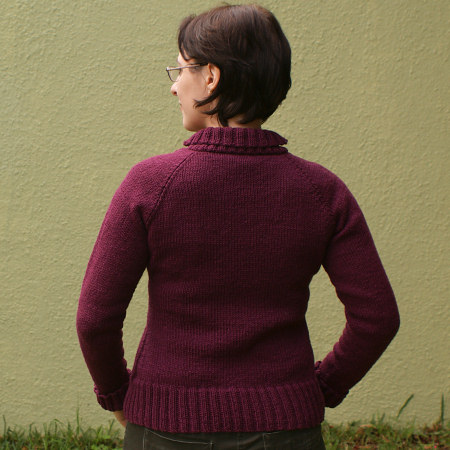
Confession time: the end result isn’t quite how I envisioned this sweater; I made a slight blip in my yoke calculations, and ended up losing a bit of length in my planned armhole depth and neckline depth as a result. It still fits pretty well though, so I decided it wasn’t worth reknitting everything from the armpits up. But I’ve learnt that lesson now, so I won’t make the same mistake next time.

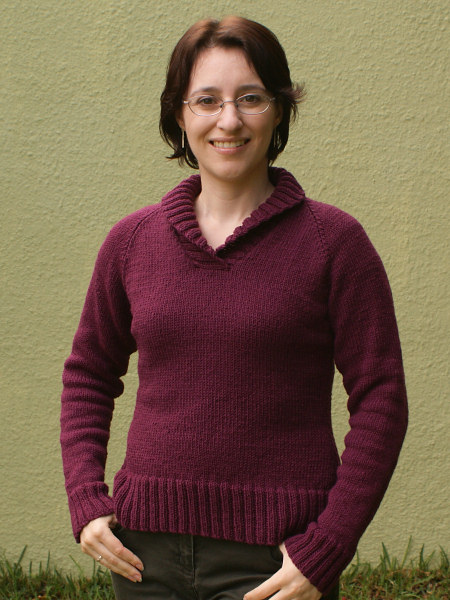
shawl collared knit sweater by planetjune

I’m pretty pleased with myself for working all this out though; this sweater doesn’t look like I made it up as I went along, and I feel like it actually has some design to it! I love how the collar turned out – I wanted it to be narrow at the front so it wouldn’t overpower my frame, but wide at the back to make a snuggly warm collar. I’d hoped my first attempt at short rows might work to create the shape I needed, and the collar actually ended up working perfectly on my first try. This sweater is definitely going to get a lot of wear (I’m actually wearing it right now!)

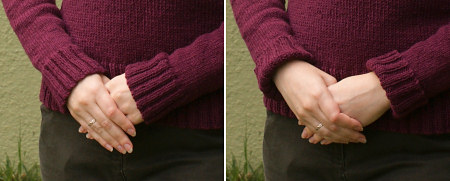
I also intentionally made the sleeves extra long, for cosiness. I can wear them uncuffed and keep my hands warm – built in wristwarmers! – or turn the ribbing back to normal sleeve length for a slightly smarter look.

shawl collared knit sweater by planetjune

(Oh, and I didn’t bother to block it, so it may look even better after I wash and block it!)

What’s Next?

Now I have a basic template for a sweater that fits me, I’m definitely going to knit more of them, and learn some new techniques with each, so I don’t make the same design over and over again and I can keep advancing my knowledge bit by bit. I’m already working on my next design, with interior shaping and a subtler, less bulky ribbing.

After making it all up as I go along for my first two knitted garments, I’ve decided it’s time to find out how you’re really meant to go about designing garments that fit. I’ve bought a couple of Craftsy online classes (Custom Cabled Pullovers with Carla Scott, and Handknit Garment Design with Shirley Paden) that should help me understand some of the slightly more advanced elements of knitwear design, e.g. set-in sleeves, and I’m trying to figure out how I can get my hands on a copy of Amy Herzog’s new book, Fit to Flatter. (I’ll keep you posted with reviews once I’ve finished taking the classes, and if I can get the book!)

I love, love, love being able to make clothes I can actually wear and that fit me, and not having to worry about making patterns for them. Having a relaxing and useful hobby that’s completely unrelated to my work is so refreshing!

Comments (6)

Forgotten Gems CAL roundup

The Forgotten Gems CAL featured an eclectic mix of some of my more neglected designs:

Forgotten Gems CAL at PlanetJune

With no fast (or free) patterns on offer, I knew there’d be fewer entries than usual, but we’re definitely looking at quality, not quantity this month – looking at the photos below makes me a very proud designer!

And it’s interesting to see that, with all that choice, there were some definite themes running through the CAL – surprise favourites have been Aardvarks and Yetis & Bigfoots, as well as lots of Chunky Elegance Rugs made into surprisingly beautiful doilies (just use crochet thread and a steel hook if you’d like to try making one too).

Now, roundup time! (And don’t forget to keep reading to the end for the May CAL details…)

Read the rest of this entry »

Comments (5)

Cuboctahedron crochet pattern

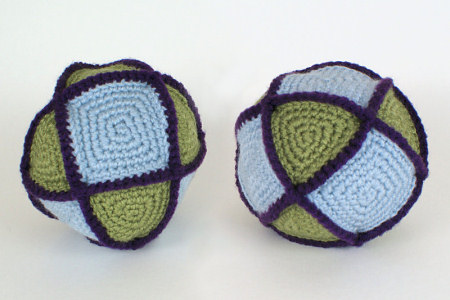
Time for another geeky-fun geometry-inspired pattern! The Cuboctahedron is one of the Archimedean solids – a group of polyhedra made from two or more types of regular polygons, where every vertex (corner) is identical. The 13 Archimedean solids have up to 92 faces each, but the Cuboctahedron is perfect to crochet because it has only 14 faces and the resulting shape is a nicely balanced, satisfyingly large ball.

cuboctahedron geometric ball crochet pattern by planetjune
Cuboctahedron is a faceted geometric ball – how fun is that?!

I’m releasing the Cuboctahedron as an expansion pack for my Polyhedral Balls pattern, so you can extend the value of of that pattern if you’ve already bought it, without having to pay the full price again for something similar.

What is an Expansion Pack?

Expansion Packs by PlanetJune

  • An Expansion Pack is an add-on to an existing PlanetJune pattern.
  • The Expansion Pack lets you modify or add to the original pattern to create something else.
  • You cannot use the Expansion Pack alone – you must also purchase the original pattern in order to be able to complete the pictured items in the Expansion Pack pattern.

Cuboctahedron, in particular, includes:

  • All the modifications required to crochet and assemble a cuboctahedron.
  • Tips for colour selection to give your ball the most impact.
  • Full right- and left-handed step-by-step assembly diagrams as separate appendices, so you need only print the pages you need.

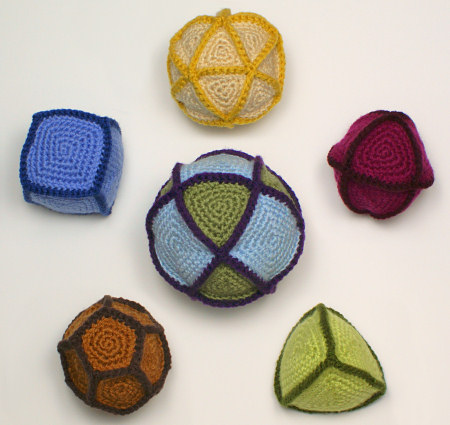
Cuboctahedron dwarfs my other Polyhedral Balls! It makes a lovely toy as it’s 6″ (15cm) in diameter:

cuboctahedron geometric ball crochet pattern by planetjune
Cuboctahedron with its smaller Polyhedral Ball cousins

You can buy the Cuboctahedron Expansion Pack for only $2.50 individually from the shop, or, if you haven’t yet bought the Polyhedral Balls pattern, you can select it as an add-on to that pattern before you add it to your shopping cart, and save 50c on the pair.

Launch Discount

I know you’ve probably already bought Polyhedral Balls, so you won’t be able to save that 50c. But, for this week only, if you add the Cuboctahedron Expansion Pack pattern to your shopping cart, together with anything else (totalling $5 or more), then use the code GEEKYFUN at checkout and you’ll still get your discount! (Valid until next Monday: 6th May 2013.)

Note: If you don’t need anything else right now, this also applies to Gift Certificate purchases, so you can pick up a $5 gift certificate now, get your discount, and have $5 in your PlanetJune account ready for your next purchase, or to send to a crocheting friend!

cuboctahedron geometric ball crochet pattern by planetjune

I really like this cuboctahedron – it’s interesting and unusual, and it doesn’t take too long to crochet and assemble. I’m not sure if I’ll make any of the other Archimedean solids though: the other small (few-sided) ones are too unbalanced to make good balls, and, discounting the 64- and 92-sided ones, the remaining interesting ones still have at least 26 faces!

(I assume a pattern for a polyhedral ball with 26, 32, or 38 faces would be off-putting, but do let me know in the comments if I’m wrong about that – I’d be happy to make more of these geometric designs if there’s demand for them…)

Happy geometric crocheting!

Comments (5)

    navigation: arrow

    buy crochet patterns and accessories from my online store

    'Everyday Crochet' and 'The Essential Guide to Amigurumi' crochet books by June Gilbank

    Crochet video tutorials and step-by-step photo tutorials

    Free PlanetJune crochet patterns

    Frequently Asked Questions

    navigation: arrow

    Punchneedle Embroidery information, ebook & patterns

    Papercraft ebook & tutorials

    Free PlanetJune craft projects & tutorials

    PlanetJune Under the Sea CAL
    Ravellenic Games: Team PlanetJune
    PlanetJune Reindeer Games
    PlanetJune Temperature Snake CAL

    June Gilbank

    Hi, I'm June. Welcome to my world of nature-inspired crochet and crafting. I hope you enjoy your visit!

    If you'd like to get in touch, you can contact me here.
    crocheted Canadian flag by PlanetJune
    Proudly made in Canada!
    A fanned-out pile of the books Everyday Crochet and The Essential Guide to Amigurumi, with text 'The answers to all your crochet questions at your fingertips - find out more'

    Has my work helped you?

    You can also send me a donation through my shop, or simply click ♥ Support PlanetJune ♥ before you shop at Amazon, Etsy, KnitPicks, and more, and I'll make a small commission on your purchase, at no cost to you!

    Tip: This link is also in the footer of every page!

    Thank you so much for your support!