PlanetJune Craft Blog

Latest news and updates from June

Archive for July, 2009

AmiDogs Great Dane

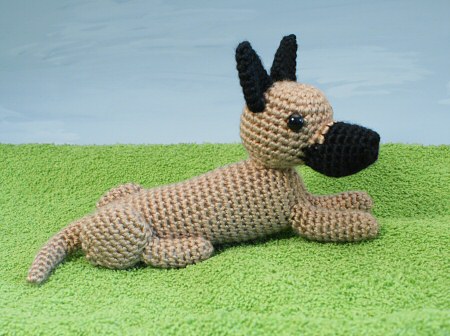
The Great Dane has been on my list of AmiDogs to create for a long time, but it presented a few logistical problems:

I wanted the Dane to be a bit larger than my other AmiDogs, because when you think Great Dane, you think BIG, but trying to support a larger body on long thin crocheted legs wouldn’t be possible without some kind of wire support inside the legs, which I didn’t want.

So, that led to the decision to make a seated or lying dog. I didn’t want to make this design much more difficult to follow than my other AmiDogs patterns, so I couldn’t use the same tricks that I used for the legs on my Ring-Tailed Lemur pattern.

Finally, after much prototyping, I got it! All the pieces are really simple to make. The finished Great Dane is 10″ long (including his tail) or 8″ if you don’t count the tail, and the pattern has instructions for a single-coloured and dual-coloured dog. I’ve also included 2 different ears in the pattern, because Great Danes look so different when they have cropped ears:

amidogs great dane crocheted amigurumi dog by planetjune

…and when their ears are left natural:

amidogs great dane crocheted amigurumi dog by planetjune

The AmiDogs Great Dane crochet pattern is now available for purchase in my store. You can buy it individually, or did you know that I now have a listing for a custom set of AmiDogs? You can mix and match to create your own set of any 3 AmiDogs patterns for the same bargain price as a regular set of AmiDogs!

I hope you like him!

Comments (12)

lemmings on demand

Wow, someone in the gaming/tech world discovered my amigurumi lemmings last week, and there’s been an explosion of interest and blog posts featuring them ever since! Welcome, gamers, to the world of PlanetJune 🙂

crocheted lemmings by planetjune
Please click through to see the full-size image – it looks so much better that way!

I’ve been getting so many requests to make sets of lemmings, I thought I’d address the issue here to save me answering it hundreds of times…

crocheted lemmings by planetjune
Click through to see the full-size image

I don’t think I could create a duplicate of all the lemmings I made – the walker and blocker would be fine, but the accessories for the other three took literally hours and hours to make each one, which would make my price ridiculously high! But if you’re interested in some walkers and/or blockers, I’d be happy to create them for you. Here’s an example of a commissioned set of two walkers and a blocker that I recently completed:

commissioned set of crocheted lemmings by planetjune

My rates are artist’s rates as I’m a busy designer and writer, and don’t have time to create all the creatures I have requests for on a daily basis. If you think my prices are too high, you don’t appreciate the time and care I put into each one of my creations. If you’re interested in one or more custom-made lemmings, please e-mail me and we can discuss it!

So that I can stay sane, I will only accept a couple of orders per month – I have no desire to become a lemming-making factory – so please let me know if you have an urgent deadline or are prepared to wait a while for your lemming(s) 🙂

Comments (10)

the moon punchneedle pattern

Just in time for the weekend, The Moon punchneedle pattern is now available from the PlanetJune shop.

The finished moon is 5″ in diameter, and the pattern includes 4 colourways for the Moon: Purple Moon, Sepia Moon, Blue Moon, and Harvest Moon (thanks Alice for suggesting that last one!).

Punchneedle pattern: Purple Moon, Sepia Moon, Blue Moon, Harvest Moon

There are three ways to buy The Moon pattern:

  • Purchase it individually for $4.50
  • Create a custom set of any three punchneedle patterns for $11.25
  • Choose it as your free pattern when you purchase The Punchneedle Handbook for $8.50

the moon (punchneedle) by planetjune

I can’t describe how happy I am with all the interest I’m been getting since I released my eBook – this week has been an absolute whirlwind, and it’s wonderful to see that people are finally starting to pay attention to punchneedle! Thank you so much for all the positive comments and encouragement you’ve sent me!

And thanks to Craft for their lovely write-up, and Sister Diane at CraftyPod for her wonderful review of my book!

Please let me know if you have any punchneedle pattern requests or any questions I can help you with 🙂

Comments (8)

punchneedles

Looking for more punchneedle information?
See my Punchneedle info page.

I don’t sell punchneedle equipment in my store because I wouldn’t be able to offer competitive pricing. Instead, I’ll give you some information about where you can buy punchneedles and some of the commonly-available options.

As far as I know, all the big craft stores sell at least one type of punchneedle – I have verified that Michaels, JoAnn & AC Moore all sell punchneedles. I suggest you look for punchneedles in craft or embroidery supply shops (either locally to you, or online).

To give you an idea of what’s available, here are some of the types of punchneedle you may see, with my comments about them:

punchneedle comparison
L-R: Dimensions, Clover, Ultra Punch

Punchneedles come in several styles and sizes. The basic needle (size medium) accommodates 3 strands of embroidery floss, but fine 1-strand needles and coarse 6-strand needles are also available. (UPDATE: See the bottom of this post for more size information.) Some punchneedles have adjustable depth (which determines the length of the loops you punch); the most basic needles have a fixed loop length. The more expensive punchneedles may have a more comfortable grip for long periods of use, but they all work in exactly the same manner, so a basic punchneedle is all you need.

The Dimensions punchneedle is inexpensive and not adjustable, but you don’t need an adjustable needle for miniature punchneedle, so this needle is really all you need to get started. You should find it near the cross stitch section in almost any craft stores.

The Clover Embroidery Stitching Tool is more expensive and you can buy various-sized needle tips (you will need a MEDIUM needle for it), but it is quite short and some people may prefer a longer pen-shaped barrel (I know I do!)

The Ultra-Punch Needle (previously sold as Cameo Ultra Punch) is the most expensive and has an adjustable loop length. I own this needle – it is very comfortable to use, but I always leave it on the shortest loop length. You can buy it in three needle tip sizes or in a set of all 3 needle tip sizes. You only need the MEDIUM sized needle. (I’m not sure if you can buy this needle in stores; you can buy it from amazon, or it’s available online from JoAnn.com and probably elsewhere too.)

buy The Punchneedle Handbook by June Gilbank

There are other brands of punchneedle too – basically, any punchneedle with a medium-sized tip is suitable for the Miniature Punchneedle Embroidery taught in The Punchneedle Handbook.

I hope you find this information useful!

UPDATE: Punchneedle Tool Sizes

Punchneedle sizing information is very unclear, and the packaging rarely tells you exactly which sizes you’re buying! I’ve researched it and here’s what I found. The punchneedle sizes are as follows:

EXTRA SMALL (1 strand of floss)
SMALL (2 strands of floss) = 1.2mm
MEDIUM (3 strands of floss) = 1.6mm
LARGE (6 strands of floss) = 2.2mm
EXTRA LARGE (used with rug yarn or ribbon)

In general:

  • If a punchneedle comes with only one needle tip, it will be MEDIUM unless otherwise marked.
  • Three needle tips will be SMALL, MEDIUM and LARGE.
  • Four needle tips will also include the EXTRA SMALL (the rug punch is a separate tool and will never be included in a set with the other sizes)

Mystery solved!

Comments (12)

moon embroidery

With an astronomer for a husband, it seemed doubly appropriate that I make something to commemorate the 40th anniversary of the moon landing (July 20, 1969). And with my new punchneedle fixation, it seemed obvious what I should make:

punchneedle moon by planetjune

I looked at source photos from NASA to make my moon design, and then embroidered it with punchneedle. I decided to use a soft purple colour scheme instead of harsh greys – four shades of purple plus white. I even got some professional advice from my resident astronomer to make sure my design was accurate before I started!

punchneedle moon by planetjune

The finished embroidery is 5 inches across. I made it into an applique and attached it to a black paisley fabric (doesn’t really show in these pics, but it’s black on black and has a soft velvety texture) mounted on a padded stretcher bar frame. I love the texture of the punchneedle and how it almost looks 3D. And the purples happen to match my new shelves perfectly. I’m very happy with it – now I just have to hang it!

punchneedle moon by planetjune

When I write up the moon pattern I’m going to give a choice of colour schemes (sepia tones, soft blues, etc), in case purple isn’t your thing. Any requests?

I hope you like my moon! Are you starting to see how cool punchneedle can be?! I really do love it!

Edited to add: I’ve set up a new mailing list for my Punchneedle designs – sign up if you’d like to be notified when the moon pattern is finished!

Edited to add: The Moon Punchneedle pattern is now available for purchase 🙂

Comments (20)

punchneedle: the next big thing?

I’m so happy to finally be able to reveal the secret project I’ve been working on for the past couple of months. You may remember that I discovered a little-known traditional technique called Punchneedle Embroidery a couple of months back, and posted about my first experiments with it.

Since then, I have been busy researching, learning, experimenting, designing, and testing, and I’m so excited by my results!

punchneedle by planetjune

Why isn’t Punchneedle more popular? I think the reason is that all the available patterns seem very focused in one genre (country/primitive style) that doesn’t appeal to a lot of today’s crafters, so Punchneedle hasn’t seen the surge in popularity that many other traditional crafts are experiencing.

Well, I’m here to change all that – this technique is too good to be overlooked any longer! Here are just a few of the reasons I find it so appealing:

  • Easy: Only one simple stitch to learn; you don’t have to be super-neat to get a beautiful result
  • Fast: No need to knot the ends of the thread, and, other than the outline, it doesn’t matter exactly where you place your stitches, as long as you punch enough stitches to fill each area
  • Stunning results: Easy to create bold, bright, appealing embroideries
  • Relaxing: Unlike cross stitch, there’s no counting involved – just fill in each area with colour like a paint-by-number painting!
  • Inexpensive: After you’ve bought a punchneedle and hoop, the only supplies you need are fabric and embroidery floss
  • Easy to fix mistakes: Any stitch can be easily pulled out without affecting neighbouring stitches; with a few simple techniques you can fix any unsightly mistakes
  • Portable: Carry all your project supplies in a small bag for those crafting on-the-go moments
  • Versatile: Make finished embroideries into framed artwork, decorative patches or appliqués, or add fabric borders to make quilts, cushions, etc – there’s limitless potential here

Intrigued yet?

buy The Punchneedle Handbook by June Gilbank

I’ve written an eBook called The Punchneedle Handbook: Miniature Punchneedle Embroidery Basics & Beyond. This eBook includes everything about punchneedle from the absolute basics for those who have never heard of this craft, to my techniques that will allow absolutely anyone to create beautiful punchneedle embroideries. I designed the eBook to be a go-to reference book for all your punch needle questions. See more details and the table of contents.

I’ve made an excerpt from the eBook into a free tutorial so you can get a taste for what punchneedle is about.

Of course, a techniques book would be useless without some patterns, and this is the part I’m really excited about – time to show you my initial designs! I hope you like them…

punchneedle patterns by planetjune

I’ve found that designing in 2D is very different to designing in 3D – I think that the shaping is the most important feature of my crochet patterns, whereas with these punchneedle designs it’s really the colour that gives them such impact.

(I’m also working on another piece – something very different to the above designs, which will show a different side of punchneedle – more on that later today.)

Square designs are so useful because they can easily be sewn directly together to make a larger piece, or fabric borders added to make quilt squares etc. Here’s what I’ve made with my three jungle designs:

tote bag with jungle animal punchneedle designs by planetjune

… a cute little green linen tote bag. The techniques I used to join the finished embroideries together and to attach the fabric ‘frame’ to make the front of the bag are covered in detail in The Punchneedle Handbook.

My punchneedle patterns are available individually or in a set of any three patterns of your choice. As an introductory offer, I’m also giving away one pattern (of your choice) FREE with every purchase of The Punchneedle Handbook eBook!

I know this has been a long post, but I had a lot to cover! If you’re interested in learning more about punchneedle, here’s a summary of your options, with links:

Please let me know what you think of my new venture! I anxiously await your comments…

Comments (22)

lotus card

I made this pretty pop-up card a couple of weeks ago, but had to wait until it arrived with its recipient before I could post about it!

lotus blossom pop-up card

lotus blossom pop-up card

It’s a lotus blossom that we featured on Folding Trees last year – such a pretty design! You can now see my review of the process of making the card, below.


Tutorial Review: Lotus Blossom Card

This review was originally published on my old papercraft site, Folding Trees.

In progress

Cutting the template pieces:lotus flower card

Finished piece

The finished card, open:lotus flower card

And from the side:
lotus flower card

Notes on this tutorial

The template comes on 2 pages. Unfortunately it’s designed for 11.7″ long paper, so for folks with letter-sized or A4 paper, the template is slightly too long and a couple of edges will be cut off. I didn’t realise this, so I had to draw the missing bits back onto my printouts by eye before cutting them out. You can avoid this by making sure “Shrink to Printable Area” is selected in Adobe Reader when you go to print.

I found it slightly annoying to have to cut everything out twice (once on printer paper to make the templates after printing, and then again on the coloured cardstock after tracing the templates), but you could save and reuse the printed paper templates, so you only have to do that step once. You could print directly onto your cardstock, but as each piece is cut from a  different colour, you’d waste a lot of cardstock that way.

The card came together easily enough – the directions are very simple. The stamens were a bit fiddly to cut and to attach; I’d advise that you treat them gently so you don’t bend them.

The finished card is stunning and the pop-up effect works well. You could modify the idea with different coloured cardstock, or, if you’re feeling very creative, change the shape of the petals to make a different type of flower. If you haven’t checked out the tutorial yet, I recommend you take a look!

Level of difficulty

intermediate

Time

moderate

Cost

low (recycle away)
 

Link

The original tutorial is available here.

Comments (15)

hummingbird nectar recipe

I’m still deeply ensconced in my secret project, so I haven’t had anything crafty to post about recently – hopefully that will all change soon! In the meantime, I thought I’d share a quick nectar recipe for those of you who are lucky enough to live in an area visited by hummingbirds.

ruby throated hummingbird

Hummingbirds are fascinating little miracles – so tiny and so fast, it’s hard to believe they can exist! They are only 3-4 inches long from beak to tail and they beat their wings around 60 times per second, which produces the humming sound for which they were named. Coming from the UK, I had never even seen a hummingbird until a couple of years ago, and now I can see Ruby-throated Hummingbirds daily (in summer) in my own garden, just by putting up a little nectar feeder for them 🙂

ruby throated hummingbird

You can buy powdered hummingbird nectar, but it’s a bit messy to prepare, and expensive. It’s actually super-simple to make your own nectar for feeding hummingbirds: all you need is sugar and water! Hummingbird feeders are red, so the colour of the feeder will attract the birds and there is no need to add red colour to the nectar.

  • Ingredients: 1 part granulated white sugar and 4 parts tap water. (I use 1/2 cup sugar and 2 cups water, which makes a 2-week supply for my hummers.)
  • Place the sugar and water in a saucepan and bring to the boil, stirring occasionally.
  • Cover the suacepan and boil the nectar for a couple of minutes (this retards mould growth).
  • Allow to cool to room temperature, then pour into a clean hummingbird feeder.
  • Store leftover nectar in the fridge for up to 2 weeks.
  • Replace the nectar and clean your feeder twice a week to prevent mould.
  • Enjoy the beauty of the visiting hummingbirds!

ruby throated hummingbird

Comments (5)

  • Quick Links: Crochet

    navigation: arrow

    buy crochet patterns and accessories from my online store

    'Everyday Crochet' and 'The Essential Guide to Amigurumi' crochet books by June Gilbank

    Crochet video tutorials and step-by-step photo tutorials

    Free PlanetJune crochet patterns

    Frequently Asked Questions

    Quick Links: Crafts

    navigation: arrow

    Punchneedle Embroidery information, ebook & patterns

    Papercraft ebook & tutorials

    Free PlanetJune craft projects & tutorials

  • Blog Post Categories

  • Blog Archives

  • Welcome to PlanetJune!

    June Gilbank

    Hi, I'm June. Welcome to my world of nature-inspired crochet and crafting. I hope you enjoy your visit!

    If you'd like to get in touch, you can contact me here.
    crocheted Canadian flag by PlanetJune
  • A fanned-out pile of the books Everyday Crochet and The Essential Guide to Amigurumi, with text 'The answers to all your crochet questions at your fingertips - find out more'
  • Support PlanetJune!

    Want to say thanks? You can send me money in seconds at paypal.me/planetjune (over $20) or paypal.me/planetjune2 (under $20) or send me a donation through my shop.

    Or simply click through from my links before you shop at Amazon, Etsy, KnitPicks, LoveCrafts or Crochet.com, and I'll make a small commission on your purchase, at no cost to you! Start here:

    ♥ Support PlanetJune ♥

    Tip: This link is also in the footer of every page!

    Thank you so much for your support!