This is sweater #12 of my ‘learn to knit by making a dozen self-designed sweaters’ project. (Here are links to #1, #2, #3, #4, #5, #6, #7 #8, #9, #10, and #11, if you’d like to see my progress.)
What could I do for my 12th sweater project that I haven’t already done?! I started thinking this would have to be a spectacular finale to the project, and that put so much pressure on me, I couldn’t get started! So I decided to step back and just make something I wanted to make, as I did for all the others.
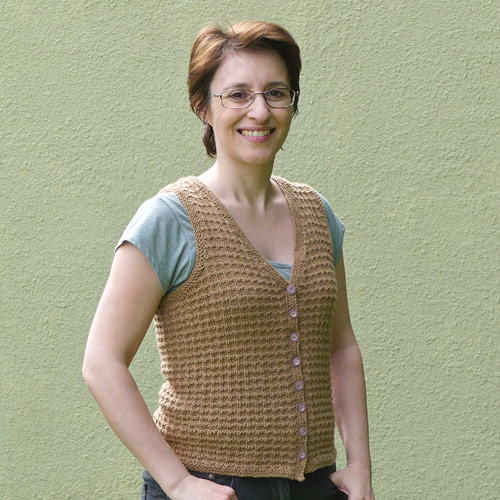
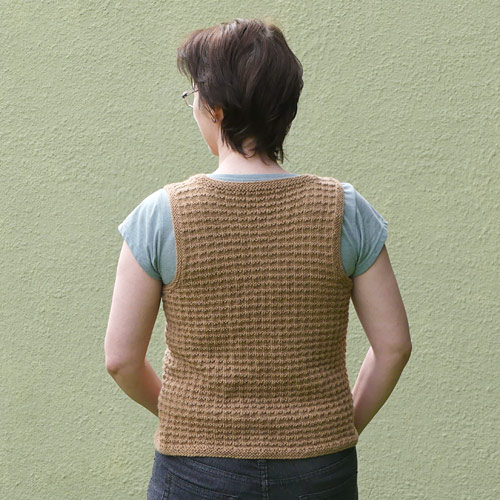
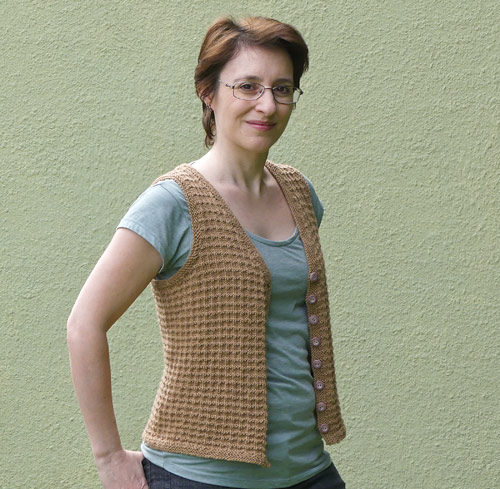
Now, you could argue that a vest is not really a sweater, but all it’s missing is the sleeves (and I definitely know how to knit sleeves by now) so I don’t think this is cheating – I could have added sleeves if I had more yarn, and I had plenty to learn from designing and knitting this vest, which was really the point of my whole project.
I had about 500m of deliciously soft baby camel yarn left over from my amigurumi Camel (I’d bought 5 hanks to take advantage of a wholesale discount price – it was far too expensive to justify buying 100% baby camel yarn for a toy at retail price). I’d hoped to think of some way to use this extremely warm yarn to make something useful, but the low yardage was going to be a challenge, so I decided it’d have to be a fairly close-fitting vest, and I’d do some calculations on the fly to make sure I could use as much of the yarn as possible without running out.
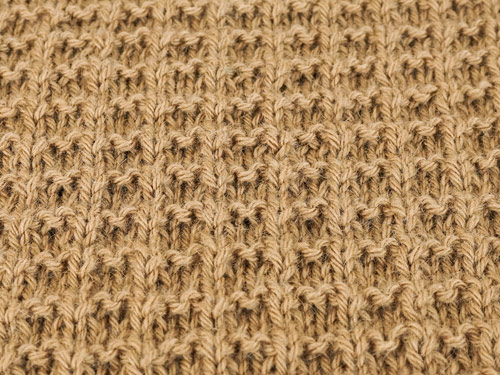
To keep it interesting and build my skills, I chose an all-over textured stitch pattern instead of plain stockinette.
Instead of joining a new ball of yarn at the end of a row, I used the Russian join to minimise wasted yarn (and had to consult my own book for the instructions – it’s been a long time since I’ve used this join and I couldn’t quite remember how to do it!)
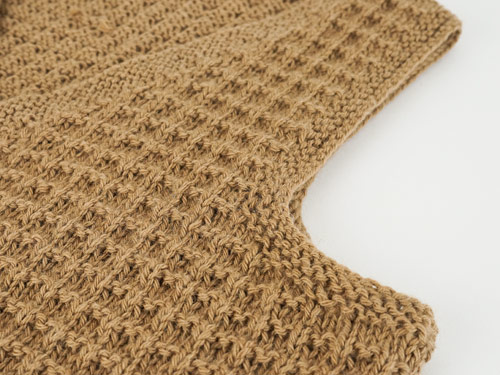
And my plan worked, eventually! It took some re-knitting: I started my textured stitch pattern in a way that caused the whole bottom border to flip up (a fact that didn’t reveal itself in my swatch or until I was way past the point of wanting to unravel it all and restart). I kept going and then unravelled from the bottom cast-on edge up until the point where I could fix the problem (and also to recover some yarn to use for a more substantial neckband than I’d budgeted for – I didn’t like the look of the narrow one I tried first), then I reknitted the bottom border and added the neckband.
I added a new tool to my knitting toolkit: an interchangeable crochet hook (size E/3.5mm) for picking up stitches. Being a left-hander, but a right-handed knitter, I’ve found that picking up stitches along an edge (as a way to start e.g. a button band or armhole edging) with a needle is too challenging for me. Until now, I’d been picking up a few stitches at a time with a normal crochet hook, then dropping them off the hook and picking them up on the needle, but this was slow and fiddly.
Now, I can just unscrew the needle tip from the cable, screw on the hook, pick up all the stitches with ease and slide them onto the cable as I go, and then switch back to the needle tip to begin knitting! The interchangeable hook has been a brilliant addition to my interchangeable needle collection.
In the end, I used 99% of my yarn (woohoo!) to complete the vest, and I’m happy with the result – it’s extremely soft and very warm without being bulky. It isn’t the sort of thing I’d usually wear – either in style or colour – but this extra-warm layer is turning out to be very useful, and it’s the natural colour of the baby camels who donated their yarn so that I could knit this vest, so that’s pretty cool!
Skills I learnt in this project:
- Working an all-over texture throughout a piece (I really like the result of the stitch pattern I used – I think it looks like a yummy waffle).
- Garter stitch… I know, it’s the most basic stitch, and yet I’ve actually never knitted anything in garter stitch until I decided to use garter edgings on this vest. I haven’t been a big fan of the look of garter, although I’m willing to change my mind on that point, because I love how flat my edgings are compared with stockinette! There are definite benefits to not being an anti-garter stitch snob.
- Decreasing in pattern for the V-neck (note to self: if I was doing it again, I’d have left two stitches of stockinette at the edge instead of one: one for the selvedge and one to make a neat border at the base of the edging).
- Weighing the work so far and adapting the design on the fly to account for the lack of yarn.
- Picking up stitches around an armhole.
- Making an armhole edging.
- Making a buttonhole in garter stitch.
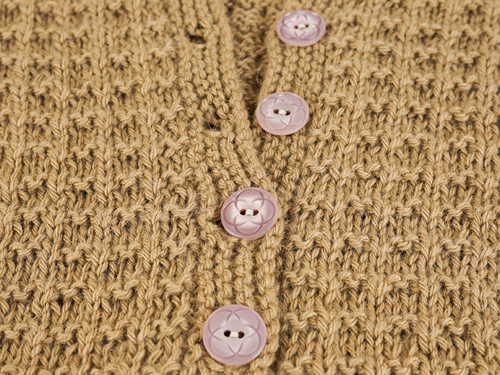
I was hoping to find some colourful buttons (maybe turquoise or dark purple) to contrast with the yarn colour, but there wasn’t anything in the right size and colour in the button shop, so I went with this dusty pink. I think it looks okay, although I may make some polymer clay buttons and swap them at some point. But, for now, it’s finished.
And, with that, my 12 sweater project is complete. Isn’t that amazing?!
I have a lot to say about the experience of the project and where I’ll go from here, but I’ll save those thoughts for a wrap-up post…


Corinthia said
What an accomplishment! Thank you for sharing your journey with us! I’m glad to see how far you got and see the skills you’ve learned! I just started my knitting journey and it has been a delight to look at sweaters and see if I can guess the stitches used. For this sweater in particular the textured stich looks similar to the Hurdles stitch but also no quite. What textured stitch did you use?
June said
Thank you, Corinthia! I used Double Andalusian stitch – it’s simpler than it looks, as 3 of every 4 rows are plain stockinette.
Nancy Eidson said
It is amazing and I love it! The hem or band and the armholes look great, I am really impressed with the look. I don’t think I have ever seen vests or sweaters with such thin and dainty looking as opposed to thick and cumbering looking. They always make me feel like I am fat and pudgy, but yours is lovely. In Canada one might need thick sweaters and vests but in Florida it is another day! lol And I love them. The can really pop an outfit and give it just what it needs. I think I’m gonna have to learn to knit! I enjoy your blog so much, thank you and keep up the excellent work! Blessings sheplady
MotherOwl (Charlotte) said
This is a lovely sweater (minus sleeves) I totally agree. And yes waffles was my first association with this pattern as well. Have you ever tride working borders in seed stitch? I find this to be a nice, non-curly border. I’m not a great garter stitch-fan.
June said
Thank you, Charlotte! I used seed stitch borders for my sweaters #5, #6 and #10, so I wanted to try something different for this one (as it was supposed to be a learning project) and garter is definitely different from anything else I’ve tried! I don’t think I’ll be making any all-garter projects any time soon, but I think it works in this case.