September 17, 2012 @ 12:47 pm · Filed under Crochet, Patterns
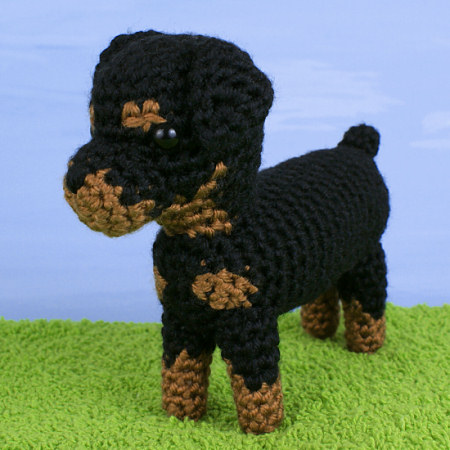
It’s amazing how quickly time flies – it’s been over a year since my last AmiDogs design (the Basset Hound who accompanies my amigurumi Columbo) but, thanks to my Commissions system, it’s time to add to the collection with my 20th dog crochet pattern, AmiDogs Rottweiler.
With 19 dog breed designs under my belt, I thought I must have a pretty good idea of how to design a dog crochet pattern by now, but it was still a challenge to capture the Rottie’s essence. I had to set it aside for a while and work on something else until I figured out the subtle changes in shape that would make the design work. I think I finally nailed it though 🙂
Don’t forget, if your favourite(s) are still missing, you can commission them! I’ve just added the most popular requests to the commission options, if you’d like to pledge towards any of them. If your favourites aren’t on the list, please submit your requests (through the form on the Commissions page) so I can consider adding them in the next design review. I no longer create new AmiDogs designs without a commission, so this is the only way to get your favourites made from now on.
If you know someone who loves Rottweilers, you can pick up the AmiDogs Rottweiler pattern in the shop right now. Or, if you’d like to add several dogs to your pattern collection, I recommend my AmiDogs Custom Set – you can choose any 3 dog breeds for a bargain price.
Thanks to everyone who commissioned me to make this design! Next up on the commissions list: the Giant Panda (I’ll be collecting pledge monies tomorrow) – yay!
September 13, 2012 @ 11:49 am · Filed under Knitting
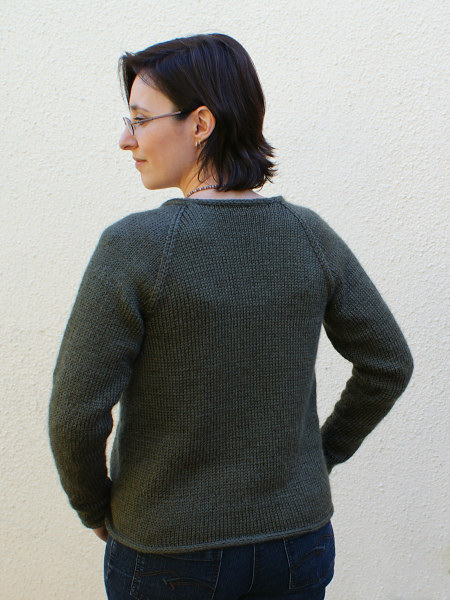
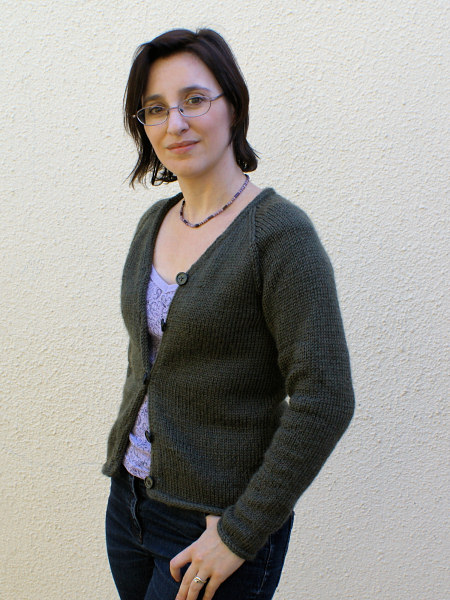
Look what I made!
This was my second ever knitting project, after the wristwarmers I made last year. I lost my knitting momentum as I waited 3 months for the needles I’d ordered to arrive in South Africa, and found it very difficult to pick it back up again, especially as my plan was pretty daunting: to make a cardigan from scratch with no pattern.
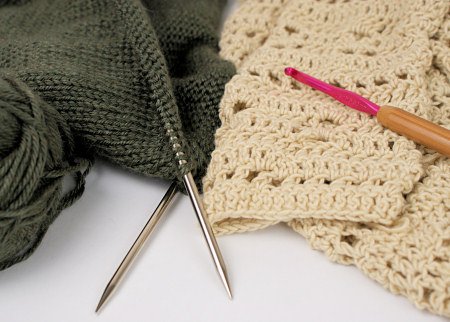
Actually, the plan was for 2 cardigans, one knit and one crochet, as relaxation projects to keep me occupied outside working hours so I don’t end up working all the time. Although the crocheted cardigan was much faster to create (I finished it in July), I haven’t quite finished weaving in the ends on that one, so the knitted one gets to make its debut first 🙂
Self-designed knitted and crocheted cardigans in progress
When I finally decided to make a start on the cardigan project in June, I measured some of my existing clothes to give me an idea of size and then just started with the back of each, with no real idea of what to do after that. My plan with this knitted cardigan was to make it a learn-as-I-go piece: picking up new knitting skills along the way as I needed them, and hopefully ending up with something wearable too; or at the very least a good idea for how to make the next one good enough to wear without embarrassment. And, somewhat to my surprise, this strategy worked!
Project Details
Yarn: Bernat Satin in Forest Mist Heather
I bought 6 skeins of this yarn at a yarn factory outlet sale in 2010. One became my Diamond Lattice Neckwarmer, so I had 5 left, and I hoped that would be enough. (If not, my plan was to add some stripes of a different colour near the edges.) As it turned out, I only needed 3.7 skeins – less than 700m of yarn – so that’ll be handy to keep in mind for my next sweater.
Needles: KnitPicks interchangeables, 5mm, with 2×24″ and 2×32″ cables
I’m really enjoying these KnitPicks needles. I have the nickel-plated tips and they’re lovely and smooth and very easy to knit with (not that I have anything to compare them with). I made full use of the interchangeable needle tips and cables with this cardigan:
I held each piece on one of the spare cables until it was time to join them together. To start the next piece, I switched the needle tips to a different cable and screwed the stoppers on each end of the old cable.
I used cable connectors to make extra-long cables and to join the cables temporarily so I could slide my live stitches from one cable to another.
At some points I had all 4 of my cables in use; I think I’ll need to invest in some more, and longer, cables before my next project.
Pattern: None! I made it up as I went along.
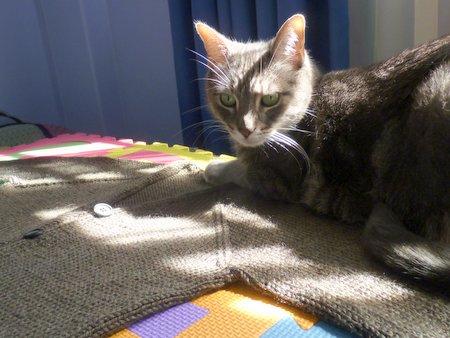
Maui volunteered to keep the finished cardigan held flat while it dried…
Techniques
Here’s my journey of new knitting skills:
Provisional cast-on: I decided to use a provisional cast-on (a crocheted chain made in a different yarn) to give me some flexibility with the length and put off the decision of how to edge the piece until I got further into the project (and hence a little more knitting practice).
Purl: As a cardigan is worked in rows, this was my first attempt at purling (my wristwarmers were worked in the round, so they only used the knit stitch). I made the body in one seamless piece, bottom up, up to the armholes, then set it aside to start the sleeves.
Increases: I knitted my first increases for the sleeves, using Knitting Help’s incredibly useful increase reference to pick the increases I liked best (M1L and M1R, in case you were wondering).
Mattress stitch: I had planned to knit the sleeves in the round as I did for my wristwarmers, but, after working flat, I couldn’t remember how I managed to knit in the round (with Magic Loop) without getting any ladders at either side – it had seemed so easy before! I decided to worry about that later and keep my momentum going by working the seams flat and learning how to stitch side seams invisibly with mattress stitch instead.
A little detour… After making most of the first sleeve, I basted it closed to make sure it was wide enough at the bicep. It turns out that, although my gauge calculations were spot on, the size of my arms is apparently a little wider than I’d thought, as the sleeve was going to fit very closely – not a very flattering look. I ripped it all out, added 20% to all my width calculations and started again…
Decreases: I joined the body and sleeves to make a raglan yoke. It was time to learn how to make left-leaning and right-leaning decreases, so I referred back to Knitting Help to choose my favourites (k2tog and SKP).
Kitchener stitch: After finishing the yoke, I had to stitch the sleeves to the body at the underarms, so it was time to learn how to stitch invisible horizontal seams with Kitchener stitch. I wish crocheted seams were this simple and invisible!
Ribbing: I decided a 1×1 rib might look nice for the edging (with the advantage that I’d then be able to try TECHknitting’s tubular cast-off that I had my eye on). (In the end, I decided against using it in the finished sweater – I just didn’t like the finished look of it, so I ripped the cuffs out and redid them later.)
Magic Loop (again): By the time I got to edging the cuffs, I’d already seamed the sleeves together, so working flat was no longer an option. I relearnt Magic Loop so I could complete the cuff edging in the round.
Tubular Cast-off: I really liked the idea of this cast-off because it has no edge to look messy (and as an added bonus, I got to learn double knitting as part of the technique). The instructions I used didn’t explain one crucial step (bring the yarn to the front before slipping the purl stitches; bring the yarn to the back before slipping the knit stitches) so it took me a while to figure out what I was doing wrong. In the end, although I did master the technique, I didn’t love the look, so I decided to lose the ribbing and tubular cast-off and try something with a cleaner look instead…
I-cord Cast-off: Did you know there are apparently infinite variants of how to do this? Knitting some, or all, of the stitches through the back loop, decrease with k2tog, ssk, or skp… Every tutorial and video I looked at had a slightly different method. I decided to try the KnitPicks tutorial (except with a provisional cast-on) and it looked fine, so I went with that method.
Picking up stitches: Edging the cuffs and bottom was easy – I just ripped out my provisional crocheted cast-on and continued knitting downwards from there. But, to make the collar edging and button band, I needed to pick up stitches along the side edge, so I could add an applied i-cord. My gauge was a perfect 18 sts and 24 rows in 4″ (exactly as the ball band of my yarn claimed!) so I picked up stitches on 3 of every 4 rows so my vertical edging wouldn’t pucker.
Buttonholes: I sort of cheated in my buttonholes: all I did was to not pick up the stitches at the points where I wanted the buttonholes to be, and worked the i-cord without attaching it for 3 rows to leave a vertical gap. I’ll have to learn a proper method in my next project!
Weaving in ends: Thanks to adding edgings, changing my mind, starting new balls of yarn, etc, I had a whopping 26 ends to weave in. Luckily, I already had an excellent tutorial bookmarked from The Purl Bee that clearly shows several different techniques. My favourite was duplicate stitch on the wrong side.
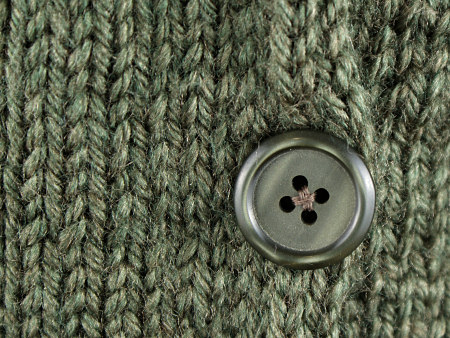
Finishing touches: I was hoping to find some decorative shank buttons to liven up the cardigan slightly, but when I went shopping I found a clear sign that wasn’t the way to go. These buttons cost 5c each (that’s less than 1 US cent apiece!) and amazingly were a perfect match for the greenish grey shade of my yarn. I used sewing thread to attach them, with a crochet hook as a spacer to make a thread shank, and small anchor buttons on the back so my thread wouldn’t cut through the yarn with wear. To finish it off, I knotted yarn all the way up each thread shank both to stop it from being floppy and to disguise the thread.
Perfect match! (This photo is untouched – the subtle heathered greenish grey of the yarn shows clearly here.)
Result
13 new knitting techniques learnt, and what do I have to show at the end of it all? A totally wearable cardigan!
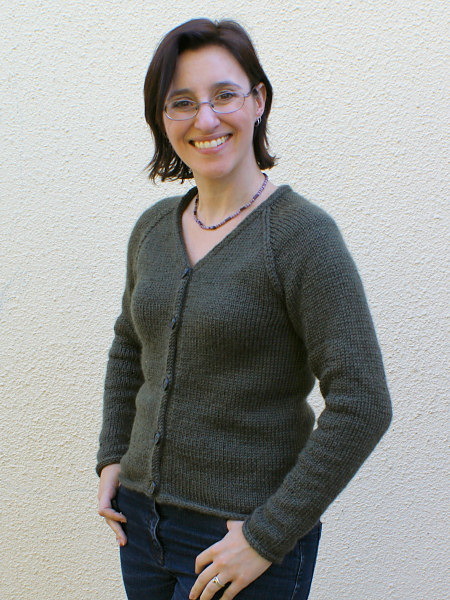
Happy June says “I made this!”
It’s not perfect in terms of design: I forgot to start neck shaping while I was wrestling with the first few rows of the joined sleeves and body, so the V is a little shallower than I’d have preferred. Also, the i-cord isn’t quite enough to stop the stockinette from curling at the bottom, although it does stay fairly flat while I’m wearing it so I don’t think I’ll bother adding a facing to stabilise it.
But it fits very nicely, it doesn’t look embarrassingly ‘homemade’, and it’s been doing a great job of keeping me warm all week. And, in the end, isn’t that exactly what a cardigan should do?
Verdict
As a self-teaching tool, this project worked exactly as I’d hoped – I gradually, over the course of making the cardigan, taught myself a huge number of knitting techniques. If I’d tried to learn them all before tackling the project I’d probably have been too daunted to ever make a start on it. I had the advantage that I’ve read lots of knitting tutorials over the past few years, so, even though I didn’t know how to knit ahead of time, I did know the theory (e.g. you need to pair a left-leaning and right-leaning decrease; you use mattress stitch for a vertical seam and Kitchener stitch for a horizontal seam, etc) – so it was just a matter of googling each new technique as I needed it.
I had no doubt that I’d be able to do something like this in crochet, but designing a knitted cardigan when I didn’t even know how to purl before I started did seem like a bit of a crazy challenge… Knowing that I had a goal (a piece of wearable clothing) in mind kept me moving forward and trying new techniques in a far shorter amount of time than I would have managed to learn them otherwise.
I guess I can say I’ve graduated from the ‘beginner’ knitter category now? Plus, I have the added bonus of a nice warm cardigan that fits! And I suppose I could even call myself a knitwear designer now too, although strictly for fun, not profit 🙂
It’s now been 6 months since I started my crowd-sourced commissions process and I thought this would be a good point to step back and re-evaluate the process. In case you aren’t interested in my review, I should mention first that there are now 12 new design options on the Commissions list, so please click through to the list if you’d like to see what’s new, and maybe pledge towards one or more!
And now to the review…
The Story So Far
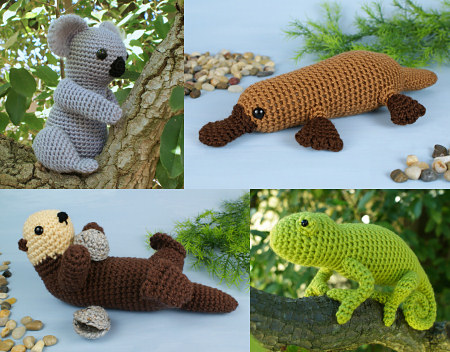
It’s been working well so far – too well, maybe, as I’ve tweaked the system 3 times so I don’t get overwhelmed with commissions! We’ve had 7 designs fully funded so far:
Koala, Platypus, Chameleon, and Sea Otter have all been completed, and I’ve had only positive feedback from the people who pledged towards them. I’m very happy to now also be able to include them in my pattern catalogue.
AmiDogs Rottweiler is being designed right now!
Giant Panda and AmiDogs Scottish Terrier are funded and still in the queue to be designed.
If the queue keeps growing, I may need to make another change, as I don’t want the queue to keep lengthening – if too many commissions stack up, I may reach the point where I wouldn’t be able to make a funded design for a year or more, and that wouldn’t make anyone happy! But, luckily, with 19 AmiDogs designs under my belt already, new breeds are typically much less difficult to design than starting from scratch with a completely new animal, so I should be able to zip through the Rottie and Scottie designs much more quickly than the ones I’ve already completed.
Copycatting
One potential concern about putting my design ideas on display like this is that I’ve noticed several other people suddenly releasing amigurumi patterns for the animals on my list. I certainly don’t have a monopoly on animals, so I’m not complaining about that, but I want to add a note of caution to anyone using my commissions list for inspiration: if you’re making animal designs from my list purely because you think that means they’ll be popular, you’re missing the point of the list.
None of my innovative and original design ideas are up there – the reason these animals are on my list is that I don’t think they’ll be big sellers, which is why I want some money upfront before I spend my time designing them! And that’s proven to be accurate: my non-commissioned designs over the same timeframe (Succulents, Baby Bunnies, Polyhedral Balls/Gaming Dice…) have all brought in far more sales than the commissioned patterns, as I expected they would.
Budding amigurumi designers: if you want to succeed, don’t look to other amigurumi designers for your inspiration. You should make designs that fit your style and the things you love – be original and be true to yourself. Do you want to be in competition with me, or do you want to carve your own niche and have no competitors..?
Pledge Review
One of the potential concerns with my idea is that, unlike Kickstarter, which inspired me to try this in the first place, my ‘campaigns’ have no end date. My gut feeling is that people who want a specific design enough to pledge towards it will still want it even if it doesn’t get developed immediately. Still, there is the concern: what happens if a design is fully funded 2 years later, or 5 years..? How many of the pledgers will still want the design enough to pay for it, or even remember they made the pledge?
For this reason, I decided to do a pledge review at this point in the process. I contacted existing pledgers to check they are still happy to honour their pledges, and delete their pledges if not. Nobody wanted to cancel altogether, and only one person reduced their pledge amount, so I may do a pledge review less frequently than 6-monthly in future (I’ve always given the option for people to contact me to delete a pledge if they change their mind before the design is fully funded). Tweaking these details is another part of developing and testing the process for the long-term.
Design Options Review
After the pledge review, I pulled the designs that were less than halfway to being funded from the list, to make way for others that may be prove to be more popular. (They may return in future – the whole point of this process was to test whether a design will be worth making, and maybe the less-popular ideas will be more appealing next year.)
For new designs, I’ve reviewed all the incoming suggestions, and sorted them as follows:
Do I want to create this design?
Do I think I can easily create this design within the time constraint of the commission?
Are there multiple requests for this design?
I’ve added some of the designs that met all these requirements to the list, and I’m saving the remainder of the suitable ideas for the next review. I’ve also saved the suggestions I loved, but that may pose more design challenges, to my regular pattern ideas list (I don’t want my design to be limited by the time constraint – some ideas just take more time to percolate!), so don’t despair if your suggestion doesn’t appear here.
Feedback Review
It’s been really helpful for me to receive questions and suggestions, so I can make improvements based on what people really want to see here.
Review your pledges: Although you always get a confirmation email for each pledge you make, people wanted a way to see everything they’ve pledged towards at once, so I’ve added the My Pledges feature. Just enter your email address and you’ll see a list of all the pledges you’ve made.
More options: I did a poll in my Facebook group to ask if people would prefer to see a larger selection of ideas in the list, or if that would be overwhelming. 75% voted that they’d still be happy if there were over 30 choices (double what I had until now), so I’ve increased the number of options on the list. Click through to the Commissions page to see (and maybe pledge towards) the new additions!
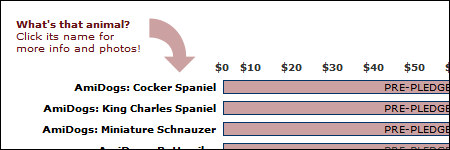
What’s that animal? I’ve also had requests, particularly from non-native English speakers, to include a photo of each animal on the list, to help them decide whether they’d like to pledge towards its design. Sourcing copyright-free images for each animal would be too much work, so, instead, I’ve made the name of each animal on the list into a direct link to its Wikipedia page (which, as yet, has always included at least one photo – I’ll link to a different page if it doesn’t).
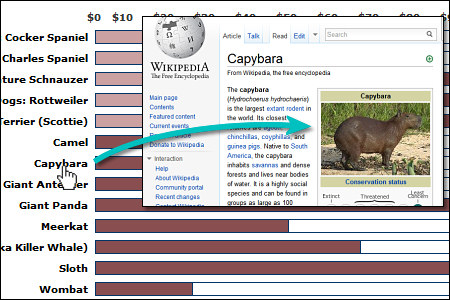
If you’re not quite sure what a Capybara (for example) looks like, just click its name on the pledge chart. The Capybara Wikipedia page will open in a new tab/window and you’ll see its photo and description:
Security Review
I ran into a major problem last week: over the course of a day, I received 3 fake pledges from people pledging huge amounts ($102, $42, $114) and giving fake email addresses. Although I deleted the pledges as soon as I spotted them, knowing it could happen again and again at any time was a big concern. The system doesn’t work if the pledge chart may be wrong and some pledgers turn out to be fake!
After a sleepless night worrying about it, I decided I had to code a verification step to prevent prank bids, so I did that on Friday morning. Now you’ll get a confirmation email with a link you have to click to verify each pledge. The added bonus is that any pledges with misspelt email addresses will also get filtered out now – those are useless to me, as I wouldn’t be able to collect the money without a valid contact email address!
This does mean an extra step whenever you make a pledge, but it makes the system far more secure and reliable, so I think it’s worth it. From now, only confirmed pledges will be shown on the chart or in My Pledges. (Do remember to check your Spam folder if you don’t see the verification emails in your Inbox!)
Summary
With a more reliable system and lots of fun new design options on the list, I think I’m ready for the next 6 months of Commissions! It’s always a risk when you come up with a completely new way of doing things, but, so far at least, it seems to be working well. I usually have to keep quiet about the designs I’m working on (to prevent copycatting before I can publish them), so I’m enjoying being able to share more of my design process with the PlanetJune Ravelry group with these designs that everyone already knows I’m creating.
As always, if you have suggestions to improve this process further, please do let me know – the advantage of doing my own coding is that I can keep tweaking and refining the system with no cost (except my time) and no delays (except my other PlanetJune priorities) – and setting myself little coding challenges makes a refreshing change from my usual design and time-management challenges!
I think the changes I’ve made are making the system stronger and, hopefully, more enticing. Why don’t you take a look and let me know what you think?
September 9, 2012 @ 11:47 am · Filed under Other Crafts
Sometimes an idea is so simple you can’t believe it never occurred to you before – and this is one of them.
I have a system for organising my crochet WIPs (works in progress): each project gets its own zip-lock bag or plastic tub, and the yarn, hook, swatches or prototypes, completed pieces, and any other project bits all stay together until the project is finished. But I have a lot of designs on the go these days, and the WIP bags and boxes were piling up all over my office. Furniture here is expensive, so I couldn’t just run out to buy an inexpensive storage solution as I would have in Canada. Then, inspiration struck!
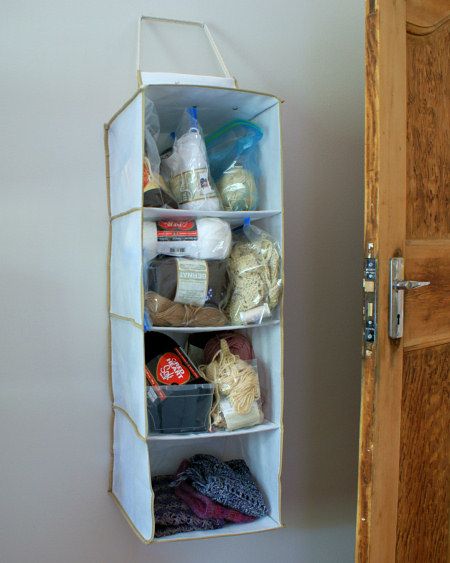
I bought this canvas hanging closet organiser when we first moved to South Africa and our temporary apartment had no storage areas except for the built-in closets. Once we moved into our house and all our clothes arrived, we needed all our hanging space for clothes, so the organiser was forgotten, until today.
A minute with the Dremel and a tiny drill bit, a couple of white screw-in cup hooks and an offcut of rope, and voilà: an instant WIP organiser. I’ve hung it in the wasted space just beyond the door in my office – and there’s actually room to add a 2nd one next to it, if my number of projects expands further…
Each project is still contained in its bag or box, but now I have a place to store them all together for easy access. The bottom shelf is reserved for items waiting to be photographed – I had to remove several amigurumi before snapping this pic, as they aren’t quite ready to show their faces in public yet 😉
It doesn’t look bad, and it cost nothing as I already had everything I needed. Obviously, this wouldn’t be sturdy enough for heavy storage, but a canvas organiser is perfect for yarn projects. I can already tell that I’m going to love being able to see all my WIP designs at a glance and not have to hunt to find the appropriate project bag when I need it!
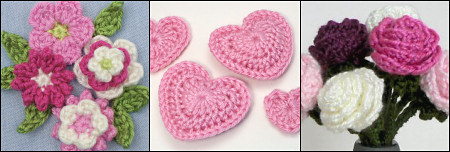
Crocheting little shapes is a great way to make your own custom accessories – brooches and pins, hair decorations, and even jewellery. The best embellishments are tiny pieces (so you can use multiple pieces without looking over the top) – such as my Posy Blossoms, Love Hearts, or Basic Rose (especially in a finer yarn so it comes out smaller and daintier).
These patterns all make beautiful crocheted embellishments
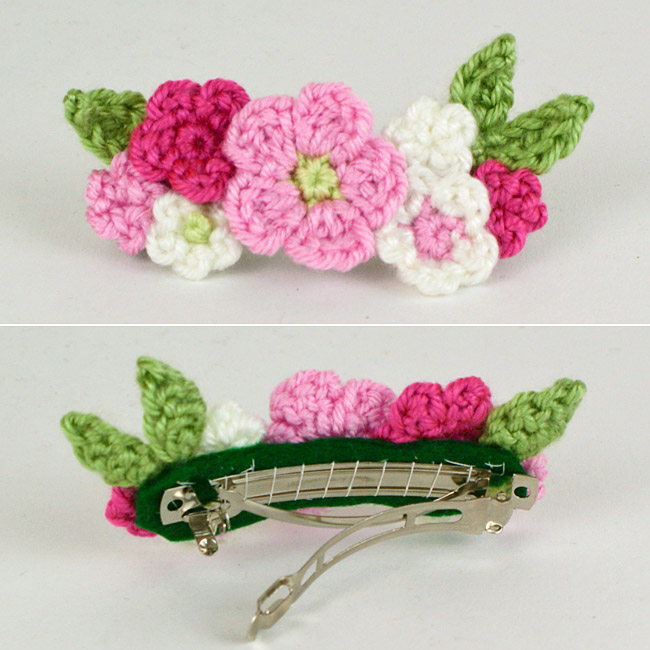
A little prep work is invaluable for attaching embellishments securely, especially if you need to attach them to something hard, like a hair barrette, brooch/pin back, etc, or make an appliqué or brooch from several crocheted pieces. There’s no one ‘right’ answer for how to tackle this, but I’ll cover some options and general tips in this tutorial.
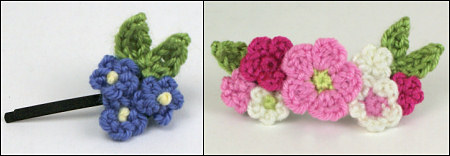
And, because it’s easier to learn by example, I’ll also give you a couple of walk-throughs so you can see exactly how I made these pretty hair accessories – a forget-me-not hair clip and a posy barrette.
As there’s a lot of content here and I think it’d be useful to keep the information for future reference, I’ve also made it into a handy 5-page PDF eBook – yours in return for any-sized donation 🙂
(Keep reading to the end of this post for details of how to get bonus entries in this month’s Review & Win contest!)
This week and next, my husband is away doing important astronomy-related things in Chile, so I’ve decided that, instead of being sad and lonely, I’ll have a 10-day design marathon while he’s away. I’ve been planning a huge new pattern series for months (the theme will be a secret until it’s all ready to launch) and I don’t know how far I’ll get towards completing all the designs, but this alone-time is a perfect opportunity to at least make lots of progress, or maybe even complete the series – we’ll see!
Review and Win contest
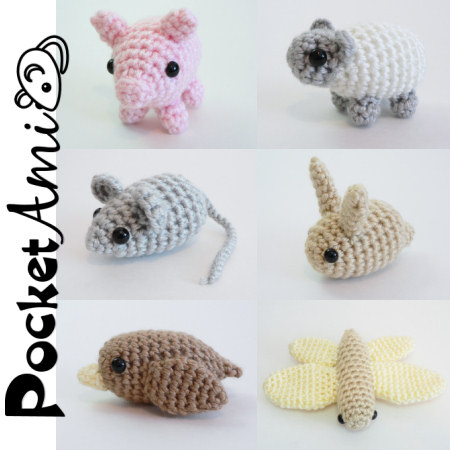
September’s ‘Review and Win’ winner is Carrolyn A, with her review of a PlanetJune classic, the PocketAmi Sets 1 & 2 multipack:
I really enjoyed making these patterns. Since the amis are so small, they can easily use up any scraps. I used the bunny to finish up my variegated brown, and still had some left over.
What I found to be another HUGE plus is that you can use 9mm eyes on these amis, which adds to their cute, chibi look. No need to buy other eyes than the typical ones I use for June’s patterns 🙂
One last thing that makes these amis so great is the tails. They are made by using the ending yarn of the pattern, unlike in patterns I’ve done from other sources that involved making a chain and then attaching it to the ami, trying to figure out how to weave in the ends. No so here, as June’s already figured that out for us 😀
Congrats Carrolyn – I’ll email you to find out which pattern you’d like as your prize 🙂
To be entered into this month’s draw for a free pattern of your choice, just write a review of any product in my shop – thank you!
Bonus Entries!
As my accessories pattern range is less well-known than my amigurumi, in preparation for next month’s Accessories CAL, I’d like to get more people who’ve already made any of my PlanetJune Accessories patterns to review them in my shop. So, throughout September, you’ll get a bonus double entry into the Review & Win contest for every PlanetJune Accessories pattern you review!
August 29, 2012 @ 12:21 pm · Filed under Art, Punchneedle
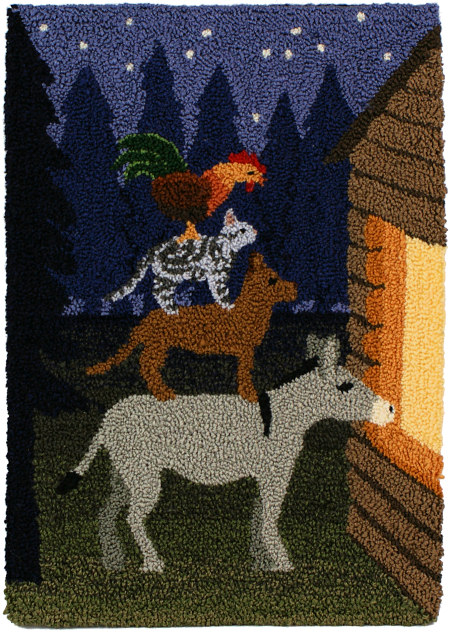
I’ve been waiting for a very long time to be able to show you this piece! I was commissioned to make some punchneedle-embroidered artwork in 2009 for a book about stories told through needlearts. Recent years have created an uncertain climate for traditional print publishing, and (to make a very long story short) the book never made it to print. So, after years of waiting, I’m finally free to show you what I made…
I chose the folk tale of the Musicians of Bremen for my design for several reasons: the story spoke to me; it’s not an obvious choice of story, so it hasn’t been overused or Disneyfied; it features animals; and there’s the iconic image of the animals standing on each others’ backs that I thought would translate well into my artwork.
If you’re not familiar with the story, the four abandoned animals find each other as they each set out alone to seek their fortune as musicians in Bremen, but ultimately they discovered all they needed to be happy when they found a home and the companionship of their friends. I like this moral of simple comfort and happiness.
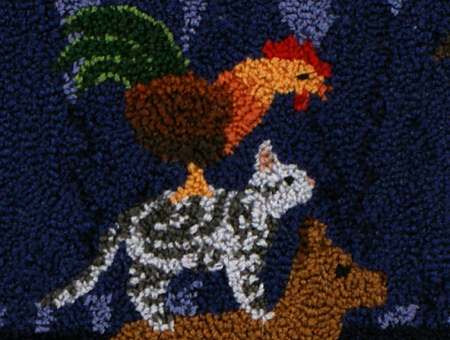
Fine detail in the cockerel and silver mackerel tabby markings.
I designed my piece to be set in the forest at night, showing the animals looking through the window of the cottage that would ultimately become their home. The visual impact comes from the color of the animals and the warmth of the lighted cottage window against the cool, dark background of the forest. I used a palette of 29 shades of embroidery floss in this piece, including a colour-blending technique to add depth to the forest floor.
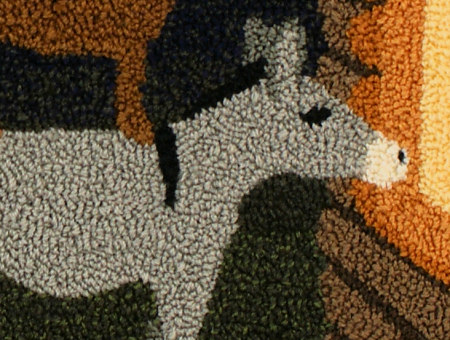
Awww, donkey! Plus some of the colour-blended background.
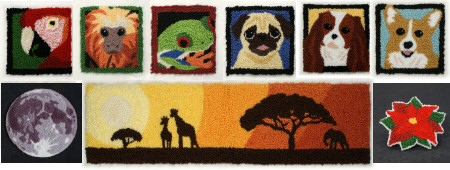
It took a couple of months to complete the embroidery. The finished piece measures 7 3/4 x 5 1/2 inches (19.7 x 14.0 cm) and is stretched over felt-covered board so it doesn’t need a frame and can be propped on a mantelpiece or hung on a wall. The Musicians of Bremen is my second-largest punchneedle project after my globe (pictured below, with my crocheted orangutan):
I haven’t had time to make any new punchneedle projects since the globe, but looking at my Musicians of Bremen piece makes me hope I can find some time to start punching again – it makes for such colourful, textural, satisfying projects!
If this post has you intrigued about punchneedle embroidery, please see my Punchneedle FAQ for more info, a tutorial, lots of patterns, and my ebook, The Punchneedle Handbook.
The humble single crochet stitch may be the simplest of crochet stitches, but it’s still open to interpretation, as it can be worked the standard way (into both loops of the stitch below) or modified by working into only the front or back loop of the stitch below. Today I’m going to delve into the differences you’ll see from working into front loops, back loops, or both loops, starting with a video tutorial in case you’re not clear about which loops are which.
Keep reading beyond the video and we’ll take a thorough look at the differences through one of my scientifically-approached crochet investigations into the results of using each of the different loops 🙂
Loops Matter!
In amigurumi, there are specific reasons for using back loops or front loops at certain places in a pattern: turning a sharp corner in either direction; using the unworked loops as attachment points to crochet back into later; using novelty yarns where the stitches will be hidden by the fuzzy yarn; or for visual or textural effect, especially in a colourwork piece.
If you’re following a crochet pattern, it’s important to work each stitch as the designer intended if you want to achieve a good result. Working into different loops not only gives your stitches a different appearance, but also changes the overall shape of the piece.
The same crochet pattern, worked in different loops, looks totally different!
I’m not convinced that people really grasp the impact of these differences, as I’ve seen many people working my patterns in back loops only and ending up with a very thin, extra-tall amigurumi as a result, without knowing why. Or working one of my fuzzy patterns (designed to be worked in back loops only) in both loops, resulting in a very squashed, short looking amigurumi. Let’s demystify this once and for all, so you can make the best amigurumi possible!
Note: The videos may look a little small embedded in the blog: if so, you can fullscreen them or click through to YouTube to watch them full-sized 🙂
A Loopy Investigation
Let’s look at this scientifically, so we can really appreciate the differences in the crocheted fabrics. For our comparison, I’ve crocheted the same sample piece three times, once in the standard both loops, once in front loops (FL) only, and once in back loops (BL) only.
To keep things fair, I kept everything else constant for each sample:
The same hook (E/3.5mm) and yarn (worsted weight, Caron Simply Soft)
The same style of crocheting (single crochet in a continuous spiral without joining or turning)
The same crochet pattern (i.e. the same number of stitches and rounds, with increases and decreases in the same places)
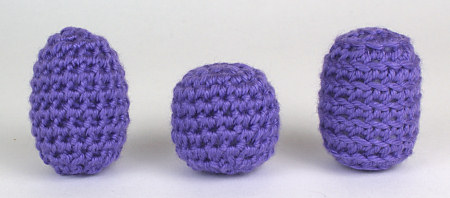
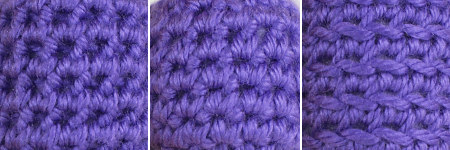
Here are the basic fabrics created by working in the round without turning [Note: I turned each of them inside out briefly to take the back (inside) photos, so you’ll know what to expect if you’re accidentally crocheting with the wrong side facing out]:
And now we’ll do a comparison of the three.
Stitch Shape
The overall shapes of the samples will clearly show any difference in the shape of the stitches: a wider sample means wider stitches, and a taller sample means taller stitches, as each sample is formed from the same number and position of stitches.
Unstuffed: We’ll compare the straight sides of each sample, where the stitches are all single crochet, with no increases or decreases.
L-R: front loops only, both loops, back loops only
As you can see, all the pieces have a comparable width. The FL piece is very slightly shorter than the regular piece, but looks quite similar, but the BL piece is considerably taller and looks completely different from the outside.
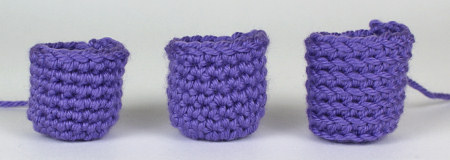
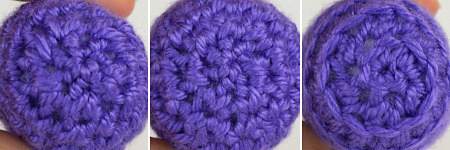
Stuffed: Now look what happens when you stuff the pieces. [Note: to keep things fair, I didn’t cram in as much stuffing as I possibly could; I used the same level of stuffing in each sample: enough to hold its shape, but still be squashy to the touch.]
L-R: front loops only, both loops, back loops only
What you may not have expected is that, with stuffing, the FL sample stretches out so it no longer looks similar to the standard piece – it stretches to be the same height as the BL sample! Now just imagine that you’re following one of my patterns and these samples are supposed to be the round head or body of an animal – you can see why working in either FL or BL only is going to give you a completely different, stretched-looking animal…
Base Fabric Characteristics
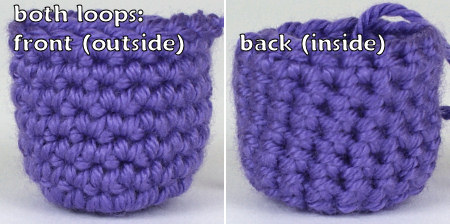
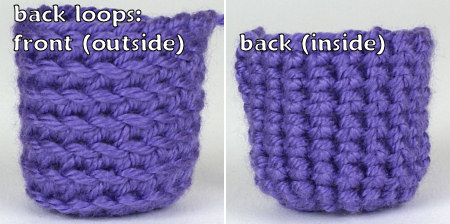
Let’s compare the fabrics formed where the stitches are worked 1 to 1, with no increases or decreases:
L-R: front loops only, both loops, back loops only
Crocheting into one loop only instead of both changes the characteristics of the fabric formed: it makes it less rigid, more fluid and flowing, and either more stretchy (FL only in my samples) or thinner and more open (BL only in my samples). Many crocheted garment patterns utilise these properties to great effect – when you’re making clothing, a more flexible fabric that can drape on your body is far more flattering than a stiff, thick boxy fabric.
But the opposite is true for amigurumi: here we are aiming for a solid stiff fabric that holds its shape with as few gaps as possible. Crocheting into both loops gives us this fabric: it has very little stretch, and the fabric is thick and firm, so it holds together when it’s stretched by the stuffing.
As the stitches are held further apart by working into either single loop, there is naturally a larger gap at the base of each stitch. (You don’t see it in the FL sample until you stuff it, because the FL fabric is stretchy but relaxed and only stretches when the stuffing is inserted.) The unworked loops help to partially obscure the resulting gap by covering the top inside edge of the FL sample, and the bottom outside edge of the BL sample, but the remaining hole (the area below each stitch where you can see right through to the stuffing) is still larger in either case than with the standard sample. You’d expect this, because working into both loops keeps the stitches pulled together, so those large holes never form.
Increasing and Decreasing
At the points where you increase and decrease, you’re either forcing 2 stitches into 1 gap, or pulling 2 stitches together to form 1. Both these cases lead to larger holes in the surrounding fabric than with normal stitches, so it’s important for us to examine both ends of the stuffed samples, to compare the end with the increases and the end with the decreases for each sample.
Decreases: I should mention that, for my standard sample, I used the invisible decrease (invdec), one of the most essential techniques for amigurumi as it practically eliminates the holes or bumps from decreasing. As this technique can only be used with standard single crochet, I couldn’t apply it to the other samples, so I was already expecting an inferior result.
L-R: front loops only, both loops, back loops only
As I suspected, neither of the single loop samples could compare with the invdec. The BL only sample in particular has very large gaps where the stuffing is clearly visible, but neither FL or BL gives what I’d consider to be a satisfactory result.
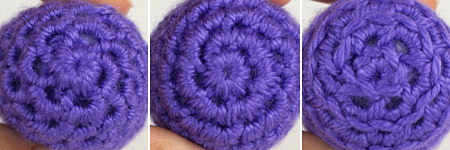
Increases: Although I do have an invisible increase (invinc) technique, I don’t regard it as an essential (as the standard increase isn’t terribly gappy to begin with), so I didn’t use it for my sample, to give a fairer test. It should be noted, though, that invinc could be used to further improve the increase results (of the standard sample only).
L-R: front loops only, both loops, back loops only
Again, neither of the single loop samples had small enough gaps to keep the stuffing hidden. The FL only increase stitches are very pretty – it looks like a flower! -and the loops on the inside do mostly hide the stuffing, but not in every stitch, so the end result is a bit uneven. The unworked loops of the BL only sample are so far below the increases above that they do nothing to hide the holes, which are very large.
If you look at my samples, you can see that the more open fabric formed by FL or BL only leaves much larger gaps with both increases and decreases. The unworked loops still help to fill the holes slightly, but only cover 1/3 or less of the hole, so the remaining gap is still much larger than in the standard sample, and there’s no technique comparable to the invdec or invinc that could be used to reduce those holes without distorting the surrounding fabric.
Summary
A firm fabric with minimal holes is the ideal for amigurumi. You can’t use my invdec/invinc techniques unless you work in standard single crochet; the thinner, stretchier fabric made from working into one loop only naturally has larger gaps and couldn’t hold the kind of shaping you see in my designs; and any shaping stitches would look gappy due to the larger holes seen when you increase and decrease.
For non-amigurumi crochet projects such as garments or accessories, you can use the special properties of BL or FL only crochet to their advantage. But, for the reasons I demonstrate above, I recommend that you always work in both loops for amigurumi or any other stuffed crocheted work, unless you have a specific reason to do otherwise.
Final thoughts:
If you’re following a crochet pattern, remember that sc and sc in BL/FL only are never interchangeable!
If you’re creating your own design, use the most appropriate stitches for your design to give you the best results.
If you’re writing a crochet pattern, be sure to specify anywhere that you use non-standard stitches (i.e not worked into both loops).
Loved this tutorial? I have so many more amigurumi tips and tricks to share with you!
Boost your amigurumi skills with my latest book, The Essential Guide to Amigurumi, your comprehensive guide to amigurumi techniques and tips.
Do you find my tutorials helpful? If so, please consider making a contribution towards my time so I can continue to create clear and concise tutorials for you:
Thank you so much for your support! Now click below for loads more crochet video and photo tutorials (and do let me know what else you’d like me to cover in future tutorials…)