Click for larger picture
In case you’ve never heard of needlefelting before, here’s the basic premise (ignore the rest of this paragraph if you already know all about it). By stabbing unspun wool repeatedly with a barbed needle, the wool fibres get tangled together and the wool begins to form a denser, more coherent piece. The more you stab, the firmer the piece becomes. By building up layers of wool in different colours and in different areas, it is possible to form complex sculptures with fine detail. That’s the theory, anyway!
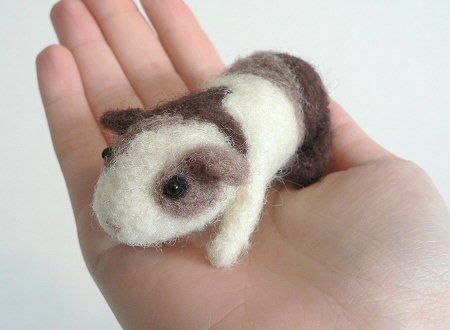
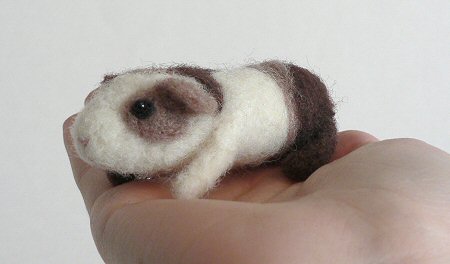
There are some amazing examples of finished work in the Needle Felting Flickr group pool. I think I first heard of needlefelting over a year ago through articles in CRAFT magazine, but I’ve never tried it until now. I had my first attempt this weekend, using the supplies I got from the show last weekend. I couldn’t decide whether to start with something simple to learn the techniques, or to jump straight in and try to make something I actually wanted to make. In the end, I decided I didn’t want to ‘waste’ my wool on a test piece, so I dug out my photographs of Cinnamon (the best guinea pig ever) and started work.
I really liked needlefelting – I found it to be like a combination of my crocheted animals (texturally) and polymer clay sculpting (you can build up areas by adding more wool, in the same way as you can with a clay sculpture). It takes a lot of stabbing to get the wool to felt together firmly , but I discovered that, by compressing the wool first as much as possible, the wool begins to hold together after only a few stabs. I also discovered (after a few hours of make-it-up-as-I-go-along experimentation) that there are some very helpful videos on YouTube that show the process – I recommend watching a few if you plan to start needlefelting for the first time!
Now back to my guinea pig sculpture. It took a long time and a lot more wool than I expected. I tried to make the markings as accurate as possible, so I started with the white wool at the head and worked my way back, adding darker sections where they were needed. With hindsight, I think it would have been a lot easier to make and shape an all-white guinea pig body and then add thin patches of darker wool over the top to create the markings – I’ll know for next time!
I needlefelted in tiny black wool patches for the eyes, and then sewed round black onyx beads over the top to give them that realistic glint. I also used two strands of embroidery floss to stitch on a tiny nose and mouth. Apart from that, the whole mini-pig is solid wool.

I’m very pleased with this as my first piece, and I have enough wool left to make a few more little sculptures. It’s very satisfying when the piece comes together, and if the shape isn’t quite right, you can just add a litle more wool over the top to reshape it.
Another craft conquered! Well, the basics of it, at least. What shall I try next…? Any recommendations? Please leave them in the comments!