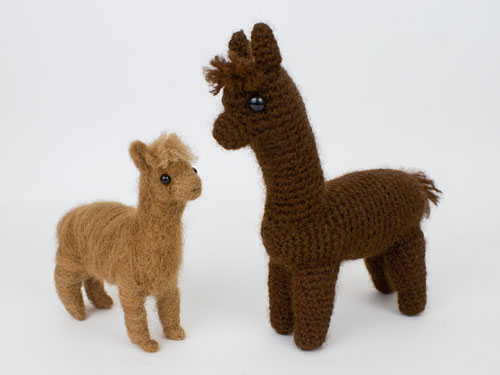
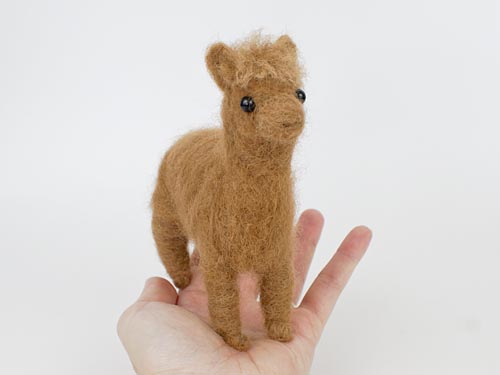
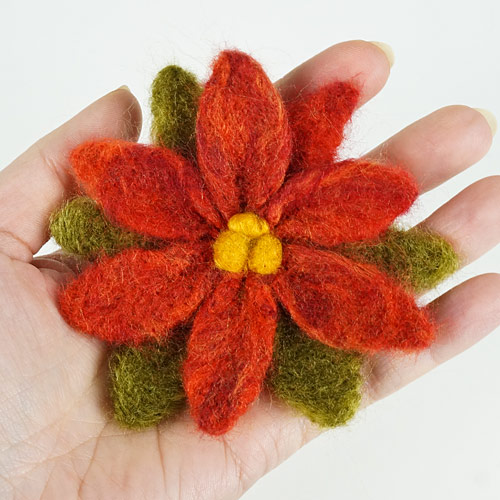
PlanetJune Craft Blog

Latest news and updates from June

Archive for Other Crafts

greenhouse photo workshop

Yesterday, I took the opportunity to learn more about photography and plants at a photowalk workshop hosted by Colour Paradise Greenhouses and taught by local photographer Abbi Longmire. It was a great pairing – Abbi encouraged us to experiment with our cameras, and the greenhouse offered beautiful and varied subjects to photograph (and maybe some ideas for future PlanetJune plant designs…)

I used the manual (M) setting on my camera for the first time ever(!) and, after a shaky start, ended up with some half-decent shots. I thought I’d share my favourites with you – bear in mind that composition etc is not my strong suit and I’m very much a beginner at this type of photography!

(These are unprocessed, out-of-the-camera shots – all I did was resize them to blog size.)

Greenhouse Photowalk photo by June Gilbank

Greenhouse Photowalk photo by June Gilbank

Greenhouse Photowalk photo by June Gilbank

Greenhouse Photowalk photo by June Gilbank

Greenhouse Photowalk photo by June Gilbank

Greenhouse Photowalk photo by June Gilbank

Not too bad, are they? 🙂

Thanks to Abbi and Colour Paradise for the inspirational afternoon! I hope I’ll be able to bring what I learnt into my nature photography, and maybe even my pattern photos…

Comments (8)

announcing my Mum’s book!

For the past year or so, I’ve been working on a collaboration with my mum, Lilian Linden, who is an acclaimed Scottish music pianist and the founder of the Invercauld Scottish Dance band.

For three decades, Mum has been composing original music ranging from lively jigs and reels to traditional strathspeys and lyrical slow airs, and now we’ve collected them all for the first time in her own music book, The Lilian Linden Collection of Scottish Music!

Lilian and June with The Lilian Linden Collection of Scottish Music

From learning how to use professional quality music notation software to create the sheet music (mostly Mum’s side of the collaboration), through designing, editing, laying out and publishing the book (mostly my contribution), via endless international Skype calls to progress the project, publishing this book has been a new challenge for both of us, but we’re delighted with the result.

The Lilian Linden Collection of Scottish Music - sheet music sample
Doesn’t it look good?

When I visited my parents last week, Mum and I had a final check of the proof copy to make sure it was 100% perfect, and now it’s up on amazon and available to purchase worldwide!

Amazon links: US, UK, CA, DE – and you can also find it on all the other Amazon international sites by searching for “Lilian Linden”. 🙂

If you know anyone who enjoys playing Scottish or Celtic music or who plays for Scottish dancing or ceilidhs, please let them know about this book. It includes 33 original tunes with chords, and is intended to be played primarily on piano, accordion and/or fiddle.

The Lilian Linden Collection of Scottish Music - cover

I’m so proud of Mum for all the work she’s put into this project and for finally getting all her original music published in print form. Please leave my mum (Lilian) a comment to congratulate her on this huge achievement!

Comments (14)

book review: Making Pipe Cleaner Pets

As always, I was not compensated for this review, and the following is based on my honest opinions!

Overview

Making Pipe Cleaner Pets by Takashi Morito was originally published in Japanese, and has now been translated into English.

book review: Making Pipe Cleaner Pets

I’ve previously reviewed another translated-from-Japanese craft book (Crafting with Cat Hair) and, like that book, this is another book of adorable crafts you’d probably never think of making until you see the book!

book review: Making Pipe Cleaner Pets

Throughout, this book has a very Japanese aesthetic. On the photo pages, the dogs are posed in cute tableaus with a variety of unrelated props – books, craft supplies, crackers – and a haiku-esque poem to introduce each dog, for example:

The morning air feels good
Now, we’ll all play ball
And bathe in the morning sun

The overall effect is charming in that bizarre Japanese craft book kind of way.

(I should mention that ‘Making Pipe Cleaner Pets‘ is a bit of a misnomer if you’re looking for a variety of pets – this is a book of dogs. It has designs for 23 different dog breeds, plus puppy-sized miniature versions of several of the breeds.)

book review: Making Pipe Cleaner Pets
A few more of the included dog breeds.

After the cute photo gallery of all the dogs, we get to the tutorials for how to make them. The first three dogs (Toy Poodle, Pug, Boston Terrier) have detailed step-by-step instructions, including both a diagram of each step and a photo of the result.

book review: Making Pipe Cleaner Pets

Those three designs teach you the basic techniques you’ll need to make all the dogs. The other 20 dog breeds have text and diagrams only, but the basic idea is the same for all the dogs, so you’ll rarely need to look back once you’ve tackled a couple of the easier dogs.

book review: Making Pipe Cleaner Pets

My Experience

I found the perfect pack of pipe cleaner colours (two browns, grey, white and black) and got started! I planned to make 2 or 3 dogs, to give myself a chance to get the hang of the technique.

First up, I tried the Toy Poodle, the first and apparently easiest dog in the book:

book review: Making Pipe Cleaner Pets

My completed effort definitely looked like a dog, but nothing like a poodle! The legs were too short, so I decided to embrace that: I shortened them further by folding over the ends, and reshaped the face a bit (by squashing it around), and now it’s a dachshund puppy. 🙂

For my next attempt, I thought I’d try the actual Dachshund model:

book review: Making Pipe Cleaner Pets

I felt like the proportions in the instructions weren’t quite right, so I lengthened the body and shortened the legs as I made my initial bends in the pipe cleaner, and I think it looks pretty good!

Okay, I’m getting the hang of this now; time to step it up a notch with a multi-colored dog. I tried the Jack Russell Terrier:

book review: Making Pipe Cleaner Pets

I like the result – the head colours are good – but I somehow made it all a bit skinny (my fault, not the book’s). I think mine has a bit of greyhound in him 😉

And then the Pug:

book review: Making Pipe Cleaner Pets

I learnt from my mistakes and used the basic method from the book, but tweaked all the proportions to be more suited to how I think a pug should look. I ended up with lots of the dark brown showing on the back of the head, so I wove a bit more of the light-coloured pipe cleaner over to hide that. What a cute pug face!

After making a few dogs, you get a feel for what you’re doing, as the basic concept is very similar for all the dogs. I decided to make some modifications for my last two dogs…

book review: Making Pipe Cleaner Pets

The Miniature Schnauzer model seemed like a bit of a cheat to me – the white beard and eyebrows were formed separately and glued into place! Instead, I used what I’d learned from the Pug and built the beard into the face.

book review: Making Pipe Cleaner Pets

And finally, the Corgi. I used the book for the face colours, but built the body myself, plumping it up and omitting the tail completely.

The advantage of this book is that, as all the dogs are constructed along the same principles, once you’ve made a few, you should be able to get a bit more creative and extend the same principles to different animals. I thought I’d test my theory by trying – what else – a grey cat!

book review: Making Pipe Cleaner Pets

I basically made another dog, but tweaked all the proportions as I went (shorter muzzle and ears, wider face, longer neck, etc) to make it more feline. The great thing about pipe cleaner models is they are completely poseable, so it’s easy to adjust the leg positions, add a curve to the back, or reposition the tail, if you decide it doesn’t look quite right.

The book suggests some finishing touches – glued-on plastic eyes and noses, trimming some of the pipe cleaner fuzz to make e.g. pointier ears, and an occasional glued-on mouth or tongue. Even my smallest (4.5mm) animal eyes are too large for my dogs, so I decided to keep my dogs (and cat) as pure pipe cleaners. I’m sure they’d look even cuter with faces, but I like them as they are, and I like that there aren’t any glued-on parts this way – they are simply twisted pipe cleaners and nothing more.

Top Tips

  • The first stumbling block is that all the designs in this book use 1m (40 inch) long pipe cleaners, which may be common in Japan, but I’ve never seen in all my years and countries of craft shopping! The book instructs that you can instead twist multiple regular-length pipe cleaners together to make a long one, but I’d recommend you use one at a time, and twist on a new one as you reach the end of the old one – it’s a lot more manageable that way. I used 3 or 4 pipe cleaners for the main colour of each dog (and 1 or 2 of any secondary colour).
  • All the dogs’ muzzles are made by coiling the pipe cleaner and then feeding the remaining end through the middle of the coil. I found this to be impossibly difficult to do neatly, until I coiled the pipe cleaner around a narrow tube (I used a small knitting needle), which gave perfectly round coils, and a nice space in the middle for feeding the end through.

Verdict

I found the concept of pipe cleaner dog models to be fun, but it was more challenging than I’d expected. Although it looks like a kid’s craft, I definitely wouldn’t recommend it for young children – it’s not easy to make a dog that looks like the photos! Teens with good dexterity and patience may enjoy making dogs, and it’s great for crafty adults like me.

The dogs are very cute and fun to pose, but there’s a bit of a learning curve, and every dog will end up with its own personality, no matter how closely you follow the directions. But that variation is part of the enjoyment of making things by hand: I feel it adds to the charm – just like a litter of real puppies, you never know exactly how each one will look until you see it!

If you persevere through a couple of practice runs, you’ll be able to make cute pipe cleaner pups too, and, once you’ve made a few dogs, you’ll see how the general idea works, and be able to try designing your own animals, if you want.

book review: Making Pipe Cleaner Pets

If you’re looking for an unusual craft to try, I can recommend Making Pipe Cleaner Pets as a fun diversion, and a great introduction to sculpting pipe cleaner animals!

Comments (13)

book review: Mandalas to Embroider

Let’s get this out of the way first: I received a copy of this book to review. But I’m not being compensated for this review in any other way, and the following is based on my honest opinions!

Carina and I have been friends since we first met (online) in our early days of craft blogging, over a decade ago! She’s well-known for her distinctive cheerful and colourful embroidery designs and has authored 3 books as well as a shopful of self-published designs (you can find them all at Polka & Bloom).

Ever since Carina mentioned that she was designing a book of mandalas, I’ve been waiting to see what she came up with, and I wasn’t disappointed! Embroidery, like other slow crafts, can be a calm relaxing hobby, and combining that with repeating mandala patterns sounds like a perfect recipe for slowing down and enjoying some crafting time.

Read on for my review, and to see the gorgeous embroidery I’ve made from one of the book patterns…

Overview

Mandalas to Embroider by Carina Envoldsen-Harris

Mandalas to Embroider: Kaleidoscope Stitching in a Hoop by Carina Envoldsen-Harris is a book of circular embroidery patterns. As Carina says in her introduction:

Mandala is the Sanskrit word for ‘circle’. These days, it is often used as a generic term for a particular motif, especially in arts and crafts, usually with a concentric design or one which radiates from the centre.

Mandalas to Embroider includes 12 large and 12 small delicate repeating patterns. Nature-based, geometric, or more abstract, the designs are all bold, happy, and – of course! – colourful. The circular nature of the patterns means they fit perfectly in an embroidery hoop, making the finished pieces easy to display.

Mandalas to Embroider by Carina Envoldsen-Harris
Such pretty and colourful designs!

The book is split into two halves: the first half includes clearly-illustrated stitch tutorials, instructions for preparing and finishing your work, and all the patterns, with colour palettes and stitching suggestions.

The pages of the second half are actually iron-on transfers for each of the patterns. Each page is perforated so it can be removed neatly, and there’s a handy pocket inside the back cover to store any transfers you’ve already used. I thought this was a really nice touch, as each transfer can be used up to ten times, so you’ll be able to keep the transfer pages together with the book, so they’re ready for the next time you want to use them.

Mandalas to Embroider by Carina Envoldsen-Harris
Left: stitch tutorials; Right: iron-on transfer

This book is beautifully styled and photographed, and I couldn’t stop paging through again and again to admire the variety of mandala-inspired patterns.

Mandalas to Embroider by Carina Envoldsen-Harris
A couple of the lovely photos

My Experience

Although Mandalas to Embroider includes 12 mini designs, I decided to jump right into one of the 12 full-sized designs. Sakura Clusters was an obvious choice for me, as I love cherry blossoms (I even designed a cherry blossom garland for my first book, Paper Chains and Garlands!) and this design was the first that really caught my eye as I flipped through the book:

Mandalas to Embroider by Carina Envoldsen-Harris

I decided to see how the design would look in a colour scheme inspired by real-life cherry blossom instead of Carina’s cheerful bright palette. That’s one of the advantages of embroidery (or crochet!) patterns – it’s so easy to make them your own by simply changing the colours. I shopped for floss colours using the pinks, reds and blue from this beautiful reference photo:

photo of cherry blossoms
I was unable to find anyone to credit this stunning photo to – if you’re the photographer, let me know!

I raided my fabric stash and the only off-white fabric I could find looked a bit thin, so I used two layers to stop the threads on the back of the piece from showing through on the front. (I wasn’t sure if that was going to work, but my stitches didn’t show through the fabric, so I suppose it did!)

sakura mandala emboidery

I wanted to make my embroidery a little smaller than the original, so I copied and reduced the pattern page, then traced the design onto my fabric with a pencil. If you use the iron-on transfers, you can skip all that and be ready to start embroidering right away!

I must admit to being a little nervous about starting stitching; although I’ve been cross-stitching for decades, and of course enjoy my punchneedle embroidery, I haven’t actually done any regular embroidery since I learnt the basic stitches in primary school.

sakura mandala emboidery

I needn’t have worried – the patterns in this book all use fairly simple stitches, which are clearly explained at the start of the book. Although I started slowly, I quickly picked up speed. By the end of the project, I felt very confident with the stitches used in this pattern, and I’m ready to learn some of the other stitches for my next embroidery project!

Look, even the back of the embroidery is quite pretty…

sakura mandala emboidery

And now for the big reveal:

sakura mandala emboidery

Isn’t it lovely? In my colour palette, the pattern takes on a more serene look, but Carina’s pretty design still shines through. I’m thrilled with my embroidery, and I’ll be very happy to display this finished piece on the wall of my craft room.

Final Thoughts

Carina’s designs always have a hand-drawn quality to them, and I was impressed to see that she’s managed to maintain that even with the repeating patterns in Mandalas to Embroider. There’s still a free, natural quality to the designs. I noticed while I was stitching the flowers that the petals of each flower aren’t perfectly identical. This is a good thing – the relaxed nature of the design felt like permission to be relaxed in the execution – there’s no need to make every stitch exactly even and perfect to get a beautiful result.

Mandalas to Embroider by Carina Envoldsen-Harris

If you’ve never tried embroidery, I’d definitely encourage you to give it a try – I found it very relaxing and satisfying to watch the design come together. And I think Mandalas to Embroider is a perfect introduction to embroidery, as you can build your confidence by practicing your stitching on the smaller patterns, or do as I did and jump right into a large one!

Comments (2)

sculpting in crochet and other media

While taking a photo of my original crocheted alpaca Alpaca together with my new felted alpaca Alpaca, it occurred to me that I’ve also made several other ‘pairs’ of crochet/non-crochet sculptures over the years!

Here’s my gallery of pairs – can you see the similarities between each pair?
(The names are links to my patterns, in case you’d like to make the crocheted version!)

Crocheted and needlefelted Alpacas (2008 and 2017):

needlefelted alpaca and amigurumi Alpaca crochet pattern, by PlanetJune

…crocheted and needlefelted Guinea Pigs (2007 and 2009):

needlefelted guinea pig and amigurumi Guinea Pig crochet pattern, by PlanetJune

…crocheted and hand-sewn Aardvarks (2011 and 2013):

hand-sewn aardvark and amigurumi Aardvark crochet pattern, by PlanetJune

…crocheted and polymer clay Strawberry Poison Dart Frogs (2010 and 2010):

polymer clay frog, and amigurumi Poison Dart Frog crochet pattern, by PlanetJune

…and crocheted and polymer clay Succulents (2012 and 2011):

polymer clay succulents, and Succulent crochet pattern, by PlanetJune

I think it’s strange and lovely to see the way my PlanetJune style seems to come through, no matter what medium I work in! I really enjoy sculpting, in any medium. Although the process of crocheting is very different from building up clay, fiber, etc, the placement of stitches to form a 3D shape gives amigurumi the added bonus that the finished pieces are more easily replicable than with other crafts.

I’m so glad that crochet lends itself to patterns – it’d be much more difficult to explain how to sculpt an animal or plant from clay or fibre without being able to quantify the instructions with specific stitches in specific places. If I hadn’t found amigurumi, I’d still be making nature-inspired sculptures, but I don’t think I’d be able to make my living from them!

I work far too slowly to be an ‘artist’ and sell my finished pieces, but I feel like my patterns are a way to share my designs in a way that I couldn’t easily do if I switched to a different medium, and I love that my patterns give me a way to help other people to craft their own soft sculptures too! ♥

Comments (3)

needlefelted alpaca

A long weekend makes the perfect opportunity to start a new craft project. I’ve been dying to do something with the alpaca fleece I bought from my Alpaca Loom trip a couple of weeks ago, and I thought a suitable first project would be to try needlefelting an alpaca (fibre) Alpaca (animal) – and I’m so happy with how it turned out!

needlefelted alpaca by planetjune

I’ve needlefelted only once before, and reading my previous blog post, I see that was almost exactly 9 years ago(!), so I think that qualifies me as an absolute beginner again…

If you’d like to try needlefelting (particularly to make animals), I recommend the video tutorials at Sarafina Fiber Art. After watching a few hours of those, I felt ready to jump in and just learn by doing. My fleece was a lot shorter than the roving Sara uses, so my learning curve was a bit steeper than I was expecting, but I got there in the end. And, after maybe 5 hours of very slow but enjoyable progress, here’s what I ended up with:

needlefelted alpaca by planetjune

I started with a pipe cleaner armature for stability and used animal eyes (without the backs), but everything else is pure alpaca fleece. I tried to loosely attach a top layer to make it look more fuzzy, and added a little fluffy topknot as a finishing touch.

needlefelted alpaca by planetjune

I’m very much still a beginner, but it’s so satisfying to see the animal slowly start to take shape, and there’s something extra-special about knowing you’re making an animal sculpture from that animal’s own fibre.

I only used a tiny fraction of my fleece, and I can already see I’m going to making more needlefelted animals, when I have time. (I also have some acrylic needlefelting fibre – thanks Alison! – that I’ve been scared to waste, so I’m looking forward to trying some more colourful animal sculptures once I’ve built a bit more confidence with the basic shaping techniques.)

It’s very freeing to make things in a different way from my usual crochet, where I can build up layers if it’s not quite right, and not have to worry about how to explain what I did to anyone. It’s good to have a new hobby 🙂

Have you ever tried needlefelting? Isn’t it fun?

Comments (7)

classic Tetris in cross stitch

tetris cross stitch embroideries

I like to have a relaxing craft project to work on over the holidays, to give me a complete break from work and designing. In December 2011, I’d hoped to do some knitting, but you have to learn to keep plans flexible when you live in Africa: the knitting needles I ordered from my local shop in November didn’t arrive until the following March(!), so I had to change my plans. Instead, I returned to one of my oldest crafty pleasures: cross stitch.

Long before I taught myself to crochet, my crafts of choice were polymer clay, candlemaking, and counted cross-stitch. I used to buy cross stitch kits, and then, later, bought software that let me design my own charts. Now I know my way around Illustrator, I can design my own charts, from scratch – much more satisfying 🙂

I like the idea of 8-bit art – basing a design on pixelated video game graphics makes it so easy to replicate the original – but I wanted to give it my own twist. So, I came up with a Tetris design to stitch in 4 shades of green to mimic the original classic 2-bit black and white (actually light green and dark green – or ‘pea soup’ colours according to Wikipedia!) Game Boy version.

And here’s the result: 10,000 perfect little stitches of geeky relaxation.

tetris cross stitch embroidery

To give this design a very small amount of meaning, the falling block has a little built-in life metaphor: do you take the easy road by dropping the block straight down and completing two lines, or do you hold out for the big rewards by shifting it one space to the left first, and hoping a straight piece comes along soon so you can complete a tetris? (I’d hold out for the tetris every time!)

The original Game Boy Tetris is still the best version of the game (although I may be biased – it was my only game for months, until I could afford to buy Super Mario Land too – and I’ve probably logged hundreds of hours of gameplay on it). I have a Tetris game for my DS, but it doesn’t hold a candle to the classic music and Russian dancing men from the original.

I considered making a companion piece showing the full band and all the dancing men, but that would need the full height of the Game Boy screen (144 pixels) – almost half as many stitches again as the first piece! I decided that’d be too much work, but, when the holidays next rolled around, guess what I started designing..?

tetris cross stitch embroidery
Can you hear the music?

I’d figured out how to draw symbol-coded cross-stitch charts in Illustrator and charted each piece fully before I started to work on it:

tetris cross stitch chart (partial) by June Gilbank

Doesn’t my chart look great? I’d hoped to eventually release both patterns as Donationware, but the issues of trademark infringement and unlicensed patterns made that idea too difficult to pursue further, so I guess my charts will never see the light of day. But at least I know how to create perfect professional-quality cross stitch charts now – you never know when that’ll come in handy!

This turned into a really long-term project. During my second Christmas of working on the second piece, I posted this wip photo (rotated so as not to give the game away):

tetris cross stitch work in progress

I was still working on it last Christmas, and it’s taken until now to complete, wash, press and mount both pieces.

tetris cross stitch - back
The back of the second piece – I love how the back of cross stitch embroideries look almost as good as the front, and have their own patterns that you don’t see from the front.

And finally, 4 years of holiday crafting and 24,800 stitches after I embarked on this project, they’re ready to hang in my office/studio! It took a lot of patience to reach this point, but I think it was worth it:

tetris cross stitch embroideries

They’re a perfect fit for the narrow wall space to the right of the window. The only question left is which should hang above the other: like this…

tetris cross stitch embroideries

…or like this…

tetris cross stitch embroideries

I really can’t decide! Which do you prefer?

Either way, I love them. And now I’ll get to see my Tetris wall hangings every day, and have a moment of happy nostalgia every time I look at them. 🙂

Comments (9)

block printing workshop

block printing workshop

On Saturday, I attended a block printing workshop, taught by Jesse Breytenbach, a Cape Town-based illustrator and printmaker. Jesse has a Masters in printmaking and many years’ experience of relief printing, producing beautiful textiles like these:

block prints by Jesse Breytenbach

The last time I tried printmaking was ‘carving’ into styrofoam with a pencil in primary school(!), but I love learning and I love making things, so I couldn’t pass up the chance to learn a new skill from a world expert in this craft.

I loved that this workshop wasn’t a class to make a specific project, but a way to learn the skills and techniques which we can then apply to any projects in future. Jesse just told us to draw simple shapes and then start to carve them….

block printing workshop

We used plastic easycut lino and learnt how to use a selection of carving tools to turn our drawn shapes (above) into a block ready to print from (below).

block printing workshop

Jesse (below, left) walked around throughout and offered help and insight to all the participants. It was so useful to hear all her tips and expertise as the workshop progressed.

I started out far too timidly with carving away the excess material, but by the end of the class I really felt like I understood the process: how to make clear outlines, how to carve fine and deep lines, how to efficiently clear away unwanted material, and how to check if the block is finished or needs a bit more work.

block printing workshop

Then it was time for the messy part: inking up our blocks and printing onto fabric!

block printing workshop

Everyone else’s test blocks were far more ambitious than mine – I just wanted to learn to carve, but the others made far more complex shapes with more fine detail and multiple colours. Here are some of my favourite prints from other participants:

block printing workshop

Looking at the variety of blocks we made, you can start to see how versatile this medium is. It was really interesting to see how all the different types of blocks behaved when they were printed.

I rotated my simple ‘boring’ block to make different patterns, which was fun and yielded some surprisingly interesting patterns! These were just test prints, so I tried to judge the spacing and angles by eye, but, with a few registration marks so I could print them evenly, I think I could make some really nice prints from my little block.

block printing workshop

This workshop was such an enjoyable and creative morning. I usually make things in isolation, so it was really fun to be creative in a group setting and get to see what other people were making. I’d definitely recommend learning a new craft from an expert, if you get the chance – they can point out exactly where you’re going wrong so there’s a lot less trial-and-error and having to figure things out for yourself.

If you live in or near Cape Town, I can highly recommend learning about block printing from Jesse! If you’re interested, contact Jesse for more information or to sign up for her mailing list for notification of her next workshop dates.


Once I got home I felt so fired up by learning a new skill, I really wanted to do some more carving. My ultimate goal when taking this class was to be able to carve a block in the shape of my PlanetJune yarn planet logo. Before I went to the workshop, I thought I’d need lots of practice before I even attempted it, but I was so excited by the whole process that I couldn’t stop myself from getting started right away, on the same day…

As a novice with only a few hours’ carving experience, I knew I’d probably mess up the carving a few times and waste some lino, and I was prepared for that to happen. But I took it slowly and steadily and remembered Jesse’s advice, and, somehow, I didn’t make any critical errors – I even remembered to carve my block as a mirror image so the design will print the right way round!

planetjune logo block print

And a couple of hours after starting, I’d gone from a square of blank lino and a piece of plain fabric to a PlanetJune yarn planet print…

planetjune logo block print

I’m so excited by all this! It feels really special to have my own hand-carved block so I can print my own hand-designed logo.

What am I going to do with it? Well, I’m planning to sew up some project bags to store my crochet works-in-progress, and print my logo in one corner of each one. They’ll be PlanetJune projects in more ways than one – isn’t that just perfect?!

Comments (8)

Next entries » · « Previous entries
  • Quick Links: Crochet

    navigation: arrow

    buy crochet patterns and accessories from my online store

    'Everyday Crochet' and 'The Essential Guide to Amigurumi' crochet books by June Gilbank

    Crochet video tutorials and step-by-step photo tutorials

    Free PlanetJune crochet patterns

    Frequently Asked Questions

    Quick Links: Crafts

    navigation: arrow

    Punchneedle Embroidery information, ebook & patterns

    Papercraft ebook & tutorials

    Free PlanetJune craft projects & tutorials

  • Blog Post Categories

  • Blog Archives

  • Welcome to PlanetJune!

    June Gilbank

    Hi, I'm June. Welcome to my world of nature-inspired crochet and crafting. I hope you enjoy your visit!

    If you'd like to get in touch, you can contact me here.
    crocheted Canadian flag by PlanetJune
  • A fanned-out pile of the books Everyday Crochet and The Essential Guide to Amigurumi, with text 'The answers to all your crochet questions at your fingertips - find out more'
  • Support PlanetJune!

    Want to say thanks? You can send me money in seconds at paypal.me/planetjune (over $20) or paypal.me/planetjune2 (under $20) or send me a donation through my shop.

    Or simply click through from my links before you shop at Amazon, Etsy, KnitPicks, LoveCrafts or Crochet.com, and I'll make a small commission on your purchase, at no cost to you! Start here:

    ♥ Support PlanetJune ♥

    Tip: This link is also in the footer of every page!

    Thank you so much for your support!