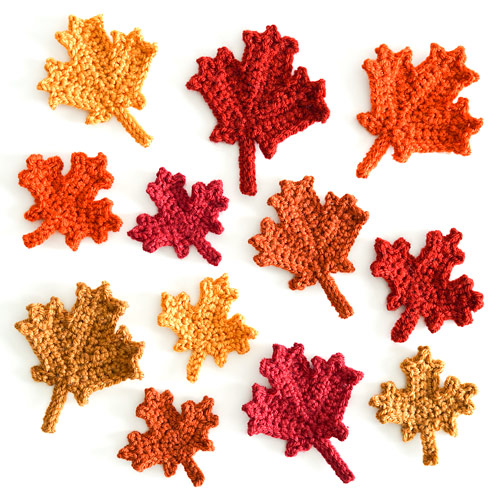
PlanetJune Craft Blog

Latest news and updates from June

Archive for Crochet

11 Free Last-Minute Christmas Crochet Patterns

Still wondering what to give your family, friends and co-workers for Christmas? I have you covered with lots of quick and easy seasonal donationware patterns!

From Christmas decorations to stocking stuffer gifts to snuggly scarves and cowls, here are my suggestions of 11 free PlanetJune patterns for you. (You can use the online version of each pattern for free, or pay-what-you-want to download the handy easy-to-print PDF version.)

free PlanetJune last-minute Christmas crochet patterns

Links to pictured patterns (clockwise from top left):

I hope you’ll find some perfect gift ideas here – enjoy 🙂

And check out the complete list of my free/donationware patterns for even more options!

Comments

Diamond Lattice Neckwarmer crochet pattern

In preparation for my move back to the Great White North later this week, I decided to crochet myself a new neckwarmer. I used my Diamond Lattice Neckwarmer pattern and a cosy merino-silk blend yarn, and look what I ended up with…

diamond lattice neckwarmer crochet pattern by planetjune

Don’t you just love it? I do!

I was a bit worried about the wool content in my yarn, especially around my neck where I’m extra sensitive, but I gave it a long soak in my favourite Soak Wash (just in case) and, after blocking and drying, I can report that the yarn is soft and not at all scratchy on my neck. (It’s KnitPicks Gloss DK Yarn in Velveteen, in case you were wondering…)

As the finishing touch, I discovered I had two adorable hazelnut buttons in my button box:

diamond lattice neckwarmer crochet pattern by planetjune

(I have no idea when/where I bought the buttons, but aren’t they amazing? So realistic!)

And now I can demonstrate that this is truly a unisex pattern. It works so well for men or women…

diamond lattice neckwarmer crochet pattern by planetjune

I can attest that it works up really quickly, and it was fascinating watching my cable design taking shape – I designed it so long ago, it felt completely new to me, even though I was following my own pattern.

If you’ve already bought the Diamond Lattice Neckwarmer pattern, I’ve updated it with the new photos and yarn details, so feel free to download it again from your PlanetJune account! If you haven’t picked it up yet, now’s a great time 🙂

And don’t forget that you can also buy it as part of the value-priced Custom Set of any three PlanetJune Accessories – a bargain if you’re looking for crochet patterns for Christmas gifts (or just for yourself)! Here are all the other pattern choices:

PlanetJune Accessories crochet patterns

Treat yourself to a Custom Set of your favourite three PJ Accessories patterns here 🙂

And – bonus for me! – now I have a new headshot of myself wearing my new neckwarmer, to replace the photo I’ve been using as my profile photo for over 7 years:

June Gilbank - PlanetJune

Hi there!

It’s so nerve-wracking changing my photo everywhere, but I really don’t look or feel like the me in the old photo any more, so it’s time to be brave and freshen things up with a photo of the 40-year-old me 🙂

Comments (6)

tool review: Yarn Ball Winder

I love my yarn ball winder! Not everyone already has (or even knows about) this useful tool, so I thought I’d share today why I find it so useful in my crocheting life, and whether getting one may help you too.

How to Use a Ball Winder

A yarn ball winder is a simple mechanical tool for quickly winding yarn into a neat ball.

To use, it, load one end of your yarn through the metal guide arm and across the slots at the top of the cone, then turn the handle and the yarn will wind onto the cone (see my photos near the end of this post for examples). When you’ve finished, tie the final end of the yarn around a couple of strands on the outside of the yarn ball so it doesn’t come undone, then pull the ‘cake’ of yarn off the cone.

yarn wound on a ball winder by planetjune

The finished ‘cake’ isn’t shaped like a hand-wound ball, but has a flat top and bottom (which makes it easy to stack and store). And the starting end of the ball (that ran across the slots at the top of the cone) is ready to be used. Pulling the yarn from the centre of the ball instead of the outside means the ball won’t roll around while you work.

My ball winder is like this one (amazon link) but there are other similar models also available on amazon and at yarn/craft shops (e.g. the KnitPicks ball winder is a popular less expensive option). I’d recommend you check reviews before you buy one, but, for what it’s worth, I’ve never had any problems with mine – it runs smoothly and quietly.

Why I Use It

A yarn ball winder is invaluable for turning a hank of yarn into a beautiful centre-pull ball. (This is especially easy if you have a yarn swift to hold the yarn for you while you wind it, but, if you don’t have one you can ask a helper to hold the loop of yarn from the hank taut between their hands while you wind it.) When I used to buy a big hank of laceweight yarn to make a shawl, it’d take me literally hours (and many tangles) to wind all the yarn by hand. Now it takes me mere minutes to wind 400m of yarn ready for use.

yarn hank and centre-pull yarn ball by planetjune
A hank of yarn (front) and a centre-pull ball (back)

But that’s not the only use I have for my winder; it’s really useful for my amigurumi yarn too! Once I’ve used over half a skein of worsted weight yarn, the remainder doesn’t hold together well any more. If you store it in that state it can tangle easily, and if you store lots of partial skeins together, you could end up with a giant yarn mess that takes hours to untangle. (I’m speaking from personal experience, here…)

Since getting my ball winder, I re-wind all my partially-used skeins of yarn into tidy small balls. They stack more neatly in my drawers, and don’t get tangled any more! In case you’re wondering, I need all these leftovers for my amigurumi projects – you never know when you might need just a few metres of an unusual colour to make a specific thing, so I never throw away any yarn over a couple of metres long (and btw I even save the shorter lengths too, to make pom-poms – nothing goes to waste in my studio).

small yarn balls by planetjune
Partial skeins wound into neat balls

My Special Trick

I do something extra when I wind yarn balls that makes a huge difference to my crocheting experience. I’ve never seen it mentioned anywhere else, so I thought I should share it with you: I like to wind each ball twice.

As soon as the ball is complete, I remove it from the winder and sit it on the table next to the winder, then reattach the end from the centre of the wound ball to the winder and re-wind it into a new ball, letting the yarn flow through my fingers with a light tension as I wind it.

As you can see, the first winding looks fine, until you compare it with the result of the second winding:

first and second yarn windings
The same hank of yarn, wound twice: the first winding is tiny compared with the second!

Why does this happen?
Let’s compare what happens during the first and second windings:
With the first winding, the tension on the yarn can be uneven as the yarn tugs on the swift to move it, or the skein flips about on the floor as it unwinds, or the fibres of two strands of yarn are slightly stuck together and it takes more force from the winder to pull them apart.
first yarn winding
First winding: partial shop-bought skein to centre-pull ball

With the second winding, the yarn comes from a centre-pull ball, so it winds very regularly, as nothing is moving apart from the strand being wound. As the yarn has only just been wound into the first ball, any loose fibre ends haven’t had a chance to snarl together, so the tension on the yarn is low and steady as you wind it.
second yarn winding
Second winding: centre-pull ball to lower tension centre-pull ball

Why does it matter?
If you keep your balled yarn wound tightly:

  • The yarn is kept in a stretched state, which will affect your gauge when you crochet or knit with it.
  • There’s more chance of the yarn strands sticking together into a clump – this is especially likely to happen with a yarn like mohair or alpaca, where the loose fibre ends along the yarn (visible as a fluffy halo) can grab onto each other. When you pull on the centre yarn end, a clump of yarn strands can come out together from the ball instead of one single strand, or, even worse, the yarn may not come out at all!
  • The longer you keep the ball wound like this, the worse the stretching and tangling can become.

The second winding is actually much more fun to do as it winds so smoothly, so it adds very little time to the process. And what’s a couple of extra minutes of winding time compared with the many hours you’ll spend using the yarn?

In my opinion, it’s definitely worth winding your yarn twice: the result is an ideal yarn ball with neat low-tension wraps that put no stress on the yarn. You can keep your yarn wound in this ball for a long time without having to worry that it will become stretched out or will be snarled up when you try to use it.


Verdict

If you crochet or knit and don’t already own a ball winder, I’d highly recommend you pick one up, or at least put it on your wishlist. It’s time-saving, and fun to use. Even if you don’t buy yarn in hanks, it makes a huge difference in keeping the partial balls of any type of yarn in your stash tidy and organised.

If you already have a ball winder, please feel free to add your experience and tips in the comments below 🙂

Comments (31)

Christmas Cactus crochet pattern

I have a gorgeous new addition to my Potted Plants range for you – a Christmas Cactus!

Christmas Cactus crochet pattern by PlanetJune

The Christmas Cactus is a popular houseplant also known as Zygocactus, Schlumbergera, and Thanksgiving Cactus. It has flat, segmented stems that resemble leaves, and beautiful bright flowers.

Christmas Cactus crochet pattern by PlanetJune

Christmas (or Thanksgiving) cacti are so named because they usually flower from November to February, but the crocheted variety can stay in bloom all year round! Choose pink, red, white, yellow, orange, or purple yarn for the flowers and buds.

A crocheted Christmas cactus would be perfect as a Thanksgiving or Christmas decoration or gift, or just to brighten the coming winter months…

Christmas Cactus crochet pattern by PlanetJune

My pattern includes detailed instructions so you can replicate my plant and pot exactly, or choose the number and length of stems and the number and arrangement of buds and flowers to make your own customized cactus!

Links to Buy & Launch Discount

Although I always offer discounts for shopping directly from PlanetJune, as it’s my birthday today, I’m offering an additional 10% discount until the end of October. Just enter code BIRTHDAY at checkout by Tuesday, 31st October 2017, and the extra discount will be applied.

Buy the Christmas Cactus pattern here in my shop. Or, if you’re not ready to buy just yet, please heart or queue it on Ravelry so you don’t forget about it:

I hope you’ll enjoy making this lovely plant for yourself, or as a stunning no-maintenance gift that’s sure to be appreciated for its never-ending blooms 🙂

Comments (5)

Goat to Yarn to Goat

From Angora Goat to Mohair Yarn to Amigurumi Goat…

Angora Goat to Mohair Yarn to Amigurumi Goat, by PlanetJune

…this is an an 8-year-long yarn story!


Our story begins in 2009, in Ontario, Canada…

Wellington Fibres angora goats

I visited Wellington Fibres, a small farm that raises Angora goats.

(In case you didn’t know, Angora bunnies produce angora fibre, and Angora goats produce mohair fibre – there’s no such thing as a ‘Mohair Goat’!)

Wellington Fibres angora goats

I enjoyed seeing all the adorable little newborn kids, and toured the mill that processes the mohair fibre into yarn.

Wellington Fibres angora goats

And I left with a skein of unwashed mohair-blend yarn, to make my own amigurumi goat.


Later that year, I washed and dried my yarn…

washing mohair yarn

…and then life happened. I moved halfway around the world, then my commissions list got so backed up that it was years before my Goat design made its way to the top of the list!


Fast forward to 2017 – my Goat commission was happening at last, so it was finally time to use my mohair yarn to make a goat from its own fibre!

I wound my precious yarn, and it looked much too fine, so I doubled it and wound it again. Ooh, it looked so good:

wound mohair yarn

But when I started to crochet, I discovered that the doubled yarn was far too thick – I wanted this goat to be a little kid, not the largest goat in my collection!

I couldn’t think of a clever way to separate the doubled yarn, so I had to unwind it a metre at a time, crochet from one strand, and hand-wind the other strand into a ball.

It was slow going, but it worked, and eventually, I ended up with my little natural-fibre goat:

kid goat from Farmyard Goats crochet pattern by PlanetJune

So now I finally have the goat I dreamed of, 8 years ago and half a world away 🙂

(By the way, if you’d like to make your own, you can find my Farmyard Goats crochet pattern here!)


Epilogue: I’ve since discovered the dreaded clothes moths in my house – disaster! My poor little goat and all my other natural fibre amigurumi are having a little vacation in a ziplock bag in the freezer at the moment, in case they’ve been contaminated – it’d be terrible if this story ended in a moth-eaten goat!


If you’d like to make an amigurumi animal from its own fibre (or from any yarn – they always look great in acrylic too, and at least aren’t at risk of moths that way!) do check out my collection of Natural Fibre Amigurumi Patterns 🙂

Comments (7)

Farmyard Goats crochet pattern

It’s here! My final commissioned pattern, Farmyard Goats, is now available to purchase!

Farmyard Goats amigurumi crochet pattern by PlanetJune

Farmyard Goats is a mix-and-match pattern that lets you choose the options you want, to make many different types of goat:

  • Ears – floppy, upright, or none?
  • Horns – long and curved, shorter, tiny nubs, or none?
  • Beard, or no beard?
  • Contrast-coloured horns and hooves, or not?

Farmyard Goats amigurumi crochet pattern by PlanetJune

You choose! Make any of my three pictured options in any colour(s), or assemble your own custom goat from all the included options – it’s up to you. 

Fun Fact: It can sometimes be tricky to tell a sheep from a goat, especially as some breeds of sheep are smooth-coated, and some goats are fluffy. Here’s the trick: if the tail points up, it’s a goat! Sheep tails always point downwards.

Meet the Goats

Farmyard Goats amigurumi crochet pattern by PlanetJune

My billy goat has upright ears, long horns, and a beard.

I invented a fun new technique to make the curved horns – it’s almost magical how it works, and yet it’s super-simple to achieve! I think you’ll enjoy it 🙂

To me, this is the definitive goat, but I know that’s not the case for many people, so I decided to include other options in the pattern, so you can make lots of different goats…

Farmyard Goats amigurumi crochet pattern by PlanetJune

My little kid goat has upright ears, short horn nubs, and no beard.

He’s a bit smaller than the other goats because, although I used the same pattern and hook size, I used mohair [goat!] blend yarn that was slightly finer than the worsted weight yarn recommended for the pattern, and 9mm eyes.

Farmyard Goats amigurumi crochet pattern by PlanetJune

My Nubian goat has floppy ears, no horns, and no beard.

But, of course, you can make a Nubian with any length horns and/or a beard, just by mixing and matching the pattern elements – this is a very versatile pattern 🙂

Ready to Crochet?

If you were one of the commissioners of this pattern, or had early access through the crochet-along, I hope you’ve been enjoying the pattern over the past few weeks!

If you’ve been waiting for the goat pattern, you can pick it up from my shop right now – and then join our Farmyard CAL in the PlanetJune Ravelry group 🙂

Or, if you’re not ready to buy just yet, please add my Farmyard Goats to your queue or favourites on Ravelry, so you don’t forget about it:

I hope you’ll enjoy my Farmyard Goats pattern! Which type of goat is your favourite?

Comments (11)

Tutorial: Attaching Legs Evenly on a Standing Amigurumi Animal

Stitching the various pieces of an amigurumi together is arguably one of the least enjoyable parts of amigurumi-making. I have a wealth of knowledge gleaned from making hundreds of amigurumi, and I’d like to share those tips with you, to make your amigurumi assembly less frustrating!

Today I’m going to share my tips on how to best attach the legs evenly on a standing 4-legged amigurumi animal, so the joins look neat and the animal can stand straight with all four feet touching the ground.

For more tips to make your amigurumi look even better, check out the new Perfect Finish category on my crochet tutorials page!


1. If They Touch, Pre-Join the Legs

Depending on how wide the legs are and how wide the body is, the legs may meet in the middle. Check your pattern’s cover photos to see if this applies, or test it out by positioning a pair of legs at the correct position beneath the body and seeing if the legs need to touch each other at the top to fit underneath the body.

Tip: If you place the legs too far apart, the feet will tend to splay outwards and the legs won’t support the body. That’s a look you’d probably like to avoid!

If Legs Don’t Meet:

amigurumi animals whose legs are separate at the point where they join the body (patterns by planetjune)
If there’s a space between the tops of the legs (as with the animals pictured above), skip down to Step 2, below.

If Legs Do Meet:

amigurumi animals whose legs touch at the point where they join the body (patterns by planetjune)

If you determine that the pair of legs will meet in the middle (as with the animals pictured above), you can stitch them together first, before attaching them to the body. This helps to attach them evenly and makes it easier to stitch the inner edge of the second leg to the body.

To do this, simply hold the pair of legs together, and stitch the tops together where they touch. (The number of stitches to attach will depend on the diameter of the legs.)

attaching legs evenly on a standing amigurumi animal

Repeat the check for the second pair of legs (remember, the body and leg shaping may mean that one pair of legs meet while the other doesn’t). If they do touch, stitch the pair of legs together as described above.

2. Attaching the First Pair of Legs

I prefer to stitch the front legs to the body first, as it’s easier to position them in relation to the head, to make sure the legs are centred beneath the body.

First, stitch just the middle of the joined pair of legs (or just the inner edge of each separate leg) to the underside of the body (below, left), making sure they are lined up with the head (or other means of recognising the top/bottom of the body).

Stop and check: is the middle of the pair of legs exactly at the bottom of the body (below, right)? If not, pull out your stitches, adjust the leg positions, and try again. Once they are centred, you’ll know that the pair of legs will be joined to the body symmetrically, without having had to pull out many stitches!

attaching legs evenly on a standing amigurumi animal

Next, move to each leg in turn and begin to stitch around the remainder of the open edge, using the Seamless Join technique (below, left). To create the smoothest join, when you reach the outer edge of the leg, try positioning your stitches onto the body slightly further out than usual, so the leg is stretched slightly as you pull each stitch tight.

When you’ve finished, the pair of legs should sit directly beneath the body (below, right).

attaching legs evenly on a standing amigurumi animal

3. Attaching the Second Pair of Legs

Move to the second pair of legs. Turn the animal upside down, and position the pair of back legs so their midpoint is in line with the midpoint of the front legs:

attaching legs evenly on a standing amigurumi animal

Again, stitch just the middle of the joined pair of legs (or just the inner edge of each separate leg, to the body, then pause and test the amigurumi to make sure the second pair is straight in relation to the first.

To do this, stand the amigurumi up on a flat surface and make sure both pairs of legs can sit squarely at the same time:

attaching legs evenly on a standing amigurumi animal

If the back legs are skewed slightly to one side or the other, only one back foot will be able to touch the ground. If this has happened, pull out your stitches, adjust the leg positions, and try again. Checking this now has just saved you from potentially having to undo all the stitches later!

As before, move to each leg in turn and begin to stitch around the remainder of the open edge, using the Seamless Join technique. To create the smoothest join, when you reach the outer edge of the leg, try positioning your stitches onto the body slightly further out than usual, so the leg is stretched slightly as you pull each stitch tight.


Congratulations! Now your amigurumi should have nice looking leg joins, and be able to stand stably on a flat surface, with the legs neatly beneath the body and all four feet making contact with the ground:

Farmyard Goats crochet pattern by PlanetJune

Give it a try on your next four-legged amigurumi and see if my technique makes the task a little less daunting for you! Let me know how it goes…


If you’re looking for my Farmyard Goats pattern, it’ll be going on general release in a couple of weeks. But if you join the Farmyard CAL in the PlanetJune Ravelry group, you can have exclusive early access to the pattern! See the Farmyard CAL thread in the group for full details 🙂

UPDATE: The Farmyard Goats crochet pattern is now available to purchase 🙂


Do you find my tutorials helpful? If so, please consider making a contribution towards my time so I can continue to create clear and concise tutorials for you:

Thank you so much for your support! Now click below for loads more crochet video and photo tutorials (and do let me know what else you’d like me to cover in future tutorials…)

See more helpful PlanetJune crochet tips and technique tutorials

Comments (1)

Starfish Collection crochet pattern

Today I have a colourful new addition to add to my AquaAmi crochet pattern range: the Starfish Collection! These puffy starfish are a fast and easy no-sew pattern and look equally good as toys or home decor.

Starfish Collection crochet pattern by PlanetJune

Starfish Collection is a mix-and-match no-sew pattern that includes 4 sizes of sea stars, ranging from 3 to 7 inches (7.5 to 18cm) across:

Starfish Collection crochet pattern by PlanetJune
L-R: Tiny, Small, Medium and Large Starfish

You can make each size in any of three colour patterns (plain, striped top, and pale underside):

Starfish Collection crochet pattern by PlanetJune
Clockwise from top left: striped top, pale underside, plain underside, plain top

The pattern also includes options (for any size and style) for making a flat appliqué starfish, and amigurumi-style starfish with a cute happy face:

Starfish Collection crochet pattern by PlanetJune
Left: flat starfish appliqué; right: happy amigurumi starfish

About the Designs

These Starfish are fun to crochet – with no sewing needed (yay!), and the same basic technique for all the different sizes and options, once you’ve made one, you’ll find them very fast to work up.

Choose size, pattern, colour(s), flat or 3D, and whether it has a face – you can mix-and-match endlessly to make new combinations. Choose whites and pale neutrals to decorate your home with an elegant seaside vibe, or make colourful smiley toys (as they are made in one piece, they’re perfect baby-safe toys too, with embroidered or no features).

And that’s not all! Why not make a starfish Amigurumi Wall Hanging, or add a couple to a Turtle Beach blanket..?

Starfish Collection & Turtle Beach blanket crochet patterns by PlanetJune
Starfish on a Turtle Beach square

About the Pattern

Starfish Collection is a detailed pattern including written patterns, step-by-step photo tutorials, and right- and left-handed stitch diagrams for each size of starfish.

This is a modular pattern, so you can save paper and ink by reading all the background tutorial information on-screen and just printing the pages you need for the written instructions (p6-8) and stitch diagrams (right-handed p10-12; left-handed p14-16).

Buy Now & Launch Discount

Ready to start crocheting? You can pick up the entire Starfish Collection from my shop right now for only $5.50!

If you’re not ready to buy just yet (or even if you are!), please remember to heart and queue it on Ravelry:

But let’s make that deal even better: for one week only, I’ll give you an extra 10% off the price! To take advantage of this deal, add the Starfish Collection to your shopping cart, and enter the discount code SEASTAR at checkout! (Offer ends Wednesday 30 August, 2017.)

Starfish Collection crochet pattern by PlanetJune

I hope you’ll enjoy my new mix-and-match pattern – I can’t wait to see which size, colours and options you choose for your first starfish. (And if you don’t feel like mixing it up, please feel free to copy my sea stars exactly – that can be just as much fun!)

Comments

Next entries » · « Previous entries
  • Quick Links: Crochet

    navigation: arrow

    buy crochet patterns and accessories from my online store

    'Everyday Crochet' and 'The Essential Guide to Amigurumi' crochet books by June Gilbank

    Crochet video tutorials and step-by-step photo tutorials

    Free PlanetJune crochet patterns

    Frequently Asked Questions

    Quick Links: Crafts

    navigation: arrow

    Punchneedle Embroidery information, ebook & patterns

    Papercraft ebook & tutorials

    Free PlanetJune craft projects & tutorials

  • Blog Post Categories

  • Blog Archives

  • Welcome to PlanetJune!

    June Gilbank

    Hi, I'm June. Welcome to my world of nature-inspired crochet and crafting. I hope you enjoy your visit!

    If you'd like to get in touch, you can contact me here.
    crocheted Canadian flag by PlanetJune
  • A fanned-out pile of the books Everyday Crochet and The Essential Guide to Amigurumi, with text 'The answers to all your crochet questions at your fingertips - find out more'
  • Support PlanetJune!

    Want to say thanks? You can send me money in seconds at paypal.me/planetjune (over $20) or paypal.me/planetjune2 (under $20) or send me a donation through my shop.

    Or simply click through from my links before you shop at Amazon, Etsy, KnitPicks, LoveCrafts or Crochet.com, and I'll make a small commission on your purchase, at no cost to you! Start here:

    ♥ Support PlanetJune ♥

    Tip: This link is also in the footer of every page!

    Thank you so much for your support!