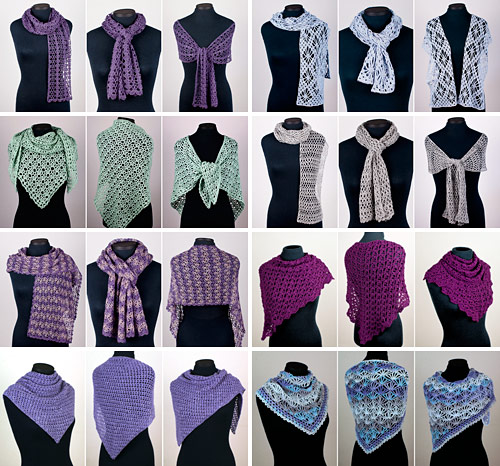
PlanetJune Craft Blog

Latest news and updates from June

Archive for Crochet

Closing Sale: PlanetJune Crochet Tools

This is your last chance to shop from the PlanetJune Crochet Tools shop before it closes forever…

PlanetJune Crochet Tools: Detail Stuffing Tool and Stitch Markers

I’m selling off my remaining stock of Detail Stuffing Tools and Stitch Markers for Crochet with deep discounts if you buy multiples of the same item – I recommend you get some spares, as they are so easy to misplace, and the discount will help offset your shipping costs:

  • 10% off when you buy 1
  • 20% off when you buy 2
  • 30% off when you buy 3
  • 40% off when you buy 4
  • 50% off when you buy 5 or more

The discounts are automatically applied – just select the quantity you’d like and add the item to your cart, and you’ll see the lower prices there.

This is also your last chance to grab a free signed bookmark! Tell me who to sign it to and add it to your tools order at no additional cost.

I’ll be closing the Crochet Tools shop at the end of April, or sooner if everything sells out before then, so please don’t wait if you want to place one last order of Stuffing Tools and Stitch Markers before they’re gone forever. I only have a hundred or so of each item left, and, once I send out my next newsletter, this message will reach many thousands of people, so they may sell out quickly…

Click through to the Crochet Tools shop to place your order now. 🙂


As I like to run PlanetJune transparently, I’ll also share the reasons why I made the decision to close my Crochet Tools shop. Keep reading if you want the behind-the-scenes view!

In January, Canada Post eliminated their Light Packet option for international shipping, meaning that the lowest price to ship a small packet out of Canada is now about $6 (USD) to the US, and about $8.50 internationally (and those prices are much higher if you want tracking and insurance).

I investigated alternatives to make that cost more reasonable for my customers, and found that I could cross the border to mail my packages from the US at far lower rates, or pay a reshipping service to do that for me.

If selling my tools was the focus of my business and I had hundreds of orders per week, something along those lines could be a good solution. But the crochet tools are just a tiny sideline for me – the money I make from them only represents a fraction of one percent of my income. I’d lose money if I tried to reship in small quantities, or I’d have to raise my prices to compensate.

So, the only remaining option is to pass the new high Canada Post shipping costs onto my customers. They’re far too high for most of my customers to be happy to pay, so I made some estimates of how many sales I’d lose as a result of the increased shipping cost. Based on these, my best guess is that I’d make only approx 1-2 orders per week in future. The cost of time and fuel to make the trip to the post office every week, just to ship a single low-value order, would leave me making a loss on every order unless I raised my prices significantly, and, again, I don’t want to do that.

The upshot is that there’s no way for me to run my Crochet Tools shop any more without losing money, and so the only sensible business decision is to close it down. But I didn’t want to leave anyone in the lurch, hence the closing-down sale as a last chance for anyone who hasn’t got around to buying their tools from me yet!

I love my crochet tools line. They’re cute and colourful, and so useful. I’m keeping a dozen spare stuffing tools for myself, because I don’t know what I’d do without one – I’ve tested all kinds of alternatives and I’ve found nothing that even comes close for stuffing small amigurumi pieces.

But nothing lasts forever, and my crochet tool shop has had a good run. This decision will be a good thing for PlanetJune in the long term – further simplifying and streamlining the business will leave me with more time to concentrate on innovating with new designs, and creating new tutorials to help you perfect your crochet technique.

So, please click through to my Crochet Tools shop now and grab any tools you need before it’s too late! I don’t want you to miss out…

Comments (8)

Extreme Amigurumi: the Making of Mega Bun

This is going to be a bit of an epic post, because I’ve had a lot of questions about Mega Bun and I want to answer them all and explain exactly how I made her. I encountered several unexpected problems along the way, and I’ll show you my solutions in case you want to try making an extreme amigurumi of your own!

Mega Bun extreme amigurumi (made from Baby Bunnies crochet pattern by PlanetJune)

Please note that I made Mega Bun as an art project, not a pattern for you to follow. As you’ll see below, although this project uses my Baby Bunnies crochet pattern and is no more difficult to crochet than that pattern, the actual crocheting forms only a small fraction of the project.

Although I’m explaining my process here and you could replicate it to make your own Mega Bun, I intend it as more of a general guide for the types of problems you may have to solve to convert an amigurumi pattern into something many times larger than intended. I’d advise that you should be prepared to a bit inventive and be ready to make some trial and error attempts if you’re going to attempt an extreme amigurumi of your own!

Okay, now onto the Mega Bun details!

Making an Extreme Amigurumi

Extreme 25mm crochet hook, with 3.5mm crochet hook for comparison

I had a few false starts – this Susan Bates Xtreme wood crochet hook is a massive 25mm (1 inch) in diameter, and every yarn I tried was far too thin, even doubled or tripled. I ruled out three strands of bulky yarn because the holes between the stitches were still so large that I was crocheting a mesh of holes instead of a sturdy fabric! 

I eventually discovered that the thickest fuzzy yarns in my stash, tripled, would just about work, thanks to the fuzz obscuring the holes between the stitches. I found that I had 6 pre-wound balls of this unlabelled yarn in my eyelash stash:

Mega Bun extreme amigurumi by PlanetJune

I have no idea what it is (I picked up a lot of second-hand fuzzy yarn when the eyelash craze of 2009 was dying down!) but it looks and feels similar to Patons Allure (except it has 80g per ball instead of 50g):

Mega Bun extreme amigurumi by PlanetJune
Top: unknown fuzzy yarn; Bottom: Patons Allure (discontinued)

I held three strands of yarn together as I crocheted. Working with such a large hook is very different – you have to move your whole arm to make each stitch, not just your wrist, so it’s quite a workout – but the hook isn’t heavy and it wasn’t difficult or painful to use.

Mega Bun extreme amigurumi by PlanetJune
Making a single crochet stitch with an extreme hook and three strands of fuzzy yarn

Overcoming Challenges

Adapting the Pattern
I used the Lop pattern from my Baby Bunnies, but Mega Bun is many times larger than my original Lop:

Mega Bun extreme amigurumi by PlanetJune

I intended to follow my pattern exactly, but I discovered that her back feet completely disappeared into the mass of her body, so I added one extra round to the back feet. Changing the scale by this much may start to affect the proportions slightly, so you may need to tweak a pattern if you’re upscaling it to extreme size.

Running Out of Yarn
I had no idea how quickly I’d get through my yarn, so I just got started and hoped for the best! After making most of the body, I could see that I wouldn’t have anywhere near enough to make all the other pieces – argh! I briefly debated turning my amigurumi into a different animal with smaller ears, but in the end I decided to make the tail in white (a good bunny colour) and the ears in light brown Patons Allure (which matches the variegated body colour nicely). Problem solved!

…Or not. I got most of the way through one ear and ran out of yarn again. Luckily, my friend Monica came to my rescue and sold me some of her precious Allure from her stash so I could complete my bunny. Working with discontinued yarns can be pretty stressful!

Yarn Thickness
Although the yarn I chose for the tail (Bernat Baby Lash, also discontinued), looked nice and bulky and fairly similar to my other yarns, when I started to crochet with 3 strands, it left huge gaping holes between each stitch – not a good look for a bunny tail! So I decided to double it yet again and crocheted with 6 strands at once to give me a nice full bunny tail. Finding sufficiently bulky yarn is definitely a major problem for a hook of this size!

Mega Bun extreme amigurumi (made from Baby Bunnies crochet pattern by PlanetJune)

Holey Fabric
As I hadn’t used the correct yarn thickness for amigurumi making, I had a problem. Although the crocheted fabric doesn’t look holey (thanks to all the lovely soft fluff in my yarn), that’s not really the case: I can stick a fingertip through any of the gaps between stitches! This would be a problem when it comes to stuffing…

Mega Bun extreme amigurumi by PlanetJune

To get around this, I bought some tulle fabric (the fine netting used for wedding veils and ballet tutus) to contain the stuffing. For the head and body, I flattened the crochet and laid it on 2 layers of tulle to act as a template for cutting the tulle. I cut the tulle around the edge of my ‘template’ with fabric scissors, leaving a few inches of extra length at the back to make stuffing easier.

Mega Bun extreme amigurumi by PlanetJune

I wasn’t sure if I could sew tulle with a sewing machine, but my mum advised that it should be fine with a long stitch length, and it was (thanks Mum!), so I sewed my 2 layers of tulle together, leaving the tail area with the excess fabric open for stuffing.

Mega Bun extreme amigurumi by PlanetJune
The completed tulle net on top of the flattened body, with excess tulle at the back.

I turned my tulle net inside out and inserted it into the body, turning the excess back outside the opening, and then I stuffed the body by pushing the stuffing into the net.

Mega Bun extreme amigurumi by PlanetJune

Once I’d finished stuffing, I overlapped the excess tulle and secured the two sides together with a few stitches by hand with a needle and thread, then crocheted the remaining body stitches and closed the remaining hole in the body as usual (with my Ultimate Finish technique).

Adapting the Stuffing Instructions
With this size of amigurumi, even the tiniest pieces that wouldn’t usually be stuffed are huge and need stuffing to support them. To stuff all the smaller pieces (paws, tail and even the eyes), I tied a blob of stuffing into the middle of a square of tulle, to make a stuffing parcel, and popped it inside the piece as I was stitching it to the body.

Mega Bun extreme amigurumi by PlanetJune
Front paws with their parcels of stuffing ready to be inserted

Stuffing Quantity
It took an entire 1lb bag of stuffing to stuff Mega Bun to a soft squishy level – perfect for cuddling – although if I’d been making a proper amigurumi (with nice firm stitches) I’d probably have needed two bags of stuffing to support the bunny shape further. Extreme amigurumi need a lot of stuffing!

Extra-Large Eyes
After measuring Mega Bun against an original Baby Bunny, I realised she’d need about 2 inch diameter eyes! I’m not sure if safety eyes even come that large (well, I’m sure they do, but they probably aren’t easy to find) and I didn’t want big hard lumps of plastic on my cuddly bunny, so I decided to crochet the eyes.

Mega Bun extreme amigurumi by PlanetJune

I used bulky yarn and an H hook to get to the right size more quickly, and added a half-stitch colour change to make the all-important glint in her eyes. (Don’t know about the glint? It’s so important to add a lifelike sparkle to non-plastic eyes – see my Glinting Eyes for Amigurumi tutorial for details!)

Adapting the Finishing Instructions
As each stitch is so huge, one sewn stitch per single crochet stitch didn’t feel like enough, so I stitched twice around each open edge to stitch it to the body, and tried to insert my yarn needle into a different part of a stitch on the body on my second time around, to reduce the gaps between my sewn stitches. (Oh, and, just out of interest, I tried using one, two or all three strands of the yarn to stitch with and didn’t see much difference in the result.)

I also used bulky yarn instead of embroidery floss to embroider the nose. Everything needs to be scaled up when you’re making an Extreme Amigurumi!

Loss of Shaping
After stitching everything in place, I realised my last problem: as my crocheted stitches are so floppy and soft, and I couldn’t stuff the body firmly, the clever Baby Bunnies shaping isn’t very apparent: the head and body looked a little too much like one giant blob. But I have a trick to fix exactly this type of disappointment!

I used my Amigurumi Needlesculpting technique to draw the body in, all the way around the neck, to define and shape her neck area. It’s hard to capture in photos because she’s so fluffy, but her shaping looks much better now.

And finally, Mega Bun was complete and ready for big cuddles!

Mega Bun extreme amigurumi (made from Baby Bunnies crochet pattern by PlanetJune)

I hope you can see that this was quite an involved project… I have lots more I could say about Extreme Amigurumi in general, but this post has got longer than I expected, so I’ll save my tips and opinions for the next post!

If you have any more general questions about Extreme Amigurumi, please ask them below and I’ll see if I can offer some advice in my final Extreme Amigurumi post. 🙂

Comments (11)

Extreme Amigurumi Crochet: Mega Bun!

When I got this extreme crochet hook a few weeks ago, my first thought was to wonder if it’s possible to make an extreme amigurumi…

Extreme 25mm crochet hook, with 3.5mm crochet hook for comparison
That’s my new size 50 (25mm/1 inch) crochet hook, with a standard E US/3.5mm hook for comparison…

I raided my stash for the thickest fuzzy yarns I could find, and held three strands together as I crocheted, following my Baby Bunnies pattern.

And the short answer is: yes!

Mega Bun extreme amigurumi (made from Baby Bunnies crochet pattern by PlanetJune)

Mega Bun is the softest, cuddliest bunny you can imagine. She’s so squeezably soft and her floppy ears are just adorable.

Mega Bun extreme amigurumi (made from Baby Bunnies crochet pattern by PlanetJune)

She measures an astounding 26″ (66cm) from nose to tail – that’s almost 6 times the size of the original Baby Bunnies…

Mega Bun extreme amigurumi (made from Baby Bunnies crochet pattern by PlanetJune)

Her puffball tail alone is the size of two Baby Bunnies stacked on top of each other!

The other bunnies and guinea pigs aren’t at all bothered by her size – they’ve accepted her as one of their own and are enjoying playing with (and on) their giant cousin:

Mega Bun extreme amigurumi (made from Baby Bunnies crochet pattern) with Baby Bunnies and Baby Guinea Pigs, crochet patterns by PlanetJune
Awww! Extreme cuteness!

Now, the long answer to “can you crochet an extreme amigurumi” is more like “yes – with caveats…”, so don’t run out and buy a bunch of fuzzy yarn just yet! If you have any questions about Mega Bun, or want to know more about how I made her, I’ll share all the details of the process of crocheting Mega Bun (and the difficulties I encountered in trying to make an extreme amigurumi) in a separate ‘Making Of’ post, coming soon.

But in the meantime, I hope my photos help you to imagine how squishably soft my adorable giant bunny is!

Mega Bun extreme amigurumi (made from Baby Bunnies crochet pattern by PlanetJune)


Oh, and if you’d like to make any baby bunnies or guinea pigs of your own (giant or regular-sized!) you can find all the Baby Bunnies and Guinea Pigs crochet patterns here 🙂

Baby Bunnies and Baby Guinea Pigs crochet patterns by PlanetJune


UPDATE: The ‘making of’ post is up! Click through to read Extreme Amigurumi: the Making of Mega Bun!

Comments (21)

Simple-Shell Sea Turtle crochet pattern

A few months ago, I had a very clever request from a customer, to design a large adult version of the turtle from my Baby Sea Turtle Collection pattern. It was such a good idea – my AquaAmi Sea Turtle pattern is an epic amigurumi showstopper, but all those shell pieces take forever to crochet – wouldn’t you like to make a simpler large sea turtle?

So here it is, a Simple-Shell Sea Turtle expansion pack (below, right) for my AquaAmi Sea Turtle (below, left):

AquaAmi and Simple-Shell Sea Turtle crochet patterns by PlanetJune

Note about size: The turtles in the above photo are different sizes because the original Sea Turtle is crocheted with bulky yarn and a G7 hook; the expansion pack is crocheted with worsted weight yarn and an E hook. You can crochet either turtle in either size (details in the patterns); if you use the same yarn and hook for both, the finished turtles will be the same size!

As you can see, both turtles have the same realistic shaping and flippers, but the new pattern gives you a simple but cleverly-shaped shell instead of the beautifully-patterned but time-consuming original shell. With only two shell pieces to crochet instead of twenty, you’ll save a lot of time!

About the Pattern

This Expansion Pack gives a simplified shell for my large AquaAmi Sea Turtle. The result gives an ‘adult’ sized turtle (about 9.5″/24cm long when made in worsted weight yarn) that matches my Baby Sea Turtle pattern (sold separately).

Simple-Shell Sea Turtle crochet pattern by PlanetJune

It includes all the modifications required to crochet a Sea Turtle much more quickly than the original AquaAmi Sea Turtle, with simple but well-shaped one-piece top and bottom shells.

Simple-Shell Sea Turtle crochet pattern by PlanetJune

And, if you’re making a turtle blanket as a gift, now you can add a larger matching cuddly turtle toy to go with it!

What is an Expansion Pack?

Expansion Packs by PlanetJune

  • An Expansion Pack is an add-on to an existing PlanetJune pattern.
  • The Expansion Pack lets you modify or add to the original pattern to create something else.
  • You cannot use the Expansion Pack alone – you must also purchase the original pattern in order to be able to complete the pictured items in the Expansion Pack pattern.

AquaAmi and Simple-Shell Sea Turtle crochet patterns by PlanetJune

You can buy the Simple-Shell Sea Turtle Expansion Pack for only $3.50 individually from the shop, or, if you haven’t yet bought the original AquaAmi Sea Turtle pattern, you can buy the multipack of both turtles, and save 50c on the pair.

Launch Discount

If you’ve already bought the original turtle pattern, you won’t be able to save that 50c. But, for 7 days only, add the Simple-Shell Sea Turtle Expansion Pack pattern to your shopping cart, together with anything else (totalling $5 or more), then use the code MORETURTLES at checkout and you’ll still get your discount! (Valid until next Tuesday: 13th March 2018.)

Note: If you don’t need anything else right now, this also applies to Gift Certificate purchases, so you can pick up a $5 gift certificate now, get your discount, and have $5 in your PlanetJune account ready for your next purchase, or to send to a crocheting friend!


PlanetJune Sea Turtle Patterns

Baby Sea Turtle Collection, AquaAmi Sea Turtle and Simple-Shell Sea Turtle crochet patterns by PlanetJune

This new addition means I now have three different sea turtle patterns, letting you make all the different options above (and even more if you resize all the patterns) – but they all match nicely, so you can build a sea turtle family with as many of the different pattern options as you wish!

In case you’re confused about which pattern makes which turtle, here’s the rundown of all the PlanetJune sea turtle patterns – and yes, it’s turtles all the way down…

Baby Sea Turtle Collection, AquaAmi Sea Turtle and Simple-Shell Sea Turtle crochet patterns by PlanetJune

A note about sizes: The top two pictured turtles were both made with worsted weight yarn. If you use only worsted weight yarn, these are the two turtle sizes you’ll make with my patterns: approx 4.5-5″ long for the babies, and 9.5″ long for any of my adult turtle patterns.

But you can choose to make a variety of turtle sizes: the third turtle down is made with bulky weight yarn, increasing the adult turtle length to 11″, and the giant 18″ long turtle at the bottom was crocheted with the same pattern, but two strands of bulky weight. The difference in size between the green turtle and the giant turtle is caused solely by the yarn and hook choices!

Read more about how to resize amigurumi by changing the hook and yarn sizes here.


If you’re not ready to make – or add to – your Turtle family just yet, don’t forget to heart and queue them on Ravelry so you don’t forget about them:

AquaAmi Sea Turtle (original): 

Simple-Shell Sea Turtle (new):

Baby Sea Turtle Collection:

I’m so happy with this new addition to my sea turtle collection – I feel like I have a turtle for every occasion now! 

Comments (4)

easy fleece and crochet cushion cover

Sometimes a project is so simple that it seems like cheating! I’d planned to sew a cover for this new body pillow once I had time to buy fabric and set up my sewing machine, but then I spotted a fleece blanket in the dollar store with a convenient blanket-stitched border…

fleece body pillowcase with crocheted trim by planetjune

I draped it around my pillow, and it was almost exactly the right size to make a soft and snuggly cover (surely a sign that this project was meant to be).

fleece body pillowcase with crocheted trim by planetjune

In case you don’t know, adding a border of blanket stitches around the edge of any fabric project makes the perfect set-up row for a crocheted trim – you can just insert your hook under the edge of each blanket stitch to begin each stitch of the first row:

fleece body pillowcase with crocheted trim by planetjune

Top tip: If you’d like to add a crocheted trim to any fabric item, just use a sharp needle and crochet thread, embroidery floss or fine yarn to blanket stitch around the edges of the fabric first, and then you can add any crochet border you want, by crocheting into the blanket stitches.

(And if you need some ideas for border stitch patterns, I can recommend Edie Eckman’s two books on just that topic!)

I’d loved this Red Heart Soft yarn in shade Watercolors in the ball, but soon realised when I tried to crochet with it that every stitch turned out as a different colour, which made the result way too busy for anything I’d wear. But this project has just a single row of crochet, so the different colours can shine without being buried by the next row. I did try out a few more interesting stitch patterns for my edging, but the constantly-changing colour is interesting enough – why over-complicate things?!

fleece body pillowcase with crocheted trim by planetjune

I tested a variety of hooks with my yarn and the blanket stitches, and determined that anything larger than a G (4mm) was too big to fit easily under the blanket stitches, so I went with the G. I folded the blanket in half and, starting at one end of the fold, began to single crochet around, inserting my hook under the blanket stitch at the edge of both layers of fabric to begin each stitch.

fleece body pillowcase with crocheted trim by planetjune

Top tip: I was worried that the two halves may not stay aligned as I continued to crochet around, so I grabbed my Wonder Clips (highly recommended for any crafters, especially to replace pins when you sew – and if you crochet or knit you can also buy them in an extra-large size to keep your pieces together when seaming). I matched the corners and clipped them together, added a clip halfway between them, and then kept adding more clips halfway between the previous ones until I had a clip every few inches.

fleece body pillowcase with crocheted trim by planetjune

As I crocheted around the edge, I added a few extra stitches around the curved corners, and anywhere the blanket stitches seemed spaced a little too far apart for one single crochet stitch to be large enough to get to the next stitch without being stretched too far.

Once I got to the second open corner, I inserted the pillow, and then crocheted along the last open short edge to close the remaining gap. I fastened off, leaving an extra-long yarn end which I ran underneath all the stitches on the short edge, so I can easily retrieve the end and unravel some stitches if I need to remove the pillow to wash the cover, and then crochet it back up afterwards.

And here’s the end result – simple, but effective:

fleece body pillowcase with crocheted trim by planetjune

I think this project was a perfect use for my yarn and adds a touch of colour to a basic cushion cover (especially in a variegated yarn which does all the work for you).

If I’d started making the cover from scratch instead of using a pre-made blanket, I’d have done 2 things differently:

  • Cut 2 rectangles of fleece instead of one large piece, so I’d have a crocheted border around all 4 sides of the cushion
  • Made the blanket stitches in a different colour, to either blend in with the fleece, or co-ordinate with the yarn

But, overall, I’m very happy with this project – definitely half an hour well spent!


How about you? Have you ever considered adding a crocheted border to a fabric project?

I’ve always liked the idea of crocheting a trim around the bottom edge of a skirt – maybe this will inspire me to make it happen next summer 🙂

Comments (6)

Fennec Fox crochet pattern

The Fennec Fox might just be one of the cutest animals out there, and it’s even cuter in crochet!

Fennec Fox crochet pattern by PlanetJune

Fennec Fox Fun Facts

  • Fennec Foxes are the smallest foxes in the world.
  • They live in the deserts of northern Africa and eat insects, rodents and plants.
  • Their massive ears stop them from overheating and help them to locate prey underground.
  • Fennec Foxes live in family groups, in large underground dens which they dig into the sand.
  • Their paw pads are covered in thick fur to protect them from the desert heat.
  • They can survive without water, getting all the moisture they need from their food and dew.

Fennec Fox crochet pattern by PlanetJune

Don’t you think this adorable little Fennec Fox is so distinctive with his huge ears, cute little nose and black-tipped tail?

You can buy my Fennec Fox pattern alone, or in a new foxy multipack with his cousins (Red Fox and Arctic Fox):

red, arctic and fennec fox amigurumi crochet patterns by planetjune

Note: The new ‘Three Foxes’ multipack replaces the old ‘Red Fox & Arctic Fox’ deal, so that item is no longer available for purchase. (If you bought it previously, both your fox patterns are still available in your PlanetJune account, of course.)

Special Deal!

I’ve set up an amazing deal for these foxes: the Multipack is only $11 – that’s buy two fox patterns, get the third free!

Note: If you’ve already bought the Red and/or Arctic Fox, you can still get a deal, for this week only! (Valid until next Tuesday: February 13 2018).

  • If you’ve already bought one fox and want the other two, buy the Multipack, email me with your order numbers (or dates) of both your fox orders, and I’ll send you a $3 PlanetJune Gift Certificate.
  • If you’ve already bought both the other foxes, buy the Fennec Fox, email me with your order number(s) (or date(s)) for all your fox orders, and I’ll send you a $3 PlanetJune Gift Certificate.

Or if you only want your favourite fox, you’ll find each pattern individually in my shop too 🙂

Handy Links:

I hope you’ll enjoy my fox patterns! Which is your favourite?

Comments (1)

Stitch Tension in Amigurumi: an investigation

Link easily to this page in your patterns: www.planetjune.com/stitchtension

Today, I’d like to dispel a common amigurumi myth…

In amigurumi, as with all crochet, you should always be keeping tension on the yarn to keep your stitches compact and regular. But I often hear misinformation that you should be ‘crocheting tightly’ to make amigurumi, and that’s not true at all!

The tightness of amigurumi stitches refers to the tension of the small stiff stitches of the fabric you produce, not to the tension in your hands while you crochet.

Showing is better than telling, so allow me to demonstrate, via a new crochet investigation, how to make perfect amigurumi stitches without hurting your hands!

Experiment 1: Effect of Hook Size

I crocheted the same sample amigurumi cup shape 3 times with different sized hooks and the same worsted weight yarn each time. I crocheted the same way as I would when making a scarf or anything else – I kept my tension even, but didn’t try to pull my stitches tightly or pull back on the yarn after pulling up each loop.

I used my standard amigurumi E hook (3.5mm), and, to show the effects of changing hook sizes, I tried a larger H hook (5mm) and a smaller C hook (2.75mm).

stitch tension in amigurumi: a PlanetJune investigation

You can see that the stitches are neat and even in all three samples and, as you may expect, using a larger hook results in a larger finished piece that’s both taller and wider than the same piece crocheted with a smaller hook.

See how the smaller hook samples can stack inside the larger ones? There’s quite a size difference!

stitch tension in amigurumi: a PlanetJune investigation

What you can’t tell from a photo is how stiff the fabric of each sample is. With the H hook, the fabric is too floppy to hold its shape well. With the E hook, the fabric is much firmer and holds its shape much better. With the C hook, the piece is even firmer and feels very solid.

I simulated the effect of adding stuffing by gently stretching out each piece between my fingers, so you can see the gaps between the stitches:

stitch tension in amigurumi: a PlanetJune investigation

As you can see, the H hook fabric is far too open for an amigurumi; the gaps between the stitches are very noticeable. With the E hook, the stitches have smaller holes between them, so the stuffing would be far less visible. And, with the C hook, the gaps between stitches are almost invisible.

So here’s the result of changing hook size: a smaller hook gives a smaller and firmer crocheted piece, with tighter stitches and smaller gaps between the stitches.

These are the properties we want for amigurumi fabric! A stiff, sturdy fabric that holds its shape and has tiny gaps between the stitches is exactly what we need for crocheting a 3-dimensional sculpture.

Choosing the Right Hook Size
The C hook was the smallest hook I could manage with this specific yarn (Caron Simply Soft, a light worsted weight yarn), and I had to stop and undo a stitch a few times, when my hook hadn’t grabbed all the plies of the yarn. I wouldn’t recommend using a hook quite this small, as it’s annoying to have to undo your work whenever you realise you have a snag in your stitches from splitting the yarn with the small hook.

My Recommendation: In practice, with a light worsted weight yarn like this, I might go down to a D hook for the best balance of small, tight stitches and not splitting the yarn as I crochet. For the heavier worsted weight yarns, I still recommend an E hook for most amigurumi.

(See my Worsted Weight Yarn Comparison for more about the differences between different yarns that are all labelled as worsted weight!)

Experiment 2: Effect of ‘Crocheting Tightly’

Now, part two of this investigation. I returned to my standard E hook and tried crocheting the same sample piece yet again, but this time I followed the misunderstood advice of ‘crocheting tightly’. I held the yarn tightly and pulled back on it against my hook each time I formed a loop, so each loop was tight around the hook and as small as possible.

stitch tension in amigurumi: a PlanetJune investigation

Both these samples were crocheted with the same hook. As you can see, the ‘tight’ piece is smaller and firmer than the normally-tensioned piece, but at what cost?

When you crochet with too-tight tension, your stitches are so small that it’s hard to work back into them, and that’s what happened in this case: it was an effort to force my hook into each stitch. My yarn-holding hand began to cramp from pulling the yarn so tightly, and I didn’t enjoy the process of crocheting at all. Even finishing this small piece was very hard work.

stitch tension in amigurumi: a PlanetJune investigation

Yes, the tight piece is definitely smaller (and therefore ‘better’ for amigurumi) but crocheting it was a horrible experience!

The Tension Exception
In amigurumi, chains and slip stitches should not be crocheted with your usual tension. These stitches need to be crocheted with an extra-relaxed tension (or a larger hook), or they’ll be too small to work back into.

See my tutorial Chains and Slip Stitches in Amigurumi for more on this.

Experiment 3: Comparing Smaller Hook and Tighter Tension

Now, let’s compare the small (C hook) sample from Experiment 1 with the extra tight tension sample (E hook) from Experiment 2:

stitch tension in amigurumi: a PlanetJune investigation

Can this be right? They look almost identical!

stitch tension in amigurumi: a PlanetJune investigation

Yes, comparing the two pieces, they look and feel almost exactly the same – the size and shape are the same, the stiffness of the fabric is the same, the gaps between stitches are the same.

The only difference? The sample on the left was crocheted comfortably with a small hook, and the sample on the right was crocheted extra-tightly, at great discomfort, with a larger hook.

Conclusions

As these experiments have shown, there’s absolutely no advantage to changing the way you crochet when you make amigurumi by working extra-tightly (and you may actually hurt your hands, wrists and arms by doing so!)

The goal with amigurumi is to maintain tension (down and backwards) on the yarn that’s balanced by your hook pulling up and forwards. This control allows you to form neat, consistent stitches.

You should never feel you have to force your hook into every stitch and/or pull your stitches as tightly as possible. This not only distorts your fabric but can also lead to hand and wrist fatigue and repetitive stress disorders.

The secret to making good-looking amigurumi without making your hands hurt is simple:

  • Select an appropriately small hook and crochet the same way as you usually do.
  • The perfect hook for your yarn is the smallest size you can manage without starting to have problems from splitting your yarn because the hook is too small to consistently grab all the plies.

The result: neat tight stitches, with no pain!

If you ever experience discomfort when making amigurumi, I encourage you to relax that death grip on your hook and yarn, and try crocheting with a slightly smaller hook instead. Your hands will love the difference and, I hope, you’ll enjoy the amigurumi-making process more.


Have you fallen for the amigurumi myth of ‘crocheting tightly’? Please leave a message in the comments and share your experiences…


Do you find my tutorials helpful? If so, please consider making a contribution towards my time so I can continue to create clear and concise tutorials for you:

Thank you so much for your support! Now click below for loads more crochet video and photo tutorials (and do let me know what else you’d like me to cover in future tutorials…)

See more helpful PlanetJune crochet tips and technique tutorials

Comments (27)

Lion Cub and Family crochet patterns

After having the privilege of watching packs of lions in the wild at Kruger Park, I thought my Lion and Lioness pattern would be adorable with a little Lion Cub pattern to complete the family. And after making the cubs, I think I was right…

Lion Family crochet patterns by PlanetJune

What do you think?

My new Lion Cub pattern complements my existing Lion & Lioness pattern perfectly, and is also a sweet standalone pattern in its own right.

Lion Cub crochet pattern by PlanetJune

Lion Cub is very fast to crochet, at only 5″ long, so you can whip up a few realistic baby lions in no time! They’re sure to charm with their big cub paws and cute little faces.

You can buy the adorable Lion Cub pattern alone, or get a great deal when you buy the whole Lion Family multipack together!

Note: If you’ve already bought the Lion and Lioness pattern, you don’t have to miss out on this deal! Just buy the Lion Cub, then email me with 1) your Lion Cub order number and 2) the order number (or date) from when you bought Lion & Lioness, and I’ll send you a coupon for $2 off your next order of $5 or more. (The coupon will remain valid for a whole year, so don’t worry if there’s nothing else you want to buy right now!)

Lion Family crochet patterns by PlanetJune

Handy Links:

Comments

Next entries » · « Previous entries
  • Quick Links: Crochet

    navigation: arrow

    buy crochet patterns and accessories from my online store

    'Everyday Crochet' and 'The Essential Guide to Amigurumi' crochet books by June Gilbank

    Crochet video tutorials and step-by-step photo tutorials

    Free PlanetJune crochet patterns

    Frequently Asked Questions

    Quick Links: Crafts

    navigation: arrow

    Punchneedle Embroidery information, ebook & patterns

    Papercraft ebook & tutorials

    Free PlanetJune craft projects & tutorials

  • Blog Post Categories

  • Blog Archives

  • Welcome to PlanetJune!

    June Gilbank

    Hi, I'm June. Welcome to my world of nature-inspired crochet and crafting. I hope you enjoy your visit!

    If you'd like to get in touch, you can contact me here.
    crocheted Canadian flag by PlanetJune
  • A fanned-out pile of the books Everyday Crochet and The Essential Guide to Amigurumi, with text 'The answers to all your crochet questions at your fingertips - find out more'
  • Support PlanetJune!

    Want to say thanks? You can send me money in seconds at paypal.me/planetjune (over $20) or paypal.me/planetjune2 (under $20) or send me a donation through my shop.

    Or simply click through from my links before you shop at Amazon, Etsy, KnitPicks, LoveCrafts or Crochet.com, and I'll make a small commission on your purchase, at no cost to you! Start here:

    ♥ Support PlanetJune ♥

    Tip: This link is also in the footer of every page!

    Thank you so much for your support!