Wet blocking is a process used to finish articles made from yarn. It basically involves soaking your finished piece of knitting or crochet to wet it thoroughly then shaping it to the final dimensions, pinning it into place, and leaving it to dry. When dry, the piece will hold its new dimensions (until you wash it, in which case it’ll need to be blocked again while it dries).
Why Wet Block?
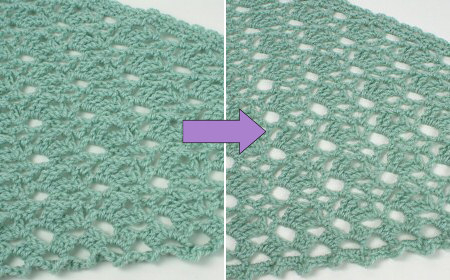
Pretty much everything can benefit from blocking, to even up your stitches and square up the edges. But, for lacy projects, blocking is essential for opening up the stitches and showing off the stitch pattern.
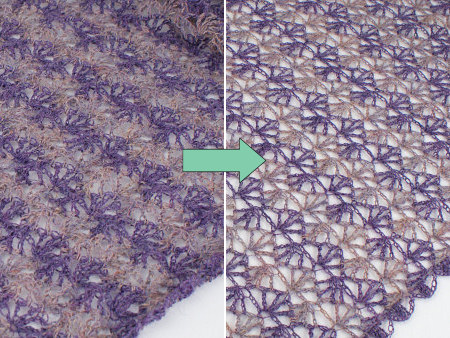
My Rippled Lace Rectangular Shawl before and after blocking – there’s no comparison!
You’ll find wet blocking instructions in all my crocheted lace PlanetJune Accessories patterns, but I thought it might be helpful to go into a bit more detail here – I’ll explain how to wet block, the best tools for blocking, and some clever money-saving substitutions (also useful if you don’t have a local shop that sells the specialised blocking tools).
Basic Wet Blocking Instructions
- Soak your piece in lukewarm water until thoroughly saturated.
- Gently squeeze without wringing, to remove most of the water.
- Lay out on a clean towel and roll the towel up to remove excess moisture.
- Lay out onto your blocking surface (foam floor tiles, or a large dry towel on a flat surface).
- Gently ease into shape, using a tape measure to make sure the piece is shaped symmetrically or achieves the required dimensions.
- Use blocking wires and/or pins to keep in position while it dries.
- When completely dry (typically about 24 hours), remove the pins and/or wires.
Wet Blocking Tools
The minimum requirements for blocking are:
- A towel to remove excess moisture
- Towel(s) large enough to lay out your project onto
- A surface you can pin into (a bed, carpet)
- Rustproof pins
But, with a couple more purchases, your blocking will be much easier and more successful. The magic tools are:
- Blocking wires
- Foam floor tiles
Blocking wires are a revelation! Any time you need to wet block a crocheted (or knit) piece with straight edges, they save so much time and make a straight edge much easier to achieve. When you stretch a wet piece to block it and pin it into shape while it dries, the fabric between each pin tends to be stretched less, and you end up with a slightly scalloped edge, where each pinned point is stretched out more than the area between pins. You can minimise this by increasing the number of pins you use, but that takes a lot of pins, and a lot of time. If you weave a blocking wire along an entire straight edge of a piece, you need only a few pins to keep the wire in position, and the final edge will be perfectly straight. This is especially crucial for lace projects.

The blocking wire keeps the entire edge perfectly straight with very few pins
Foam floor tiles are waterproof and make a perfect surface for pinning into – especially if you don’t have a spare bed or carpeted floor to leave your work pinned to for 24-48 hours! The interlocking edges allow you to create a surface as large as you like, anywhere you have room for them.
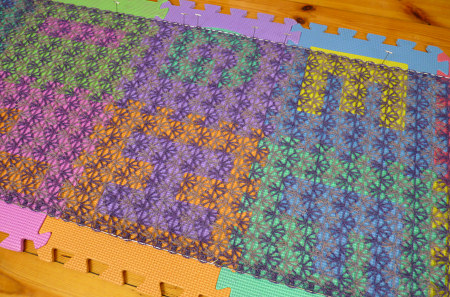
Foam floor tiles are the perfect waterproof surface to pin into
Money-saving Tips
You can buy all these from yarn shops, for example KnitPicks sell reasonably-priced foam Blocking Mats ($25), Lace Blocking Wires ($20), and T Pins ($3). But you can save even more money by looking for the same products in everyday shops (this is also helpful if you don’t have access to a yarn store that sells dedicated blocking supplies). Here are my top tips:
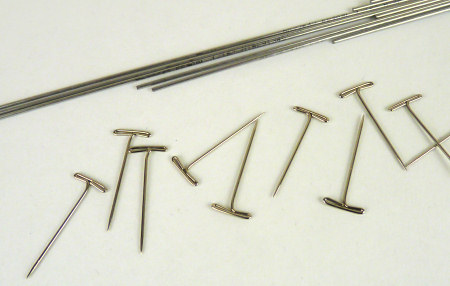
Blocking wires (welding wires) and T pins
Stainless steel welding wires are identical to blocking wires, and you get over twice as many for about the same cost – so split a pack with a friend! Look in a hardware store for 4ft welding wires, and make sure they are marked as stainless steel so they won’t rust.
T pins. Okay, you can’t beat the KnitPicks price on these, but, for those outside their shipping range, you can also find T pins with dressmaking supplies in sewing shops. Just make sure you get rustproof pins – they’ll be touching your wet yarn and you don’t want to leave rust-coloured stains on your beautiful handiwork!
Foam floor mats (play mats)
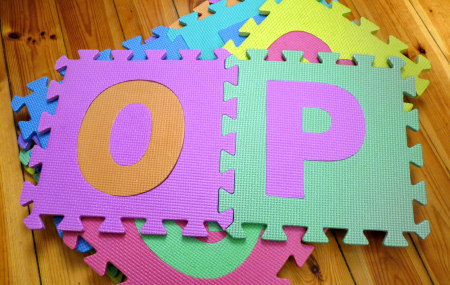
Foam floor tiles or play mats for kids are identical to blocking mats. You can buy 2ft or 1ft square tiles in bright colours or serious grey, but I prefer the set of 12″ letter mats pictured above: with 26 interlocking mats I can arrange them into the shape of any crocheted piece I’m ever likely to make. Wait for a sale and you can pick up a set for under $10 – they may look a bit unprofessional, but you get far more blocking area than in an ‘official’ set of blocking mats, for far less money.
UPDATED 22 Mar 2013: Please read my warning about colour transfer if you use these mats!
Blocking is Key
Next time you’re crocheting lace, don’t worry if it looks less than encouraging while you’re crocheting – that is just part of the magic of lace! You can stretch it out between your hands to give you a temporary idea of how the finished stitch pattern will look after blocking. It’s always worth blocking your finished work to make it look its best, even if you use an acrylic yarn:
My Climbing Eyelets Triangular Shawl is 100% acrylic fingering weight, and, although the effect isn’t as dramatic as with the laceweight alpaca, blocking it still made a big difference. And, a year and a lot of use later, my shawl still looks just as good as the ‘after’ photo.
After all the effort you’ve put into crocheting a beautiful lacy piece, don’t skimp on that one last day waiting for your blocked piece to dry – it’s well worth it to turn your work from okay-looking to spectacular!
Ready to try making and blocking some crocheted lace? How about joining the PlanetJune Accessories Crochet-Along (on Ravelry)? The CAL runs until the end of the year, so you still have plenty of time 🙂