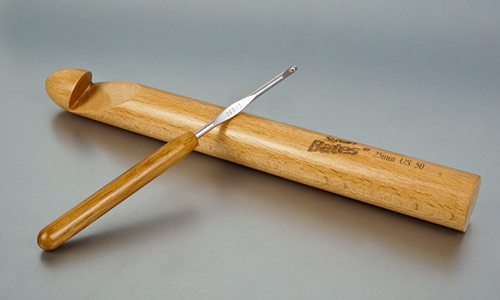
When I got this extreme crochet hook a few weeks ago, my first thought was to wonder if it’s possible to make an extreme amigurumi…
That’s my new size 50 (25mm/1 inch) crochet hook, with a standard E US/3.5mm hook for comparison…
I raided my stash for the thickest fuzzy yarns I could find, and held three strands together as I crocheted, following my Baby Bunnies pattern.
And the short answer is: yes!
Mega Bun is the softest, cuddliest bunny you can imagine. She’s so squeezably soft and her floppy ears are just adorable.
She measures an astounding 26″ (66cm) from nose to tail – that’s almost 6 times the size of the original Baby Bunnies…
Her puffball tail alone is the size of two Baby Bunnies stacked on top of each other!
The other bunnies and guinea pigs aren’t at all bothered by her size – they’ve accepted her as one of their own and are enjoying playing with (and on) their giant cousin:
Awww! Extreme cuteness!
Now, the long answer to “can you crochet an extreme amigurumi” is more like “yes – with caveats…”, so don’t run out and buy a bunch of fuzzy yarn just yet! If you have any questions about Mega Bun, or want to know more about how I made her, I’ll share all the details of the process of crocheting Mega Bun (and the difficulties I encountered in trying to make an extreme amigurumi) in a separate ‘Making Of’ post, coming soon.
But in the meantime, I hope my photos help you to imagine how squishably soft my adorable giant bunny is!
Search Press, the publisher of Mandalas to Embroider: Kaleidoscope Stitching in a Hoop by Carina Envoldsen-Harris (the beautiful embroidery pattern book I reviewed last week) have kindly offered one PlanetJune reader the chance to win a free copy of this lovely book!
If you’ve already picked up your copy, enter to win a copy to give to a friend – it’d make a lovely gift for anyone crafty 🙂
I’m delighted with the embroidery that I made using the Sakura Clusters pattern from the book (and it was my first time doing a proper embroidery, so you can definitely do this too):
If you haven’t read my review yet, click here to see what I thought of this book – then come back here and enter to win your own copy!
How To Enter
Simply leave a comment on this blog post (below) this week, i.e. before end of day EST on March 25th, 2018. You can say anything in your comment: why you’d like to win this book, your past experience (if any) with embroidery, or even just ‘Yes please!’
Make sure you enter a valid email address in the email box, as I’ll need that to contact you if you’re the winner!
This is open to everyone, worldwide 🙂
I’ll randomly draw a winner and contact them by email after the closing date to get their address. (I’ll update this post with their name once they’ve replied.) If I get no reply after a week, I’ll draw a new name.
Good luck!
UPDATE: I selected the winner by random draw (for simplicity, I numbered the comments 1-70, and I’d redraw if the winning number was one of my own comment replies) and the winner is Kate! Congratulations Kate, and thanks to everyone else who entered.
If my posts have whetted your appetite for embroidery, you can buy Mandalas to Embroider here on Amazon, or from your local bookshop 🙂
Let’s get this out of the way first: I received a copy of this book to review. But I’m not being compensated for this review in any other way, and the following is based on my honest opinions!
Carina and I have been friends since we first met (online) in our early days of craft blogging, over a decade ago! She’s well-known for her distinctive cheerful and colourful embroidery designs and has authored 3 books as well as a shopful of self-published designs (you can find them all at Polka & Bloom).
Ever since Carina mentioned that she was designing a book of mandalas, I’ve been waiting to see what she came up with, and I wasn’t disappointed! Embroidery, like other slow crafts, can be a calm relaxing hobby, and combining that with repeating mandala patterns sounds like a perfect recipe for slowing down and enjoying some crafting time.
Read on for my review, and to see the gorgeous embroidery I’ve made from one of the book patterns…
Mandala is the Sanskrit word for ‘circle’. These days, it is often used as a generic term for a particular motif, especially in arts and crafts, usually with a concentric design or one which radiates from the centre.
Mandalas to Embroider includes 12 large and 12 small delicate repeating patterns. Nature-based, geometric, or more abstract, the designs are all bold, happy, and – of course! – colourful. The circular nature of the patterns means they fit perfectly in an embroidery hoop, making the finished pieces easy to display.
Such pretty and colourful designs!
The book is split into two halves: the first half includes clearly-illustrated stitch tutorials, instructions for preparing and finishing your work, and all the patterns, with colour palettes and stitching suggestions.
The pages of the second half are actually iron-on transfers for each of the patterns. Each page is perforated so it can be removed neatly, and there’s a handy pocket inside the back cover to store any transfers you’ve already used. I thought this was a really nice touch, as each transfer can be used up to ten times, so you’ll be able to keep the transfer pages together with the book, so they’re ready for the next time you want to use them.
Left: stitch tutorials; Right: iron-on transfer
This book is beautifully styled and photographed, and I couldn’t stop paging through again and again to admire the variety of mandala-inspired patterns.
A couple of the lovely photos
My Experience
Although Mandalas to Embroider includes 12 mini designs, I decided to jump right into one of the 12 full-sized designs. Sakura Clusters was an obvious choice for me, as I love cherry blossoms (I even designed a cherry blossom garland for my first book, Paper Chains and Garlands!) and this design was the first that really caught my eye as I flipped through the book:
I decided to see how the design would look in a colour scheme inspired by real-life cherry blossom instead of Carina’s cheerful bright palette. That’s one of the advantages of embroidery (or crochet!) patterns – it’s so easy to make them your own by simply changing the colours. I shopped for floss colours using the pinks, reds and blue from this beautiful reference photo:
I was unable to find anyone to credit this stunning photo to – if you’re the photographer, let me know!
I raided my fabric stash and the only off-white fabric I could find looked a bit thin, so I used two layers to stop the threads on the back of the piece from showing through on the front. (I wasn’t sure if that was going to work, but my stitches didn’t show through the fabric, so I suppose it did!)
I wanted to make my embroidery a little smaller than the original, so I copied and reduced the pattern page, then traced the design onto my fabric with a pencil. If you use the iron-on transfers, you can skip all that and be ready to start embroidering right away!
I must admit to being a little nervous about starting stitching; although I’ve been cross-stitching for decades, and of course enjoy my punchneedle embroidery, I haven’t actually done any regular embroidery since I learnt the basic stitches in primary school.
I needn’t have worried – the patterns in this book all use fairly simple stitches, which are clearly explained at the start of the book. Although I started slowly, I quickly picked up speed. By the end of the project, I felt very confident with the stitches used in this pattern, and I’m ready to learn some of the other stitches for my next embroidery project!
Look, even the back of the embroidery is quite pretty…
And now for the big reveal:
Isn’t it lovely? In my colour palette, the pattern takes on a more serene look, but Carina’s pretty design still shines through. I’m thrilled with my embroidery, and I’ll be very happy to display this finished piece on the wall of my craft room.
Final Thoughts
Carina’s designs always have a hand-drawn quality to them, and I was impressed to see that she’s managed to maintain that even with the repeating patterns in Mandalas to Embroider. There’s still a free, natural quality to the designs. I noticed while I was stitching the flowers that the petals of each flower aren’t perfectly identical. This is a good thing – the relaxed nature of the design felt like permission to be relaxed in the execution – there’s no need to make every stitch exactly even and perfect to get a beautiful result.
If you’ve never tried embroidery, I’d definitely encourage you to give it a try – I found it very relaxing and satisfying to watch the design come together. And I think Mandalas to Embroider is a perfect introduction to embroidery, as you can build your confidence by practicing your stitching on the smaller patterns, or do as I did and jump right into a large one!
A few months ago, I had a very clever request from a customer, to design a large adult version of the turtle from my Baby Sea Turtle Collection pattern. It was such a good idea – my AquaAmi Sea Turtle pattern is an epic amigurumi showstopper, but all those shell pieces take forever to crochet – wouldn’t you like to make a simpler large sea turtle?
Note about size: The turtles in the above photo are different sizes because the original Sea Turtle is crocheted with bulky yarn and a G7 hook; the expansion pack is crocheted with worsted weight yarn and an E hook. You can crochet either turtle in either size (details in the patterns); if you use the same yarn and hook for both, the finished turtles will be the same size!
As you can see, both turtles have the same realistic shaping and flippers, but the new pattern gives you a simple but cleverly-shaped shell instead of the beautifully-patterned but time-consuming original shell. With only two shell pieces to crochet instead of twenty, you’ll save a lot of time!
About the Pattern
This Expansion Pack gives a simplified shell for my large AquaAmi Sea Turtle. The result gives an ‘adult’ sized turtle (about 9.5″/24cm long when made in worsted weight yarn) that matches my Baby Sea Turtle pattern (sold separately).
It includes all the modifications required to crochet a Sea Turtle much more quickly than the original AquaAmi Sea Turtle, with simple but well-shaped one-piece top and bottom shells.
And, if you’re making a turtle blanket as a gift, now you can add a larger matching cuddly turtle toy to go with it!
What is an Expansion Pack?
An Expansion Pack is an add-on to an existing PlanetJune pattern.
The Expansion Pack lets you modify or add to the original pattern to create something else.
You cannot use the Expansion Pack alone – you must also purchase the original pattern in order to be able to complete the pictured items in the Expansion Pack pattern.
If you’ve already bought the original turtle pattern, you won’t be able to save that 50c. But, for 7 days only, add the Simple-Shell Sea Turtle Expansion Pack pattern to your shopping cart, together with anything else (totalling $5 or more), then use the code MORETURTLES at checkout and you’ll still get your discount! (Valid until next Tuesday: 13th March 2018.)
Note: If you don’t need anything else right now, this also applies to Gift Certificate purchases, so you can pick up a $5 gift certificate now, get your discount, and have $5 in your PlanetJune account ready for your next purchase, or to send to a crocheting friend!
PlanetJune Sea Turtle Patterns
This new addition means I now have three different sea turtle patterns, letting you make all the different options above (and even more if you resize all the patterns) – but they all match nicely, so you can build a sea turtle family with as many of the different pattern options as you wish!
In case you’re confused about which pattern makes which turtle, here’s the rundown of all the PlanetJune sea turtle patterns – and yes, it’s turtles all the way down…
Bottom: AquaAmi Sea Turtle (resized by using 2 strands of yarn and a larger hook – details here)
A note about sizes: The top two pictured turtles were both made with worsted weight yarn. If you use only worsted weight yarn, these are the two turtle sizes you’ll make with my patterns: approx 4.5-5″ long for the babies, and 9.5″ long for any of my adult turtle patterns.
But you can choose to make a variety of turtle sizes: the third turtle down is made with bulky weight yarn, increasing the adult turtle length to 11″, and the giant 18″ long turtle at the bottom was crocheted with the same pattern, but two strands of bulky weight. The difference in size between the green turtle and the giant turtle is caused solely by the yarn and hook choices!
Read more about how to resize amigurumi by changing the hook and yarn sizes here.
If you’re not ready to make – or add to – your Turtle family just yet, don’t forget to heart and queue them on Ravelry so you don’t forget about them:
AquaAmi Sea Turtle (original):Â
Simple-Shell Sea Turtle (new):
Baby Sea Turtle Collection:
I’m so happy with this new addition to my sea turtle collection – I feel like I have a turtle for every occasion now!Â
Or simply click through from my links before you shop at Amazon, Etsy, KnitPicks, LoveCrafts or Crochet.com, and I'll make a small commission on your purchase, at no cost to you! Start here: