(Keep reading to the end of this post for details of how to get bonus entries in this month’s Review & Win contest!)
This week and next, my husband is away doing important astronomy-related things in Chile, so I’ve decided that, instead of being sad and lonely, I’ll have a 10-day design marathon while he’s away. I’ve been planning a huge new pattern series for months (the theme will be a secret until it’s all ready to launch) and I don’t know how far I’ll get towards completing all the designs, but this alone-time is a perfect opportunity to at least make lots of progress, or maybe even complete the series – we’ll see!
Review and Win contest
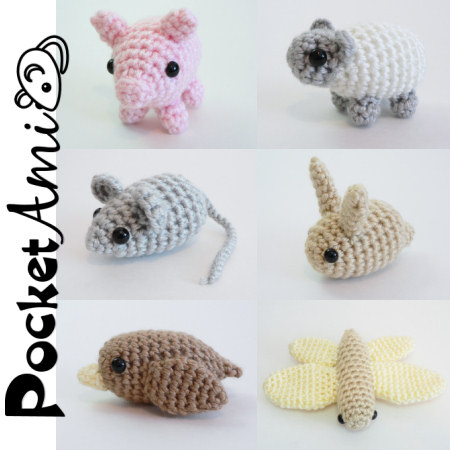
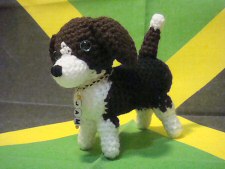
September’s ‘Review and Win’ winner is Carrolyn A, with her review of a PlanetJune classic, the PocketAmi Sets 1 & 2 multipack:
I really enjoyed making these patterns. Since the amis are so small, they can easily use up any scraps. I used the bunny to finish up my variegated brown, and still had some left over.
What I found to be another HUGE plus is that you can use 9mm eyes on these amis, which adds to their cute, chibi look. No need to buy other eyes than the typical ones I use for June’s patterns 🙂
One last thing that makes these amis so great is the tails. They are made by using the ending yarn of the pattern, unlike in patterns I’ve done from other sources that involved making a chain and then attaching it to the ami, trying to figure out how to weave in the ends. No so here, as June’s already figured that out for us 😀
Congrats Carrolyn – I’ll email you to find out which pattern you’d like as your prize 🙂
To be entered into this month’s draw for a free pattern of your choice, just write a review of any product in my shop – thank you!
Bonus Entries!
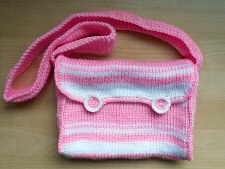
As my accessories pattern range is less well-known than my amigurumi, in preparation for next month’s Accessories CAL, I’d like to get more people who’ve already made any of my PlanetJune Accessories patterns to review them in my shop. So, throughout September, you’ll get a bonus double entry into the Review & Win contest for every PlanetJune Accessories pattern you review!
August 29, 2012 @ 12:21 pm · Filed under Art, Punchneedle
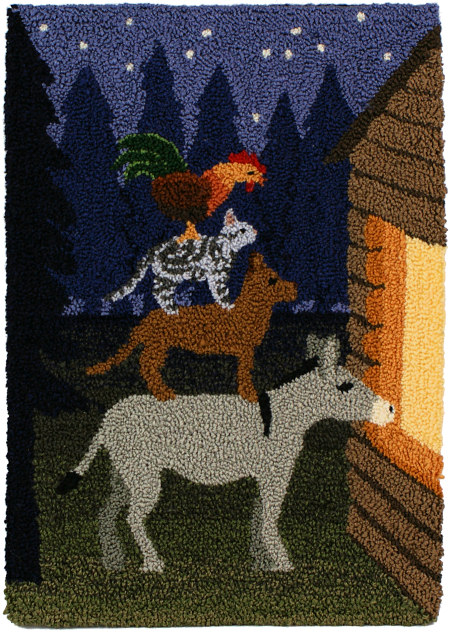
I’ve been waiting for a very long time to be able to show you this piece! I was commissioned to make some punchneedle-embroidered artwork in 2009 for a book about stories told through needlearts. Recent years have created an uncertain climate for traditional print publishing, and (to make a very long story short) the book never made it to print. So, after years of waiting, I’m finally free to show you what I made…
I chose the folk tale of the Musicians of Bremen for my design for several reasons: the story spoke to me; it’s not an obvious choice of story, so it hasn’t been overused or Disneyfied; it features animals; and there’s the iconic image of the animals standing on each others’ backs that I thought would translate well into my artwork.
If you’re not familiar with the story, the four abandoned animals find each other as they each set out alone to seek their fortune as musicians in Bremen, but ultimately they discovered all they needed to be happy when they found a home and the companionship of their friends. I like this moral of simple comfort and happiness.
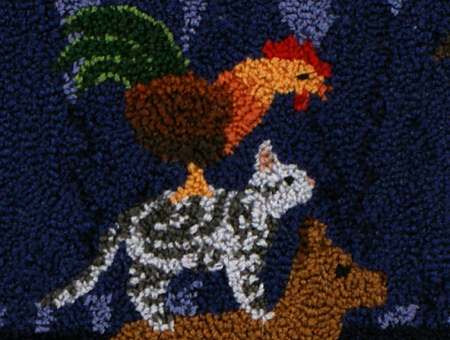
Fine detail in the cockerel and silver mackerel tabby markings.
I designed my piece to be set in the forest at night, showing the animals looking through the window of the cottage that would ultimately become their home. The visual impact comes from the color of the animals and the warmth of the lighted cottage window against the cool, dark background of the forest. I used a palette of 29 shades of embroidery floss in this piece, including a colour-blending technique to add depth to the forest floor.
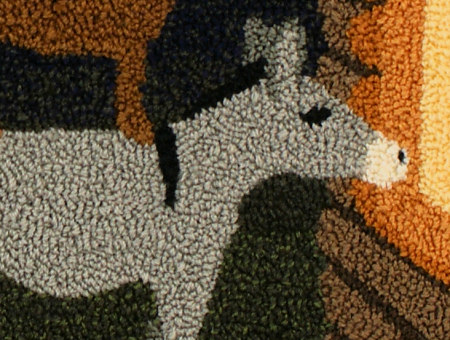
Awww, donkey! Plus some of the colour-blended background.
It took a couple of months to complete the embroidery. The finished piece measures 7 3/4 x 5 1/2 inches (19.7 x 14.0 cm) and is stretched over felt-covered board so it doesn’t need a frame and can be propped on a mantelpiece or hung on a wall. The Musicians of Bremen is my second-largest punchneedle project after my globe (pictured below, with my crocheted orangutan):
I haven’t had time to make any new punchneedle projects since the globe, but looking at my Musicians of Bremen piece makes me hope I can find some time to start punching again – it makes for such colourful, textural, satisfying projects!
If this post has you intrigued about punchneedle embroidery, please see my Punchneedle FAQ for more info, a tutorial, lots of patterns, and my ebook, The Punchneedle Handbook.
The humble single crochet stitch may be the simplest of crochet stitches, but it’s still open to interpretation, as it can be worked the standard way (into both loops of the stitch below) or modified by working into only the front or back loop of the stitch below. Today I’m going to delve into the differences you’ll see from working into front loops, back loops, or both loops, starting with a video tutorial in case you’re not clear about which loops are which.
Keep reading beyond the video and we’ll take a thorough look at the differences through one of my scientifically-approached crochet investigations into the results of using each of the different loops 🙂
Loops Matter!
In amigurumi, there are specific reasons for using back loops or front loops at certain places in a pattern: turning a sharp corner in either direction; using the unworked loops as attachment points to crochet back into later; using novelty yarns where the stitches will be hidden by the fuzzy yarn; or for visual or textural effect, especially in a colourwork piece.
If you’re following a crochet pattern, it’s important to work each stitch as the designer intended if you want to achieve a good result. Working into different loops not only gives your stitches a different appearance, but also changes the overall shape of the piece.
The same crochet pattern, worked in different loops, looks totally different!
I’m not convinced that people really grasp the impact of these differences, as I’ve seen many people working my patterns in back loops only and ending up with a very thin, extra-tall amigurumi as a result, without knowing why. Or working one of my fuzzy patterns (designed to be worked in back loops only) in both loops, resulting in a very squashed, short looking amigurumi. Let’s demystify this once and for all, so you can make the best amigurumi possible!
Note: The videos may look a little small embedded in the blog: if so, you can fullscreen them or click through to YouTube to watch them full-sized 🙂
A Loopy Investigation
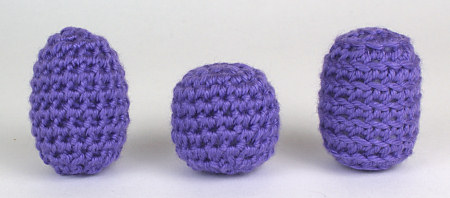
Let’s look at this scientifically, so we can really appreciate the differences in the crocheted fabrics. For our comparison, I’ve crocheted the same sample piece three times, once in the standard both loops, once in front loops (FL) only, and once in back loops (BL) only.
To keep things fair, I kept everything else constant for each sample:
The same hook (E/3.5mm) and yarn (worsted weight, Caron Simply Soft)
The same style of crocheting (single crochet in a continuous spiral without joining or turning)
The same crochet pattern (i.e. the same number of stitches and rounds, with increases and decreases in the same places)
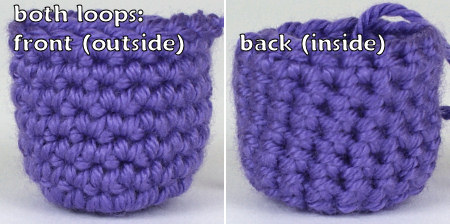
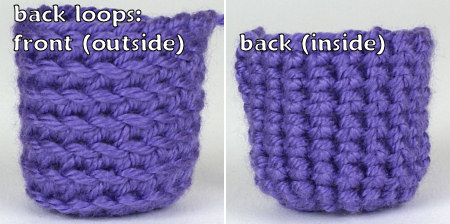
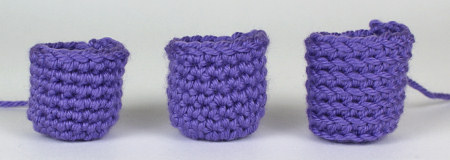
Here are the basic fabrics created by working in the round without turning [Note: I turned each of them inside out briefly to take the back (inside) photos, so you’ll know what to expect if you’re accidentally crocheting with the wrong side facing out]:
And now we’ll do a comparison of the three.
Stitch Shape
The overall shapes of the samples will clearly show any difference in the shape of the stitches: a wider sample means wider stitches, and a taller sample means taller stitches, as each sample is formed from the same number and position of stitches.
Unstuffed: We’ll compare the straight sides of each sample, where the stitches are all single crochet, with no increases or decreases.
L-R: front loops only, both loops, back loops only
As you can see, all the pieces have a comparable width. The FL piece is very slightly shorter than the regular piece, but looks quite similar, but the BL piece is considerably taller and looks completely different from the outside.
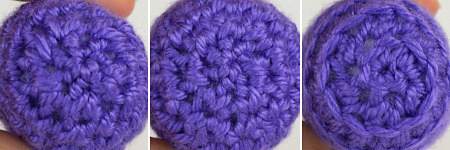
Stuffed: Now look what happens when you stuff the pieces. [Note: to keep things fair, I didn’t cram in as much stuffing as I possibly could; I used the same level of stuffing in each sample: enough to hold its shape, but still be squashy to the touch.]
L-R: front loops only, both loops, back loops only
What you may not have expected is that, with stuffing, the FL sample stretches out so it no longer looks similar to the standard piece – it stretches to be the same height as the BL sample! Now just imagine that you’re following one of my patterns and these samples are supposed to be the round head or body of an animal – you can see why working in either FL or BL only is going to give you a completely different, stretched-looking animal…
Base Fabric Characteristics
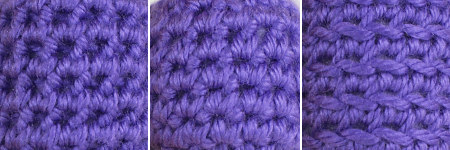
Let’s compare the fabrics formed where the stitches are worked 1 to 1, with no increases or decreases:
L-R: front loops only, both loops, back loops only
Crocheting into one loop only instead of both changes the characteristics of the fabric formed: it makes it less rigid, more fluid and flowing, and either more stretchy (FL only in my samples) or thinner and more open (BL only in my samples). Many crocheted garment patterns utilise these properties to great effect – when you’re making clothing, a more flexible fabric that can drape on your body is far more flattering than a stiff, thick boxy fabric.
But the opposite is true for amigurumi: here we are aiming for a solid stiff fabric that holds its shape with as few gaps as possible. Crocheting into both loops gives us this fabric: it has very little stretch, and the fabric is thick and firm, so it holds together when it’s stretched by the stuffing.
As the stitches are held further apart by working into either single loop, there is naturally a larger gap at the base of each stitch. (You don’t see it in the FL sample until you stuff it, because the FL fabric is stretchy but relaxed and only stretches when the stuffing is inserted.) The unworked loops help to partially obscure the resulting gap by covering the top inside edge of the FL sample, and the bottom outside edge of the BL sample, but the remaining hole (the area below each stitch where you can see right through to the stuffing) is still larger in either case than with the standard sample. You’d expect this, because working into both loops keeps the stitches pulled together, so those large holes never form.
Increasing and Decreasing
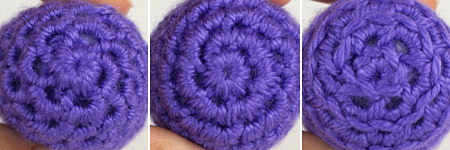
At the points where you increase and decrease, you’re either forcing 2 stitches into 1 gap, or pulling 2 stitches together to form 1. Both these cases lead to larger holes in the surrounding fabric than with normal stitches, so it’s important for us to examine both ends of the stuffed samples, to compare the end with the increases and the end with the decreases for each sample.
Decreases: I should mention that, for my standard sample, I used the invisible decrease (invdec), one of the most essential techniques for amigurumi as it practically eliminates the holes or bumps from decreasing. As this technique can only be used with standard single crochet, I couldn’t apply it to the other samples, so I was already expecting an inferior result.
L-R: front loops only, both loops, back loops only
As I suspected, neither of the single loop samples could compare with the invdec. The BL only sample in particular has very large gaps where the stuffing is clearly visible, but neither FL or BL gives what I’d consider to be a satisfactory result.
Increases: Although I do have an invisible increase (invinc) technique, I don’t regard it as an essential (as the standard increase isn’t terribly gappy to begin with), so I didn’t use it for my sample, to give a fairer test. It should be noted, though, that invinc could be used to further improve the increase results (of the standard sample only).
L-R: front loops only, both loops, back loops only
Again, neither of the single loop samples had small enough gaps to keep the stuffing hidden. The FL only increase stitches are very pretty – it looks like a flower! -and the loops on the inside do mostly hide the stuffing, but not in every stitch, so the end result is a bit uneven. The unworked loops of the BL only sample are so far below the increases above that they do nothing to hide the holes, which are very large.
If you look at my samples, you can see that the more open fabric formed by FL or BL only leaves much larger gaps with both increases and decreases. The unworked loops still help to fill the holes slightly, but only cover 1/3 or less of the hole, so the remaining gap is still much larger than in the standard sample, and there’s no technique comparable to the invdec or invinc that could be used to reduce those holes without distorting the surrounding fabric.
Summary
A firm fabric with minimal holes is the ideal for amigurumi. You can’t use my invdec/invinc techniques unless you work in standard single crochet; the thinner, stretchier fabric made from working into one loop only naturally has larger gaps and couldn’t hold the kind of shaping you see in my designs; and any shaping stitches would look gappy due to the larger holes seen when you increase and decrease.
For non-amigurumi crochet projects such as garments or accessories, you can use the special properties of BL or FL only crochet to their advantage. But, for the reasons I demonstrate above, I recommend that you always work in both loops for amigurumi or any other stuffed crocheted work, unless you have a specific reason to do otherwise.
Final thoughts:
If you’re following a crochet pattern, remember that sc and sc in BL/FL only are never interchangeable!
If you’re creating your own design, use the most appropriate stitches for your design to give you the best results.
If you’re writing a crochet pattern, be sure to specify anywhere that you use non-standard stitches (i.e not worked into both loops).
Loved this tutorial? I have so many more amigurumi tips and tricks to share with you!
Boost your amigurumi skills with my latest book, The Essential Guide to Amigurumi, your comprehensive guide to amigurumi techniques and tips.
Do you find my tutorials helpful? If so, please consider making a contribution towards my time so I can continue to create clear and concise tutorials for you:
Thank you so much for your support! Now click below for loads more crochet video and photo tutorials (and do let me know what else you’d like me to cover in future tutorials…)
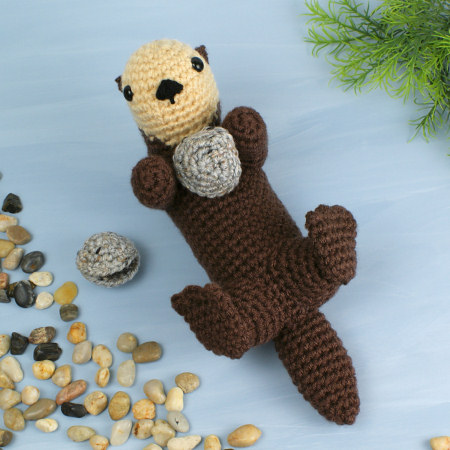
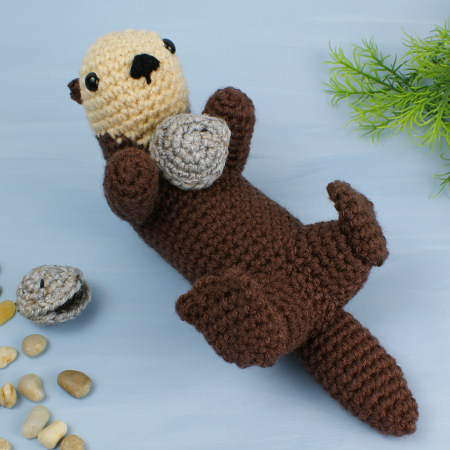
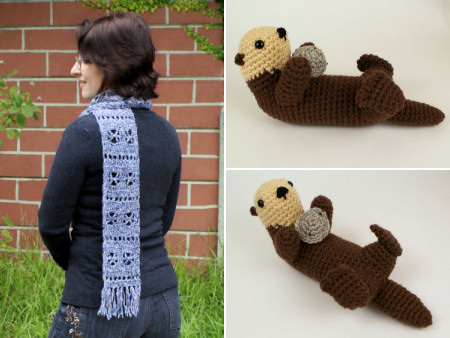
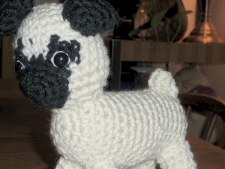
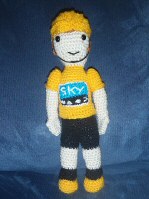
Here’s my latest commissioned design – say hello to my Sea Otter!
This pattern is a little later than scheduled, I’m afraid; I just wasn’t able to write up the pattern until I got over my bronchitis enough to have a clear head. Turning the new techniques I use to create my designs into clear and easy to follow instructions is impossible when my brain isn’t fully functional. But hopefully you’ll agree that it was worth the wait 🙂
I’ve wanted to make a sea otter for years – they are truly adorable. Have you seen pictures of a pair floating together, holding hands?! Awwww!
Sea Otter fun facts
Sea Otters are both the smallest marine mammal and the largest member of the weasel family.
Their fur is the densest of any animal and traps a layer of insulating air bubbles within it to keep the otter warm in the cold ocean waters.
Sea otters almost never leave the ocean. They float on their backs to rest, groom and sleep.
Their diet is shellfish and crustaceans. They often use a rock as a tool to crack open the hard shells.
They have special kidneys that allow them to drink sea water and process out the salt!
To help with my design, I made a list of essential sea otter features:
Sea otters have small sensitive front paws that let then catch their food by touch.
To aid in swimming, their back feet are large, flat and webbed, and their tails are broad and strong.
Their colour varies from beige to very dark brown, and the fur on their heads lightens with age.
They have a diamond shaped nose and small ears. They can close their nostrils and ears when underwater.
I hope the sea otter’s playful nature has come through in my design – especially in the back feet! I think sea otters really need to have something to hold on their tummies for maximum cuteness, so I’ve also included a bonus pattern to make the simple clam you can see in my photos – you can make the closed and/or open (empty) version.
If you pledged towards the commission, you should have already received your copy of the pattern. Otherwise, if you’d like to make a sea otter of your own – or a pair to hold hands – you can now pick up the Sea Otter crochet pattern from the PlanetJune shop!
If you’re not quite ready to buy though, how about queuing Sea Otter on ravelry so you don’t forget about it?
August 20, 2012 @ 7:37 am · Filed under CAL roundups
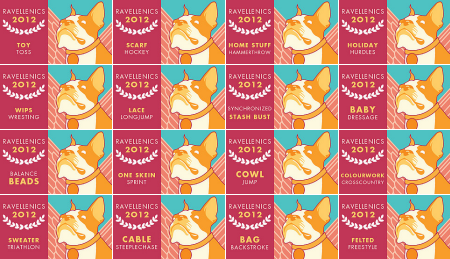
The 2012 Olympic Games, and the yarny Ravellenic Games, have now drawn to a close. I’d like to salute all the members of Team PlanetJune, for participating through competing and/or cheerleading.
Overall, we attained 90 medals in 16 different events – an amazing achievement!
Photo Gallery
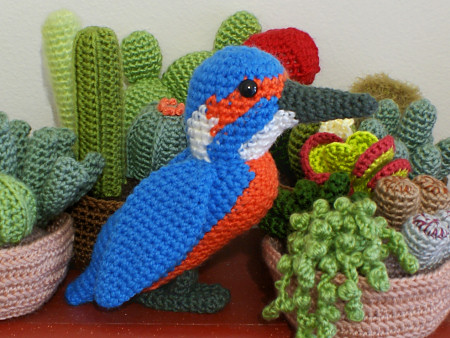
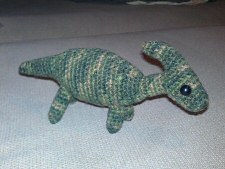
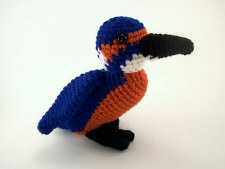
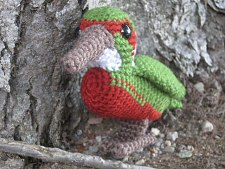
I’ll show you my entries first so I can explain them quickly. The Kingfisher is a replacement for my original that was lost after I sent it to be photographed by a magazine. I’m so glad to have finally had a chance to remake him:
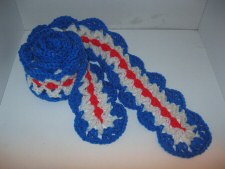
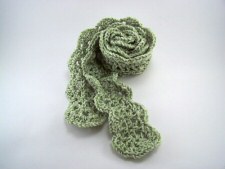
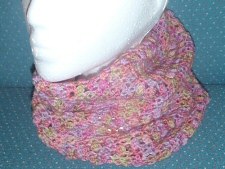
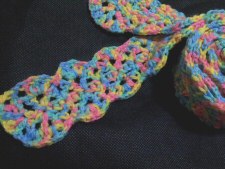
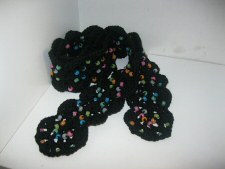
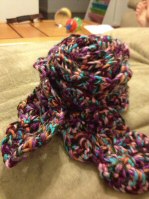
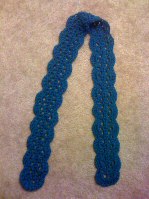
And my other entries were new designs: the (as yet unnamed) scarf will be a new PlanetJune Accessories donationware pattern next month, and the Sea Otter is a commissioned design (pattern coming very soon!):
Here are all the other team entries – notice how people have challenged themselves through quantity of projects, making more advanced accessories, completing old WIPs, or modifying my patterns to include beading, felting, miniaturising, and more…
Luna1130 & hattalahutta
PinkytheLizard & theMarkofSMB
hattalahutta & theMarkofSMB
CrochetChrisie & HotPinkCrayola
Fatals-attraction & CrochetChrisie
theMarkofSMB & petrOlly
CrochetChrisie & AKmtnnymph
Fatals-attraction & CrochetChrisie
theMarkofSMB & abjCrochet
arbitrarily & Enphra
CrochetChrisie & hattalahutta
arbitrarily & tripleb
tripleb & Fatals-attraction
PinkytheLizard & theMarkofSMB
rastakt & theMarkofSMB
theMarkofSMB & SugarAngel
CrochetChrisie & BettyH553
theMarkofSMB & themegababe
petrOlly & petrOlly
Fatals-attraction & theMarkofSMB
CrochetChrisie & Fatals-attraction
CrochetChrisie & klopferli
camaharet & PinkytheLizard
petrOlly & theMarkofSMB
yaney & petrOlly
petrOlly & jukatca
theMarkofSMB & Fatals-attraction
themegababe & BettyH553
Veggie, CrochetChrisie & PinkytheLizard
BanuyeGharbi, MorganAdel & Luna1130
yaney, BiologyJAP & CrochetChrisie
Isn’t that an impressive collection? (Both in terms of quality and quantity: remember, these were all made within the just over 2 week timeframe…) Excellent work, team! 🙂
Prizes!
Thanks to Michelle of Suncatcher Eyes for sponsoring Team PlanetJune! In addition to her beautiful handpainted eyes, Michelle carries a full range of high quality black and clear animal eyes for your amigurumi.
All eligible projects were entered in the draw, and the six winners are:
$10 gift certificate for the PlanetJune shop: PinkyTheLizard
A free pattern of your choice from PlanetJune: hattalahutta, klopferli
10 pairs of eyes (your choice of colours and sizes) from Suncatcher Eyes: theMarkofSMB
5 pairs of eyes (your choice of colours and sizes) from Suncatcher Eyes: petrOlly, SugarAngel
Congratulations to the winners – I’ll rav PM you to sort out your prizes!
All other Team PJ members with projects pictured above will receive the runner-up prize of a PlanetJune discount coupon (I’ll send it as a rav PM, so look out for it there!)
I’m sure the whole team would also like to extend a special thanks to our co-Captain, CrochetChrisie, who helped answer everyone’s questions about the Ravellenic Games rules and took the pressure off me – there’s no way I could have managed the admin for this by myself! To show my gratitude, I’m awarding Chrisie with a surprise gift – Chrisie, it’ll be in the mail shortly 🙂
Competing for medals in the Ravellenic Games was fun, but a little stressful too! If you’d like to participate in a more relaxed no-pressure crochet-along, join us in the PlanetJune Ravelry group for the BotaniCAL from now until the end of September – we’re crocheting beautiful flowers, plants and fruit…
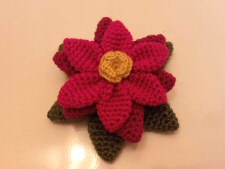
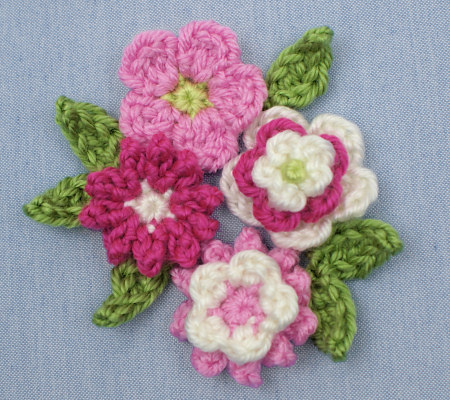
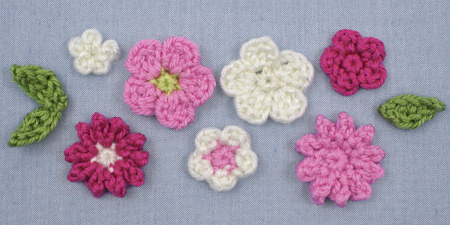
Posy Blossoms is my latest donationware crochet pattern for you! What began as an idea to make a tiny basic flower shape expanded until I had a set of seven different sweet miniature flowers with two leaf designs. As they all go together perfectly, you can mix, match, stack and combine endlessly to create floral embellishments perfect for any situation.
Make them in your favourite colours, or themed colours to match decor or occasion. (Thinking ahead, don’t you agree that dark green leaves with white and/or red blossoms would make beautiful winter/Christmas decorations..?) You can make each blossom in one or two colours, and stack the smaller blossoms on the larger ones in the same or contrasting colours.
Each tiny component takes only minutes (or less!) to crochet. The sizes vary from approx 0.75-1.5″ (2-4cm) diameter when worked in worsted weight yarn, and of course you could miniaturise them further with finer yarn and an appropriately smaller hook.
Use a single flower to embellish a hairclip, stitch two or three to a bag or purse, or combine your favourites into a larger posy for a brooch or pin. Stitch them around the neckline of a t-shirt or cardigan, embellish a photo frame, decorate your amigurumi, create floral crocheted jewellery… The only limit is your imagination!
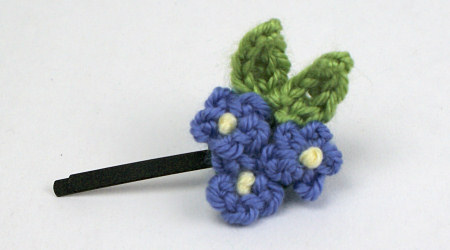
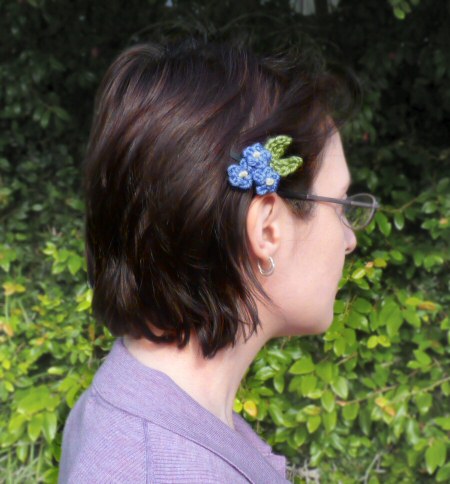
Above and below, you can see one example of how I used this pattern (3 x blossom A with the optional knotted centre, plus 1 x double leaf I) to make a sweet forget-me-not posy hair clip:
As always, the pattern is free for your use, but if you’d like to send me a donation towards it (completely optional), you’ll receive the nicely formatted and easy-to-print PDF version of the pattern as a thank you.
I hope you’ll enjoy this pattern – I can’t wait to see how you use it! I’m hoping we’ll see a huge range of embellishments, accents and decorations, all made using unique combinations and colour schemes.
The new PlanetJune Crochet-Along is an extended BotaniCAL, taking us through from now until the end of September. The botanic theme, chosen by the members of my ravelry group, covers all my flower, plant and fruit patterns, so this is the perfect chance to start creating with my new Posy Blossoms pattern, and to be inspired by how other people are using it!
PlanetJune Botanicals patterns – find them all in the Flowers & Plants section of my shop.
(By the way, although the Ravellenic Games have now ended, the Team PlanetJune roundup and prize drawing will be later this week, as there’s a 24 hour grace period for posting projects to the finish lines and I don’t want to omit anyone from the roundup post or from receiving their contest entries.)
Please join us at the BotaniCAL thread in the PlanetJune Ravelry group if you’d like to crochet Posy Blossoms – or any other PlanetJune Botanicals – along with us!
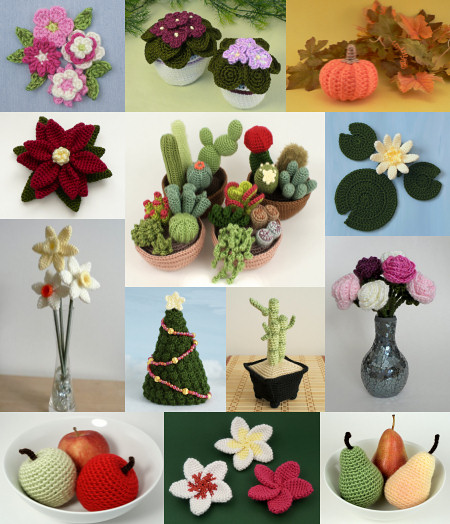
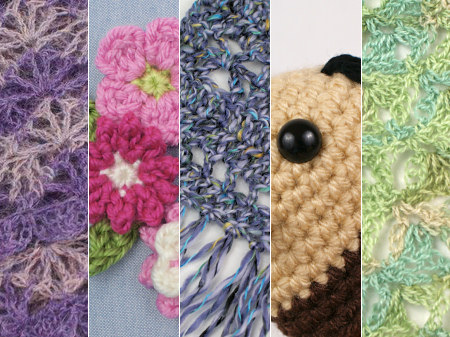
What’s going on chez PlanetJune? Things seem quiet here lately for a combination of reasons. Getting bronchitis has upset my plans a bit (e.g. no July video tutorial as I can’t really talk at the moment without coughing or wheezing), but I’ve also been working on lots of things that just aren’t quite ready yet, so good things are coming! Here’s a little peek at some of my upcoming designs:
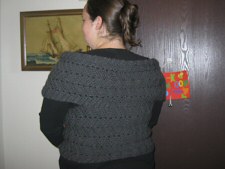
A new shawl design just needs cover photos and then it’ll be ready to launch
A new floral donationware pattern with accompanying crochet-along – coming very soon
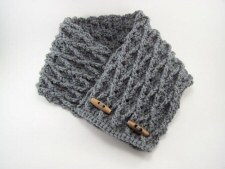
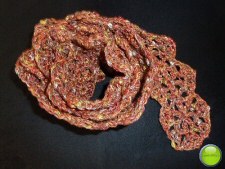
I’ve been working on a scarf during the Ravellenic Games which will become another new donationware pattern
The commissioned Sea Otter pattern is in the works (and looking very cute so far)
I’ve started crocheting another new shawl design – it’s beautiful so far but it’s going to be very large, so it’ll be a longer-term project for me
And I have a few other fun secret projects which I’m not ready to share yet… (If the photo above looks surprisingly short on amigurumi, that’s why – don’t worry, I’m not abandoning my animal designs!)
So I’m not just sitting around feeling sick and sorry for myself (although there may be a bit of that going on too) – I need to keep taking things slowly until I can breathe properly again, but I’m still making progress on things, and I will have exciting new patterns for you soon 🙂
Review and Win contest
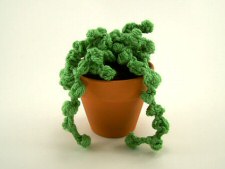
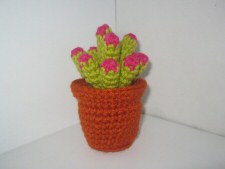
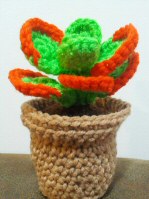
August’s ‘Review and Win’ winner is Aleksandra S, with her Succulent Collection 2 review:
** This review is only for the string of pearls and the small pot as I didn’t make anything else yet **
Stunning and very realistic result, very quick & easy pattern. I want to make more strings of pearls now 🙂
After only reading the tutorial / looking at the photos:
I was amazed how June managed the colourful pattern on top of the living stones – it’s so easy and ingenious! I would like to say I was pleasantly surprised but the quality is just great as always 🙂
Congrats Aleksandra – I’ll email you to find out which pattern you’d like as your prize 🙂
To be entered into this month’s draw for a free pattern of your choice, just write a review of any product in my shop – thank you!
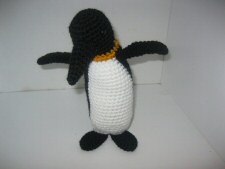
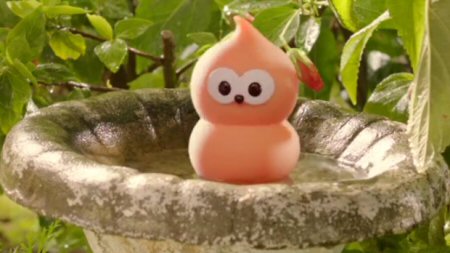
In the UK, there’s a TV ad campaign for an energy company featuring a character called Zingy. It’s a hugely popular series of commercials, but there’s no official Zingy merchandise available (yet).
Zingy character and photo copyright Beatbots LLC, for EDF Energy commercials.
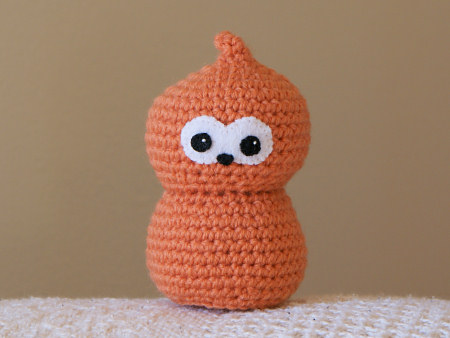
My sister is a big fan so I told her I’d make her a Zingy. Of course, I had no craft supplies with me, so I had to buy everything I needed locally – quite a challenge on the tiny island of Jersey! The best I could manage was DK weight yarn, a 3mm tapered hook (as far as I could tell, there are no in-line hooks available in the UK…), fibrefill, and some black and white felt. Here’s what I came up with:
My crocheted Zingy fan art. I’m not licensed to produce a pattern for the Zingy character, so please don’t ask me for one!
Considering the constraints, I think he turned out well, and the recipient is happy, so that’s the main thing 🙂
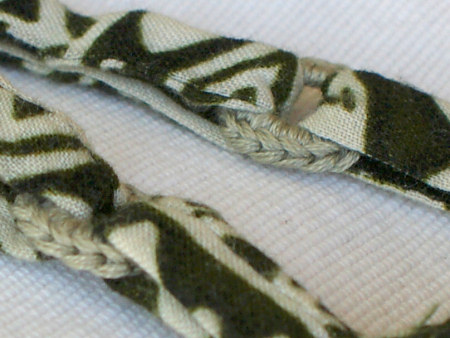
I also had a chance to solve a problem using crochet: my sister had a dress with plastic rings connecting the bodice to the straps, but one of the rings had broken. The only way to replace the ring would be to unpick the stiching on the bodice loop and the strap, and re-stitch them around a new ring. And then I had the idea to crochet a ring directly, with no need to unpick any stitching. I bought some embroidery floss in a complementary colour, made a magic ring that passed through both strap loops, and crocheted over it, rotating it as I crocheted so the straps didn’t get in the way.
Of course, I had to replace both rings so both sides of the dress would match, but it only took a few minutes to crochet each replacement ring, and it ended up looking prettier than with the original plastic rings:
Close-up of new rings attaching the adjustable straps to the dress bodice, crocheted from embroidery thread.
I had packed yarn and hook to create my next crochet lace shawl design while I was away, but I didn’t even get halfway through it as I only worked on it during my flights and on one evening. But that’s okay – I can still look forward to finishing the shawl (I’m planning to do a beaded edging), and I’m glad I could do a little helpful crochet while I was visiting my family!