PlanetJune Craft Blog

Latest news and updates from June

Archive for Punchneedle

punchneedle globe WIP (part 5)

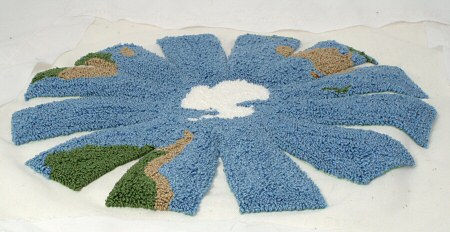
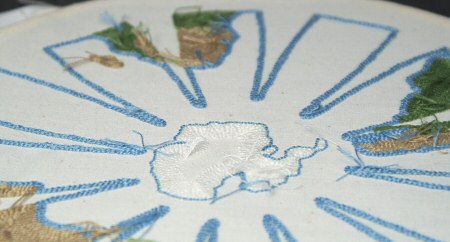
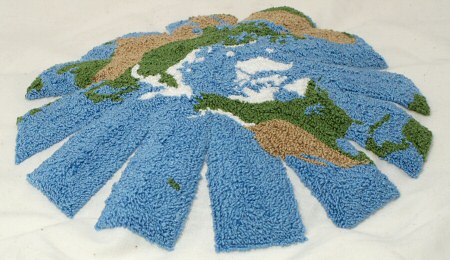
Ah, this is an exciting moment: I think this will be the final WIP post for my punchneedle globe, because…

punchneedle project - work in progress

That’s right, I’ve finished punching the northern hemisphere!

(FYI, it looks wrinkly in the pic above because I’ve just taken it out of the embroidery hoop, and there’s no point in pressing the surrounding fabric because it’ll all be trimmed down shortly.)

Now all I have to do is stitch up this half into a hemisphere shape, as I did for the southern hemisphere (pictured below), and then keep my fingers crossed that it’ll all match up when I put the two halves together!

punchneedle project - work in progress
Will the top half match the bottom half?! That remains to be seen…

That final seam is going to be the hardest part of all. I’ll have all that pleated fabric you see in the pic above, from both halves, to wrangle (I think I’ll trim some of the excess from what you see above before I begin). And, as if that wasn’t enough, I’ll have to stitch almost half of it from the outside (instead of working inside-out, as I do to stitch the flat circles into a hemisphere). That’ll be more difficult in this project than hand-sewing the final seam closed in a normal sewing project, because the loops of the punchneedle stitches splay out over the seam I want to sew from both sides, so I think it’ll be tricky to get my needle close enough to the edge of my embroidery to create a close-to-invisible seam. But I’ll do my best!

Please keep your fingers crossed that this all comes together as I’d hoped – it’s been a huge and time-consuming project, and I really won’t know if it’s going to work out or not until I’ve made the final stitches and I either have a globe or a big lumpy mess…

Stay tuned for the nailbiting conclusion of the punchneedle globe project! 😀

Comments (13)

punchneedle globe WIP (part 4)

Punchneedle Globe menu:

Here’s where we left my punchneedle embroidery globe at the last update:

punchneedle project - work in progress

This next stage is the real test of my design: I based my idea on the concept of a papercraft globe I’d once seen that turns 2D sheets of paper into a 3D globe. So, in theory, I should be able to do the same thing using a 2D embroidery. The moment of truth: I hand-sewed up all the unembroidered darts, to (fingers crossed) convert the flat piece into a hemisphere, and…

punchneedle project - work in progress

It worked! I now have one very nice hemisphere. Thanks to that extra-dense punching I did, the seams are pretty much invisible from the outside. You’ll have to take my word for that, because I’m going to be a little bit mean and only show you the inside of the hemisphere for now – I have to save something for the big reveal once I’ve punched the other half of the globe…

There’s a lot of work left to do to get it finished – the second half should actually take longer than the first: the northern hemisphere has more landmasses, islands, lakes, and general detail that I included in my pattern, so it’s going to take a lot longer to punch than the (mostly blue) southern hemisphere.

But I’ve found something to make my punchneedle go much more quickly from now on! This is a punchneedle spooler:

punchneedle spooler (image courtesy of The Punchneedle Marketplace)

Spooler for Cameo punchneedle (image courtesy of The Punchneedle Marketplace)

It sits in the top end of the punchneedle. You wind your floss onto the spool and can punch for the entire length of a skein instead of having to rethread the needle every metre or so (the floss can easily get tangled or trapped with a length much longer than that). And, with a 2-step threading process, that’s a significant time saving – I think it took me almost as long to thread the needle as it did to use one length of floss!

Slight problem though: punchneedle supplies are pretty scarce these days… I don’t know of any Canadian suppliers of this attachment, and I knew it would cost a lot in shipping to import one from the Punchneedle Marketplace. So what’s a crafty girl to do? Get crafty!

Here’s my homemade punchneedle spooler:

punchneedle project - work in progress
Prototype punchneedle spooler

  • The wire is just heavy floral wire, bent into shape with pliers. It works okay, but I’d like to get some stiffer wire to replace this, now that I know my concept is sound – I don’t think the floral wire will last forever.
  • The spool is just an empty spool from regular sewing thread.
  • I used my Dremel with a cutting disc to cut the pointy end off an IKEA pencil (which fits nicely inside the spool).
  • I hollowed out the graphite from both ends of the pencil with a Dremel drill bit, so that the ends of the wire can slip inside the pencil.
  • The black rubber bands are mini hair elastics. I found that, without those, the spool clicks back and forth against each end of the wire with each punch, and that noise gets very annoying very quickly!

The spool rotates freely on the pencil, so more floss is fed to the needle every time I make a stitch. Isn’t it great to be crafty?! It’s all made with supplies I had on hand, and it works brilliantly!

punchneedle project - work in progress
Starting the Northern Hemisphere

Thanks in part to my new spooler, my Northern Hemisphere is coming along much more quickly – I wonder if I’ll be able to finish the whole globe over the Christmas holiday…

Comments (33)

punchneedle globe WIP (part 3)

Punchneedle Globe menu:

I wasn’t feeling great last weekend so I treated myself to a day resting on the sofa, working on my punchneedle globe project. And I’ve finally made some serious progress: I’ve finished the southern hemisphere! I thought for a while I’d never reach this point – I finished the land masses months ago, but there’s just so much ocean below the equator (i.e. blue, blue, and more blue – so boring!). Here’s where it was last time you saw it:

punchneedle project - work in progress

And now:

punchneedle project - work in progress
The back

You can see how close I made my stitches – in punchneedle there are supposed to be gaps between the rows of stitches, but I intentionally covered the entire surface with stitches so there’d be too many loops on the front. By the way, I always keep those straggly ends long and then clip them at the end, but they aren’t going to show, so I don’t think I’ll bother clipping them (I’m such a rebel!)

punchneedle project - work in progress
The front

Ooooh… I think this just might work!

punchneedle project - work in progress
Close-up

It looks like my over-dense punching strategy is going to work – see how the piece wants to curl under at the edges already? The excess of loops on the front means that the front surface wants to be larger than the back, making it curl. It should mean that when I stitch up the globe, there won’t be any visible bald patches between loops, even when it’s curved into a sphere. Aren’t I smart?!

Thoughts I had while I was punching the neverending blue oceans:

  • I’ve been using 3 strands of embroidery floss. I wonder, could I have used all 6 strands for the ocean and made my stitches further apart (i.e. less of them), or would the result have looked strange?
  • File this under “duh”: why didn’t I dye my fabric blue before I started?! The landmasses would have stuck out realistically from the oceans (the bare blue fabric), and I wouldn’t have needed to punch any blue at all!
  • Of course, now I’m halfway through, I’m committed to the strategy I originally chose, otherwise the two halves wouldn’t match when I eventually assemble the entire globe. But I do like that my method means it’ll all be smooth and even (and snuggly soft!) all over so I’m okay with that.

Now for the (fingers crossed) magic part: turning the 2D into 3D. My idea is probably self-explanatory; I’m going to stitch up those ‘darts’ of unembroidered fabric extending into the circle, to (hopefully) turn it into a hemisphere. Stay tuned!

Comments (12)

punchneedle globe WIP (part 2)

Punchneedle Globe menu:

So, as everyone guessed from my last post (yeah, I didn’t think it’d be much of a stumper!), my ongoing punchneedle project is going to be a 3D globe, embroidered onto two flat circles (with wedge-shaped gaps around the edges so I can stitch them into hemispheres later) and then stuffed and stitched into a full globe.

punchneedle project - work in progress

It’s pretty ambitious, and even more so than I first imagined when I decided on the size: as the fabric will be curved after punching it, the loopy stitches will end up splaying further apart than usual, so I’m punching my stitches very close together so you (hopefully) won’t be able to see the fabric between the stitches after the globe is assembled. It’s sloooow going, but also quite nice to have a ‘mindless’ project I can work on – designing projects all the time is tiring, and, now I’ve completed the design for the globe, this is a soothing project to work on when I’m watching TV, just filling in each area with the right colour.

As you can see from the picture below, I have completely finished 2 of the 12 sections of the southern hemisphere, and I’m partway through the rest. And – hey – is that Australia I spy?

Here’s something that’s made it more fun though: Jessica at How About Orange linked to these cute printable floss bobbins designed by Wild Olive, and I thought they’d inject a bit of cute into the process.

I printed a sheet of bobbins onto white cardstock and cut them out (yes, I did pick the 4 shades that were closest to my floss colours – silly things like that make me happy). In contrast to the globe, they were a very quick and satisfying project!

Here’s a little papercrafty tip for you: to cut a smooth curve like these bobbin edges, hold the scissors steady and rotate the cardboard as you cut.

punchneedle project (work in progress) + cardboard bobbins

As I punch with 3 of the 6 strands of floss at a time, I usually cut a 1.5m length of floss, split it into two, and then leave the other 3-strand length languishing in my project box until I need it. Now I can wind the spare length onto the bobbin, and it’ll be neatly stored until I need that colour again. And I’ve even pre-cut and split an entire skein of the blue floss and wound all the lengths onto my blue bobbin, so I won’t be interrupted with cutting new lengths during my next punchneedle session. (As I’m working on the southern hemisphere, there’s a lot of blue ocean to fill in!)

Printable cardboard floss bobbins: recommended! They may not last forever, but they make me smile and I can always print more when these wear out. Or – shock horror – use the other shades that I already printed… but I don’t know if my matchy-matchy self will allow me to do that: green thread on a red bobbin? That’s just crazy talk! 😀

Comments (8)

punchneedle update

I haven’t posted anything about punchneedle for a while, but I haven’t forgotten all about it: I’ve been working on larger scale projects instead of new small patterns. My punchneedled Moon, with a 5″ diameter, was the largest project I’d undertaken, until I bit the bullet and bought a mammoth 10″ diameter embroidery hoop so I could make some larger, more complex, pieces.

the moon (punchneedle) by planetjune

I was commissioned to make a very interesting project for publication, but the actual publication process has gone through some twists and turns, and it’ll be a while longer before it sees the light of day, so I don’t think I can talk about it yet (or share a picture :(). This is one of the reasons why I find the immediacy of self-publishing so satisfying – I completed the piece in December 2009 and I still can’t talk about it, whereas if I’d self-published it, I’d have been able to share all the details before last Christmas!

But my latest punchneedled piece is just for me, and it’s somewhat ambitious (aka large), so it’s going to take a while to complete. I have a tendency to hide my work until it’s ready for the big reveal when it’s completed, but I think that in this case it might spur me on to keep making progress if I share it as a WIP (work in progress) every now and then.

I was inspired by 3D papercraft models to try something unique: using a combination of punchneedle and sewing to create a full 3D shape. I’m punching the design onto a flat piece of fabric, and then stitching along the lines where you’d glue a tab from one piece to the next in a paper model. I think it’ll work very well, although I’ve never seen anyone do anything similar, so I won’t know for sure until my piece is ready to assemble!

completed paper models
I assembled these paper models for a tutorial I posted at Folding Trees with tips on how to cut and assemble models like these. I’m using the same concept (turning a flat design into a 3D shape) for my punchneedle project!

I invested many hours into it before I even started the embroidery: figuring out the flat shapes I’d need to embroider, so I could eventually cut and stitch them together to create the final 3D shape, and then drawing my pattern in Illustrator. Now, I have no idea if the subject of my punchneedle will be very obvious from this photo, or a bit cryptic – can you tell what it’s going to be? (This is the reverse side, by the way – the side I look at while I’m punching. The other side will look much prettier!)

punchneedle project - work in progress

I hugely underestimated the amount of embroidery floss I’d need to complete this project – I initially bought 10 skeins, but my revised estimate is now 28 skeins! That’s a lot of embroidery, even with the speed of punchneedle (which is much faster than conventional embroidery). This is definitely going to be a long-term project…

buy The Punchneedle Handbook by June Gilbank

If you’re saying “huh? Punchneedle – what’s that?”, you might like to check out my eBook, The Punchneedle Handbook: Miniature Punchneedle Embroidery Basics & Beyond. This eBook includes everything about punchneedle from the absolute basics for those who have never heard of this craft, to my techniques that will allow absolutely anyone to create beautiful punchneedle embroideries. I’ve also made an excerpt from the eBook into a free tutorial so you can get a taste for what punchneedle is about.

So, how about it – any guesses as to what my giant punchneedle project is going to be?

Comments (8)

free pattern: Punchneedle Poinsettia

I doubt you’ll remember this from previous years, but I’ve developed my own little holiday crafting tradition of creating a poinsettia every year. I’m not quite sure why I do it, but a tradition that means I only have to make one item per year and forces me to try something new each time sounds pretty good to me. I suppose at some point I’ll run out of ideas for different crafts to make a poinsettia from, but I’m nowhere near that point yet!

In 2006 (well before the recent kanzashi popularity!), I made a kanzashi poinsettia:

tsumami kanzashi poinsettia

In 2007, I designed the famous crocheted poinsettia (with free pattern):

In 2008, I created the polymer clay poinsettia (with free tutorial):

polymer clay poinsettia by planetjune

And for this year? Why, it had to be punchneedle embroidery, of course! Here’s the 2009 PlanetJune Poinsettia:

punchneedle poinsettia by planetjune
Please click through to see the larger version – it’s worth it!

If you’d like to punch your own, the Punchneedle Poinsettia pattern is free! If you’re new to punchneedle, you might also like to consider buying my eBook, The Punchneedle Handbook, which will teach you everything you need to know!

This 2.5″ Poinsettia design uses Punchneedle Embroidery for a fast and festive result. It can be made as an applique and attached to almost anything to give it a more Christmassy feel!

Here are a few ideas for use, to get you started:

  • Attach a felt backing and a pinback to make it into a removable pin
  • Attach a felt backing and hanging loop and use it as a tree decoration
  • Use washable fabric glue to attach it directly to a table runner or fabric napkin ring
  • Use fabric glue to attach it to a bag or purse as a pretty embellishment

punchneedle poinsettia by planetjune

Hope you enjoy the latest addition to my poinsettia collection!
Go to the free Punchneedle Poinsettia pattern >>

Comments (10)

Serengeti Sunset & interview

The lovely Sister Diane interviewed me for the latest episode of her podcast, CraftyPod #97: Two Ways to Publish a Craft Book, with June Gilbank. We talked about our experiences in print and eBook publishing. If you have any interest in publishing a craft book at some point, either the traditional way (through a print publisher) or by self-publishing an eBook, you should definitely listen – there’s a lot more to publishing a book (either way) than you might realise!

For my non-crafty family and friends who don’t have any interest in the subject matter but just want to hear me and my English accent, my section starts at 13 mins through 🙂

I’m also very happy to be able to reveal my latest punchneedle design, entitled Serengeti Sunset. Distinctive acacia trees are silhouetted against the African sunset as giraffes and an elephant wander the plains of the Serengeti:

serengeti sunset punchneedle embroidery by planetjune

This design is a little different from my others – I laid it out as a long landscape, which would make a great embellishment for a purse or bag, as well as a stunning wallhanging.

I also modified the design to create a tapered coffee sleeve to fit over a standard disposable coffee cup. The loops of punchneedle embroidery form a thick, dense fabric which is perfect to use as a barrier to stop your hand from being burnt while holding your hot beverage of choice! Look stylish while you help save the environment by not using a second cup or a cardboard disposable sleeve each time you buy a coffee:

punchneedle coffee sleeve by planetjune

The full instructions for both the flat rectangular embroidery and the tapered coffee sleeve (with full assembly instructions) are provided in the Serengeti Sunset pattern.

The Serengeti Sunset pattern costs $5, or take advantage of my new special offers:

I’ve set up a new mailing list for my punchneedle designs, so please sign up for that if you’d like notification when I release new patterns!

I hope you like my latest design! Please leave me a comment if you
do…

Comments (10)

last chance for a free pattern!

embroidery floss by planetjune

This weekend is your last chance to take advantage of my introductory offer of a FREE punchneedle pattern of your choice when you buy my eBook, The Punchneedle Handbook.

Praise for The Punchneedle Handbook:

The book is brief, clear, direct, logical. It includes everything you need to know to get started. And, best of all, June tips us off to the most common errors and explains how to avoid or correct them. I know exactly what I was doing wrong now (several things), and I can’t wait to try it again.
Excerpted from CraftGossip review by Denise Felton

June has done a bang-up job of outlining everything you need to know to get started with this craft: how to prepare your materials, how to thread the needle and punch stitches, how to get perfect outlines and color effects, and how to troubleshoot problems while you’re learning. June also covers the basics of finishing your work and preparing it for incorporation into other crafts. It’s all illustrated with nice, clear photographs.
Excerpted from Craftypod review by Diane Gilleland

buy The Punchneedle Handbook by June Gilbank

New pricing will be in effect from Monday, so if you haven’t got around to buying The Punchneedle Handbook yet, now is the perfect time to take the plunge!

(Also on Monday, I’ll have a brand new African-themed punchneedle design to show you…)

Comments (3)

Next entries » · « Previous entries
  • Quick Links: Crochet

    navigation: arrow

    buy crochet patterns and accessories from my online store

    'Everyday Crochet' and 'The Essential Guide to Amigurumi' crochet books by June Gilbank

    Crochet video tutorials and step-by-step photo tutorials

    Free PlanetJune crochet patterns

    Frequently Asked Questions

    Quick Links: Crafts

    navigation: arrow

    Punchneedle Embroidery information, ebook & patterns

    Papercraft ebook & tutorials

    Free PlanetJune craft projects & tutorials

  • Blog Post Categories

  • Blog Archives

  • Welcome to PlanetJune!

    June Gilbank

    Hi, I'm June. Welcome to my world of nature-inspired crochet and crafting. I hope you enjoy your visit!

    If you'd like to get in touch, you can contact me here.
    crocheted Canadian flag by PlanetJune
  • A fanned-out pile of the books Everyday Crochet and The Essential Guide to Amigurumi, with text 'The answers to all your crochet questions at your fingertips - find out more'
  • Support PlanetJune!

    Want to say thanks? You can send me money in seconds at paypal.me/planetjune (over $20) or paypal.me/planetjune2 (under $20) or send me a donation through my shop.

    Or simply click through from my links before you shop at Amazon, Etsy, KnitPicks, LoveCrafts or Crochet.com, and I'll make a small commission on your purchase, at no cost to you! Start here:

    ♥ Support PlanetJune ♥

    Tip: This link is also in the footer of every page!

    Thank you so much for your support!