PlanetJune Craft Blog

Latest news and updates from June

Archive for July, 2015

free pattern: Crochet Braid Bracelet

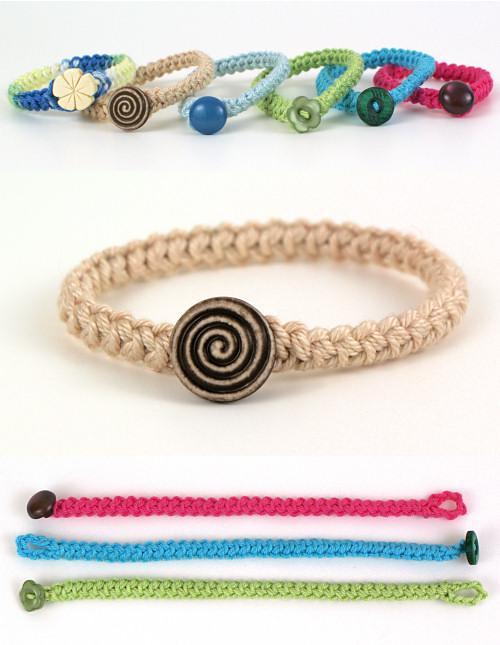
Even though I’m in the middle of winter, I’m channeling summer with my new free PlanetJune Accessories pattern: the Crochet Braid Bracelet.

Crochet up a speedy braided bracelet with this decorative cord technique that’s deceptively easy to crochet as it uses only single crochet stitches! Customize the length and look to match your own style or make a personalized gift. Simply change the yarn colour and button fastener to go from playful children’s jewellery to a rugged man’s bracelet, or from a beachy summer look to a fashion accessory in your favourite colour.

crochet braid bracelet pattern by planetjune

Isn’t it lovely? This bracelet uses a special technique that uses single crochet stitches worked in an unusual way to create a decorative cord. It’s very easy once you’ve seen it in action, so I’ve made a new video tutorial for this technique: Basic Crochet Cord (as always, my videos are available in right- and left-handed versions). Once you’ve made a bracelet or two, you’ll probably want to make more of these cords to use for other things (I have some suggestions on the video page!)

Although the basic Crochet Braid Bracelet is a free pattern, I’ve included lots of bonuses if you choose to donate for the PDF version:

  • Step-by-step text and photo instructions for the Basic Crochet Cord (in right- and left-handed versions), so you can make the bracelet without having the video in front of you
  • Bonus tips and advice
  • Instructions to make a double-stranded variation – a neat two-strand bracelet with the button centred over the crossover point

crochet braid bracelet pattern by planetjune

I hope you’ll enjoy crocheting bracelets as much as I do – as you can see, I couldn’t stop once I got started… More colours! More button styles! So much fun…

Go to the free Crochet Braid Bracelet pattern >>

Or jump straight to donate:

Order the Crochet Braid Bracelet pattern >>

Not ready to make it yet? Add it to your Ravelry queue:

Comments

block printing workshop

block printing workshop

On Saturday, I attended a block printing workshop, taught by Jesse Breytenbach, a Cape Town-based illustrator and printmaker. Jesse has a Masters in printmaking and many years’ experience of relief printing, producing beautiful textiles like these:

block prints by Jesse Breytenbach

The last time I tried printmaking was ‘carving’ into styrofoam with a pencil in primary school(!), but I love learning and I love making things, so I couldn’t pass up the chance to learn a new skill from a world expert in this craft.

I loved that this workshop wasn’t a class to make a specific project, but a way to learn the skills and techniques which we can then apply to any projects in future. Jesse just told us to draw simple shapes and then start to carve them….

block printing workshop

We used plastic easycut lino and learnt how to use a selection of carving tools to turn our drawn shapes (above) into a block ready to print from (below).

block printing workshop

Jesse (below, left) walked around throughout and offered help and insight to all the participants. It was so useful to hear all her tips and expertise as the workshop progressed.

I started out far too timidly with carving away the excess material, but by the end of the class I really felt like I understood the process: how to make clear outlines, how to carve fine and deep lines, how to efficiently clear away unwanted material, and how to check if the block is finished or needs a bit more work.

block printing workshop

Then it was time for the messy part: inking up our blocks and printing onto fabric!

block printing workshop

Everyone else’s test blocks were far more ambitious than mine – I just wanted to learn to carve, but the others made far more complex shapes with more fine detail and multiple colours. Here are some of my favourite prints from other participants:

block printing workshop

Looking at the variety of blocks we made, you can start to see how versatile this medium is. It was really interesting to see how all the different types of blocks behaved when they were printed.

I rotated my simple ‘boring’ block to make different patterns, which was fun and yielded some surprisingly interesting patterns! These were just test prints, so I tried to judge the spacing and angles by eye, but, with a few registration marks so I could print them evenly, I think I could make some really nice prints from my little block.

block printing workshop

This workshop was such an enjoyable and creative morning. I usually make things in isolation, so it was really fun to be creative in a group setting and get to see what other people were making. I’d definitely recommend learning a new craft from an expert, if you get the chance – they can point out exactly where you’re going wrong so there’s a lot less trial-and-error and having to figure things out for yourself.

If you live in or near Cape Town, I can highly recommend learning about block printing from Jesse! If you’re interested, contact Jesse for more information or to sign up for her mailing list for notification of her next workshop dates.


Once I got home I felt so fired up by learning a new skill, I really wanted to do some more carving. My ultimate goal when taking this class was to be able to carve a block in the shape of my PlanetJune yarn planet logo. Before I went to the workshop, I thought I’d need lots of practice before I even attempted it, but I was so excited by the whole process that I couldn’t stop myself from getting started right away, on the same day…

As a novice with only a few hours’ carving experience, I knew I’d probably mess up the carving a few times and waste some lino, and I was prepared for that to happen. But I took it slowly and steadily and remembered Jesse’s advice, and, somehow, I didn’t make any critical errors – I even remembered to carve my block as a mirror image so the design will print the right way round!

planetjune logo block print

And a couple of hours after starting, I’d gone from a square of blank lino and a piece of plain fabric to a PlanetJune yarn planet print…

planetjune logo block print

I’m so excited by all this! It feels really special to have my own hand-carved block so I can print my own hand-designed logo.

What am I going to do with it? Well, I’m planning to sew up some project bags to store my crochet works-in-progress, and print my logo in one corner of each one. They’ll be PlanetJune projects in more ways than one – isn’t that just perfect?!

Comments (8)

purple cardigan with lace detail

This is sweater #6 of my ‘learn to knit by making a dozen self-designed sweaters’ project. (Here are links to #1, #2, #3, #4 and #5, if you’d like to see my progress.)

I wanted to stretch myself – but not too much! – with this cardigan, so I decided to include a narrow lace panel up both arms and on either side of the button band on the front as a test to see how I’d like doing something that takes a bit of extra concentration. And look at the result!

purple cardigan

It looks almost professional, doesn’t it? I picked a very simple stitch pattern that’s only 5 stitches wide, and only 1 in every 4 rows actually involves doing anything other than knits and purls, but it made a huge difference to the look of the cardigan.

purple cardigan - detail

This lovely lace panel runs all the way up each sleeve.

(And yes, I know the yarn colour looks completely different in these close-up pics, but purple is notoriously difficult to photograph, and the different lighting conditions inside and outside didn’t help with that! The true yarn colour is somewhere between the two – a very muted plum colour.)

purple cardigan

The rest of the cardigan is just stockinette (with my usual waist shaping for fit) and the non-lace parts knitted up fairly quickly. I really liked the seed stitch button band from my previous cardigan, so I used the same band for this one, and also made matching seed stitch cuffs and bottom band, to tie it all together.

purple cardigan - detail

I wanted to make polymer clay buttons again, but I didn’t think I’d ever be able to match the purple of the yarn with my buttons so I decided that a neutral contrasting colour would be safest. In case you think everything goes right first time for me, I’ll have to show you my disastrous first attempt at making the buttons for this cardigan… but I’ll save that for another post! Luckily, things went much better second time around.

I used Sculpey Granitex which has a built-in stone effect, so I decided to keep it simple and just cut plain circular buttons with two holes – no further embellishment required.

purple cardigan - detail

I finished with the same details I’ve used in the past: sewing thread to match the yarn instead of the button, and hidden anchor buttons inside the button band to avoid putting too much stress on the yarn. Those little details always make me happy, even though I know nobody else will notice them, but it’s an added pleasure every time I put on something I’ve made and get to enjoy the little finishing touches.

purple cardigan

This is the halfway point of my learn-to-knit project and I’m so pleased with how this cardigan turned out. Knowing how to make a sweater that fits me makes all the difference – this is a cardigan that can button all the way down without drowning me at the bust and waist or pulling at the hips. It’s revolutionary!

It’s really worth learning how to make clothes (whether you’re sewing, knitting or crocheting) that fit you properly and don’t make you feel that (for example) your hips must be the size of a house because you can never fasten the bottom button on any store-bought cardigan. My problem now is that I think I may have to learn to sew clothes too, because I’d really like all my clothes to fit properly after discovering how good that feels! Maybe that’ll be my next learn-to-craft project, once my dozen sweaters are finished…

After this success, I’ve been inspired to get a little more adventurous with the lace in my next cardigan – and you’ll see the results of that when I finish #7!

Comments (9)

South Africa wildlife VII: Durban

Last weekend, I took the opportunity to travel with Dave, as he had an astronomy conference in Durban, on the other side of the country. South Africa is so huge that it takes 2 hours to fly from coast to coast, from Cape Town to Durban. We stayed at Umhlanga Rocks, a resort village just north of the city of Durban.

durban_from_cape_town

Cape Town is on the cold Atlantic Ocean, and Durban is on the warm Indian Ocean, so the climate is quite different. We’re in the middle of winter at the moment, and it can get pretty cold in Cape Town, but this is Durban’s weather:

durban1

Not a horrible place to come for a winter weekend break! And waking up to this gorgeous sunrise over the ocean was quite nice too…

durban2

While Dave was working, I walked along the promenade by the beach and hunted for wildlife. It’s amazing what you can find, when you really look. What’s that on the roof of that hotel?

durban3

It’s a monkey!

durban4

Vervet monkeys are common in Durban. We saw some from the car as we were leaving the airport, but I couldn’t stop on the highway to take photos, so I was secretly hoping I’d be able to spot one when I had my camera ready. I got lucky with this thoughtful-looking windswept monkey – doesn’t his fur look soft?

durban5

I also spotted lots of birds that I recognised as being related to ones I know from Cape Town, but different regional varieties. I had to look them all up when I got home, like this stunning Spectacled Weaver:

durban6

And this happy little guy is an African Pied Wagtail:

durban7

A sunbathing skink:

durban8

A handsome Dark-Capped Bulbul (the Cape Bulbuls I see in my garden have white rings around their eyes):

durban9

And Common Mynas, which I didn’t expect to see in South Africa!

durban10

I was amazed to spot this wild bee hive half-hidden beneath the leaves of an aloe:

durban11

And very happy to see my first Speckled Mousebird (it’s hard to see in the photo, but its long tail feathers extend right down to the bottom left of the picture):

durban12

But possibly best of all was when I spotted a pod of dolphins, swimming together in the sea!

durban13

Although my photos don’t really capture the magic, it was just beautiful to watch as they came up to the surface and dipped under again as they swam…

durban14

It was a lovely, if very short, getaway. My knee held up to a lot of walking, and didn’t hurt at all provided I stayed on flat, paved surfaces. So I’m definitely not up to hiking just yet, but I think I’m ready to cautiously resume my quest for wildlife. 🙂

And I’m also consciously working to improve my wildlife photography skills – I don’t know if you can tell that from these photos, but I’m trying! I’ll only ever be an enthusiastic amateur in this area, and there’s a lot of luck involved in wildlife photography, but I’m happy that I managed to capture almost everything I saw last weekend in a fairly pleasing portrait. I think I’ll keep improving with more practice and trying to be more aware of lighting, surroundings, etc.

I hope you’ve enjoyed my little window into some of the wildlife on the east coast of South Africa!

Comments (6)

  • Quick Links: Crochet

    navigation: arrow

    buy crochet patterns and accessories from my online store

    'Everyday Crochet' and 'The Essential Guide to Amigurumi' crochet books by June Gilbank

    Crochet video tutorials and step-by-step photo tutorials

    Free PlanetJune crochet patterns

    Frequently Asked Questions

    Quick Links: Crafts

    navigation: arrow

    Punchneedle Embroidery information, ebook & patterns

    Papercraft ebook & tutorials

    Free PlanetJune craft projects & tutorials

  • Blog Post Categories

  • Blog Archives

  • Welcome to PlanetJune!

    June Gilbank

    Hi, I'm June. Welcome to my world of nature-inspired crochet and crafting. I hope you enjoy your visit!

    If you'd like to get in touch, you can contact me here.
    crocheted Canadian flag by PlanetJune
  • A fanned-out pile of the books Everyday Crochet and The Essential Guide to Amigurumi, with text 'The answers to all your crochet questions at your fingertips - find out more'
  • Support PlanetJune!

    Want to say thanks? You can send me money in seconds at paypal.me/planetjune (over $20) or paypal.me/planetjune2 (under $20) or send me a donation through my shop.

    Or simply click through from my links before you shop at Amazon, Etsy, KnitPicks, LoveCrafts or Crochet.com, and I'll make a small commission on your purchase, at no cost to you! Start here:

    ♥ Support PlanetJune ♥

    Tip: This link is also in the footer of every page!

    Thank you so much for your support!