PlanetJune Craft Blog

Latest news and updates from June

Archive for May, 2010

PayPal: a warning

After using PayPal to accept payment for all my sales for years without incident, I feel utterly let down by their service today. I’ve discovered that mine is not an isolated incident, but arose from a decision on their part to exclude virtual products from their Seller Protection policy. So if you sell patterns, eBooks, or any other information product, please read on and spread the word about how you may end up out of pocket when PayPal decide to return your customers’ money to them – after they have already downloaded your products!

Here’s the scenario:

  1. Customer orders lots of patterns and pays with her husband’s PayPal account. (Note: she is a repeat customer and has ordered 4 times before this, always paying with her husband’s account.)
  2. Customer downloads her patterns and everyone is happy.
  3. PayPal get suspicious of a potential fraud because she’s paid with an account that is not her own.
  4. PayPal dispute the transaction and put a hold on the funds so I can’t access them while they investigate. PayPal contacts me and customer.
  5. I send PayPal proof that customer has downloaded patterns.
  6. Customer, for whatever reason, does not respond to PayPal’s email.
  7. PayPal decides this is proof that customer is a fraud, and returns my money to her.
  8. Customer has patterns AND money. I have nothing except for a bad taste in my mouth.
  9. I phone PayPal, sure that this silly mistake will be sorted out if I can speak to a real person, right? PayPal rep informs me that virtual items (e.g. patterns) are not covered under their Seller Protection, and that all I can do at this stage is contact my customer and ask her nicely if she’d like to pay again for the goods she’s already received.

So apparently, all you need to do if you’d like some free stuff is to order it online, pay with a friend or relative’s account, and then get your co-conspirator to ignore any emails from PayPal enquiring if they really did place that order. PayPal will reverse your payment, but by that time you’ll have your merchandise already – and you’ll get your money back too! Sweet! Oh, except for the poor seller, who is left with nothing.

Nice going, PayPal.

I am so upset about this, but the part I really don’t understand is that PayPal decided that not getting a response from my customer’s husband was proof that my customer had taken the money from him without permission, and made them decide to return the money to him.

There are many legitimate reasons why my customer’s husband could have not responded, for example:

  • He was out of town or sick and didn’t check his email
  • He only uses that email account for PayPal payments and doesn’t check it at all
  • The email from PayPal was filtered as Spam and he never saw it
  • He did see it, but assumed it was a phishing scam and didn’t respond

Any of these are perfectly legitimate (and likely) reasons for his non-response, and do nothing to prove that his wife stole the money from him and thus it should be returned to him. Surely the only way PayPal could really have obtained proof of this so-called theft is if the husband responded to PayPal saying “yes, this money was taken from me without my permission” – and PayPal confirmed to me that this did not happen!

I am appalled that PayPal would take such a stance. This entire scenario was based solely on a “review of recent transactions” that PayPal took it upon themselves to conduct. There was never any complaint for PayPal to respond to! They just decided to “protect” the buyer (my customer’s husband) even though he had not complained about the transaction, and didn’t even respond to PayPal to confirm that any fraud had occurred.

So the buyer got his money back, even though he didn’t ask for it, and a trustworthy small business owner lost out on a sizeable transaction, even though no theft/crime/fraud/error has occured. The only error is on PayPal’s part, for taking this scenario to such an absurd conclusion.

Considering that I conduct all my business online, through PayPal, that means that PayPal basically get to keep 3% of my gross income! You would think that would make them eager to look after reliable customers like myself who keep them in business.

But, apparently, PayPal do not deem sellers of virtual products worthy of protection. And in this age of so many digital products – patterns, eBooks, etc – this is a decision that affects many of us! I think we should all be aware of it, even though we’re pretty much stuck with using PayPal because there sadly isn’t much competition for their service. Let’s hope that changes, or that PayPal will take notice and change their policies to allow some kind of protection for those of us that make our living selling virtual products.

Luckily in my case, after hours of worry on my part, I heard back from my lovely (and honest) customer, who has paid me (again) for the patterns. Let’s hope that PayPal don’t decide she’s still “a fraud” and give the money back to her husband again!

Comments (19)

Yeti & Bigfoot crochet patterns

I was commissioned by comic book writer Jeff McClelland to design a cute yeti – Jeff’s comic book series, Teddy and the Yeti, is about a robot and a yeti who defend the Earth from external threats. A yeti is a bit of a departure from my usual subject matter, but it was an interesting challenge and here’s what I came up with, using colours inspired by the comic book yeti and adding a large dose of cuteness to the mix:

crocheted yeti by planetjune

The Yeti, or Abominable Snowman, is a legendary Himalayan creature. I’ve also made his North American cousin, the Bigfoot, or Sasquatch:

crocheted bigfoot by planetjune

My Yeti and Bigfoot are cute and shy and have no idea why some people think of them as ‘abominable’ or ‘monsters’ – it must be because of their giant size – they stand at fully 7 inches tall 😉 They have brushed bodies and jointed arms. If you’d like to make your own mini army of not-so-abominable mythical creatures, the Yeti and Bigfoot crochet pattern is now available in my shop!

yeti & bigfoot crochet pattern by planetjune

What do you think? Should I come up with some more Mythical Creatures designs? I’d love to design a dragon, for starters…

Comments (14)

box of bits

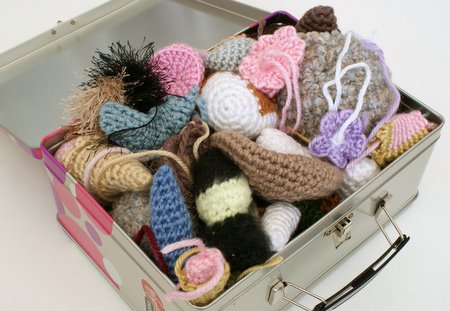
One of my crazy habits idiosyncracies is that I hate to throw anything away. As a result, I have a box full of rejected crochet pieces: the prototypes that didn’t work out; the spare pieces I made to take photographs for patterns. The box is now full to overflowing (and has been for a long time!), and I’ve sometimes wondered if I’m being stupid by keeping these useless pieces.

box of crocheted bit by planetjune

But, are they really useless? No, they are not! Allow me to present the case as to why I am actually very smart for keeping all these random bits:

Exhibit 1: Photo Props. When I needed to take a photo for my stitch markers, I just delved into the box to find some photogenic pieces to clip the markers to for my photo:

stitch markers for crochet
The pieces in this photo are actually (clockwise from top left): a rejected flower design from my African Violet pattern; a snout from a prototype pig that never made the cut; and a spare section of shell from my Sea Turtle!

Exhibit 2: Experimental Pieces. When I wanted to try out yarn brushing with non-wool yarns, I delved into the box to find some pieces I could test it on:

brushed crochet experiment
Cotton and acrylic samples – perfect!

Exhibit 3: Emergency Yarn. I can’t believe this has happened to me twice now: a couple of weeks ago, I ran out of black yarn with one round to go on the final leg of my Farmyard Pigs, and yesterday I ran out of white yarn with one round to go on another new design..! The black yarn was old and a new skein probably wouldn’t have matched, and the white yarn was out of stock when I went to buy a new skein… What’s a girl to do?!

farmyard pigs amigurumi by planetjune

Luckily, in both cases, after a momentary panic, I thought to search through the magic box for any pieces made from those same yarns. And there I found a rejected Boston Terrier ear that was made from the right black yarn, and a partial Beagle body that contained the right white yarn – a minute of frogging and I had salvaged more than enough yarn to finish both my amigurumi 🙂

The defence rests – one more crazy perfectly sensible habit justified! The box of bits is staying in my craft room – I wonder what it’ll come in handy for next time…

Comments (20)

farmyard pigs crochet pattern

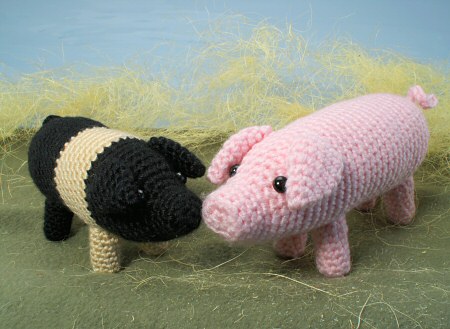
I’ve seen a lot of cartoony amigurumi pigs but I thought it was about time we saw a more realistic-looking pig design, so here’s what I’ve come up with:

farmyard pigs amigurumi crochet pattern by planetjune

I named this design Farmyard Pigs to denote that it’s a realistic pig pattern. Then I realised that the word farmyard is British English, and wasn’t sure if my US-based audience would understand it (the US equivalent is barnyard) so I did a quick poll on Twitter to check. The results were varied, but overall it seems that, although most Americans wouldn’t use the word farmyard, they would understand it well enough for my purpose. So, phew! The pattern name stands 🙂

I’ve created the pattern with two variants: the simple pink colourway, and as a black saddleback pig with a pale coloured band (the ‘saddle’ of the name – you could make it in pink, white or beige) and forelegs. The pattern includes full instructions for both versions – including positioning instructions for the single-coloured pig’s forelegs, where you don’t have the visual cue of the band to guide you!

farmyard pigs amigurumi crochet pattern by planetjune

It’s a really quick and easy pattern to work up, as the head, body and snout are all worked in one piece, but there’s some clever shaping around the face (which I hope you can see in these photos) that gives the piggies their personality!

One thing: I’d just like to clarify that, although my saddleback pig is smaller than my pink pig, both versions of the pattern make the same sized pig; the size difference between my samples arises because the pink yarn I used was slightly thicker than the other shade!

If you’d like to make your own piggies, you can find the Farmyard Pigs crochet pattern in my shop!

Comments (18)

refashioning an unflattering top

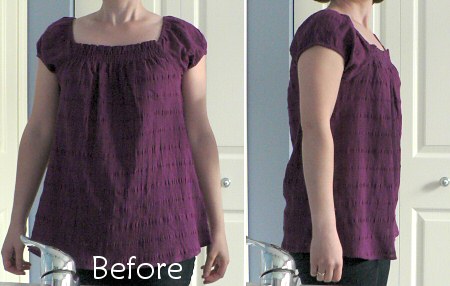
I bought a cute summer top last week. It was very inexpensive, the colour was lovely, the fabric had a nice texture, and it looked like it would be a cool, pretty, summer top.

And then I tried it on. Um…

the original baggy top
Please excuse the bathroom fixtures in these photos – it’s the only place I have to take photos of myself in the mirror!

I don’t know which body types the ‘potato sack’ look would flatter, but it’s certainly not mine. Is it a maternity top? No it’s not – I did check after seeing the fit, or lack thereof! Do I need a smaller size? No – it’s a size XS. Ridiculous.

I thought of returning the top, but then I decided to try a little refashioning instead to see if I could improve it. The fabric doesn’t stretch, so I had to take care not to make it too fitted – I need to be able to get it on and off!

Step 1: Measure for new side seams. I turned the top inside out, tried it on, and pinned new seamlines down each side. I took in about an inch and a half on each side, tapering out a bit at the bottom because I didn’t want it to get too tight around my hips. (Turning the top inside out first lets you pin the new shape while you wear the top, and means that you can stitch directly along your pin lines once you take it off.)

Step 2: Sew new side seams and cut off excess fabric. I stitched along my pinned lines with a straight stitch, and then cut off the excess fabric 1/4″ outside my new seams. A serger would be helpful here, but I don’t have one, so I used a zig zag stitch to overcast the new raw edges so they wouldn’t unravel after cutting the fabric.

taking in the side seams
L: pinning the new seams; R: the top after sewing the new seams

Already a little improvement, but I think we can do more…

Step 3: Add an elastic empire waist at the front. I tried on the top and pinned an empire waistline under the bust, from one side seam to the other. Next, I measured myself along that line and cut a piece of 1/4″ elastic to the same length. I pinned the ends of the elastic to the side seams at the front along the empire waistline. To keep the resulting gathers in the fabric even, I stretched the elastic so that the fabric was flat, and pinned the two together at several points along the elastic.

elastic pinned in place

Step 4: Stitch elastic in place. I picked a pretty stretch stitch that happened to match the texture of my fabric, and stitched the elastic to the front of the top, stretching the elastic as I went so that the fabric lay flat as I sewed.

right side of empire waist

Now the front looked good, but the back was still bulging with excess fabric.

Step 5: Make ribbon ties. I salvaged the strips of fabric I had cut from each side and unpicked the original seams so I had 2 strips of fabric from each side of the top. I ironed them flat and trimmed each pieces into a 1″ wide strip. Then I stitched each pair together to make two longer strips, and ironed the long edges into the middle (using my 1/2″ bias tape maker to keep the strips straight). I couldn’t hide the raw edges because I didn’t have enough fabric width to fold the strip in half again, so I just zigzag stitched down the middle of each strip, catching both raw edges as I went. I ended up with two 24″ ribbons to tie together at the back of the top.

ribbon tie

Step 6: Attach ribbon ties. I unpicked enough of each side seam just underneath the elastic to insert the unfinished end of the tie to the inside. I then turned the top inside out and re-stitched the side seams, trapping each tie in place as I sewed.

Turn it back the right way out and… Ta-da!

refashioned top

Still loose and floaty, but it has enough shape to not make me look horribly dumpy – which, as I’m only 5’2″ tall, is a prime consideration for me! Potato sack into cute summer top in 6 easy steps 🙂

Comments (28)

cute plush hamster

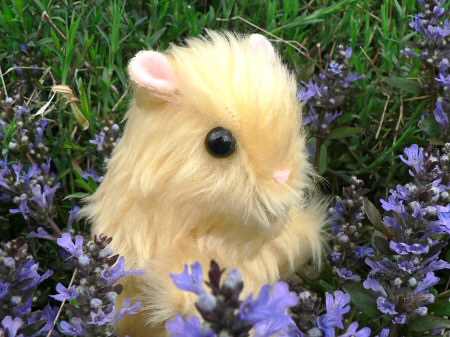
It just occurred to me that I haven’t really shown you this hamster yet. You may have spotted him (in progress) in the demo video for my Detail Stuffing Tool:

I wanted to make a stitched project to use in the demo video, to show people that my tool has uses beyond stuffing amigurumi. Coincidentally, only a couple of days earlier, I’d saved the link to an adorable hamster pattern at Nuno Life, even though I had no plans at the time to make one. And then the perfect excuse came along: a cute hamster toy and the prop I needed for my video, all in one!

plush hamster by planetjune

When I was clearing out my old bedroom at my parents’ house last year, I brought back all my old craft supplies from when I was a kid: rubber stamps, spirograph, cross stitch supplies, and a small stash of fur fabric and felt from my pre-teen toymaking endeavours. It seems strange that I’ve had these materials for around 20 years (let’s not think about how old that makes me sound!) – is that old enough to call them ‘vintage’ craft supplies? Ha!

I found that I had the perfect golden hamster-coloured fur fabric and pink felt in my rediscovered treasures. I’ve always hoarded supplies, to the extent that I used to not use anything in fear of making a mistake and ‘wasting’ it, so it’s especially satisfying to finally be able to use some of my precious, carefully guarded materials.

The pattern was easy to follow (just remember that, as with most Japanese sewing patterns, the pattern shapes don’t include a seam allowance, so cut outside the lines to add your seam allowance) and the minimal instruction was enough to piece it all together. I snipped two tiny eyeholes in the fur before stuffing so that I could use safety eyes with backs. The nose (made by the pattern seams) seemed too low to me, so I cut a tiny piece of felt and made a higher nose. Finally, I trimmed the fur around the eyes so they weren’t obscured.

plush hamster by planetjune

It was a small and satisfying hand sewing project, and look how cute my hamster is – especially those little ears!

plush hamster by planetjune

If you’d like to make one too, check out Runo’s free hamster pattern 🙂

Comments (8)

April’s winners!

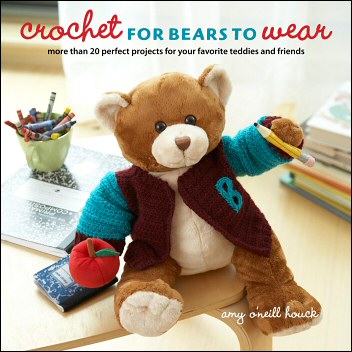
I have two winners to announce today…

First up, the winner of a copy of Crochet for Bears to Wear.

crochet for bears to wear

There were 80 entries, and the randomly chosen winner was… #1! (Huh, how often does that happen?! I guess 1 in 80 times in this case; although it seems strange, it’s as likely as any other number to come up.) So, Susan G of Finagling Life, I’ll be emailing you for your address, and then I’ll mail your book out to you. Congratulations!

A little aside about reviews: I was very pleased (and a little surprised) to see that so many people commented on how they appreciated my thorough and honest book review. To me, that’s how all reviews should be – anything less is really just an advertisement disguised as a review!

I feel that a good craft book review should provide you with all the information you need to be able to decide if it’s a book you’d be interested in buying, and that has to include a review of usability, not just how pretty the book and designs look. Well-written, complete instructions should be an essential part of every craft book, don’t you think?

Publishers and authors: feel free to contact me if you’d like me to share a thorough, honest review of your craft book(s) with my readers…

And now onto my second winner off the day! It’s time for the first monthly drawing for a free pattern (winner’s choice) from everyone who reviewed one of the patterns or products in my shop.

Since I launched the review capability in my shop, there have been 44 reviews, and the randomly selected winner for April is review #24, written by Katie U. Congrats Katie, I’ll be emailing you to ask which pattern you’d like as your prize!

I’d like to say a big thank you to everyone who has already taken the time to write a review for my shop – I think people are going to find them really helpful. But I have a lot of products in my shop that don’t have even one review yet, so please keep those reviews coming, and who knows, you may be the lucky winner in May’s free pattern draw! Each review you post will give you an additional entry into the draw 🙂

Comments

  • Quick Links: Crochet

    navigation: arrow

    buy crochet patterns and accessories from my online store

    'Everyday Crochet' and 'The Essential Guide to Amigurumi' crochet books by June Gilbank

    Crochet video tutorials and step-by-step photo tutorials

    Free PlanetJune crochet patterns

    Frequently Asked Questions

    Quick Links: Crafts

    navigation: arrow

    Punchneedle Embroidery information, ebook & patterns

    Papercraft ebook & tutorials

    Free PlanetJune craft projects & tutorials

  • Blog Post Categories

  • Blog Archives

  • Welcome to PlanetJune!

    June Gilbank

    Hi, I'm June. Welcome to my world of nature-inspired crochet and crafting. I hope you enjoy your visit!

    If you'd like to get in touch, you can contact me here.
    crocheted Canadian flag by PlanetJune
  • A fanned-out pile of the books Everyday Crochet and The Essential Guide to Amigurumi, with text 'The answers to all your crochet questions at your fingertips - find out more'
  • Support PlanetJune!

    Want to say thanks? You can send me money in seconds at paypal.me/planetjune (over $20) or paypal.me/planetjune2 (under $20) or send me a donation through my shop.

    Or simply click through from my links before you shop at Amazon, Etsy, KnitPicks, LoveCrafts or Crochet.com, and I'll make a small commission on your purchase, at no cost to you! Start here:

    ♥ Support PlanetJune ♥

    Tip: This link is also in the footer of every page!

    Thank you so much for your support!