I always like to experiment and see if there are ways to improve amigurumi techniques to give better results, and today I have a new one to share with you.
Back loop only (BLO) stitches are often used to add detail in amigurumi designs, particularly for turning sharp corners. For example, look at the bottom of a crocheted plant pot (where you turn a sharp corner from the base of the pot to begin the sides) or the bottom of a foot (where you turn from the flat base to the side of the foot).
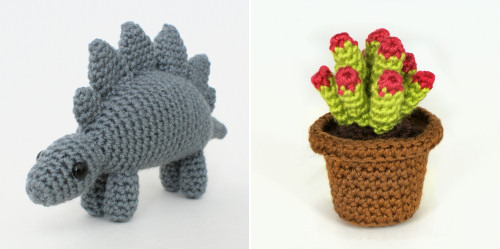
Stegosaurus and Succulent plants both have a round of BLO around the bottom edge (of their feet and pot, respectively)
But BLO stitches are looser and more open than standard stitches worked in both loops, so the corner round will lose the solid, firm fabric of the rest of your amigurumi. My new modified BLO technique solves this problem!

The holes above the unworked front loops are eliminated with my technique
Now, before we get started, I should explain what this technique is not: this is not a new method for patterns that are worked in BLO throughout. Using it in that way would change the shape of the finished pieces (more about that later).
This technique is best used to replace occasional BLO details in a piece worked in both loops, e.g. the round of BLO stitches used for turning sharp corners in amigurumi patterns. Just as you can replace a “ch 2” start with a magic ring, and an “sc2tog” with an invisible decrease, you can replace that round of BLO with my modified BLO (in any amigurumi pattern) and it’ll give your amigurumi a much nicer result.
What’s wrong with BLO?
The problem with BLO stitches compared with stitches worked in both loops is that they can easily stretch open. When you’re making amigurumi, where the stitches are stretched by the stuffing, this results in taller stitches with larger gaps between each round.
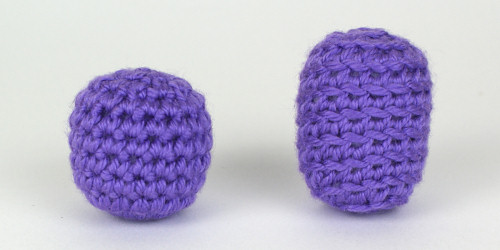
L-R: sc worked in both loops, sc in back loops only
(I discussed this in more detail in my tutorial Front Loops, Back Loops, Both Loops.)
Why Use BLO?
But BLO has several uses as an accent in amigurumi designs, for example:
- to add textural detail with the unworked front loops
- to add anchor points for additional stitches worked back into in the unworked front loops
- to turn sharper corners than you can achieve with regular single crochet stitches
This last one is the main use of BLO in amigurumi, and the situation that you can most improve with my new technique! Although BLO makes a nice corner, it does leave the fabric looser and more floppy around that round, because the stitches can stretch open.
A Better BLO
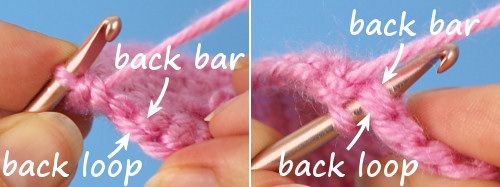
When you look at a single crochet stitch, you usually work into both the front loop and the back loop at the top of the stitch:
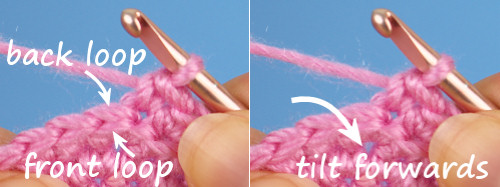
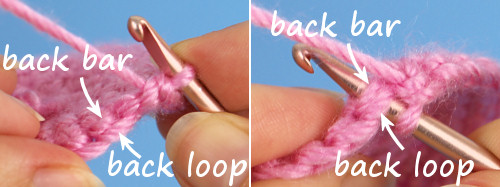
But, if you rotate your work forwards a bit, you can see that there’s another horizontal bar just beneath the back loop, at the back of the stitch (below, left).
To improve the appearance of your BLO, work each stitch into both the back loop and this back bar (below, right).
Are you left-handed? Here’s how it’ll look for you:
You can see the stitch in action in the videos below:
Video Tutorial (right-handed)
Video Tutorial (left-handed)
Note: The videos may look a little small embedded in the blog: if so, you can fullscreen them or click through to YouTube (links: right-handed; left-handed) to watch them full-sized 🙂
Stitch Comparison
So you can see the difference this technique makes, let’s compare the modified BLO stitch with a standard single crochet (worked in both loops) and a standard BLO single crochet.
I’ve crocheted the same sample 3 times, once using each stitch.
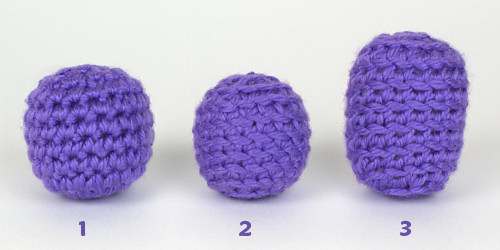
#1: single crochet in both loops
#2: modified BLO single crochet
#3: BLO single crochet
As you can see, the modified BLO does not stretch out like a BLO stitch; the stitches are much closer in size to a standard single crochet (although very slightly smaller still, as the stitches are tighter).
Comparing the BLO and modified BLO in close-up:
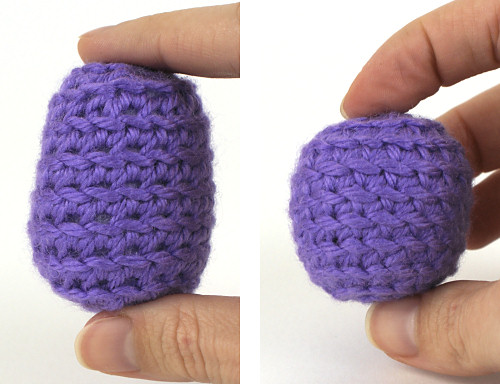
Left: BLO; right: modified BLO
You can see that the gaps that result from standard BLO stitches are eliminated with this technique, and the stuffing doesn’t show through between the stitches.
So this modified stitch is a much better match for a standard single crochet, as it keeps the tight, solid appearance of a regular amigurumi, and doesn’t leave any unwanted gaps.
Caveats
- Do not use this technique for a piece designed to be worked in back loops only. As you can see, using the modified BLO stitch with a pattern designed to be worked entirely in BLO would give the same problem as working the pattern in both loops – the shape would be compressed vertically.
- I recommend you use this technique only as an accent stitch for pieces crocheted predominantly in both loops. (The only reason I crocheted the above sample piece entirely in modified BLO is to give you a clear way to compare the differences between the size and shape of the stitches.) This stitch is more difficult to work than either standard or BLO single crochet, because the back bar is tighter, so I don’t suggest you ever crochet an entire piece using this technique!
In Practice
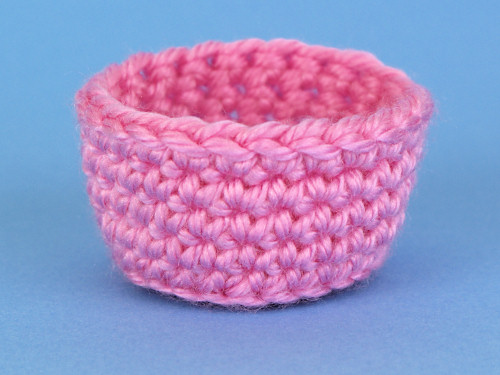
I crocheted this little amigurumi-style pot as a sample to demonstrate this technique. The corner formed by the modified BLO round is neat and firm, and it’s actually a little sharper than the corner you get from a standard BLO stitch.
Conclusion
You can safely use the modified BLO to replace a single round of stitches (or any number of individual stitches) worked in back loops only in any amigurumi pattern.
It prevents the gap from forming below each BLO stitch as the fabric stretches, and it maintains the firm solidity of the amigurumi fabric throughout your piece.
While this isn’t an essential technique, it’s another ‘upgrade’ you can use with any pattern (like my invisible increase) to improve the look of your amigurumi.
I know I’ll be using it for all my BLO details in future, and I hope you’ll enjoy it too!

Loved this tutorial? I have so many more amigurumi tips and tricks to share with you!
Boost your amigurumi skills with my latest book, The Essential Guide to Amigurumi, your comprehensive guide to amigurumi techniques and tips.
Do you find my tutorials helpful? If so, please consider making a contribution towards my time so I can continue to create clear and concise tutorials for you:
Thank you so much for your support! Now click below for loads more crochet video and photo tutorials (and do let me know what else you’d like me to cover in future tutorials…)


Nina said
Hi June,
just a question: How do you avoid the jog/seam when you have only one row with BLO? I tried using joined rounds before and after(with many varations on how and where to join and start) as well as spiral rounds and all of them leave visible jog where the BLO round starts and ends…
Thanks!
Nina
June said
Nina, amigurumi crochet is not symmetrical by the nature of the stitches, and trying to make it ‘perfect’ could drive you crazy! There’s a trade-off between the ease and smoothness of crocheting in a spiral, and the slower speed and difference in the appearance of the other stitches around the join whenever you try to avoid the jog. For amigurumi, I tend to accept the jog and make sure to place it at the back/bottom of my work.
Several people have asked me about this lately, though, so I may look further into it in future: I’d have to investigate before I can recommend my best technique if you really want/need to avoid that jog 🙂 Subscribe to my newsletter to make sure you don’t miss any of my tutorials or crochet investigations!
Mari said
Thank you so much for this thorough post. I love how you show the comparison – it’s fantastic for visual person like me. And thanks for tutorials 🙂
Jennifer said
Thank you so much! This is so innovative and looks like a great technique. I’m sure I will use it a lot. Happy creating!
Regina Tinkham said
Thank you June. I will definitely try this.
Patricia said
Thank you June. This is great to learn. I love your carefully detailed patterns.
Patricia Taplin said
Thanks June for yet another great tip. I use the invisible decrease all the time now, also changing colours in the round. All very helpful tips, thank you .
Shellie said
I haven’t had a chance to use this yet but I am sure its going to come up soon! I like the tight look, I always did hate the gaps.
TAM said
That looks simple, yet efficient ! Yet another improvement of our basic stitches, thank you, June !
Lisa Schwartz said
Great technique. I had already been doing this when using BLO to make turns, but I still appreciate having a great tutorial for it that I can point others to.
.: petrOlly :. said
The comparison is incredible! The shape of the piece almost didn’t change. Fantastic improvement, June 🙂 It might be a bit tricky (especially with thinner yarn) but I will definitely give it a try 🙂
June said
I agree it’s probably even trickier with thinner yarn, but watch the video for my trick to make it easier – I’m sure that’ll help!
.: petrOlly :. said
Indeed it does 🙂 Although it’s still not so easy and quick as the “classic” method – at least for someone crocheting very tightly & with a thin yarn, as I always do 😉
But the final result after using your new method looks so much better! So I will definitely use it for the small amount of BLO stitches in your pattern.
Thanks! 🙂