Punchneedle Globe menu:
- Update 1
- Update 2
- Update 3
- Update 4 – you are here
- Update 5
- The Finished Globe!
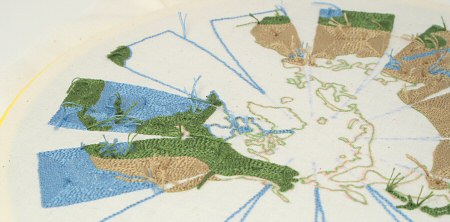
Here’s where we left my punchneedle embroidery globe at the last update:
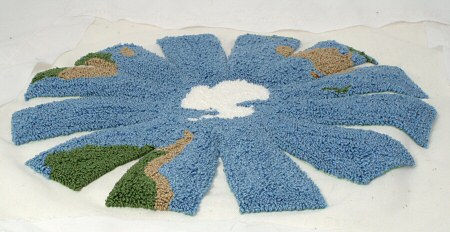
This next stage is the real test of my design: I based my idea on the concept of a papercraft globe I’d once seen that turns 2D sheets of paper into a 3D globe. So, in theory, I should be able to do the same thing using a 2D embroidery. The moment of truth: I hand-sewed up all the unembroidered darts, to (fingers crossed) convert the flat piece into a hemisphere, and…
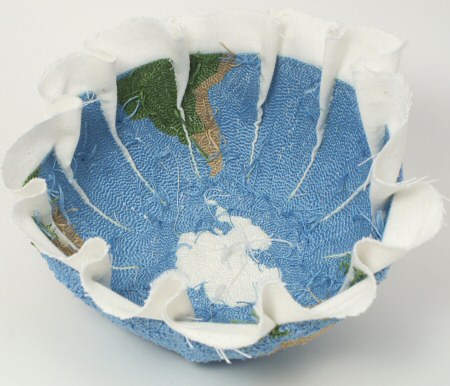
It worked! I now have one very nice hemisphere. Thanks to that extra-dense punching I did, the seams are pretty much invisible from the outside. You’ll have to take my word for that, because I’m going to be a little bit mean and only show you the inside of the hemisphere for now – I have to save something for the big reveal once I’ve punched the other half of the globe…
There’s a lot of work left to do to get it finished – the second half should actually take longer than the first: the northern hemisphere has more landmasses, islands, lakes, and general detail that I included in my pattern, so it’s going to take a lot longer to punch than the (mostly blue) southern hemisphere.
But I’ve found something to make my punchneedle go much more quickly from now on! This is a punchneedle spooler:
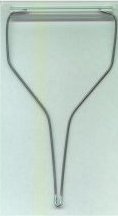
Spooler for Cameo punchneedle (image courtesy of The Punchneedle Marketplace)
It sits in the top end of the punchneedle. You wind your floss onto the spool and can punch for the entire length of a skein instead of having to rethread the needle every metre or so (the floss can easily get tangled or trapped with a length much longer than that). And, with a 2-step threading process, that’s a significant time saving – I think it took me almost as long to thread the needle as it did to use one length of floss!
Here’s my homemade punchneedle spooler:
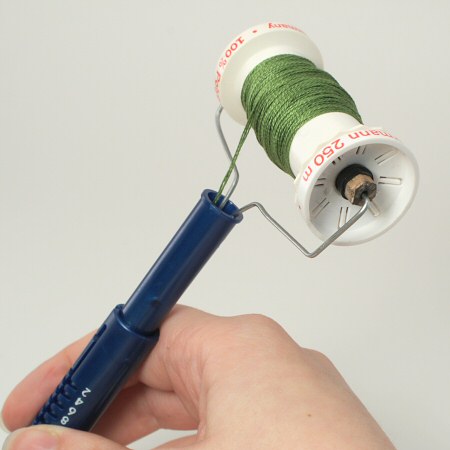
Prototype punchneedle spooler
- The wire is just heavy floral wire, bent into shape with pliers. It works okay, but I’d like to get some stiffer wire to replace this, now that I know my concept is sound – I don’t think the floral wire will last forever.
- The spool is just an empty spool from regular sewing thread.
- I used my Dremel with a cutting disc to cut the pointy end off an IKEA pencil (which fits nicely inside the spool).
- I hollowed out the graphite from both ends of the pencil with a Dremel drill bit, so that the ends of the wire can slip inside the pencil.
- The black rubber bands are mini hair elastics. I found that, without those, the spool clicks back and forth against each end of the wire with each punch, and that noise gets very annoying very quickly!
The spool rotates freely on the pencil, so more floss is fed to the needle every time I make a stitch. Isn’t it great to be crafty?! It’s all made with supplies I had on hand, and it works brilliantly!
Starting the Northern Hemisphere
Thanks in part to my new spooler, my Northern Hemisphere is coming along much more quickly – I wonder if I’ll be able to finish the whole globe over the Christmas holiday…


Jean said
Thank you so much for explaining how to make the spooler, it will make it so much easier. I’m just learning to punch needle and was not looking forward to rethreading every meter or so.
Carol Abbott said
janet…ive been needle punching along time & have had troubke with the hoops slipping & the thread….this is such a great idea…cant wait till u put this on the market…love ur post…..i usually punch with very delicate threads with almost glitter about them….
amaranda de jong said
Have just made my own spooler ! thanks for all your help and advice June.It’s through the kindness of people like you that crafting is such a wonderful world !!!! ( boy drilling the lead out is messy ‘ innit ?)
June said
Yay, you’re welcome! And yes, I might have used a piece of dowel in place of a pencil if I’d had one (no lead to make a mess with that way!) but it works, and that’s the main thing!
Mary Anne said
Hi, It
June said
Thanks, Mary Anne! I’m afraid I have no idea what happened to Punchneedle Marketplace – last time I looked, the site was still up, so I don’t know if this is a temporary thing, or if they’ve closed down relatively recently.
I can recommend the glue I use for my punched pieces, though. I don’t know how it compares with yours, but I’ve never had any problems with Aleene’s OK to Wash-It fabric glue – it’s what I always use!
Mary Anne said
Thanks June. I just found this comment! I was using fabric glue, but not Aleenes. I love all the Aleene glueproducts so I will try that next.
Is there a link to the finished globe? I can’t wait to see it.
June said
Oh yes, good point! Here’s the direct link to the finished globe – I think it turned out pretty well!
I’ve added a menu to the top of all these posts now so other people can also see how it turned out 🙂
Arthur said
Hi June!
How is the Boye punch needle spoiler sold at Hobby Lobby stores?
Best regards
Arthur Barry
June said
I’m not sure what you’re asking, Arthur, but if you’ve found a spooler to buy that’s compatible with your punchneedle tool, that’s great!
Mahlon Stainton said
Can I buy one of your homemade punchneedle spooler.
June said
I don
Elena said
Are you selling these. ?
June said
I don’t have a professional product to sell; I just made mine from floral wire, a pencil, and hair elastics! You can follow my directions above to make your own 🙂
Ann G said
Just started on punch needle embroidery and I’d found this to be very helpful! Ingenious idea! Thanks
Naomi said
I was thinking of making a spooler with coat-hanger wire. do you think that would work?
June said
Provided you have some strong pliers to bend it into shape, I think that would work well, Naomi. Let me know how it goes!
Hayley Tessier said
Hello,
I’m pretty new to punchneedle…I love the punchneedle spooler you describe here! My question is, do you use all the threads when you punchneedle? The directions I found on one punchneedle kit I bought said to only use three threads from a skein of floss. Using the entire piece of floss would make this so much easier and faster!!
Thanks!
June said
Hayley, the number of strands to use depends on the thickness of your tool’s needle – please see my Punchneedle tool information post for more details 🙂
laura said
I just bought Ultra Punch needle set with the dee-lite spooler (it’s not the original but it fits anyway).. in the site that you told us.. so I can learn punch needle! I’m so exciting! <3 thanks to you June, to explain a lot of things! <3 I love your globe (I think it's very difficult to made).
Laura from Italy
Carol said
You said you were looking for harder metal? The metal that you have now can be changed by taking a hammer and hitting the metal wire on an anvil. It changes the molecular consistancy of the wire and hardens it. I have done this many times and it works wonderfully. Don’t forget you have to have the wire shaped in the design you want.
Be well
Carol
June said
Thanks Carol – that’s an interesting technique! I actually don’t think I want to harden my wire because I need to bend it open to change out the spool. Hardening without tempering makes metal more brittle when you bend it, and I’m already concerned that it may snap over time with being bent open and closed many times. Unless I find a stronger metal (stiff but not brittle so I can bend it) I’ll just replace mine with a new bent piece of floral wire if/when I need to 🙂 I appreciate your suggestion though!
Melanie J said
Hi!
Just looking again at your spooler because I just started doing punchneedle, and I was wondering how it works. Not how it works works–that’s very clear! But if you’re separating the floss into strands of three and spooling those on, are you attaching the ends so it keeps going through?? I’m confused as to how it makes it so you don’t have to thread the needle, because you can’t tie knots to attach lengths of floss or it won’t work… I hope you understand my question, and that it’s not a silly one!!
Thanks,
Melanie
June said
I understand! You still have to thread the needle at all – it’s not a magic ‘never thread the needle again’ solution 🙂 The difference is that you usually cut a length of floss, maybe a metre long, or 1.5m at most (any longer than that and the floss length tends to gets trapped or stuck under something and you can’t punch properly). With my spooler, I can separate an entire 8m skein of floss into 2 loooong 8m lengths (with 3 strands each) and then punch continuously until all 8m have been used.
Separating an entire skein into 2 sets of 3 strands is tricky, so I wind it directly onto 2 cotton reels as I separate it. Then I can just switch out the empty reel for the full one once I’ve finished punching the first 8m length. So I thread the needle twice per skein of floss when I use the spooler, vs 12 or 16 times when I used to cut manageable lengths of floss. I hope that’s clear now!
Melanie J said
Ahhhh, gotcha!! Thanks for the detailed explanation! 🙂 So far I’ve just started with punchneedle kits, which come with pre-cut lengths that I would assume are about a meter. So I was picturing having to respool and thread it every metre, which would not really help! haha. I didn’t realize that a skein of floss is 8 metres long, so that would be much faster! Very cool. Thanks for replying!
Melanie
Lindy said
Your punchneedle globe is looking great. I look forward to seeing more. I love the colours and the texture as well. You’re very inventive making your own punchneedle spooler.
Jessica said
Oooh – that globe does look good… but it is very mean of you not to show us what the outside of the southern hemisphere looks like 🙁
Corvus said
I love watching the globe grow- it’s such a fantastic little project! Also: that quite the clever little tool. I must try punchneedle some time.
Silverlotus said
Wow, that is very clever. I’m looking forward to the big reveal.
Amy O'Neill Houck said
June–your spooler is awesome. What a great idea!
Sister Diane said
Holy moly, this is getting cool! This has got to me one of my favorite projects in the crafty blogosphere this year. Thanks for sharing updates!
Miriam said
Wonderful! The globe and the spool both. Every time I come here you’re busy figuring out solutions to interesting problems.
Kristi said
Hooray! This project is going to be amazing! I also wanted to drop you a note to say how neat it was to see your Amigurumi for Dummies book in my Amazon recommendations – I saw the picture of the cover and thought “Ohhh that’s Planet-June June’s book!” Yes that is some sort of odd compliment 🙂