This is sweater #5 of my ‘learn to knit by making a dozen self-designed sweaters’ project. (Here are links to #1, #2, #3 and #4, if you’d like to see my progress.) There’s a funny story behind this cardigan: I bought 4 balls of this drab green yarn on clearance – it was all they had left in the shop. I thought it’d be a tight fit to get a whole sweater from so little yarn, so I made all my design choices based on helping the yarn to go as far as possible…
Knitting is supposed to be my relaxing hobby, and I was worried that getting into complex stitch patterns might require too much concentration to be really relaxing for me, but I did want to try venturing away from the pure stockinette fabric of all my previous sweaters, so I thought I’d try an all-over 4×1 rib pattern (that’s 4 stitches of knit, then 1 stitch of purl, repeated, to give narrow vertical purl stripes in the cardigan). The stretchy fabric should also give a nicely fitted result without needing any shaping to be built in, so I could concentrate on just getting the purl stitches in the right place without needing to keep track of anything else.

I started with the body, and designed it to be close-fitting and shorter than my usual preferred length, to minimise the amount of yarn it used – once the body was finished, I’d be able to judge how much yarn I had left for the sleeves and plan accordingly (either to make short/no sleeves, or make the sleeves in a different colour, if necessary). Keeping it minimal, I opted to avoid a decorative border around the bottom – the all-over rib is enough to keep the fabric from curling up at the edges, and the cable cast-on makes a tidy edge.
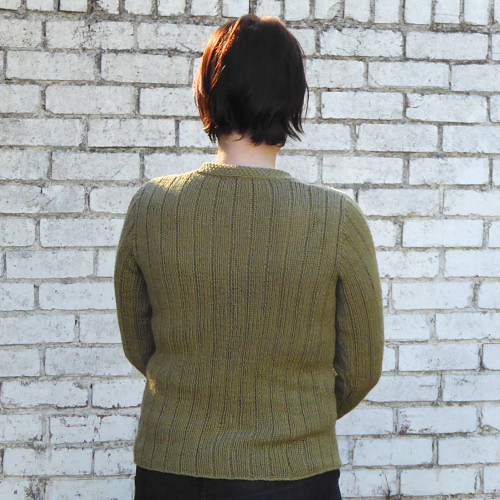
After finishing the body, there seemed to be plenty of yarn left for full-length sleeves, which was a relief. I made the sleeves close-fitting too, to match the style of the body, and I used what I learnt from the mistake in my last sweater to make very neatly set-in sleeves – I think I’ve nailed this technique now!
Once the sleeves were finished, I made my first real button band (my previous buttoned cardigan used an attached i-cord, with detached sections to form the buttonholes, so I’d never tried to knit a buttonhole before). I decided to make the button band in seed stitch with a smooth stockinette edge, and, after a few attempts, came up with a tiny, neat, stretchy buttonhole to fit into my band.
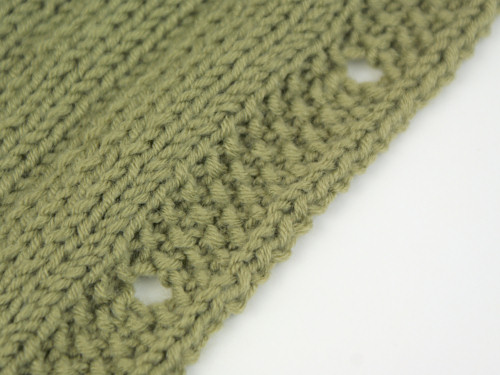
Instead of picking up stitches for the button band, I knitted it separately (as hundreds of 8 stitch wide rows!) and then stitched it on so it lay flat without my needing to calculate a ratio to pick up stitches beforehand. Stitching the ‘button’ half of the button band down before I knitted the ‘buttonhole’ half let me calculate exactly where to place my buttonholes as I knitted. This is a really nice method if you’re winging it and not following a pattern – I love the freedom of just making it all up as I go along! It’s such a break from keeping accurate notes of all my stitches for my crochet pattern.
And the irony: far from running out of yarn as I’d feared, I actually ended up with an entire ball left over! I guess my yarn quantity estimation skills still need a little polishing 😉
The finishing touch for the cardigan was to make polymer clay buttons, inspired by Lisa Clarke’s knitted cardigans with polymer clay buttons. It’s such a pleasure to be able to combine two of my hobbies in one project!
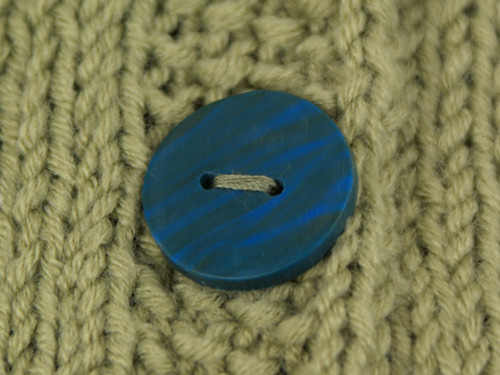
I decided not to try to match the yarn colour, and cut my buttons from a sheet of marbled clay: bright turquoisey blue and darker green. I had to brighten the photo above so you can see the marbling more clearly, as the very bright blue became muted with the marbling, and the green darkened more than I expected in the oven, so the overall result is quite subtle. I still really like them though, even if hardly anyone else will notice the marbled effect.

I found some perfect small buttons in my button bag to act as anchor buttons on the inside of the button band – I know nobody but me will ever see them, but it’s a tiny thrill to know that these little hidden buttons match my yarn so well.
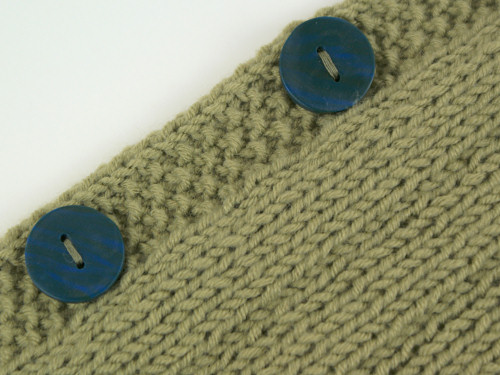
And using a sewing thread that matched my yarn to stitch the buttons to the cardigan tied the whole thing together perfectly.
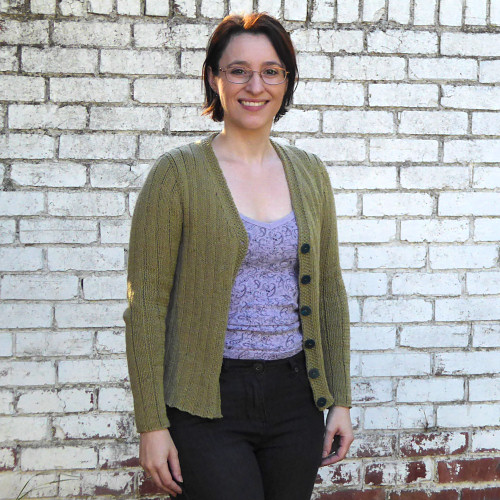
I’m really happy with how this cardigan turned out – although shorter than I’d usually prefer, it’s not too short. It’s snug and fits well, and it feels a little lighter than my other sweaters, so it’s nice for a chilly, but not cold, day. And it’s very satisfying to see how my knitting skills are progressing with each finished piece: I’m learning new techniques as I need them, and perfecting the ones I didn’t fully understand while making my previous sweaters. Onto #6!


Damon said
Could you offer advise on accounting for potential shrinkage when improvising a garment? I’m good at custom hats and socks, but sweaters intimidate me.
June said
Damon, I recommend you consult books/classes on garment design – I’ve been buying books (I’m currently enjoying Sally Melville’s Knitting Pattern Essentials) and various Craftsy classes on knitwear design, and they are invaluable. Even if you’re just improvising a one-off garment and won’t be writing a pattern, the same principles still apply to get good shape and fit in the finished garment.
But, basically, you should measure the as-knitted gauge of your swatch, then block it (or wash and dry it as you’ll wash and dry the garment) and measure it again, to see how it changes. The same advice applies whether you’re following a garment pattern or improvising!
Hilary said
Oh my goodness June! And you’re a beginning knitter??? Well done indeed, I’ve been knitting for years and probably wouldn’t get anything looking so good. Especially as you said you were worried about not having enough yarn and then choosing a rib which always uses more than plain stocking stitch! Love the buttons too. And your buttonband looks perfect – it’s always much more difficult sewing on afterwards as it stretches, or not, and hard to get it looking as good. Always pick the stitches up on mine as reckon easier to get a good finish. Can’t wait to see the next creation, onwards and upwards eh…!
June said
Thank you, Hilary! I’m a beginner in the sense that this is only the 7th thing I’ve ever made, but I do have a big advantage: as a very experienced crocheter I’m an expert at tensioning yarn, I understand how stitches build on each other to create shaping, etc. It’s just the techniques specific to knitting that I’m learning as I go 🙂
(Plus, you don’t get to see my mistakes that didn’t make it into the finished piece, e.g. with this sweater I accidentally made one sleeve a whole inch – one stitch pattern repeat – wider than the other and didn’t realise until I came to sew in the sleeves. I had to frog the whole sleeve and reknit it!)
Simone said
This cardi is amazing! Your skill and willingness to tackle tricky topics is totally talentshow-worthy!
Thanks for including the link to the Craftsy Classes. I’ll have a look.
Oh, and one thought crossed my mind: This is a real life example for “When life gives you lemons…”, IMHO!
Cheers,
Simone
June said
Thanks, Simone! I strongly believe that learning new things and challenging yourself is the key to keeping your brain sharp, so even though knitting is my ‘relaxing’ hobby, I’d be bored if I made it too easy 😀
Reg8 said
June, that looks fabulous!!! It fits you so well. Are you able to provide any details on how you went about creating the pattern? I love it!
June said
Thanks very much! I’ve learnt how to make a custom design to fit my own measurements exactly by taking online classes on Craftsy; there are several very good knitwear design classes I’ve bought. In case you – or anyone else – would like to try one, here are the classes I have:
Even though I have no desire to branch out into knitwear design (for anyone other than myself!) these classes have given me a really strong foundation for how to go about creating a pattern from scratch that’s tailored to me. When I have time I should really review all the classes; each instructor approaches the calculations for the design in a different way, so I pick and choose the methods that make most sense to me.
Deborah said
That is a very lovely cardigan. I love the green color and the blue buttons.
June said
Thank you! It was quite a revelation for me when I realised that my buttons don’t need to match the yarn colour (because they do on all my shop-bought cardigans!) – another reason why handmade is better… 😉
.: petrOlly :. said
June, I am totally amazed! Your skills progressed in no time and this sweater is just beautiful (it has my favourite neckline) despite the colour (it’s not my favourite…).
The buttons are great – it’s nice that you could combine two hobbies in this project.
Do you already have plans for your next sweater? Or at least for the last ball of the yarn you used for this one? 😉
June said
Thanks! I think this is my favourite one so far, even though I only started it as a way to see if I’d enjoy knitting a non-plain stitch pattern. And, yes, I actually have the next two in progress already! (This green one was finished a while ago, apart from weaving in the ends, but my knee surgery meant I haven’t been able to take photos until now.)
I usually end up with the best part of a ball of yarn left at the end of my projects – better to have too much than to run out – so I guess one day I’ll have to turn all the remnants into some sort of scrap blanket, or give them away, or something…
Aine said
June, it is so much fun “watching” you develop into a confident knitter. This sweater is perfect and shows your skills.
Be well, be strong.
June said
Thank you, Aine! I feel I still have a long way to go – there’s still so much to learn – but it’s exciting to see how much progress I’ve made already, when I’m less than halfway to my goal.