PlanetJune Craft Blog

Latest news and updates from June

Archive for August, 2022

Turtle Beach: Puffy Seafoam video tutorial

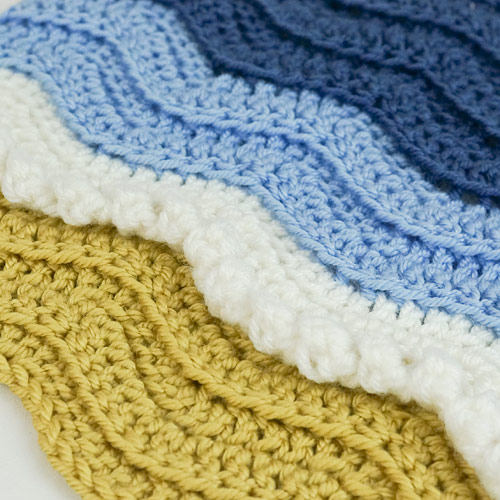
Trying something new today: I’ve created my first pattern-exclusive video tutorial: a quick video demonstration that’s only available to purchasers of a specific pattern, and that demonstrates a specific part of the pattern that might trip you up.

In this case, I’m demonstrating the optional Puffy Seafoam add-on for my Turtle Beach blankets, found in the donationware version of the Ribbed Ripple/Turtle Beach pattern.

3D crocheted Puffy Seafoam addition for any Turtle Beach blanket by PlanetJuneIsn’t it a lovely effect?

This addition lets you add a row of 3-dimensional seafoam to any of my Turtle Beach blanket patterns. It’s crocheted as an afterthought directly onto the completed blanket, so if you’ve already made a turtle beach blanket, you can add the puffy seafoam at any time!

A Little Background…

Turtle Beach Collection is my most popular pattern set, having gone viral multiple times since I first released the original donationware blanket pattern to accompany my baby sea turtles in 2016, and I’ve been improving and expanding the collection ever since then, with more blanket patterns, flat and stuffed turtles, starfish, and additional modification ideas.

In 2019 I first added a brief explanation for the Puffy Seafoam at the end of the basic Ribbed Ripple/Turtle Beach Donationware pattern. It’s a fast and fun addition with a realistic 3D effect, but the construction is a little unusual, so I thought it deserved a bit more detail to help you make it!

Now, I’ve updated the tutorial in the pattern (it now includes full right-handed and left-handed instructions) and I’ve created an exclusive video tutorial (with right- and left-handed versions) to accompany this, so you can watch it in action – isn’t that cool?

video tutorial for 3D crocheted Puffy Seafoam addition for any Turtle Beach blanket by PlanetJune

How to Get the Video

If you’ve ever donated for the Ribbed Ripple/Turtle Beach blanket pattern, you can log back into your PlanetJune account and download the new Ribbed Ripple pattern PDF from ‘My Patterns‘.

On page 9 of the PDF, you’ll find the updated Puffy Seafoam add-on instructions, including the links to both the right-handed and left-handed versions of the new video.

Turtle Beach Collection crochet patterns by PlanetJuneLeft: Classic Blue blanket; stuffed 3D turtles
Right: Teal Ombre blanket; flat appliqué turtles

You can also add the seafoam to my Classic Blue (above, left) or Teal Ombré (above, right) Turtle Beach blankets, so if you haven’t bought the Ribbed Ripple pattern too, you might like to think about grabbing it now!

For your minimum $2 donation you’ll get the Puffy Seafoam add-on – including the video links – and also an optional edging you can use if you’d like to square off the edges of your finished blanket, to turn it into a rectangle or use as a base to add any fancy crocheted edging. These options work with any of my Turtle Beach blanket patterns.

Turtle Beach Collection crochet patterns by PlanetJune3D seafoam, squared-off edging

Pattern-Exclusive Videos: Good Idea?

This project was an experiment for me in two ways:

  1. To see if I can make a ‘quick’ video that doesn’t take hours of my time to produce and edit (the answer to that is no!)
  2. To see how well this idea of making bonus pattern-exclusive video content works – and that’s where you come in…

Please watch the video and let me know what you think!

  • Is the video demo a valuable addition to a pattern?
  • Is it useful to have the video link on the same page, so it’s right there as soon as you get stuck?
  • Would you like to see more patterns with private video tutorials for any tricky bits?

Please email me or comment below with your feedback!

What’s Next

I hope you’ll enjoy the new video! It’s a novel method with a lovely 3D result, and I think the video will really help you to visualize what you’ll be doing as you crochet the seafoam, and how it comes together.

If this ‘pattern-exclusive video’ idea is popular, I’ll start keeping an eye on my customer support requests for any other common questions that would benefit from a quick video tutorial, and then update the relevant pattern with the link once I’ve made the private video.

Tip: From now on, I’ll notify you of any pattern updates in my monthly newsletter, so if you don’t already subscribe, please sign up to make sure you know about any bonus content and improvements I’ve added for the patterns you own!

Comments (3)

Relaxing Crafts: Finger Knitting with Loop Yarn

Have you seen this novelty loop yarn in stores? It’s designed to be finger-knit with no tools – you just pull one loop through the next.

finger knitting with loop yarn

Working straight gives you a standard knitted fabric, and crossing pairs of loops before you ‘knit’ them lets you make pretty stitch patterns.

finger knitting with loop yarn

I picked up a bargain bundle of this Bernat Blanket Alize Blanket EZ from the yarn factory outlet store as part of my quest to find relaxing crafts to try. (And yes, this is the wrong time of year to be making a cozy blanket, but I have air conditioning, so it’s not that bizarre…)

Choosing a Pattern

Once you know what you’re doing, you can probably adapt many knitting patterns for this type of yarn, but I’d recommend starting out by choosing a pattern that’s designed especially for loop yarn.

I chose my favourite pattern, Yarnspirations’ Diamond Lattice Blanket, and looked up other projects on Ravelry to see what other people thought of it. Based on the feedback of a few other ravelers, I started by forming a starting chain so the bottom of the blanket would match the cast-off edge, and pulled up a row of plain knit stitches in the back bumps of the chain before beginning the lattice pattern, to give a straighter bottom edge.

This pattern says it’s rated as ‘experienced’ skill level, and I agree with that assessment. I wouldn’t jump into this as your first loop knitting project like I did unless you really like a challenge. (Luckily, I do!)

finger knitting with loop yarn

As others had noted in their project notes, the pattern is extremely wordy and not clear to follow. I decided to just ignore the pattern directions after the first row, and figure it out myself based on watching where the slanted crossed stitches should go next. I got a bit confused at the edges at first, but apart from that it was fairly straightforward, thanks to my experience with crossed stitches in knitting. Again, I wouldn’t recommend this specific pattern unless you’re familiar with loop knitting and/or regular knitting with crossed stitches.

Loop Knitting: The Process

Loop knitting is actually a little more difficult than I’d imagined it would be:

  • As you never turn the work, you work left to right for one row and right to left for the next, so each hand has to do different things on odd and even rows.
  • It’s definitely a two-handed craft – crossing loops with one hand while finding the next loop of the working yarn with the other keeps you on your toes!

finger knitting with loop yarnCrossing a pair of stitches

Upsides

Although the in-progress project looks like a knitter’s nightmare – just like you’ve dropped all your stitches off the needles! – the textured yarn holds the loops in place well, so the stitches are fairly secure. It even takes a bit of effort to frog these stitches if you make a mistake, so stitches unravelling by mistake doesn’t seem to be a problem.

finger knitting with loop yarn

The yarn is very soft and feels nice to work with (if you’re familiar with plush chenille super bulky blanket yarns, it’s like a looped version of an extra thick one). As each stitch is large, it works up quickly and the resulting fabric is extremely thick and plush – I’d never use this yarn and technique to make anything other than a cozy blanket.

Downsides

I discovered a major problem with using this kind of yarn: as you never turn the work, you don’t see the back until you’ve finished (or stop and flip it over). That wouldn’t be a problem, except that it’s very easy to skip a loop in your working yarn without noticing, so you keep going blissfully along with no problem until the end of your session when you fold up your work and see this:

finger knitting with loop yarnNoooo!

A big loop on the back of the work! The only solutions at this point are:

  • Cut the loop off (which should be just as safe as starting a new ball of looped yarn – there’s just a tiny nub of plain yarn at the end of each ball – but that would leave two extra tiny nubs in your work).
  • Cut the loop in half and weave in each of the resulting ends (again, it’s safe to do this, but I’m not sure how well the ends would stay hidden over time).
  • Undo alllll the way back to the loop and redo it properly.

Can you guess which one I did?! That’s right, I frogged back to fix the mistake whenever I realised that I’d done it again, sometimes unravelling 5 or 6 entire rows, so I could fix the problem – ugh.

And here’s the other problem with this yarn: the fluffy chenille is very ‘grabby’ – when you’ve pulled a loop through another loop, they tend to hold in place. This is obviously a good thing when you have a whole row of loose loops to work with, but it does mean that unravelling takes almost as long as knitting the loops in the first place!

Adding a New Ball of Yarn

I couldn’t find any info on how to add the next ball of yarn, so my solution was to hold the last loop of the old ball and the first loop of the new ball together. Then, on the next row, all I had to do was to remember to pass the new loop through both the loops below.

Tip: As there are free loops all over the place, it’s easy to miss the doubled loop, so I clipped a locking stitch marker around both loops so I could easily spot them again as I worked the next row.

The Result

My finished blanket is 43×57″, which is a nice size for a sofa throw. (It did confuse me though, as the pattern claims the blanket is 56″ wide, not 43″ – I think that must be a mistake in the pattern instructions, as that’s a huge discrepancy.)

loop knitted lattice blanketIsn’t it pretty?

Although it’s far too hot to even contemplate needing a thick cozy blanket at the moment, I know I’ll enjoy using mine when the cooler weather arrives. It’s very soft, has a good weight to it, and I love that lattice stitch pattern.

loop knitted lattice blanket

A couple more angles…

loop knitted lattice blanketHere’s the texture of the back of the blanket.

loop knitted lattice blanketAnd here are the top and bottom edges – they did end up matching nicely.

And, most importantly: it’s passed the Maggie test! She curled straight up on it on my lap and went to sleep – that’s high praise from my discerning girl. 😉

loop knitted lattice blanket

Relaxing Verdict

Loop knitting is definitely a relaxing craft if you’re following a simple repetitive pattern. Once you’ve completed the first row, it’s very easy to form knit stitches by pulling the next loop from the working yarn through the next loop of the row below. I found it to be mostly relaxing once I got used to my more challenging stitch pattern, and if you chose a more straightforward stitch pattern, it would be very relaxing!

Finger knitting with pre-looped yarn means you don’t need to worry about tension – the size of each loop is fixed, so you know you’ll get a nice even result without any effort to control it. But it does give rise to the problem of accidentally leaving a loop on the back of your work – that’s one thing that would never happen with knitting or crochet, or even finger knitting, where you always control the flow of yarn.

Immersing your fingers directly in the soft cozy yarn to create a blanket makes a nice change from holding a hook or needles, but my overall verdict is that looped yarn is a bit of a novelty with limited applications. It’s fun to try, and the results can be lovely – I’m very happy with my chunky blanket! – but I don’t see loop knitting becoming the ‘next big thing’ in fibre arts. What do you think?

Comments (6)

  • Quick Links: Crochet

    navigation: arrow

    buy crochet patterns and accessories from my online store

    'Everyday Crochet' and 'The Essential Guide to Amigurumi' crochet books by June Gilbank

    Crochet video tutorials and step-by-step photo tutorials

    Free PlanetJune crochet patterns

    Frequently Asked Questions

    Quick Links: Crafts

    navigation: arrow

    Punchneedle Embroidery information, ebook & patterns

    Papercraft ebook & tutorials

    Free PlanetJune craft projects & tutorials

  • Blog Post Categories

  • Blog Archives

  • Welcome to PlanetJune!

    June Gilbank

    Hi, I'm June. Welcome to my world of nature-inspired crochet and crafting. I hope you enjoy your visit!

    If you'd like to get in touch, you can contact me here.
    crocheted Canadian flag by PlanetJune
  • A fanned-out pile of the books Everyday Crochet and The Essential Guide to Amigurumi, with text 'The answers to all your crochet questions at your fingertips - find out more'
  • Support PlanetJune!

    Want to say thanks? You can send me money in seconds at paypal.me/planetjune (over $20) or paypal.me/planetjune2 (under $20) or send me a donation through my shop.

    Or simply click through from my links before you shop at Amazon, Etsy, KnitPicks, LoveCrafts or Crochet.com, and I'll make a small commission on your purchase, at no cost to you! Start here:

    ♥ Support PlanetJune ♥

    Tip: This link is also in the footer of every page!

    Thank you so much for your support!