PlanetJune Craft Blog

Latest news and updates from June

Archive for May, 2019

Seahorse crochet pattern

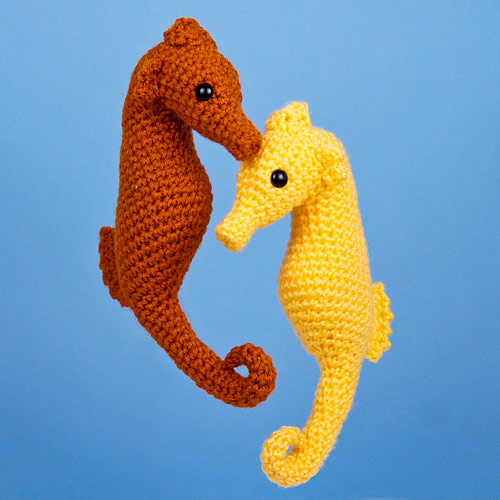
I have a very special new design for you today – it’s a beautifully-shaped Seahorse crochet pattern:

seahorse crochet pattern by planetjune

Aren’t they sweet? I’m so pleased with how they turned out 🙂

Seahorse Fun Facts

  • Seahorses are a very unusual-looking type of fish.
  • They live in sheltered areas of warm seas across the world.
  • Seahorses swim upright, using their dorsal fin (at the back) to move them forwards and their pectoral fins (at either side of the head) for steering.
  • They are slow, weak swimmers, so they use their prehensile tails to grasp onto seaweed, coral, etc so they don’t drift away in the currents.
  • Unlike most animals, the male seahorse cares for the babies. The eggs are kept safely in a special brood pouch on his stomach until they are ready to emerge as fully-formed miniature seahorses!

About the Design

My seahorse design is realistically shaped and about 9″ (22.5cm) long when worked in worsted weight yarn.

It’s an elegant low-sew design, as the entire head, body and tail are crocheted as one piece. The only sewing is to attach the fins and coronet.

seahorse crochet pattern by planetjune

I made my samples in Lion Brand Vanna’s Choice worsted weight yarn in realistic seahorsey shades, but you have lots of scope for creativity in your yarn choice!

  • Multicoloured or variegated yarns would work well.
  • Glossy or sparkly yarns would add a magical touch.
  • Scale it down with finer yarn and a smaller hook for a cute miniature seahorse.
  • Make a giant cuddly seahorse using my Giant Amigurumi techniques!

About the Pattern

As always, the pattern includes full instructions and detailed step-by-step photographs for assembly and all special techniques used, so you can follow along and make a perfect seahorse.

I’ve also included stitch diagrams in addition to written instructions for all the fins and coronet, so you can use whichever instructions work best for your learning style.

You’ll love the way it magically comes together…

seahorse crochet pattern by planetjune

Buy Now & Launch Discount

Ready to get started? Pick up my Seahorse crochet pattern from my shop right now. Or, if you’re not ready to make it just yet, add it to your Ravelry queue or favourites so you don’t forget about it:

And for one week only, you can take an extra 50c off the price: add the Seahorse pattern to your shopping cart, and enter the discount code MAGIC at checkout! (Offer ends Thursday 6 June, 2019.)


I feel that there’s something almost magical about these special creatures – don’t you agree? And their beautiful elegant shape lends itself so well to a sculptural design like this.

seahorse crochet pattern by planetjune

I really hope you’ll enjoy my Seahorse pattern. Don’t forget to share photos with me when you’ve made one:

…I always love to hear from you, and to see what you’ve been making from my patterns. 🙂

Comments (3)

Crochet Investigation: Invisible Finish

The standard way to finish an open-ended piece in amigurumi is to join with a slip stitch (sl st) to the next stitch, to reduce the height jog of the spiral between the first and last stitches of the final round. It’s a quick and easy method, and is perfectly fine if you’ll be stitching the piece down to something else so the edge won’t show in the finished amigurumi.

That’s not always the case, though – sometimes the edge will be visible in the finished piece, and in this case the sl st finish isn’t the best choice – it leaves a little bump that’s impossible to hide completely.

When I decided to make a video tutorial to show the most invisible finish for an open edge in amigurumi, I realised that, while there’s a standard method for amigurumi worked in joined rounds (and this actually forms the basis of my Perfect Stripes Invisible Join), there’s no consensus for amigurumi worked in spirals…

And you know what that means: it’s time for another crochet investigation!

Method

All my candidates are based on the standard invisible finish for joined rounds, but I considered two ways that the method can be varied that may affect the look of the finished edge:

  1. Should there be a slip stitch before the join, or not? A slip stitch would reduce the height difference before the join, but might end up more visible than without.
  2. Should there be a duplicated stitch, or an additional stitch added? The additional stitch was my original preferred method from 2009 (there’s no need to maintain the stitch count if the edge won’t be worked back into, so the duplicate stitch isn’t necessary) but is that a good reason to keep doing it? (Of course not – not if there’s a better way…)

So that gives us four candidates for the experiment:

C: no slip stitch, join in next stitch
D: no slip stitch, duplicate stitch join
E: slip stitch, join in next stitch
F: slip stitch, duplicate stitch join

The photos below show the results of each test, together with:

A: the piece after the final stitch is worked, before any join (note the difference in height between the final stitch, below the hook, and the next stitch to its right)
B: slip stitch join (the yarn tail isn’t woven in here, but you can clearly see the knot just below the tail that can’t be completely hidden)

candidates for the most invisible finish around an open edge in amigurumi, by PlanetJune

Results

I compared the 4 samples and noted my observations (don’t worry if you can’t see all these in the photos above; they are much more apparent when viewed from multiple angles):

C: height jog very visible; stitch count not maintained
D: height jog minimised; skipped stitch visible from front; stitch count is maintained
E: height jog minimised; sl st visible from front; stitch count not maintained
F: height jog minimised; sl st and skipped stitch visible from front; stitch count is maintained

C is an immediate fail: you can clearly see that it does the worst job of blending the height difference between the start and end of the final round.

F is the next to go: there’s an extra bar visible beneath the V from either a slipped stitch or a skipped stitch, and F has both while D and E only have one each, so it’s the worst in terms of invisibility, with extra bars visible beneath two stitches.

That leaves D and E. They’re both pretty good in terms of invisibility, but I’m going to award the prize to D: the fact that it maintains the stitch count around the edge makes it the most versatile; you can use it for an open-ended piece or one that will be stitched to something else with no problems, so this means you’ll have one fewer technique to remember!

Refining the Technique

While working on the test, I also noted that the downside of any of these methods is that you have to pull the duplicate stitch very carefully to the right size to make it look truly invisible, which makes it more difficult to then weave in the yarn tail without disturbing the size. So, I came up with a tiny refinement that makes it much easier to control the size of the duplicate stitch and keep it held in place once you’ve adjusted it to the right size.

Intrigued? Good! I’ll explain all in my new Invisible Finish video tutorial 😉

Invisible Finish for Open Edges in Amigurumi - a crochet tutorial by PlanetJune

Continue to the Invisible Finish for Open Edges in Amigurumi video tutorial >>

Comments (2)

Giant Amigurumi Dinosaur!

Way back in February, I announced on Twitter that I was going to make a Giant Dinosaur:

And now it’s time for the big reveal!

Giant Amigurumi Triceratops Dinosaur by PlanetJune

Georgette the Giant Purple Triceratops is 36 inches (over 90cm!) long, weighs 1.9lbs (850g) and is impossibly soft and cuddly.

I made her using my Triceratops pattern from Dinosaurs Set 1 and the techniques from my Complete Guide to Giant Amigurumi.

Giant Amigurumi Triceratops Dinosaur by PlanetJune

Isn’t she huge?!

Although she turned out beautifully, I did have a few hitches along the way…

Yarn

I was excited to find a new (to me) yarn to try for this project: Bernat Blanket Extra. According to my calculations, one strand of Extra would be the equivalent of the two strands of Bernat Blanket I use for most of my giant ami, so it seemed like the perfect yarn for Giant Amigurumi! In the picture below, it’s the purple yarn second from the top:

yarn for giant amigurumi (pictured: worsted weight, super bulky, and two sizes of jumbo yarns)
Pictured top to bottom:

  • Bernat Blanket Big (#7 jumbo – good for Extreme Amigurumi)
  • Bernat Blanket Extra (#7 jumbo – good for Giant Amigurumi)
  • Bernat Blanket (#6 super bulky – use 2 strands for Giant Amigurumi or 1 for Mini Giant Amigurumi)
  • Lion Brand Vanna’s Choice (#4 worsted weight – a standard amigurumi yarn, for comparison)

While I was correct that a single strand of Extra is an ideal yarn for Giant Amigurumi, I made a bit of a miscalculation and used the weight instead of the yardage when I was figuring out how much yarn I’d need (using the calculation method from the book). Converting from 2 strands of Blanket to 1 strand of Extra, the yardage is a straight 2:1 conversion, but the weight isn’t quite the same (as the Extra weighs just a little more per yard than 2 strands of Blanket).

Thanks to that mistake, I didn’t buy quite enough yarn for the Giant Stegosaurus I had planned 🙁 , but I ran the numbers and realised I had enough to make a Giant Triceratops instead – problem solved!

Structure

Giant ami aren’t as rigid as standard amigurumi, and, even though they are light for their size, the weight of Georgette’s head, including the horns and frill, was a bit much for her front legs – they were squashed down a little, which made her chin touch the ground. So I added an extra round to her front legs to offset that ‘squish factor’, which worked out fine 🙂

Giant Amigurumi Triceratops Dinosaur by PlanetJune

Other than that, I followed the pattern, together with my book’s technique advice, exactly:

  • The secure magic ring was a lifesaver, especially for those giant horns!
  • It turns out that a giant triceratops frill is very floppy, but the stiffening flat pieces technique sorted that right out.
  • The large size crocheted eyes were the perfect finishing touch.

Giant Amigurumi Triceratops Dinosaur by PlanetJune together with a standard-sized triceratops

Awww, don’t they look just like a mama triceratops and newly-hatched baby?

Georgette is exactly 4 times the length of the standard Triceratops, and 15 times the weight! But she’s extremely cute and cuddly – yay for non-scary dinosaurs 😀

Make Your Own!

If you’re inspired to try crocheting a giant dinosaur too, here’s what you’ll need:

The Complete Guide to Giant Amigurumi ebook by June Gilbank - available in right-handed and left-handed versions

Of course Giant Amigurumi isn’t limited to just dinosaurs (although I’m still tempted to buy more yarn to make a giant stegosaurus!) – see the book for lots of other examples, and advice for which amigurumi patterns will be easiest to scale up to giant size.

Please share photos of your giant amigurumi projects on any social media using the #giantamigurumi hashtag, and tag me @planetjune so I can see what you’re making! And if you’re a member of the PlanetJune Ravelry group, you can also share your giant amis in our ongoing Giant Amigurumi CAL 🙂

I’m still smitten with Giant Amigurumi – they’re just so much fun, don’t you think? Who could resist a giant purple triceratops?!

Comments (19)

greenhouse photo workshop

Yesterday, I took the opportunity to learn more about photography and plants at a photowalk workshop hosted by Colour Paradise Greenhouses and taught by local photographer Abbi Longmire. It was a great pairing – Abbi encouraged us to experiment with our cameras, and the greenhouse offered beautiful and varied subjects to photograph (and maybe some ideas for future PlanetJune plant designs…)

I used the manual (M) setting on my camera for the first time ever(!) and, after a shaky start, ended up with some half-decent shots. I thought I’d share my favourites with you – bear in mind that composition etc is not my strong suit and I’m very much a beginner at this type of photography!

(These are unprocessed, out-of-the-camera shots – all I did was resize them to blog size.)

Greenhouse Photowalk photo by June Gilbank

Greenhouse Photowalk photo by June Gilbank

Greenhouse Photowalk photo by June Gilbank

Greenhouse Photowalk photo by June Gilbank

Greenhouse Photowalk photo by June Gilbank

Greenhouse Photowalk photo by June Gilbank

Not too bad, are they? 🙂

Thanks to Abbi and Colour Paradise for the inspirational afternoon! I hope I’ll be able to bring what I learnt into my nature photography, and maybe even my pattern photos…

Comments (8)

Bearded Dragon crochet pattern

Since leaving the warmth of Africa for the Great White North, one thing I really miss is being able to see lizards all the time – both when out exploring nature, and in my own garden. I grew to love lizards after observing them in the wild for so long, and I’m considering getting a pet bearded dragon one day.

Until then, I now have the next best thing with my new addition to my amigurumi menagerie – a life-sized Bearded Dragon crochet pattern:
bearded dragon crochet pattern by planetjune

She’s such a cutie!

Bearded Dragon Fun Facts

  • Bearded dragons, aka ‘beardies’, are one of the most popular reptiles to keep as pets.
  • These lizards are docile and friendly, and eat insects and vegetables.
  • In the wild, bearded dragons can be found in the Australian deserts.
  • Beardies can flatten their bodies and change colour when they bask in the sun, so they can absorb more heat.
  • When threatened, they puff out their spiky ‘beard’ throat skin and open their mouth wide so they appear larger.

About the Design

My bearded dragon is roughly life-sized and realistically shaped, at about 12″ (30cm) long. It has an alert stance, a wide body and wedge-shaped head, and tiny spines along the sides of its head and body, just like a real beardy!

bearded dragon crochet pattern by planetjune

I made my sample in a heathered yarn (Lion Brand Heartland) which adds a subtle variegated effect which I love, but you can use a solid colour of yarn instead if you prefer. Fancy bearded dragons come in a wide range of colours (orange, yellow, brown, grey, and even red or white) so you have lots of scope for making life-like beardies in all sorts of colours.

About the Pattern

As with my other lizard patterns, the realistic legs are wired with pipe cleaners, but the pattern also includes tips for omitting the pipe cleaners if you want your beardy to be baby-safe.

bearded dragon crochet pattern by planetjune

The pattern includes stitch diagrams for the spines in addition to the written instructions, so you can use whichever instructions work best for your learning style.

And, as always, close-up photos aid with every step of the assembly, so you can be confident you’ll be able to make a perfect bearded dragon too.

Buy Now & Launch Discount

Ready to get started? Pick up my Bearded Dragon crochet pattern from my shop right now. Or, if you’re not ready to make it just yet, add it to your Ravelry queue or favourites so you don’t forget about it:

And for one week only, you can take an extra 50c off the price: add the Bearded Dragon pattern to your shopping cart, and enter the discount code BEARDY at checkout! (Offer ends Wednesday 8 May, 2019.)


This bearded dragon design has been over a year in the making, but I’m really happy with the end result – I think I got the alert beardy pose just right, and the tiny spines don’t overwhelm the design, even in worsted weight yarn.

bearded dragon crochet pattern by planetjune

I hope you agree, and that you’ll enjoy my Bearded Dragon pattern 🙂


PlanetJune Herps

With this new pattern, my herp (reptiles and amphibians) pattern collection is now up to 10 designs: 5 lizards, 3 turtles and 2 frogs! You can find all the PlanetJune reptile and amphibian crochet patterns here 🙂

Reptiles and Amphibians crochet patterns by PlanetJune

Do you have any other herp pattern requests? Let me know in the comments!

Comments (5)

  • Quick Links: Crochet

    navigation: arrow

    buy crochet patterns and accessories from my online store

    'Everyday Crochet' and 'The Essential Guide to Amigurumi' crochet books by June Gilbank

    Crochet video tutorials and step-by-step photo tutorials

    Free PlanetJune crochet patterns

    Frequently Asked Questions

    Quick Links: Crafts

    navigation: arrow

    Punchneedle Embroidery information, ebook & patterns

    Papercraft ebook & tutorials

    Free PlanetJune craft projects & tutorials

  • Blog Post Categories

  • Blog Archives

  • Welcome to PlanetJune!

    June Gilbank

    Hi, I'm June. Welcome to my world of nature-inspired crochet and crafting. I hope you enjoy your visit!

    If you'd like to get in touch, you can contact me here.
    crocheted Canadian flag by PlanetJune
  • A fanned-out pile of the books Everyday Crochet and The Essential Guide to Amigurumi, with text 'The answers to all your crochet questions at your fingertips - find out more'
  • Support PlanetJune!

    Want to say thanks? You can send me money in seconds at paypal.me/planetjune (over $20) or paypal.me/planetjune2 (under $20) or send me a donation through my shop.

    Or simply click through from my links before you shop at Amazon, Etsy, KnitPicks, LoveCrafts or Crochet.com, and I'll make a small commission on your purchase, at no cost to you! Start here:

    ♥ Support PlanetJune ♥

    Tip: This link is also in the footer of every page!

    Thank you so much for your support!