How to Crochet an Invisible Decrease
After the magic ring, what’s the one other technique you need if you want to create beautifully finished amigurumi? The invisible decrease (abbreviated invdec) – it’s absolutely invaluable.
What is an Invisible Decrease?
The invisible decrease (invdec) really is as good as its name claims – it’s almost impossible to see, even if you’re looking for it! You’ll have no more bumpy or gappy decreases once you’ve mastered this technique – all your stitches will look smooth and even.
Standard decreasing methods (sc2tog or skipping stitches) leave a bump or gap when you decrease. The invisible decrease (invdec) method is different: it’s practically invisible, even if you know what you’re looking for! (See my blog post for a comparison of the three methods.)
Why does it work so well? The magic behind the invdec is that it groups the previous stitches together at its base, so the stitch itself looks identical to a regular single crochet.
The invisible decrease method will probably take a few attempts to master, but, just like the magic ring, it’s one of those techniques that’s so good, you’ll wonder how you ever crocheted without it!
I recommend you watch the video to see the method in action, but in case you prefer text or want something visual to refer to, I’ve also made a photo tutorial version for you.
Quick finder:
- Video Tutorial (right- and left-handed)
- Invisible Decrease Tips
- When to Use Invisible Decreases
- Step-by-Step Instructions (right-handed)
- Step-by-Step Instructions (left-handed)
Invisible Decrease for Amigurumi – Video (right-handed)
Click to watch this video on YouTube.
Invisible Decrease for Amigurumi – Video (left-handed)
Click to watch this video on YouTube.
Note: The videos may look a little small embedded in the blog: if so, you can fullscreen them or click through to YouTube to watch them full-sized 🙂
Invisible Decrease Tips
Invdec is a little tricky to get the hang of, and there are two points during the decrease where you can accidentally lengthen your stitch so it isn’t neat and tight, and the resulting decrease will be far more obvious.
I’ll demonstrate these invdec problem points, so you know where the pitfalls are, and how to avoid them. You’ll find this tutorial useful if:
- You’re new to the invisible decrease technique (watch my video tutorial before you continue reading this!)
- You’ve tried invdec but been disappointed by your results
- Your invdecs look inconsistent, gappy, or too prominent
- You want your amigurumi to look as good as possible!
A Note about Tension
Although maintaining consistent tension on your yarn is a skill you need to master in order to crochet anything beautifully, it’s vitally important for amigurumi, as you need your stitches to be tight and even to produce the regular, firm amigurumi fabric that allows us to create complex ami shaping, and hides your stuffing. I’ve seen some people recommend that you tug on your yarn after every stitch to tighten it up, but that isn’t necessary if you maintain consistent tension.
Tensioning your yarn is a balance between the hook pulling forward and your other hand pulling backward.
How do you do that? Well, while your hook is pulling the yarn forward, your non-hook hand is simultaneously pulling back on the yarn, so you use a controlled amount of yarn to form each stitch. (You probably do this without even realising you’re doing it; if the yarn could just slide freely through your fingers with no tension, your hook would pull up large, inconsistent loops, and your crochet would look sloppy.)
When I talk below about pulling back on the yarn so the working loop is tight around your hook, the goal is to bring the tension back to your standard level, so the working loop should be the same size and tightness as it is for all your other stitches. If you go too far and pull it extra-tight, you’ll just make it more difficult to work back into that stitch in the following round.
Perfecting the invdec
If you look at the top of an invdec stitch, you’ll see there’s a ‘V’ at either side of the decrease. (As invisible decreases are practically indistinguishable from the surrounding stitches, I’ve crocheted my samples with the invdecs and the surrounding top loops in a different colour, so you can see what I’m talking about!)
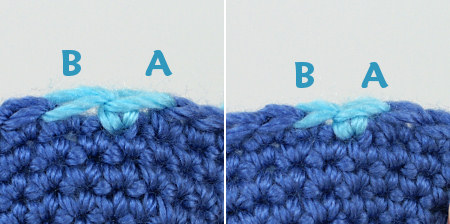
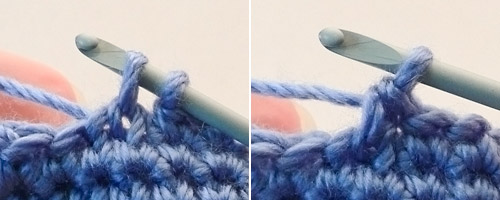
Left: The source of the problems is these extra-long Vs at the top of the stitches surrounding the invdec.
Right: Invdec done correctly, with the Vs the same length as in the surrounding stitches.
These two Vs (A and B) are the culprits – if either or both of these is lengthened, there’ll be extra space around the invdec and it can look gappy or sloppy.
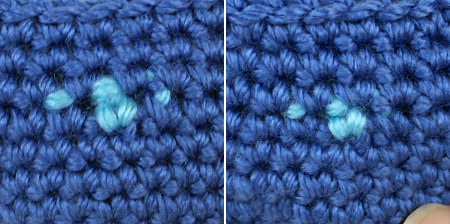
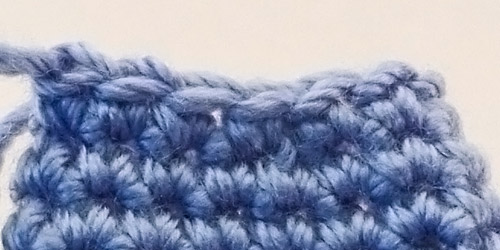
Left: The lengthened Vs have left a larger gap at either side of the invdec.
Right: Invdec is indistinguishable from the surrounding stitches (except for my helpful colour change!)
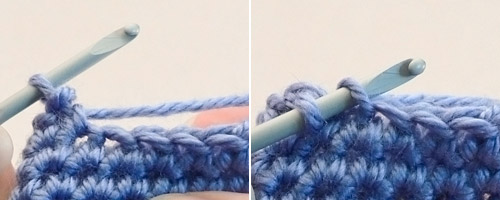
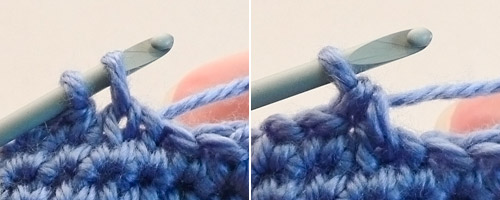
Loop A
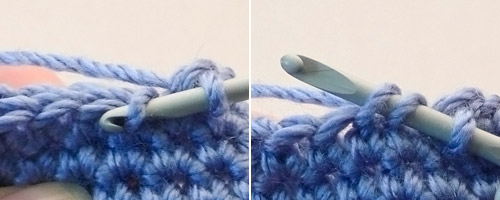
Checkpoint: When you begin an invdec stitch, as you’re swinging the hook around to get the tip through both front loops, the working loop (the one that was already on your hook before you started the stitch) tends to loosen up.
Fix this: Once you’ve inserted your hook under the two front loops, and before you yarn over, tug the yarn to make sure the working loop is still tight on your hook and hasn’t lengthened.
Left: Lengthened working loop on hook will cause a loose stitch.
Right: Tightened loop – perfect!
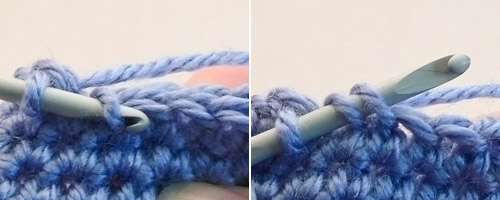
Loop B
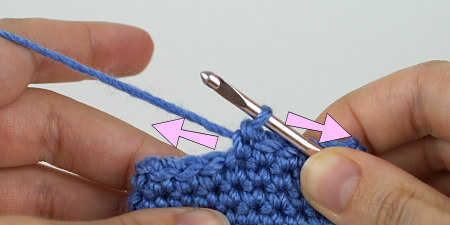
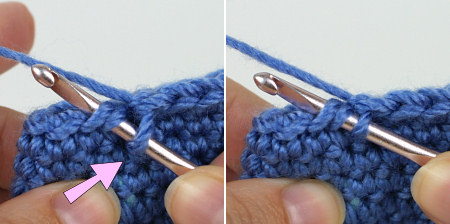
Checkpoint: After you complete the invdec, you’ve just turned 2 stitches into 1 stitch, and your hook is now further back than it usually would be for starting a new stitch. So this is another point where your yarn can make an extra-long loop, as you bring your hook forward over that extra distance to begin the next stitch.
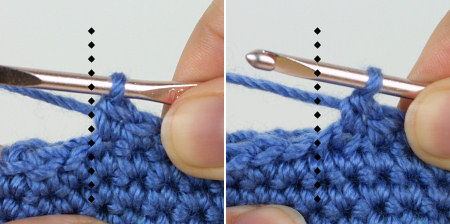
Left: The position of the hook after a sc stitch.
Right: After an invdec, the hook is further back (dotted line marks the usual position), so there’s a greater distance to reach the next stitch.
Fix this: Make sure you keep tension on your yarn, so the loop on your hook doesn’t stretch out as you insert your hook into the stitch after the invdec. (If, after inserting your hook to begin the next stitch, you see the working loop has lengthened, just pull the yarn so the working loop is tight around your hook again, before you yarn over and continue with the stitch.)
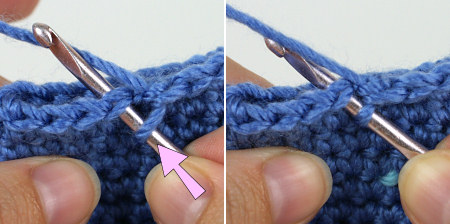
Left: Lengthened working loop after inserting hook into next stitch.
Right: Tightened loop – perfect!
Multiple Decreases
The potential problem is doubled when you’re working 2 invdecs in a row, as you have the ‘too far back’ effect (Checkpoint B) and the ‘swinging the hook’ effect (Checkpoint A) both acting on the same loop, so you should make a little extra effort to be conscious of the size of the loop on your hook, and make sure it stays tight and doesn’t lengthen.
Invisible Decrease Perfected!
With a little extra effort to make sure you’re maintaining consistent tension, even while you decrease, your stitches will all stay the same size, and your invdecs will be as invisible as advertised!
When to Use Invisible Decreases
In addition to the obvious use in amigurumi, you can also use the invisible decrease for any piece worked in single crochet, in the round, without turning (e.g. hats).
As each invdec leaves two unworked loops visible from the reverse side, you won’t want to use it for anything where you turn between rows/rounds, or where both sides will be on display.
For projects like amigurumi and hats, the backs of the stitches are always hidden on the inside, so the unworked loops won’t show from the front of the finished pieces, and all you see is smooth and even decreases.
Invisible Decrease – Step-by-Step Instructions (right-handed)
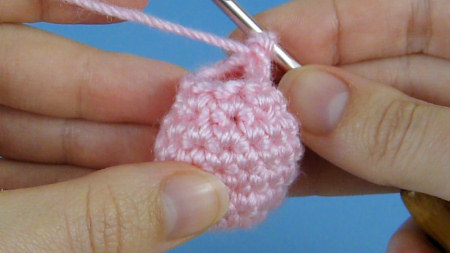
Starting position (below, left). Insert the hook into the front loop of the first stitch (2 loops on hook, below, right). DO NOT YARN OVER.

Insert the hook into the front loop of the next stitch. To do this, you’ll need to first swing the hook down (below, left) so you can insert the hook under the front loop (3 loops on hook, below, right).
Yarn over and draw through the first two loops on the hook (2 loops on hook, below, left). Yarn over and draw through both loops on the hook (invdec completed, below, right).
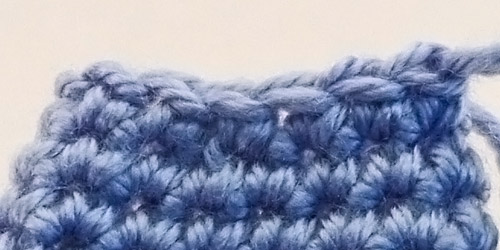
Now let’s play a game: spot the decrease…
Good, huh? Give it a go with your next ami – I promise you won’t regret it…
Invisible Decrease – Step-by-Step Instructions (left-handed)
Starting position (below, left). Insert the hook into the front loop of the first stitch (2 loops on hook, below, right). DO NOT YARN OVER.
Insert the hook into the front loop of the next stitch. To do this, you’ll first need to swing the hook down (below, left) so you can insert the hook under the front loop (3 loops on hook, below, right).
Yarn over and draw through the first two loops on the hook (2 loops on hook, below, left). Yarn over and draw through both loops on the hook (invdec completed, below, right).
Now let’s play a game: spot the decrease…
Good, huh? Give it a go with your next ami – I promise you won’t regret it…

Loved this tutorial? I have so many more amigurumi tips and tricks to share with you!
Boost your amigurumi skills with my latest book, The Essential Guide to Amigurumi, your comprehensive guide to amigurumi techniques and tips.
Do you find my tutorials helpful? If so, please consider making a contribution towards my time so I can continue to create clear and concise tutorials for you:
Thank you so much for your support! Now click below for loads more crochet video and photo tutorials (and do let me know what else you’d like me to cover in future tutorials…)


Tootsie said
2024 readiness
Starting with the head the instructions indicate “invdec” ! In preparing I found lots of help here and community.
That said, sure enough, I didn’t even need to ask, just search within!
Thankful for the left handed instruction!!
Tootsie is a lefty
Meral Maria Gokcen said
What a lovely way to do a sc decrease! Is it possible to decrease hdc in a similar way? Because hdc2tog looks so bulky & ungainly at the fronts of booties!
Di said
Excellent instructions. It works beautifully.
Susan Baleja said
I have just discovered your invisible decrease and love it, it really works well. I am currently using a pattern that calls for single crochet 3 stitches together, sc3tog. How do I do that? Once I have the 4 loops on my hook after going through the front loops of 3 stitches and yarn over, how many loops do I pull the yarn through?
June said
You’ll need to pull it through all three of those front loops, so to finish the stitch it’ll be “yarn over and draw through 3 loops, yarn over and draw through both loops on hook”.
Ana Carolina said
Thank you very much for these tips, June! I started to crochet with your blog and it helped a lot!! I remeber that I’ve bought your cacti and succulent collection before knowing anything, but I was in love, no way back! Then, I bought your book and always keep an eye for any news here! It took me a lot of work to improve my invisible decreases, this article would help a lot, ehehehe. You are an inspiration! Ü
Peggy Grow said
Hi June! This technique is brilliant. I hadnt really thought the invdec through until now. Makes perfect sense! You’re the best!
Corinne Shire said
This is a new technique for me. I can’t wait to try it. Would it work on baby booties?
James Craw said
I use this technique often with amigurumi it’s so helpful. I always need to refresh though so sites like this are super helpful.
Kristy said
Wow! I just stumbled across this tonight. I wish I had known about it about 4 snowmen and 15 angels ago! I am doing another angel tonight and will try it!
Thank you!
Patsy said
Thanks so much for generously sharing how tos and tips on techniques you’ve devised! So far the one I use most is this invisible decrease and the other I’ve made lots of use of is the perfect stripes no cut method. I’ve used the latter most in regular crochet projects like hats because I do more of that kind of crochet than amigurumi. I have also made use of your video about crocheting tubes for amigurumi in creating tusks for a Razorback hood I made a fan. Thank you, June!
Cherl said
I am an experienced crotcher too, and I really like the inv decrease now. It looks great. You demonstrate it wonderfully.
Laura Paul said
Thank you for the great tips. You are an angel. I’m left handed and have learned to read patterns backwards but always have trouble with the pictures and video instructions. Thanks again for the lefty version. They are great tips. Love the invdec.
Anna said
This is a great tip you’ve shared and even though I am new to crocheting, I can definitely see the advantage to this method of decreasing. Glad you’ve kept the post up all these years.
Dorothy Stuhr said
Thanks so much June. I was doing it wrong, I would yarn over to soon and then again! I am making a doll and the decreases looked awful. So I went back to your tutorial and it’s perfect. Thanks, you are an valuable asset to the crochet community.
Claudia said
Thank you so much for this information it will make my crocheting much easier & looking so much better.
MindeeK said
This is absolutely fantastic. THANK YOU!
Sandy said
I tried your decrease for the snowballs and I’m confused a bit . I like how it looks on the inside but, on the outside you see the back loop. What am I doing wrong?
June said
It sounds like you have your work inside out! Please see www.planetjune.com/rightside to check and get instructions for how to correct this in future 🙂
Dave said
Outstanding find ! I bookmarked it after I read the picture instruction on invdec. Then I checked out the video just for fun and it complements the pictures and really drive the instructions home. Your site is a gold mine for crochet tips. Thanks much,
Dave
Lily said
Oh My Gosh! This is fantastic! I’ve been crocheting for several years and always cried a little inside when I had large gaps in my decreases while making amigurumi! I will do it this way from now on! Thank you!
Babou said
Très jolie c’est petites pieuvres ,j’aimerai bien en faire mais où puis je ,trouvais la traduction en français. … d’avance merci
June said
Babou, please see the translation information in my FAQ.
Jane Pope said
You are nothing less than a genious. Thank you so much!
bonnie greenhoe said
thank you so much for your free patterns . I love them all. I want to make the booties and a blanket for my 2 grandbabies that were born in june.
Nicole T Permenter said
Purchasing one of your patterns was well worth it, just to find out about this stitch. Lol
Hillary said
Oh my gosh! How. Fabulous! Thanks so much for this!
Margaret said
Thank you so much for your amazing videos. I have been crocheting for 65 years and have never come across these methods of invisible decrease and joining in the next yarn before. These tips will make such a difference to my amigurumi animals.
brenda said
Thank you June, whenever I’m in a jam you seem to have the answer! I couldn’t figure out why my invdec showing so much. Tension is definitely an issue in my crocheting right now.
MegsMadeIt said
Oh thank you! This just made my day
Naomi said
Oh. MY. GAWD. This is exactly what I was lamenting about with my last amigurumi piece and you have answered it so clearly and easily. I will try this for the next one. Thank you!!!
Kerry said
Thanks so much for this. As I’ve done the standard decrease before it’s often been in my head to wonder if exactly what this tutorial shows would work … and it does. So maybe I should listen to my inner voice more often – which is what you obviously did.
I love your tutorials which are so easy to follow – and so very helpful. Thanks again.
Danielle said
Hi June! I’ve always found your website so helpful. But I’m currently struggling to find an answer to this reacurring problem I have. I’m making an animal head, the pattern calls for one row of 4sc, Dec., next row 3sc, Dec., next 2sc, Dec., next 1, dec, then dec around. Ive used the invisible decrease. But when I close up the hole, it pulls all the stitches wide open.
Do you think the decrease in the pattern is just too fast? Is this a tension issue? I reached out to the person who wrote it but all they said was they never had a problem with the decrease. So I don’t know how to fix it!!!
I hope you can help!
June said
Without seeing the pattern, I can’t tell if it’s a pattern issue or an issue with your hook/yarn combination or stitching. I’d suggest that you try following one of my PlanetJune amigurumi patterns (if you don’t want to buy one, you can just pick something simple from my free patterns – an apple or pear would be a good test) and see if you find you have the same problem with your decreases:
I hope that helps! (If not, see my Perfect your Invisible Decreases tutorial for further assistance on avoiding gaps.)
Amanda Watson said
I really would have been glad if I had known about your invisible decrease, when I was working on a “Crochet Yoda” from my sister’s Star Wars Crochet book.
Jo Ann McNeil said
Thank you so much, going right now to try this on my next project. I don’t know if it would ever be called for but is there a way to do this with double crochet?
June said
Hi Jo Ann, yes there is! I’ve already given details in a previous comment, here 🙂
Elaine said
Thank you for providing instructions for left handers too!! It has been difficult for me to find any instructions for left handers. Everything I make comes out backwards because what is the right side for right handers is the wrong side for left handers. I try to refigure everything so that it comes out right, but am not always successful.
Jan McCarthy said
Hi June,
Am making the sea turtle, what great and clear instructions.just love the magic ring process.Love the web site, will be buying many more patterns, and learning so much more. Thanks so much Regards Jan McCarthy..Australia.
AT said
Hi, many thanks for your tutorials. 🙂
I have a question about the invdec. I get how it works, you have to use the front loop when decreasing. However, is this before or after turning the amigurumi the ‘right’ way? Do I have to use the back loop if I decrease before turning?
Thanks in advance for your response. 🙂
June said
If you watch my ‘Which is the Right Side?‘ video, you’ll notice that the front sides of the stitches always face you while you’re crocheting, whether you’ve flipped your piece inside out yet, or not. So you should always invdec using the front loops (i.e. the loops closest to you while you crochet), as the unworked back loops will all end up hidden on the inside once the piece is right side out.
If that doesn’t seem to make sense, just try making a couple of decreases and then flipping your piece inside out and back again, and you’ll see how it works in practice 🙂
Davina said
Hi June,
I am an experienced crocheter and have recently discovered your website and absolutely love it. It is so exciting to use your tips and hints and I do wonder how I have been crocheting for years and had to make do without them. Please keep up the good work as I am now an ardent follower even though I am an oldie I love to keep up.
Sarah Lewis said
Greetings from Portsmouth, England. Excellent tutorials. I wanted to thank you not only for being so generous with your skill and time but for including us left handers. Off to try an amigurumi Unicorn.
Rita Silveira said
Thanks for sharing. God bless you.
irina dalah said
hi june,
thank you so much for sharing this method!! I did use it on an amirugumi owl (this is how I first got to your blog) but I have tried it with vests and tops!
it really works wonders!! and the more I use it the easier and more instinctive it becomes!!
thank you again!!
and keep up the good work 😉
Dianne U said
June, your way of making amigurumi is amazing and outstanding! I only wish I had found you much sooner. I’ve made several items over the past few years, but now – with your methods to help me improve – they look awful to me. Your tips and tricks make the world of difference in the quality of my pieces and I’m forever grateful and thankful for your expertise! Bless you and thanks again.
patty said
Love your tutorial also great you have for lefthanders as I’m a lefty
On your video for invisible stitch love the flower with the yellow stem and green base would you have the directions for that if ya do could you email me again great tutorial and you go slow as ya can follow
June said
Patty, I’m not sure which video (or pattern) you’re referring to, but you can find all my plant and flower patterns here, so you should be able to spot the one you were interested in!
Claudia said
Your homepage and all tutorial videos are just amazing. Thanks a lot! I have recently started with amigurumi, that’s my decreases didn’t look very professional. Now I know why… Thanks for all your lovely patterns! It’s wonderful that they look like real animals. Greetings from Mexico, Claudia
Debbie said
I’ve never made anything amigurumi. The Crochet ball that you showed us how to make will be my first. I am so excited. I will make so for my cat. i am also going to try and make ninja turtles in memory of our son who passed away. He collected the old Ninja Turtles. I still have them.
Tesia said
This works so well, I had to start using markers during the decreasing rows in my work. I can’t tell where my decreases are anymore. Love it. Thanks!