How to Crochet an Invisible Decrease
After the magic ring, what’s the one other technique you need if you want to create beautifully finished amigurumi? The invisible decrease (abbreviated invdec) – it’s absolutely invaluable.
What is an Invisible Decrease?
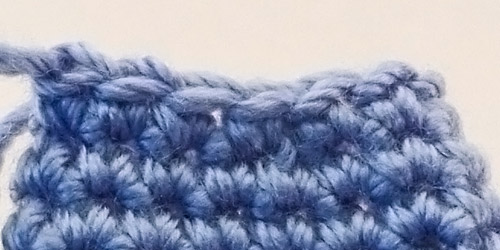
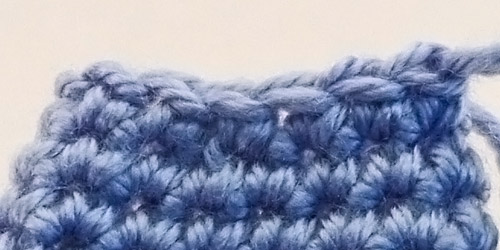
The invisible decrease (invdec) really is as good as its name claims – it’s almost impossible to see, even if you’re looking for it! You’ll have no more bumpy or gappy decreases once you’ve mastered this technique – all your stitches will look smooth and even.

Standard decreasing methods (sc2tog or skipping stitches) leave a bump or gap when you decrease. The invisible decrease (invdec) method is different: it’s practically invisible, even if you know what you’re looking for! (See my blog post for a comparison of the three methods.)
Why does it work so well? The magic behind the invdec is that it groups the previous stitches together at its base, so the stitch itself looks identical to a regular single crochet.
The invisible decrease method will probably take a few attempts to master, but, just like the magic ring, it’s one of those techniques that’s so good, you’ll wonder how you ever crocheted without it!
I recommend you watch the video to see the method in action, but in case you prefer text or want something visual to refer to, I’ve also made a photo tutorial version for you.
Quick finder:
- Video Tutorial (right- and left-handed)
- Invisible Decrease Tips
- When to Use Invisible Decreases
- Step-by-Step Instructions (right-handed)
- Step-by-Step Instructions (left-handed)
Invisible Decrease for Amigurumi – Video (right-handed)
Click to watch this video on YouTube.
Invisible Decrease for Amigurumi – Video (left-handed)
Click to watch this video on YouTube.
Note: The videos may look a little small embedded in the blog: if so, you can fullscreen them or click through to YouTube to watch them full-sized 🙂
Invisible Decrease Tips
Invdec is a little tricky to get the hang of, and there are two points during the decrease where you can accidentally lengthen your stitch so it isn’t neat and tight, and the resulting decrease will be far more obvious.
I’ll demonstrate these invdec problem points, so you know where the pitfalls are, and how to avoid them. You’ll find this tutorial useful if:
- You’re new to the invisible decrease technique (watch my video tutorial before you continue reading this!)
- You’ve tried invdec but been disappointed by your results
- Your invdecs look inconsistent, gappy, or too prominent
- You want your amigurumi to look as good as possible!
A Note about Tension
Although maintaining consistent tension on your yarn is a skill you need to master in order to crochet anything beautifully, it’s vitally important for amigurumi, as you need your stitches to be tight and even to produce the regular, firm amigurumi fabric that allows us to create complex ami shaping, and hides your stuffing. I’ve seen some people recommend that you tug on your yarn after every stitch to tighten it up, but that isn’t necessary if you maintain consistent tension.
Tensioning your yarn is a balance between the hook pulling forward and your other hand pulling backward.
How do you do that? Well, while your hook is pulling the yarn forward, your non-hook hand is simultaneously pulling back on the yarn, so you use a controlled amount of yarn to form each stitch. (You probably do this without even realising you’re doing it; if the yarn could just slide freely through your fingers with no tension, your hook would pull up large, inconsistent loops, and your crochet would look sloppy.)
When I talk below about pulling back on the yarn so the working loop is tight around your hook, the goal is to bring the tension back to your standard level, so the working loop should be the same size and tightness as it is for all your other stitches. If you go too far and pull it extra-tight, you’ll just make it more difficult to work back into that stitch in the following round.
Perfecting the invdec
If you look at the top of an invdec stitch, you’ll see there’s a ‘V’ at either side of the decrease. (As invisible decreases are practically indistinguishable from the surrounding stitches, I’ve crocheted my samples with the invdecs and the surrounding top loops in a different colour, so you can see what I’m talking about!)
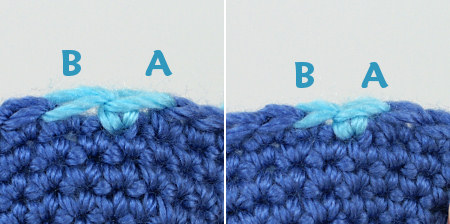
Left: The source of the problems is these extra-long Vs at the top of the stitches surrounding the invdec.
Right: Invdec done correctly, with the Vs the same length as in the surrounding stitches.
These two Vs (A and B) are the culprits – if either or both of these is lengthened, there’ll be extra space around the invdec and it can look gappy or sloppy.
Left: The lengthened Vs have left a larger gap at either side of the invdec.
Right: Invdec is indistinguishable from the surrounding stitches (except for my helpful colour change!)
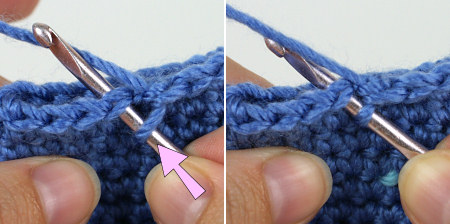
Loop A
Checkpoint: When you begin an invdec stitch, as you’re swinging the hook around to get the tip through both front loops, the working loop (the one that was already on your hook before you started the stitch) tends to loosen up.
Fix this: Once you’ve inserted your hook under the two front loops, and before you yarn over, tug the yarn to make sure the working loop is still tight on your hook and hasn’t lengthened.
Left: Lengthened working loop on hook will cause a loose stitch.
Right: Tightened loop – perfect!
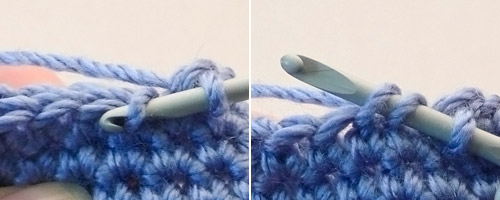
Loop B
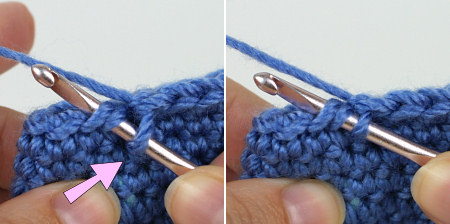
Checkpoint: After you complete the invdec, you’ve just turned 2 stitches into 1 stitch, and your hook is now further back than it usually would be for starting a new stitch. So this is another point where your yarn can make an extra-long loop, as you bring your hook forward over that extra distance to begin the next stitch.
Left: The position of the hook after a sc stitch.
Right: After an invdec, the hook is further back (dotted line marks the usual position), so there’s a greater distance to reach the next stitch.
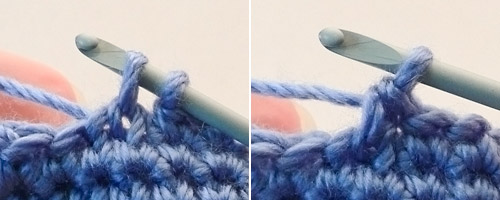
Fix this: Make sure you keep tension on your yarn, so the loop on your hook doesn’t stretch out as you insert your hook into the stitch after the invdec. (If, after inserting your hook to begin the next stitch, you see the working loop has lengthened, just pull the yarn so the working loop is tight around your hook again, before you yarn over and continue with the stitch.)
Left: Lengthened working loop after inserting hook into next stitch.
Right: Tightened loop – perfect!
Multiple Decreases
The potential problem is doubled when you’re working 2 invdecs in a row, as you have the ‘too far back’ effect (Checkpoint B) and the ‘swinging the hook’ effect (Checkpoint A) both acting on the same loop, so you should make a little extra effort to be conscious of the size of the loop on your hook, and make sure it stays tight and doesn’t lengthen.
Invisible Decrease Perfected!
With a little extra effort to make sure you’re maintaining consistent tension, even while you decrease, your stitches will all stay the same size, and your invdecs will be as invisible as advertised!
When to Use Invisible Decreases
In addition to the obvious use in amigurumi, you can also use the invisible decrease for any piece worked in single crochet, in the round, without turning (e.g. hats).
As each invdec leaves two unworked loops visible from the reverse side, you won’t want to use it for anything where you turn between rows/rounds, or where both sides will be on display.
For projects like amigurumi and hats, the backs of the stitches are always hidden on the inside, so the unworked loops won’t show from the front of the finished pieces, and all you see is smooth and even decreases.
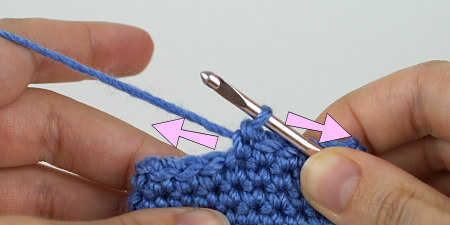
Invisible Decrease – Step-by-Step Instructions (right-handed)
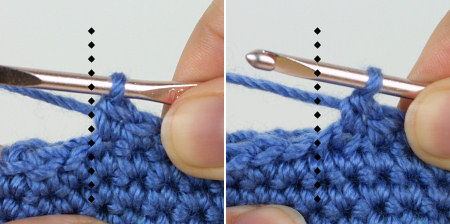
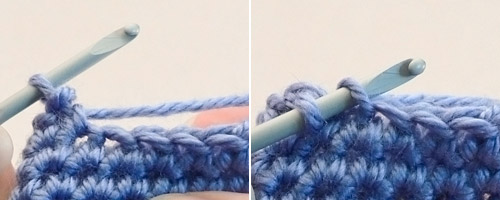
Starting position (below, left). Insert the hook into the front loop of the first stitch (2 loops on hook, below, right). DO NOT YARN OVER.

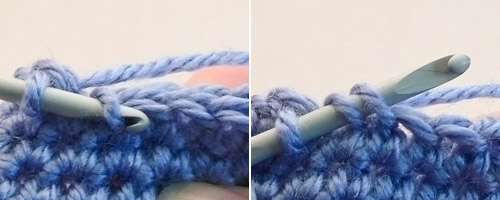
Insert the hook into the front loop of the next stitch. To do this, you’ll need to first swing the hook down (below, left) so you can insert the hook under the front loop (3 loops on hook, below, right).
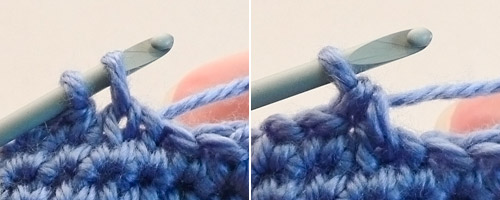
Yarn over and draw through the first two loops on the hook (2 loops on hook, below, left). Yarn over and draw through both loops on the hook (invdec completed, below, right).
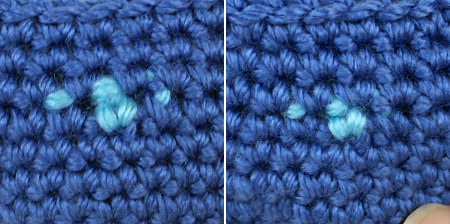
Now let’s play a game: spot the decrease…
Good, huh? Give it a go with your next ami – I promise you won’t regret it…
Invisible Decrease – Step-by-Step Instructions (left-handed)
Starting position (below, left). Insert the hook into the front loop of the first stitch (2 loops on hook, below, right). DO NOT YARN OVER.
Insert the hook into the front loop of the next stitch. To do this, you’ll first need to swing the hook down (below, left) so you can insert the hook under the front loop (3 loops on hook, below, right).
Yarn over and draw through the first two loops on the hook (2 loops on hook, below, left). Yarn over and draw through both loops on the hook (invdec completed, below, right).
Now let’s play a game: spot the decrease…
Good, huh? Give it a go with your next ami – I promise you won’t regret it…

Loved this tutorial? I have so many more amigurumi tips and tricks to share with you!
Boost your amigurumi skills with my latest book, The Essential Guide to Amigurumi, your comprehensive guide to amigurumi techniques and tips.
Do you find my tutorials helpful? If so, please consider making a contribution towards my time so I can continue to create clear and concise tutorials for you:
Thank you so much for your support! Now click below for loads more crochet video and photo tutorials (and do let me know what else you’d like me to cover in future tutorials…)


Kristina said
What a difference this technique made! I remade a giraffe, using your method. No more stair-case look! I’m so pleased! This was just my second amigurimi, so I have much to learn. You explain so comprehensively and clearly. Thank you June(:
Deborah Donahue said
Hi, I was looking for instructions on how to do a hdc2tog stitch and Pinterest led me to your site. I just read in a reference book for crochet that US terms and UK terms are different. (It did not show me the hdc2tog stitch tho.) So is the invisible decrease stitch in US terms a sc2tog stitch? Which means I can do this stitch but using the hdc? Thank you for the information. I looked several places and either could not understand it or it was not the correct stitch but I understand your tutorial easily!
Deb
June said
My invdec is a different type of sc2tog stitch – it does decrease two sc stitches to one, but it only looks good if the back of the stitch will be hidden (for example, on a toy or a hat), so it’s not a suitable substitution for every sc2tog. (See my standard sc2tog instructions for comparison.)
Hdc is US stitch terminology (equivalent to a half treble crochet in UK terminology). You may use my invdec concept to make an ‘invisible’ hdc2tog (by yarning over before you begin the invdec instructions) – or any other decrease – but, again, I’d only advise it if the back of the decrease stitch will not be visible on your finished piece.
Jo Schreibeis said
Hi! I love your tutorial for this invisible decrease! I’m inquiring if you would allow me to link to this in a pattern I am writing for a bear pattern? I will give you credit in the pattern (obviously since it’s going to your blog!).
Thank you for your consideration!!
June said
Absolutely! You’re very welcome to link to any of my tutorials in any of your patterns – please see my linking policy in my FAQ for the best way to do this.
Dorothy Atkinson said
Hi June, I’m an 80 year old who discovered Amigurimi approximately two months ago. I have ten Stuffies made. I’m giving them to the Salvation Army to be given to children for Christmas, I hope to have at least thirty made by then, my invisible decrease has looked nice right up until the monkey I just finished, I noticed that the stitch looked stretched I managed to fix it but your tutorial helped me diagnose the problem. Thanks so much. Dorothy.
Pat Driscoll said
Have just mastered the magic circle, thanks to your very clear instructions. You’re right, its unlikely that I will use the old method again. Thank you.
Mell Andre said
Thank you so much! I was wondering if there is a way to
Do this with double crotchets?
June said
Yep! See my previous answer here for details. 🙂
Tania Oliveira said
Thanks for sharing your knowledge so clearly.
I am now starting with amigurumis, and your tutorials are wonderful.
Thank you, God bless you greatly
Trish said
Thanks so much for this. I found your tutorial really helpful. How on earth did I manage without it before? X
Lois said
Can you please tell me what size safety eyes I need to use?
Thank you.
June said
Lois, that depends on what you’re making! Most of my patterns use 8, 9 or 10mm eyes, but there are some that use 6mm or 12mm. All PlanetJune patterns list the recommended eye sizes in their description in my shop (and on page 1 of the pattern itself, if you’ve already bought it).
Susan said
I can’t tell you how much I appreciate you for writing this tutorial! I crochet hats, do amigurumi, clothing for babies and so much more. Such a difference your invisible decrease is! Thank you, Thank you, Thank you!!!
Donna said
Hi June,
My hat is off to you. You do beautiful work. You’re an inspiration to all crocheters. Thanks so much for sharing your amazing work. You are a true artist.
Kathy said
My pattern calls for a Double decrease (using 3 stitches). Can this be accomplished using your invisible method? Thanks 🙂
June said
Kathy, you can use this method for a decrease over more stitches, but it won’t be invisible: changing 3 (or more) stitches to 1 is always going to leave a bump and/or gap, however you do it – it’s the nature of such a large decrease. I suggest you try it in your pattern, compare it with a standard sc3tog, and see which result you prefer.
Rachel said
Thank you so much for this! I love doing amigurumi and didn’t realise there was such thing as an invisible decrease! I hated having the bumpy side showing on some of my creations. I’m getting out of bed just to try this out now!
Leelou de France said
Hi ! I like your patterns and purchase several. They are clear and, MORE in these patterns they are links to all your technical explanations. And these explanations are also so clear !! You are really a MASTER, “the” TEACHER !! THANKS, THANKS, so thank for sharing all your knowledges !!!! Leelou
(I hope that you understand my approximate english 😉 …..)
June said
Thank you, Leelou! I’m so happy you find my patterns and tutorials to be clear and helpful – that’s what I aim for 🙂
Debby said
THANK you !! I was making little crocheted toy balls for my grandson, and did not care for the little holes where the stuffing could come out – your version is perfect !!
Angela said
Fabulous tutorials. I am new to crochet and are well on my way with my first cuddly rabbit, thanks to you.
Angela
Pat Reynolds said
This is a great tutorial ty for sharing
g
Lynsi said
AMAZING. Mind blown. I’m never doing another type of decrease again!
robin quade said
Thank you for explaining this method, but do you need to go in the front loop for the rest of the stitches in the row?
June said
Definitely not, Robin – changing to front loops only would change the look and shape of your stitches. Invdec is only used as a direct substitute for sc2tog decreases; all the other stitches in the pattern remain unchanged.
Juliet said
Thank you SO MUCH! I love all of your work and your tutorials are so wonderfully helpful. The invisible decrease and these tips on perfecting it are absolutely brilliant. I’ve been trying to fix these gaps and getting frustrated as my attempts fixed the old problems but created new ones. You are my favorite crochet guru.
Habiba said
Hey June! I really dont get the invisible dec method
I have a round that says
[ inv dec , sc 4] around { 36}
How do i do it??
June said
The ‘invdec’ in your pattern is just the invisible decrease I show above – an invisible way of turning 2 stitches of the round below into 1. If you don’t understand the way your pattern is written, you should contact the designer for assistance 🙂
Stacey said
I LOVE you! lol Thank you so much this is amazing! I definitely do not regret learning this ;)! and I am sorry I haven’t found this sooner!! But, oh well, from now on, no more visible decs!!
Thanks again!
Cheers! xo
Jessica said
you are awesome! came across the site when I saw the dinosaur patterns, and started browsing, found your YouTube channel as well. super helpful and addresses so any questions/problems I’ve had while crocheting. thank you!!!
Jennifer LaVeglio said
Thank you June! The invisible decade was just the stitch I was looking for to keep my work flawless!
Perrie said
Thank you for the tutorial. I’ve been crocheting for a long time and I never heard of this stitch. It’s so invisible that I’m amazed at how I can now hide my decreases. Very cool. JAH BLESS AND ONE LOVE! !
Nicole H said
Thanks so much for sharing your knowledge and creativity with the rest of us! Special kudos for including left-handed instructions! Now to go try to master the MC. It’s usually hit-or-miss whether or not I get it right.
Celine said
Thank you so much for your tutorial! My decreases looked horrible before. I tried your method and it works like magic : no visible decreases anymore! Thanks again!
Jessica said
I am 18 and I just started to crochet recently, I love it. The only problem I had was the way my decreases looked, this is great. Thanks a lot.
Irene Foss said
Thank you very much for the lesson on invisible decrease. I had never heard of it before. But then when I started crocheting again this spring it had about 35 years since I had done any crochet.
This will be so nice to use in the 2 crochet sweaters I’m making for 2 great grand daughters. The pattern has a pretty yoke and lots of decreases. I was so glad to see the post by Sam Said asking if the invisible decrease could be done in dc. The yoke of the sweater is made in dc. I am just getting to the point where I will be starting the decreases and will use the invisible technique
SallyStrawberry said
Hi June,
Thanks so much for this tutorial. I have used the invisible when making some toadstools and the comparison between the ones I made before I learned this method of decrease and the one I have made after are tremendous! A pic can be seen in my latest post at sallystrawberrycrochetandknitting.blogspot.co.uk/
Thanks again for such a brilliant tutorial!
Sally x
Kelsey said
Thanks for this!
Except.. Now I’m having issues. After attempting and reading multiple times, It still isn’t matching my other stitches. Well, that was until I realized that ALL my crochet stitches look very different than yours. My pieces look like X’s while your stitches are more of an upside-down “U” shape. Am I crocheting wrong? I’ve never seen any issues until now… and I’m really confused as I’ve been crocheting for a few months perfectly fine.
Thanks!
June said
Kelsey, from your explanation, I know exactly what you’re doing! I won’t say it’s wrong (because, provided you’re happy with it, there is no ‘wrong’ way to crochet), but you are crocheting in a non-standard way. My Yarn Over vs Yarn Under post and video tutorial will explain all 🙂
Gardenchef's Needle and Pen said
Great tutorial! Thank you for this!
t.hoang said
I don’t get how this is different than single crocheting two together other than going only through the front loop…? or is that the magic difference?? 😮
t.hoang said
wait, nvm. i see the difference :]
Less bulky? said
Does the invisible decrease work because it is less bulky?
June said
Yes, and the invdec essentially pulls the stitches below together with a sc stitch, instead of a sc2tog which is formed from the bottom half of two sc stitches joined together at the top. Removing that extra half stitch does makes the decrease stitch less bulky, and the resulting stitch also looks the same as all the surrounding sc stitches, so it’s harder to spot.
Lana said
Hello! Im attempting to make an amigurumi hippo and the pattern im following calls for a full round of *SC4TOG, SC 1* repeat. no matter what yarn or hook size i try i cannot manage to do this drastic decrease without 7 large bumps appearing (each about the size of a dime around). is there a way to decrease 4 st at a time with a method similar to this one, so they wouldnt be so noticeable?
All the best,
Lana
June said
I’m afraid not; decreasing 4 stitches at a time is a huge change in stitch count, and it’s going to leave a bump or a gap no matter what you do! I’d never use such a steep decrease in my designs for that reason.
elham said
hi, thankyou very much beacuse of ur teaching
bernadette said
will that invisible dec work when decreasing along neck edge.
also can you show dec in basket weave stitch please
Roberta S. said
Love your website–I am just starting with amigurumi. You are a wealth of knowledge. My question is this: is the only difference between a sc2tog decrease and an invisible decrease that fact of where you put your hook/pick up a stitch? It appears they both operate the same (go into one stitch, don’t yarn over and go into the next stitch and pull through 3 loops) but with the invisible you are only picking up the front loop, whereas with the sc2tog (even though they don’t really say) you pick up both loops of the stitch? Is the key in picking up the front loop only?
June said
Not quite, Roberta: for a sc2tog, in addition to using both loops, you yarn over and draw up a loop in both the first and second stitches – see my tutorial for the full sc2tog instructions 🙂
Roberta S. said
Understood! Thank you for pointing this out. Again, you are a wonderful resource for crocheters!
Sherri said
Hi June,
Thank you for preparing the tutorials which are all very useful and practical. Is it possible for you to give me a lesson on how to control the tension of hdc and dc etc? When making hdc and dc, I always find the top “V” is obviously larger than that of the sc. Thank you very much for your consideration.
Sherri
Yarnitect (Dana) said
Love your tutorials. I’m sharing with friends and new students! =)
Lauren F said
Thank you for sharing this! I’m planning to start offering designs for sale myself this year. One of the problems in the back of my head was decreases – I’ve never been able to do them well. So far I’d just addressed that by trying to minimize the amount of decreases needed (putting most of my shaping in on increase rows) but this is going to help so much!
I’m also definitely going to be purchasing your book now, as well. (Ok, I’d already planned on it, but if this is the sort of advice you give out on the blog, then wow, that book’s going to be worth it.) I just wish I could find somewhere local that carries it so I could pick it up on my way home today, instead of having to wait for the Internet to deliver it for me! *sniff sniff*
Carrie Mather-Crowner said
Thanks for sharing your knowledge! I’m going to try this decrease as soon as I get home! 🙂
Theresa said
You are a mind reader. I was trying to find out how to get rid of gaps last week and now I know. Thank you.
Cherish said
This is wonderful. Thank you! Can’t wait to try this with my next amigurumi project.
Deedre Sigmond said
Dear June, I love the instructions, tutorials.
Had a problem with invisible stitch and magic ring. I now have that, but what is magic ring. I am doing the tiny cat balls.
Thank You, Deedre S.
June said
Deedre, see my magic ring tutorial; if you have other crochet questions, just see my help page for the list of all my tutorials 🙂
cathleen said
THANK YOU SO MUCH for catering to the left-handed crocheters!! I can’t tell you how much I appreciate the picture tutorials you have provided!
Bless you!
Sam said
Can this stitch be done with double crochet?
June said
Yes, Sam, any standard crochet stitch can be made ‘invisible’ using this method. The key thing to remember is that the decrease occurs at the base of the invisible decrease (not at the top as with a standard decrease), so you only create one stitch that covers two stitches of the row below. That’ll be clearer with an example – follow these instructions and you’ll understand!
To create an invisible double crochet decrease:
TK said
Thanks Bunches for sharing! I am making a doll and this technique will finish her very nicely.
BIG Hugs ~ TK
Tamara said
Thank you! Thank you! Thank you! When I saw invisible decrease on a pattern I was worried that it would be extremely difficult. Your tutorial has explained it wonderfully. I like that you have it for left handed people as well. My granny is a lefty 🙂 now back to making a kitty keychain 🙂
Lee Ann said
I love there tutorials! I JUST started in ami work, and even started a doll for my daughter, with all parts done (hoping to finish by Christmas, but can’t find the right size eyes locally), but with FINALLY figuring out the magic circle, and with these other tutorials, I think I will start a new doll for her, finish this one and give it away. I’m excited to start over (sort of, LOL!) and do it right! Can’t thank you enough for these awesome tutorials! I may go ami crazy! =D
Rachael said
Thank you for taking the time and effort to make your invaluable tutorials.. I have learned so much as a beginner and I am much more confident in making my amigurumi now.. Your site is the only one I refer to if I ever have a problem.. and you have gorgeous patterns as well!
metoob said
this is amazing! i love it, but one question, will it work for 3 or 4 sc decreases?