PlanetJune Craft Blog

Latest news and updates from June

Archive for November, 2020

Cozy Cables Earwarmer crochet pattern

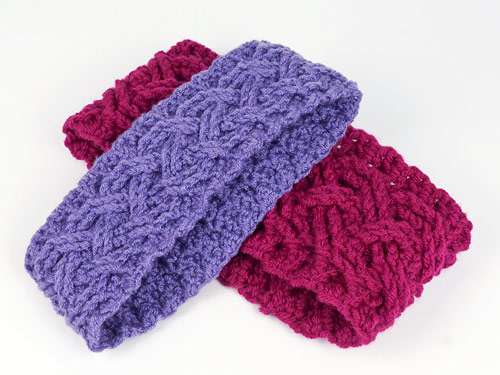
Don’t miss the launch discount, at the end of this post!

With the winter chill setting in, it’s always my ears that feel the cold first. I usually wear a very functional earwarmer – just a shopbought band of boring black insulated fleece – but I really wanted something a bit more stylish to bring some cheer to the season this year. And here’s what I came up with – a wonderful cable pattern that looks far more complex than it is!
 
Cozy Cables Earwarmer crochet pattern by PlanetJune

I’ve given two width options using different yarn weights depending on how wide and bulky you’d like your earwarmer to be, and how quickly you’d like to get it finished (thicker yarn needs fewer repeats!) 

Cozy Cables Earwarmer crochet pattern by PlanetJuneCozy Cables Earwarmer crochet pattern by PlanetJune

The dense crochet cables make a plush squishy fabric that’s great for blocking wind. The edges of cabled panels tend to be gappy, but I’ve filled those gaps with some hidden stitches with extra squish on the inside to keep you warmer around the edges.

Cozy Cables Earwarmer crochet pattern by PlanetJune 
They’re only hidden from the outside! You can clearly see those snuggly stitches all around the inside top edge in the photo above.

The worsted weight option can also be worn as a fitted neckwarmer, as shown below. If you want a chunkier neckwarmer, you could upscale it further with a bulky or super bulky yarn to make a wider cowl.

Cozy Cables Earwarmer crochet pattern by PlanetJune

This earwarmer is worked flat and seamed, you can easily customise the fit by working the pattern until it’s the desired length. Try it on as you go and check if it’s long enough to give a snug fit around your head, or just use my standard measurements as a guide if it’ll be a surprise gift for a child or adult! 

Cozy Cables Earwarmer crochet pattern by PlanetJune

As always with my PlanetJune Accessories designs, the pattern includes full stitch instructions and my tips for all the techniques used, as well as written and charted versions of the pattern.

If you’ve been nervous to tackle cables, I’ll walk you through it in the pattern. There’s a 4-row repeat, but every wrong side row is just plain half double crochet, so you only have two pattern rows to remember. After you’ve made a few repeats, you’ll be able to fly through the pattern and make impressive-looking earwarmers for everyone on your list! 

Links and Launch Discount

Ready to get crocheting? You can buy the Cozy Cables Earwarmer pattern individually from my shop, or as part of a Custom Set of any 3 PlanetJune Accessories patterns of your choice.

PlanetJune Accessories crochet patterns by PlanetJune

And, for this week only, save 50c on the Cozy Cables Earwarmer pattern by using discount code COZY at checkout. (Valid until Monday November 30 2020.)

Tip: The discount is valid on the Earwarmer alone and the Custom Set including the Earwarmer – so you can save even more by buying the multipack deal with the discount!

Or, if you’re not ready to buy just yet, please heart or queue it on Ravelry so you don’t forget about it:

If you’re planning on making one (or more!), please join the PlanetJune End of Year 2020 CAL – I’d love to see your earwarmers, and you’ll be entered in the CAL contest! Join us in the PlanetJune Ravelry group (or click here for full details of the CAL, including non-Ravelry entry option) 🙂


I do hope you’ll enjoy this pattern as much as I’ve enjoyed designing it. I’ve been wearing my earwarmers out in the snow already this week, and I can report that they’re keeping my ears and forehead toasty warm, even when my cheeks are freezing!

Comments

machine knitted dog sweater

After the success of my first big machine knitting project, I wanted to try something smaller so it wouldn’t take as much energy to knit, and now I have Maggie I finally have a small recipient to knit for!

(You may think machine knitting sounds easy and automated, but there’s a lot to it: pushing the carriage back and forth across the needles; remembering to move the weights up every few rows; checking no stitches have jumped off the needles, and following the pattern by counting rows and manipulating stitches to make increases or decreases. Doing all that at the same time takes physical and mental energy – and the more tired you get, the more chance you forget to do something and risk dropping a stitch or skipping a section of the pattern. No prizes for guessing how I know all this!)

I decided to keep it simple for my first attempt at a dog sweater: I drafted a basic pattern by measuring the sweater I bought for Maggie last winter – it’s just formed from two knitted rectangles stitched together, so it should be simple to make. By using the leftover yarn from my last sweater, I didn’t even need to make a gauge swatch to calculate the number of stitches and rows I’d need, so I could get started right away.

My knitting machine is very basic and only forms knit stitches, so in my last project I hand-knitted all the ribbing after machine-knitting the bulk of the sweater. This time I was brave enough to knit extra rows for the ribbing, and then drop every other column down by the length of the ribbing while the piece was still on the machine and latch them back up in the other direction to form purl columns, so there was no hand-knitting at all involved. Once you get the hang of this, I think it’s much faster than hand knitting ribbing.

I knitted my two rectangles on the machine, remembering to leave a slit for the leash at the shoulder, and stitched the two rectangles together (without finishing anything in case it needed to be altered). Then it was time for the first test fitting!

machine knitted dog sweater

Maggie wasn’t so sure about this monstrosity with all the dangling yarn ends, but it fit nicely, so I could weave in all those ends and move onto phase 2 of the sweater…

You see, Maggie’s fur attracts snow, and the more she walks in the snow, the more tiny snowballs form on her legs, until she ends up with snow and ice ‘boots’ caking her entire legs!

machine knitted dog sweater

By that point, it’s difficult for her to walk – that’s no surprise, with blocks of ice in her armpits – so I decided to add some sleeves to this sweater, in the hope of preventing the snow from getting too high up her legs.

The armholes in the sweater are just slits, so I knitted some teeny-tiny little rectangular sleeves with ribbed cuffs:

machine knitted dog sweater

I seamed them up and stitched them into the armhole slits.

machine knitted dog sweater

I wasn’t at all sure how this would look, as it’s the equivalent of a drop-sleeved sweater for a human – a boxy shape without a close fit – but this is a dog sweater, so I wasn’t too worried: it’s going to get dirty and snagged on twigs and thrown in the wash dozens of times over its lifetime. All it needs to do is keep her warm and stay in place on our walks.

But, flattened to the side, it looks like it should work…

machine knitted dog sweater

And it needed one finishing touch before we could field-test the sweater: strengthening the leash slit with an edging. I decided to keep it simple and single crocheted around the slit with the same yarn. It turned out to be an easy way to make a very neat-looking buttonhole.

machine knitted dog sweater

And now for the moment of truth: will Maggie like her sweater?? Let’s try it out at the park and see what she thinks…

machine knitted dog sweater

I think that happy face says it all – it’s a big success!

(By the way, it looks from these pics like the sweater might be too short, but that’s just because Maggie’s sweet spiral tail pushes it up her back so it won’t stay in place – I don’t think there’s any way around that!)

As I made Maggie’s sweater from the leftover yarn from my own, we now have matching sweaters. And while we won’t be going out in public like this (any time Maggie’s wearing her sweater, it’ll be cold enough for me to need a coat), I couldn’t resist asking Dave to take a photo of us in our matching outfits…

machine knitted dog sweater

Hahaha – isn’t that hilarious?!

I’m really pleased with how this project worked out. And I’m especially happy because, by the time I got to the second sleeve, I finished the entire piece without making a single mistake – maybe I’m actually getting the hang of this machine knitting thing!

It’ll probably take 24 hours for a wet sweater to dry before Maggie can wear it again, so I think she’s going to need at least a few more sweaters, don’t you? 😉

That gives me an excuse to try some more knitting machine experiments without having to make a me-sized sweater. I think I’m going to try some stripes on her next one, so stay tuned to see how that turns out…


Comments (16)

PlanetJune End-of-Year 2020 Crochet-Along

This year has been a struggle for everyone, so let’s try to end it on a high note, and celebrate our love of crochet together, with prizes for everyone!

The annual PlanetJune Christmas Crochet-Along (CAL) is back, but it’s even more inclusive this time around. You can enter the End-of-Year 2020 CAL any time from now until the end of the year by:

  • Crocheting any PlanetJune Xmas/winter-themed patterns you’re making for your holiday decorating
  • Crocheting any PlanetJune pattern you’re giving as a holiday gift or as a donation to a good cause (or selling to someone who’s buying it as a gift)
  • Crocheting any PlanetJune pattern you’re making for yourself – remember, you deserve treats too!

Basically, you can make any PlanetJune patterns you want – the more the merrier! Share what you’re making and join our crochet party as we approach 2021.

Come to the PlanetJune group on Ravelry and join the fun! Share your crochet plans, post photos of your projects in progress, let everyone else know you like their projects, and (of course) post pics of your finished projects so we can all appreciate them.

If you don’t use Ravelry, or can’t at the moment due to their accessibility problems, see the ‘How to Enter’ section below for how to participate via social media instead.

Prizes

Thanks to a generous anonymous benefactor, we have extra prizes this year:

  • First prize: $20 PlanetJune Gift Certificate
  • Second prize (2 winners): $10 PlanetJune Gift Certificate
  • Participation prize (2 winners): $5 PlanetJune Gift Certificate
  • Runner-up prize (everyone else!): 10% PlanetJune discount code to spend in 2021

Pattern Options

While you aren’t limited to my seasonal patterns with this CAL, I thought I’d whet your appetite for project ideas with a collage of all my Christmas patterns:
Christmas crochet patterns by PlanetJune

Isn’t that amazing? There are soooo many to choose from! You can find all these patterns at www.planetjune.com/xmas – including plenty of free/donationware options if funds are short 🙂

How to Enter

Ravelry Users
Post a pic of your PlanetJune projects to the CAL thread in the PlanetJune Ravelry group, and tag your projects with PJCAL2020 in order for them to appear as part of the CAL.

New to Ravelry or PlanetJune CALs? See my Crochet-Along FAQ for all you need to know!
Non-Ravelry option
If you are unable to use Ravelry, you can still enter the contest by:
  1. Posting a photo of your finished PlanetJune project on Facebook, Instagram or Twitter
  2. Tagging me (@PlanetJune) in the post so I’ll see it
  3. Using the hashtag #PJCAL2020 in the post so I know it’s an official entry (only use the hashtag once per entry please, even if you post multiple photos or in multiple places!)

Example message “Here’s my entry into the @PlanetJune End-of-Year CAL! #PJCAL2020” (and add your photo, too!) 

Rules

  • Prizes will be drawn from all eligible entries, starting from first prize and working down the list, with a maximum of one prize per person.
  • You’ll receive one entry per PlanetJune pattern used in a completed project and tagged PJCAL2020 (if you make e.g. a Christmas wreath using 5 different patterns, you’ll get 5 entries).
  • Entries will be capped at 8 per person, to give everyone a chance of winning.
  • Bonus entry option (for the participation and runner-up prizes only): even if you don’t manage to complete a project, you can still be entered into the contest – all you need is to have posted at least 5 posts in the CAL thread. So do join in the conversation – you’ll be guaranteed at least a runner-up prize!

I do hope you’ll join us for this PlanetJune end-of-year crochet party – I’m really looking forward to seeing what you’re making from my patterns, as holiday gifts or for yourself! See you in the ravelry group or on social 🙂

Comments

  • Quick Links: Crochet

    navigation: arrow

    buy crochet patterns and accessories from my online store

    'Everyday Crochet' and 'The Essential Guide to Amigurumi' crochet books by June Gilbank

    Crochet video tutorials and step-by-step photo tutorials

    Free PlanetJune crochet patterns

    Frequently Asked Questions

    Quick Links: Crafts

    navigation: arrow

    Punchneedle Embroidery information, ebook & patterns

    Papercraft ebook & tutorials

    Free PlanetJune craft projects & tutorials

  • Blog Post Categories

  • Blog Archives

  • Welcome to PlanetJune!

    June Gilbank

    Hi, I'm June. Welcome to my world of nature-inspired crochet and crafting. I hope you enjoy your visit!

    If you'd like to get in touch, you can contact me here.
    crocheted Canadian flag by PlanetJune
  • A fanned-out pile of the books Everyday Crochet and The Essential Guide to Amigurumi, with text 'The answers to all your crochet questions at your fingertips - find out more'
  • Support PlanetJune!

    Want to say thanks? You can send me money in seconds at paypal.me/planetjune (over $20) or paypal.me/planetjune2 (under $20) or send me a donation through my shop.

    Or simply click through from my links before you shop at Amazon, Etsy, KnitPicks, LoveCrafts or Crochet.com, and I'll make a small commission on your purchase, at no cost to you! Start here:

    ♥ Support PlanetJune ♥

    Tip: This link is also in the footer of every page!

    Thank you so much for your support!