PlanetJune Craft Blog

Latest news and updates from June

Archive for April, 2018

new Succulent Collections 3 & 4 crochet patterns

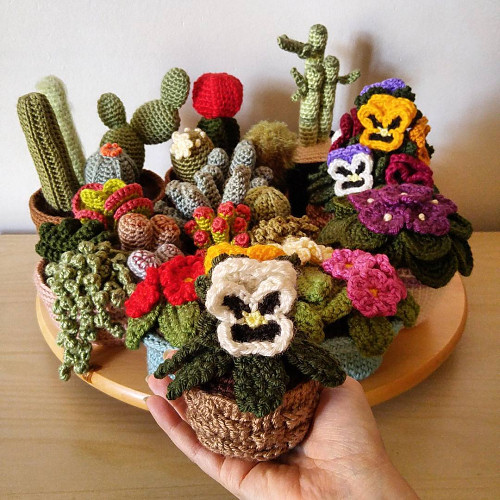
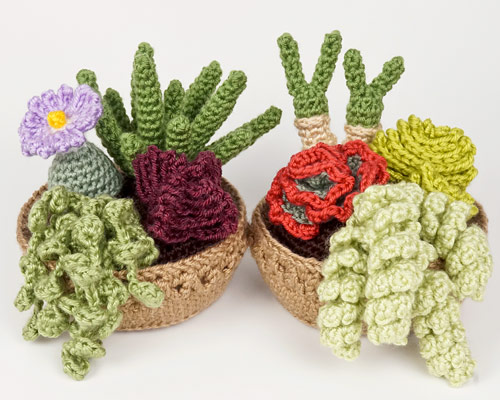
I’m so excited to share my latest designs with you – I’ve been working on them for months and they’re finally ready. Announcing: Succulent Collections 3 & 4!

Succulent Collections 3 and 4 crochet patterns by PlanetJune

Since I published my Cactus Collections 1 & 2 (in 2010) and Succulent Collections 1 & 2 (in 2012) they’ve never dropped out of my bestseller lists. My potted plants are unique and popular – they’ve been featured in home decor magazines as well as crochet publications – and make a wonderful gift or desk decoration because they’re lifesize and realistic, plus they never need watering, never stop blooming, and never die!

I’ve had the idea for a few years now to develop more succulent patterns and, at the start of 2018, while I was living in an empty house waiting for my furniture (and yarn) to rejoin me from Africa, I took the opportunity to delve into succulent research.

I searched through over 500 succulent species to find different, interesting, and crochetable ideas. Once I had my crochet supplies back, I developed prototypes for 15 species, which I finally narrowed down to these two gorgeous new collections of four:

Succulent Collection 3 crochet pattern by PlanetJune

Succulent Collection 3, L-R: Conophytum Burgeri ‘Burger’s Onion’; Peperomia ‘Trailing Jade’; Crassula Capitella ‘Red Pagoda’; Aloe Vera ‘Medicine Plant’

Succulent Collection 4 crochet pattern by PlanetJune

Succulent Collection 4, L-R: Monilaria Moniliformis ‘Bunny Succulent’; Callisia Navicularis ‘Chain Plant’; Sedum Burrito ‘Burro’s Tail’; Echeveria ‘Mauna Loa’

I’ve developed some clever new techniques for you to enjoy with these patterns, and I’ve come up with some easy construction methods to minimise the sewing and finishing. I think you’ll have fun making these!

Here’s a gallery so you can click in and see each of the new succulents in more detail:

One of my challenges, now I have so many potted plant patterns, is to come up with an original design for the pot each time, and I’m delighted with the new pot for these collections. I made it to resemble stoneware pottery, with a striking textured zigzag decoration that you crochet as you go (it’s easier than it looks, and I’ve included bonus right- and left-handed step-by-step tutorials for it as appendices to both the new patterns) and I think it’s one of my favourite pots to date. I hope you’ll love it too.

zig-zag pot decoration detail from Succulent Collections 3 & 4 crochet patterns by PlanetJune

Mix and Match

And here’s the best part: all the new designs are completely interchangeable with all my other Cactus and Succulent Collection patterns!

Cactus Collections 1 & 2, and Succulent Collections 1-4 crochet patterns by PlanetJune

Now you can choose between 24 different plants for your next cactus/succulent garden, and you know they’ll all look good together! Just grab a few shades of green (or red, orange, purple, grey… google ‘succulents’ to look for colour inspiration!) and a hook and you’ll be ready to get started.

Crochet-Along (and Save!)

As with my other plant collections, you can save several dollars when you buy both collections in the set together. But you can save even more if you join the BotaniCAL crochet-along (CAL) in my PlanetJune group on Ravelry: just leave a message in the BotaniCAL thread saying you’d like to join the CAL, and I’ll private message you with an exclusive discount code that you can use against either or both of the new Succulent Collection patterns!

Find out more about the BotaniCAL here. I hope you’ll join us in crocheting PlanetJune plant, flower and fruit patterns over the next couple of months 🙂

Handy Links to the Patterns

Don’t forget to join the CAL and get your discount for the new patterns!

Heart and queue them on Ravelry:

  • Succulent Collection 3:
  • Succulent Collection 4:

And you can find all my other cactus and succulent patterns here!

Cactus Collections 1 & 2, and Succulent Collections 1-4 crochet patterns by PlanetJune
Back, L-R: Cactus Collection 2, Cactus Collection 1, Succulent Collection 1
Front, L-R: Succulent Collection 3, Succulent Collection 4, Succulent Collection 2

It’s been a long process to get to this point, but I’m so happy with the new additions to my collection of crocheted cacti and succulents, and I hope you will be too!

Please leave me a comment if you love them, and I hope to see you in the BotaniCAL soon 🙂

Comments (9)

Join the BotaniCAL Crochet-Along!

I’m very excited to announce that I’ll be launching two beautiful new plant designs coming soon, to add to my potted plant crochet pattern collection! What are they? You’ll have to wait until next week to find out… 😉

potted plant crochet patterns by PlanetJune
I need a new crocheted plant display – there’s no room to add the new pots here!

And what better way to celebrate the new designs than with a crochet-along (CAL)? You’ve probably seen my cactus patterns being shared over social media lately – my crochet plants are more popular than ever, and this is a great time to try making your first PlanetJune potted plant, or to add to your collection!

As an added bonus, register for the CAL now (in the PlanetJune Ravelry group) and I’ll private message you with an exclusive discount code that you can use against either (or both!) of my two new plant pattern collections when they launch next week!

The BotaniCAL crochet-along is suitable for all levels of crocheter – if you’re intimidated to make a whole potted plant, you can get your feet wet first by trying a smaller project: one of my 13 popular flower and fruit designs. These are available online for free (or pay-what-you-want for the PDF version) so everyone can join in, no matter your skill level or financial situation. Just look at all your options:

PlanetJune BotaniCAL crochet patterns: crocheted potted plants, fruit and flowers
Which would you like to make first?!

The goal of this CAL is to build a virtual collection of as many PlanetJune plants, flowers and fruits as we can, and brighten the world with cheerful, colourful crochet projects. The BotaniCAL runs all the way through to the end of June, so you’ll have plenty of time to complete your project – or even make several lovely new plants!

Make them to keep, make them to gift, make them to sell – it’s up to you! PlanetJune crocheted plants (and flowers and fruit) are unique and beautiful. The potted plants make a wonderful gift or desk decoration because they’re lifesize and realistic, plus they never need watering, never stop blooming, and never die 😉

It’s easy to join a PlanetJune CAL – just click through to the CAL thread, post a message to say you’re joining, pick a PlanetJune plant, fruit or flower pattern, and get crocheting! Ask questions and share progress photos along the way, enjoy seeing what everyone else is making, and we’ll all cheer you along and admire your project once you finish it.

If you’re new to Ravelry, you’ll also need to create a free Ravelry account first, and join the PlanetJune group. You can find instructions for all of that (plus joining the CAL and posting your projects) in the PlanetJune Crochet-Along FAQ.

I hope you’ll join in this CAL and crochet beautiful BotaniCALs to share with us and brighten your day! Click through to the PJ Ravelry group right now and register for the CAL by leaving a comment, and you’ll get your exclusive discount on my new potted plant collections (in your Ravelry private messages) as soon as they’re released!

Comments (5)

Closing Sale: PlanetJune Crochet Tools

This is your last chance to shop from the PlanetJune Crochet Tools shop before it closes forever…

PlanetJune Crochet Tools: Detail Stuffing Tool and Stitch Markers

I’m selling off my remaining stock of Detail Stuffing Tools and Stitch Markers for Crochet with deep discounts if you buy multiples of the same item – I recommend you get some spares, as they are so easy to misplace, and the discount will help offset your shipping costs:

  • 10% off when you buy 1
  • 20% off when you buy 2
  • 30% off when you buy 3
  • 40% off when you buy 4
  • 50% off when you buy 5 or more

The discounts are automatically applied – just select the quantity you’d like and add the item to your cart, and you’ll see the lower prices there.

This is also your last chance to grab a free signed bookmark! Tell me who to sign it to and add it to your tools order at no additional cost.

I’ll be closing the Crochet Tools shop at the end of April, or sooner if everything sells out before then, so please don’t wait if you want to place one last order of Stuffing Tools and Stitch Markers before they’re gone forever. I only have a hundred or so of each item left, and, once I send out my next newsletter, this message will reach many thousands of people, so they may sell out quickly…

Click through to the Crochet Tools shop to place your order now. 🙂


As I like to run PlanetJune transparently, I’ll also share the reasons why I made the decision to close my Crochet Tools shop. Keep reading if you want the behind-the-scenes view!

In January, Canada Post eliminated their Light Packet option for international shipping, meaning that the lowest price to ship a small packet out of Canada is now about $6 (USD) to the US, and about $8.50 internationally (and those prices are much higher if you want tracking and insurance).

I investigated alternatives to make that cost more reasonable for my customers, and found that I could cross the border to mail my packages from the US at far lower rates, or pay a reshipping service to do that for me.

If selling my tools was the focus of my business and I had hundreds of orders per week, something along those lines could be a good solution. But the crochet tools are just a tiny sideline for me – the money I make from them only represents a fraction of one percent of my income. I’d lose money if I tried to reship in small quantities, or I’d have to raise my prices to compensate.

So, the only remaining option is to pass the new high Canada Post shipping costs onto my customers. They’re far too high for most of my customers to be happy to pay, so I made some estimates of how many sales I’d lose as a result of the increased shipping cost. Based on these, my best guess is that I’d make only approx 1-2 orders per week in future. The cost of time and fuel to make the trip to the post office every week, just to ship a single low-value order, would leave me making a loss on every order unless I raised my prices significantly, and, again, I don’t want to do that.

The upshot is that there’s no way for me to run my Crochet Tools shop any more without losing money, and so the only sensible business decision is to close it down. But I didn’t want to leave anyone in the lurch, hence the closing-down sale as a last chance for anyone who hasn’t got around to buying their tools from me yet!

I love my crochet tools line. They’re cute and colourful, and so useful. I’m keeping a dozen spare stuffing tools for myself, because I don’t know what I’d do without one – I’ve tested all kinds of alternatives and I’ve found nothing that even comes close for stuffing small amigurumi pieces.

But nothing lasts forever, and my crochet tool shop has had a good run. This decision will be a good thing for PlanetJune in the long term – further simplifying and streamlining the business will leave me with more time to concentrate on innovating with new designs, and creating new tutorials to help you perfect your crochet technique.

So, please click through to my Crochet Tools shop now and grab any tools you need before it’s too late! I don’t want you to miss out…

Comments (8)

Extreme Amigurumi: the Making of Mega Bun

This is going to be a bit of an epic post, because I’ve had a lot of questions about Mega Bun and I want to answer them all and explain exactly how I made her. I encountered several unexpected problems along the way, and I’ll show you my solutions in case you want to try making an extreme amigurumi of your own!

Mega Bun extreme amigurumi (made from Baby Bunnies crochet pattern by PlanetJune)

Please note that I made Mega Bun as an art project, not a pattern for you to follow. As you’ll see below, although this project uses my Baby Bunnies crochet pattern and is no more difficult to crochet than that pattern, the actual crocheting forms only a small fraction of the project.

Although I’m explaining my process here and you could replicate it to make your own Mega Bun, I intend it as more of a general guide for the types of problems you may have to solve to convert an amigurumi pattern into something many times larger than intended. I’d advise that you should be prepared to a bit inventive and be ready to make some trial and error attempts if you’re going to attempt an extreme amigurumi of your own!

Okay, now onto the Mega Bun details!

Making an Extreme Amigurumi

Extreme 25mm crochet hook, with 3.5mm crochet hook for comparison

I had a few false starts – this Susan Bates Xtreme wood crochet hook is a massive 25mm (1 inch) in diameter, and every yarn I tried was far too thin, even doubled or tripled. I ruled out three strands of bulky yarn because the holes between the stitches were still so large that I was crocheting a mesh of holes instead of a sturdy fabric! 

I eventually discovered that the thickest fuzzy yarns in my stash, tripled, would just about work, thanks to the fuzz obscuring the holes between the stitches. I found that I had 6 pre-wound balls of this unlabelled yarn in my eyelash stash:

Mega Bun extreme amigurumi by PlanetJune

I have no idea what it is (I picked up a lot of second-hand fuzzy yarn when the eyelash craze of 2009 was dying down!) but it looks and feels similar to Patons Allure (except it has 80g per ball instead of 50g):

Mega Bun extreme amigurumi by PlanetJune
Top: unknown fuzzy yarn; Bottom: Patons Allure (discontinued)

I held three strands of yarn together as I crocheted. Working with such a large hook is very different – you have to move your whole arm to make each stitch, not just your wrist, so it’s quite a workout – but the hook isn’t heavy and it wasn’t difficult or painful to use.

Mega Bun extreme amigurumi by PlanetJune
Making a single crochet stitch with an extreme hook and three strands of fuzzy yarn

Overcoming Challenges

Adapting the Pattern
I used the Lop pattern from my Baby Bunnies, but Mega Bun is many times larger than my original Lop:

Mega Bun extreme amigurumi by PlanetJune

I intended to follow my pattern exactly, but I discovered that her back feet completely disappeared into the mass of her body, so I added one extra round to the back feet. Changing the scale by this much may start to affect the proportions slightly, so you may need to tweak a pattern if you’re upscaling it to extreme size.

Running Out of Yarn
I had no idea how quickly I’d get through my yarn, so I just got started and hoped for the best! After making most of the body, I could see that I wouldn’t have anywhere near enough to make all the other pieces – argh! I briefly debated turning my amigurumi into a different animal with smaller ears, but in the end I decided to make the tail in white (a good bunny colour) and the ears in light brown Patons Allure (which matches the variegated body colour nicely). Problem solved!

…Or not. I got most of the way through one ear and ran out of yarn again. Luckily, my friend Monica came to my rescue and sold me some of her precious Allure from her stash so I could complete my bunny. Working with discontinued yarns can be pretty stressful!

Yarn Thickness
Although the yarn I chose for the tail (Bernat Baby Lash, also discontinued), looked nice and bulky and fairly similar to my other yarns, when I started to crochet with 3 strands, it left huge gaping holes between each stitch – not a good look for a bunny tail! So I decided to double it yet again and crocheted with 6 strands at once to give me a nice full bunny tail. Finding sufficiently bulky yarn is definitely a major problem for a hook of this size!

Mega Bun extreme amigurumi (made from Baby Bunnies crochet pattern by PlanetJune)

Holey Fabric
As I hadn’t used the correct yarn thickness for amigurumi making, I had a problem. Although the crocheted fabric doesn’t look holey (thanks to all the lovely soft fluff in my yarn), that’s not really the case: I can stick a fingertip through any of the gaps between stitches! This would be a problem when it comes to stuffing…

Mega Bun extreme amigurumi by PlanetJune

To get around this, I bought some tulle fabric (the fine netting used for wedding veils and ballet tutus) to contain the stuffing. For the head and body, I flattened the crochet and laid it on 2 layers of tulle to act as a template for cutting the tulle. I cut the tulle around the edge of my ‘template’ with fabric scissors, leaving a few inches of extra length at the back to make stuffing easier.

Mega Bun extreme amigurumi by PlanetJune

I wasn’t sure if I could sew tulle with a sewing machine, but my mum advised that it should be fine with a long stitch length, and it was (thanks Mum!), so I sewed my 2 layers of tulle together, leaving the tail area with the excess fabric open for stuffing.

Mega Bun extreme amigurumi by PlanetJune
The completed tulle net on top of the flattened body, with excess tulle at the back.

I turned my tulle net inside out and inserted it into the body, turning the excess back outside the opening, and then I stuffed the body by pushing the stuffing into the net.

Mega Bun extreme amigurumi by PlanetJune

Once I’d finished stuffing, I overlapped the excess tulle and secured the two sides together with a few stitches by hand with a needle and thread, then crocheted the remaining body stitches and closed the remaining hole in the body as usual (with my Ultimate Finish technique).

Adapting the Stuffing Instructions
With this size of amigurumi, even the tiniest pieces that wouldn’t usually be stuffed are huge and need stuffing to support them. To stuff all the smaller pieces (paws, tail and even the eyes), I tied a blob of stuffing into the middle of a square of tulle, to make a stuffing parcel, and popped it inside the piece as I was stitching it to the body.

Mega Bun extreme amigurumi by PlanetJune
Front paws with their parcels of stuffing ready to be inserted

Stuffing Quantity
It took an entire 1lb bag of stuffing to stuff Mega Bun to a soft squishy level – perfect for cuddling – although if I’d been making a proper amigurumi (with nice firm stitches) I’d probably have needed two bags of stuffing to support the bunny shape further. Extreme amigurumi need a lot of stuffing!

Extra-Large Eyes
After measuring Mega Bun against an original Baby Bunny, I realised she’d need about 2 inch diameter eyes! I’m not sure if safety eyes even come that large (well, I’m sure they do, but they probably aren’t easy to find) and I didn’t want big hard lumps of plastic on my cuddly bunny, so I decided to crochet the eyes.

Mega Bun extreme amigurumi by PlanetJune

I used bulky yarn and an H hook to get to the right size more quickly, and added a half-stitch colour change to make the all-important glint in her eyes. (Don’t know about the glint? It’s so important to add a lifelike sparkle to non-plastic eyes – see my Glinting Eyes for Amigurumi tutorial for details!)

Adapting the Finishing Instructions
As each stitch is so huge, one sewn stitch per single crochet stitch didn’t feel like enough, so I stitched twice around each open edge to stitch it to the body, and tried to insert my yarn needle into a different part of a stitch on the body on my second time around, to reduce the gaps between my sewn stitches. (Oh, and, just out of interest, I tried using one, two or all three strands of the yarn to stitch with and didn’t see much difference in the result.)

I also used bulky yarn instead of embroidery floss to embroider the nose. Everything needs to be scaled up when you’re making an Extreme Amigurumi!

Loss of Shaping
After stitching everything in place, I realised my last problem: as my crocheted stitches are so floppy and soft, and I couldn’t stuff the body firmly, the clever Baby Bunnies shaping isn’t very apparent: the head and body looked a little too much like one giant blob. But I have a trick to fix exactly this type of disappointment!

I used my Amigurumi Needlesculpting technique to draw the body in, all the way around the neck, to define and shape her neck area. It’s hard to capture in photos because she’s so fluffy, but her shaping looks much better now.

And finally, Mega Bun was complete and ready for big cuddles!

Mega Bun extreme amigurumi (made from Baby Bunnies crochet pattern by PlanetJune)

I hope you can see that this was quite an involved project… I have lots more I could say about Extreme Amigurumi in general, but this post has got longer than I expected, so I’ll save my tips and opinions for the next post!

If you have any more general questions about Extreme Amigurumi, please ask them below and I’ll see if I can offer some advice in my final Extreme Amigurumi post. 🙂

Comments (11)

  • Quick Links: Crochet

    navigation: arrow

    buy crochet patterns and accessories from my online store

    'Everyday Crochet' and 'The Essential Guide to Amigurumi' crochet books by June Gilbank

    Crochet video tutorials and step-by-step photo tutorials

    Free PlanetJune crochet patterns

    Frequently Asked Questions

    Quick Links: Crafts

    navigation: arrow

    Punchneedle Embroidery information, ebook & patterns

    Papercraft ebook & tutorials

    Free PlanetJune craft projects & tutorials

  • Blog Post Categories

  • Blog Archives

  • Welcome to PlanetJune!

    June Gilbank

    Hi, I'm June. Welcome to my world of nature-inspired crochet and crafting. I hope you enjoy your visit!

    If you'd like to get in touch, you can contact me here.
    crocheted Canadian flag by PlanetJune
  • A fanned-out pile of the books Everyday Crochet and The Essential Guide to Amigurumi, with text 'The answers to all your crochet questions at your fingertips - find out more'
  • Support PlanetJune!

    Want to say thanks? You can send me money in seconds at paypal.me/planetjune (over $20) or paypal.me/planetjune2 (under $20) or send me a donation through my shop.

    Or simply click through from my links before you shop at Amazon, Etsy, KnitPicks, LoveCrafts or Crochet.com, and I'll make a small commission on your purchase, at no cost to you! Start here:

    ♥ Support PlanetJune ♥

    Tip: This link is also in the footer of every page!

    Thank you so much for your support!