PlanetJune Craft Blog

Latest news and updates from June

Archive for May, 2012

amigurumi basics: flattened pieces

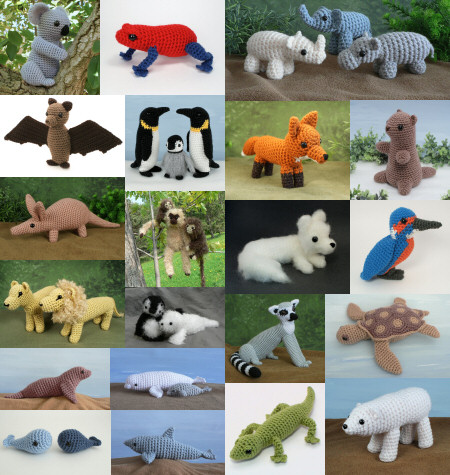
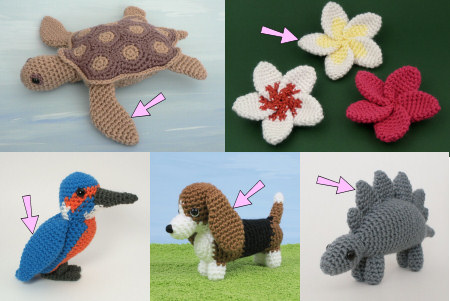
Link easily to this tutorial in your patterns: www.planetjune.com/flatten

Flattened shapes are a basic in amigurumi for creating rigid, flat elements like ears, beaks, wings, hands, feet, flower petals, leaves, etc. Here are a few examples from some of my patterns that use flattened shapes:

flattened pieces used in planetjune amigurumi
All these amigurumi use flattened pieces in different shapes and sizes (marked here by arrows). Clockwise from top left: flipper, petal, plate, ear, wing.

There seems to be some confusion about how to flatten the shapes after crocheting them (see the comments left on my Plumeria pattern for an example of this!) so I thought I’d spell it out with this tutorial so I can refer back to it whenever people email me for help in future.

For any shape that will be flattened, it’ll start out looking like a cone or cup shape. The exact shape and dimensions depend on the pattern and the required shape for the finished piece; it may be:

  • very long and thin or short and wide
  • pointy tip or rounded tip
  • tube-shaped or cone-shaped or widening and then narrowing

… or something in between! Here are a few examples:

amigurumi flat pieces tutorial
All the pre-flattened shapes in this picture have the magic ring on the left and the open edge on the right.

But, whatever the specific shape, it will always have the magic ring at the bottom, and an open edge (which you crochet around) at the top:

amigurumi flat pieces tutorial
Before flattening – note how the open edge runs around the top and the magic ring is at the bottom.

When you flatten it, you’ll always bring the two sides of that open edge together:

amigurumi flat pieces tutorial
Squash the front and back of the open edge together to flatten the piece.

And then continue to flatten the entire piece, right down to the magic ring.

amigurumi flat pieces tutorial
All the flattened pieces from the top…

amigurumi flat pieces tutorial
…and from the side. Note that, in these pictures, the magic rings are all still on the left, and the open edges on the right.

The magic ring will form the tip of the item (ear, petal etc), and you’ll stitch it to the base piece (head, flower, etc) by the open edge – which now looks like two parallel rows of stitches.

That’s all there is to it! I hope this clears up any remaining confusion about how to flatten and attach these pieces to your amigurumi.


Do you find my tutorials helpful? If so, please consider making a contribution towards my time so I can continue to create clear and concise tutorials for you:

Thank you so much for your support! Now click below for loads more crochet video and photo tutorials (and do let me know what else you’d like me to cover in future tutorials…)

See more helpful PlanetJune crochet tips and technique tutorials

Comments (5)

blog redesign

Finally! 2 months after I announced my new logo, I’ve finally launched the new blog layout today. (If you’re reading this in a feed reader, please click through to get the full impact!)

Hopefully this won’t look too new and strange to you; the purpose of this redesign wasn’t to give my blog a new look, but to make it easier for you to use, and to incorporate the new logo.

Here’s the old look, as a quick reminder:

PlanetJune blog - old look

And here’s the new and improved version:

PlanetJune blog - new look

The new layout is slightly wider, which gave me space to add an extra sidebar down the left-hand side with quick links to the things people most often look for on my site. The actual sidebar contents are still in progress – I’d like to add some more prominent links to my Ravelry group and Flickr group, a link to an as-yet unwritten page for my crocheted art, and other things as and when I think of them – but that can wait until I have time.

I think the biggest improvement is to the header area. Gone is the ‘patchwork’ of images at the top that confused people into thinking they were all pictures of crochet patterns:

PlanetJune old blog header

Now there’s just one large clear photo, but if you refresh the page (or click to a different page on the blog) you’ll see that the image changes – you get a random one each time – so it hopefully still gives a feel for the variety of my patterns.

PlanetJune blog - new header

The almost-invisible main menu located above the header is gone (did you ever even notice it was there?!), and these impossible-to-find text links in the sidebar (I finally realised that a heading called ‘Pages’ means nothing to non-bloggers!):

PlanetJune blog - old links
Ugh, big block of random text links (circled in blue)

All replaced by a more complete menu bar below the header. Everything you need to navigate my site is organised into drop-down menus, and there’s a more prominent Search box on the right.

PlanetJune blog - new menu

I still have to redo the rest of PlanetJune to match the new blog design and make it all more useable, but that’ll take a lot longer – I’d anticipated I’d need 2 weeks to complete the blog redesign, and it’s taken 2 months! I also need to figure out a better way to organise my crochet tutorials – now I have lots of photo tutorials and a growing collection of video tutorials, I’m going to need to find a clearer way to present them to you. Piece by piece, I’ll keep working on it all in between everything else – my goal is to have it all completed by the end of the year.

But, for now, I hope you’ll at least find the blog much easier to navigate! I’ve built up a lot of excellent resources on my blog (crochet and craft tutorials, free patterns, videos, etc), but they aren’t much use if you can’t find them 🙂

Comments (17)

beanbag smartphone stand

I’m so busy these days that I rarely have any time for non-business-related crafting. In fact, I haven’t made anything just for fun since Christmas (and I haven’t yet had a chance to show you that project either!)

We took two much-needed days off at the end of last week, and I finally had a chance to make something just for me. I first saw this idea on Pinterest 40(!) weeks ago and it’s taken me until now to find the time to make it: a little beanbag stand for my BlackBerry so I can prop it up at my desk. It’s a really simple, neat design, and quick to sew.

beanbag phone stand

My pin linked to a finished handmade item for sale on Etsy. Now, copying someone else’s design is one of those grey areas, and as I’ve talked about it before (from the point of view of the designer being copied) I thought I’d address that aspect quickly: this is a one-off stand for my personal use (not for profit), and a quick Etsy search for “iPhone stand” revealed that at least 4 other sellers are making stands made using the same design (so it’s a non-exclusive design).

The shape is very simple and it’s obvious from a glance how to make one: it’s just a pyramid beanbag with a little ledge at the front to support the phone, so I’m comfortable that it was fair for me to make this one for myself. Still, it’s not my design, and I didn’t refine the concept or invent any special techniques to make this, so please don’t ask me for a tutorial or any tips on how I made mine – I’m not going to profit from someone else’s idea!

beanbag phone stand

In South Africa, many craft supplies are difficult (or impossible) to find, so I’m reusing and upcycling wherever I can – I’ll be showing you more of those projects as and when I finish them! I’m hoarding my supply of plastic stuffing pellets for future amigurumi designs, so I didn’t want to use them up on this project. Instead, I went to a thrift store and found this poor sad little toy dog. I could feel that the body was stuffed with plastic pellets, so R3 (less than 50c) later, I had a carefully unpicked seam and a big bowl of plastic pellets. Despite my justifications and my careful toy surgery, I still feel like a soft toy murderer, but I really don’t think anyone would have bought this dog for a child to play with as it’s so stained and dirty, so at least I’ve given it some kind of new use.

recycling plastic pellet stuffing from an old stained toy

It took forever to stuff it pellet by pellet (I only left a small opening, but the larger pellets kept getting stuck in the funnel I’d planned to use for the stuffing…) and I probably should have used a heavier-weight fabric too, but I love the result. I used some of the leftover fabric from my One Yard Wonders designs and it’s so nice to finally get to see the adorable Japanese fabric in use on a project!

beanbag phone stand

It’s a shame the print doesn’t really show when the phone is in the stand, but now the little hedgehogs and squirrels can make me smile every time I pick up the phone and see the print that was hidden beneath it.

I definitely need to make time for more non-work projects. This was so much fun – I’d almost forgotten how much I enjoy just making stuff. Now I feel refreshed and ready for another busy week 🙂

Comments (6)

May update

Just a few quick items this month, as, behind the scenes, I’m juggling over 20 designs in various stages of completion, and trying to get my blog redesign finished so I can finally use my new logo…

Wildlife-Along CAL

Choose from my menagerie of wild animal patterns to crochet and meet us in the PlanetJune Ravelry group for the Wildlife-Along crochet-along, running until the end of the month…

Wildlife-Along CAL at PlanetJune

You’ll find all the patterns – and a few more that didn’t make it into the above collage – in the Wild Animals category of my shop. And if you’re thinking “CAL? Huh?” or “What’s Ravelry?”, see the PlanetJune Crochet-Along FAQ for everything you need to know 🙂

With close to 100 new members in my Ravelry group over the past week (welcome to all of you!), I hope this CAL will be even better than usual!

Review and Win contest

April’s ‘Review and Win’ winner is Erica A, with her Baby Bunnies review:

Baby Bunnies crochet pattern by PlanetJune

A very cute pattern that is enjoyable to make. The instructions are clear and detailed for both the crochet and the assembly. I love how the subtle shaping results in such a cute and realistic finished object. The three variations give added interest and value.

Congrats Erica – I’ll email you to find out which pattern you’d like as your prize 🙂

To be entered into this month’s draw for a free pattern of your choice, just write a review of any product in my shop – thank you!

Commissions

With 2 designs completed, the new commissions process is still going well.

koala crochet pattern by planetjune Platypus amigurumi crochet pattern by PlanetJune

I’ve added a couple of new options to replace the animals I’ve already designed, but I’ve had requests for many more. I’ve put up a poll on my Facebook page to find out if you’d prefer to have more choices, or if too many in the list at once would get confusing – please vote (or comment here if you don’t use FB) if you have an opinion on that!

Comments (1)

Next entries »
  • Quick Links: Crochet

    navigation: arrow

    buy crochet patterns and accessories from my online store

    'Everyday Crochet' and 'The Essential Guide to Amigurumi' crochet books by June Gilbank

    Crochet video tutorials and step-by-step photo tutorials

    Free PlanetJune crochet patterns

    Frequently Asked Questions

    Quick Links: Crafts

    navigation: arrow

    Punchneedle Embroidery information, ebook & patterns

    Papercraft ebook & tutorials

    Free PlanetJune craft projects & tutorials

  • Blog Post Categories

  • Blog Archives

  • Welcome to PlanetJune!

    June Gilbank

    Hi, I'm June. Welcome to my world of nature-inspired crochet and crafting. I hope you enjoy your visit!

    If you'd like to get in touch, you can contact me here.
    crocheted Canadian flag by PlanetJune
  • A fanned-out pile of the books Everyday Crochet and The Essential Guide to Amigurumi, with text 'The answers to all your crochet questions at your fingertips - find out more'
  • Support PlanetJune!

    Want to say thanks? You can send me money in seconds at paypal.me/planetjune (over $20) or paypal.me/planetjune2 (under $20) or send me a donation through my shop.

    Or simply click through from my links before you shop at Amazon, Etsy, KnitPicks, LoveCrafts or Crochet.com, and I'll make a small commission on your purchase, at no cost to you! Start here:

    ♥ Support PlanetJune ♥

    Tip: This link is also in the footer of every page!

    Thank you so much for your support!