PlanetJune Craft Blog

Latest news and updates from June

Archive for December, 2006

zippered pouch and flower

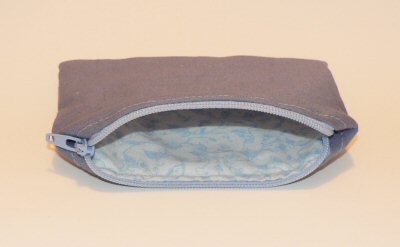
Now it’s Christmas, I can show you the present I made for my Mum. It’s a zippered pouch (based on the twelve22 tutorial) with a tsumami fabric flower in the same fabric as the lining of the pouch.

Happy Christmas Mum – hope you like it!

Comments (1)

crocheted snowflakes

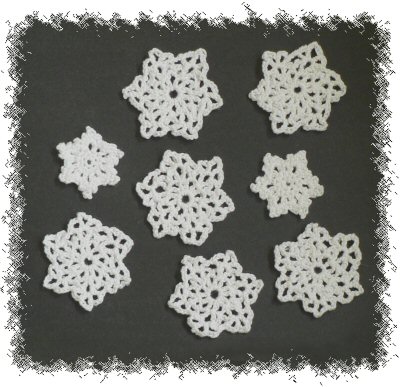
Looks like this is the only kind of white Christmas I’m going to see this year! I crocheted these snowflakes a couple of weeks ago (loosely based on these patterns) but I’ve been sick since then so I never got around to doing anything with them.

crocheted snowflakes
Happy Christmas!

Comments

sweet sweater

In the Fall 2006 issue of Crochet me, there was a crochet-along to make a Sweet sweater. I really wanted to participate, but I had to finish my afghan first, and then I needed to give my wrist a break from crochet for a while, so I bought some yarn but didn’t get started. Now the official Sweet crochet-along is finished, but that’s okay…

sweet crochet-along

I had bought 4 balls of Lion Brand Homespun in Regency because I wanted something bulky enough to crochet up quickly and keep me warm, but I can’t tolerate wool against my skin, so I needed a soft acrylic yarn. I knew I wanted to adapt the pattern to be long-sleeved, but still reasonably fitted. I used a size J hook and half double crochet stitch.

First attempt: I noted the comments from others who completed the CAL and found the neck opening to be too small, so I started off with a 7″ measurement at the back of the neck. I had crocheted down from the shoulders to the bust and completed one and a half sleeves before I noticed that the width of the body was several sizes too large for me. I decided to write it off as a “practice” and start again (reusing the yarn from the first one as I needed it).

Second attempt: I used a 5″ neck measurement and a deeper V in the front, and it worked out much better. When I got to the bust, it was still a bit big, even after some decreases at each side, so I switched to an I hook down to the waist, and then back to a J again. I edged the neckline, cuffs and bottom edge with my new favourite edging, reverse single crochet. The finished sweater used exactly three balls of Homespun.

my sweet sweater

I would definitely make another one of these at some point, with some variations in yarn and stitch. The top-down construction is very clever as you can try it for fit at any point and adjust it as you go. I can’t believe I’ve crocheted a wearable article of clothing! It’s really warm and cosy.

Comments (5)

no more jingling keys

I wasn’t sure if I should post this or not – it’s so simple, and not exactly stylish… But it’s so useful and it really works – you could make a much prettier version (and I probably will, but I’m testing this one for longevity first).

By the way, I have been making other things lately… but they are Christmas presents, so they will have to wait to be posted!


At work, I carry around my ID and keys on a lanyard. They jingle and clank together every time I take a step. I work in a library so I get a lot of looks as I walk by, jingling as I go… 

All that is no more! I can move silently again thanks to my quick fix: craft foam.

stop keys from jingling with craft foam

I used scissors to roughly cut pieces of craft foam to shape, cut a hole in the top of each piece, and added one piece of foam onto my keyring between each key. I also made an ID-card shaped piece to stop the keys from clunking against my ID.

Easy and 100% effective against key-jingling embarrassment.

Comments (3)

roll-up crochet hook case tutorial

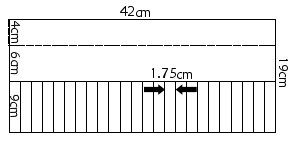
As promised, here are the instructions to make my roll-up crochet hook case. Click the images for larger versions.

  1. First, you need to figure out how big you want your case to be. I drew the figure below to design my case.

    Here are my calculations, in case you want to vary the size:
    • I chose 24 pockets of 1.75cm width each. Finished case width = 24*1.75 = 42cm
    • My tallest hook is 15cm tall, so I added 4cm to the height of the case to make the top flap so the hooks don’t fall out. Finished case height = 15+4 = 19cm
    • My pockets are 9cm tall so the hooks stay in nicely. Pocket height = 9cm
    • I added 1cm around each edge for seam allowance.
  2. Cut your fabric as follows:


    Materials list:

    • Outer fabric (pink): 44x21cm
    • Lining fabric (pigs): 44x21cm
    • Pocket fabric (pink): 2 pieces, each 44x10cm
    • Piping trim for top of pocket (red): 44cm
    • Piping trim for edge of case (not shown) = 2*(finished width + finished height + overlap) = 2*(42+19+1) – 126cm
    • Ribbon or similar to tie the case closed (not shown)
       
  3. Place one piece of pocket fabric face up. Pin the pocket trim on top along the length of the pocket, with the raw edges of fabric and trim matching. Sew all the way along, as close to the piping stitching as possible (I used the zipper foot on my sewing machine):
     
  4. Pin the other piece of pocket fabric on top, so the pocket has right sides together and the piping is sandwiched between the two. Flip the fabric over and sew along your previous line of stitching.
     

    Pocket opened out, right sides down. Note all the raw edges (piping and both pieces of fabric) are together at the top.                 


    Here’s the pocket fabric with the wrong sides together. The piping now shows on the right side

  5. Lay out the lining fabric right side up. Place the folded pocket on top of the lining so the bottoms of the pieces are aligned. Now open the pocket fabric upwards as shown below and pin the pieces together from the bottom up to the seam in the pocket. Check under the folded up flap of the pocket to make sure the piping is not pinned down! Pin the seams down toward the bottom.


    Mark out the lines for the individual pockets using a fabric pen or pencil – remember to add 1cm (the seam allowance) to the pocket at each end. Sew up each line from the bottom of the fabric to the seam as in the picture below.
     

  6. Place the the outer fabric right side up. Starting with the end of the piping along the middle of any edge of the fabric, pin the piping around the edge of the fabric, with the raw edges to the outside. Clip the corners of the piping as in the photo below, so the piping can go around the corners.


    Sew all around the edge of the piping, leaving a couple of inches free at each end of the piping. Unravel the seam on one end of the piping by 1cm and trim the other end so it slips inside the open end. Fold the raw edge under and finish sewing the piping.
     

    Yes, it looks messy, but the stitching isn’t going to show and the piping join looks good!


    The finished piping.
  7. Lay out the lining+pocket face up (make sure the pocket fabric is flipped down to hide the stitching), then pin the outer+piping to it face down (i.e. right sides together). Flip the piece over, then sew over your previous stitching (from attaching the piping). Sew all around the edge, but remember to leave about 3 inches open so you can turn the case right side out. This will also be the place where the ties are attached, so decide if you want to roll the case from the left like mine (so it will tie on the right of the finished case) or vice versa. 
     

    The gap for turning is in the middle of the left side.        


    Here’s the gap – all ready to turn…

  8. This is the magic part… Turn the piece right side out through the gap you left:
     

    Voila! The gap is on the right side.
     
  9. Now all you need is to attach something to keep the case closed. I went fancy with this one, but the easiest thing to do would be to cut a length of ribbon long enough to wrap around the rolled case and tie closed. Fold the ribbon in half and slip the folded end just inside the gap. Hand-sew the gap closed, trapping the folded end of the ribbon as you go. You will end up with the two long ends of ribbon – wrap them around the case and tie them in a nice bow!
      

    Finished! The top flaps down over the hooks.      


    Here’s the case rolled up.    


And that’s it! I hope you find this tutorial useful – please let me know if anything is unclear and I’ll modify it. Please also let me know if you make a case – I’d love to see what you come up with! More pictures of my case are available here.

Comments (17)

tsumami poinsettia

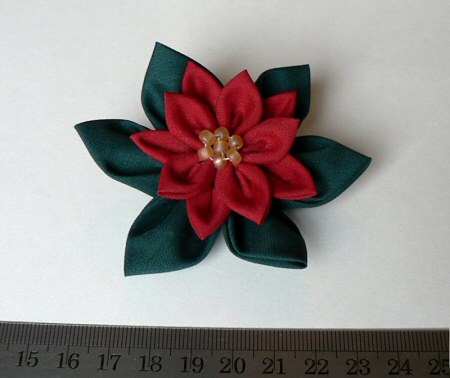
This is my entry for the December One Hour Craft Challenge (a lovely brooch or boutonniere). I thought with Christmas approaching, I’d try making a poinsettia flower using the tsumami techniques I started learning last week. I tried making up some different folds for this one, and used fabric glue and sewing to assemble the flower from 10 separate petals and 6 leaves.

Here’s some poinsettia trivia: the red “petals” are actually modified leaves called bracts; the actual flowers are the little yellow bits in the middle.

Oh, and here’s my tsumami poinsettia (ruler included for scale; click for larger image) – what do you think?

tsumami kanzashi poinsettia fabric flower

PS – See the comments below for brief instructions on how I made this ornament!
 

Comments (5)

  • Quick Links: Crochet

    navigation: arrow

    buy crochet patterns and accessories from my online store

    'Everyday Crochet' and 'The Essential Guide to Amigurumi' crochet books by June Gilbank

    Crochet video tutorials and step-by-step photo tutorials

    Free PlanetJune crochet patterns

    Frequently Asked Questions

    Quick Links: Crafts

    navigation: arrow

    Punchneedle Embroidery information, ebook & patterns

    Papercraft ebook & tutorials

    Free PlanetJune craft projects & tutorials

  • Blog Post Categories

  • Blog Archives

  • Welcome to PlanetJune!

    June Gilbank

    Hi, I'm June. Welcome to my world of nature-inspired crochet and crafting. I hope you enjoy your visit!

    If you'd like to get in touch, you can contact me here.
    crocheted Canadian flag by PlanetJune
  • A fanned-out pile of the books Everyday Crochet and The Essential Guide to Amigurumi, with text 'The answers to all your crochet questions at your fingertips - find out more'
  • Support PlanetJune!

    Want to say thanks? You can send me money in seconds at paypal.me/planetjune (over $20) or paypal.me/planetjune2 (under $20) or send me a donation through my shop.

    Or simply click through from my links before you shop at Amazon, Etsy, KnitPicks, LoveCrafts or Crochet.com, and I'll make a small commission on your purchase, at no cost to you! Start here:

    ♥ Support PlanetJune ♥

    Tip: This link is also in the footer of every page!

    Thank you so much for your support!