Would you prefer to see the video tutorial demonstrating this method? If not, read on:
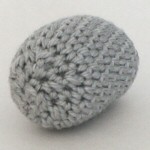
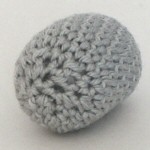
I’ve written before about how there are several ways you can finish off a closed piece in amigurumi, and there’s no one ‘best’ method for closing that remaining hole to give the neatest finish. I’d like to officially change my opinion on that point! Here are my previous results:

Since I wrote that post, I’ve been doing more experimenting, and I think I’ve finally found the definitive method to give the best possible finish to a closed piece in amigurumi. It works almost like a Magic Ring (and we all know how good that is!) so that’s why I’ve named this technique the Ultimate Finish for amigurumi:
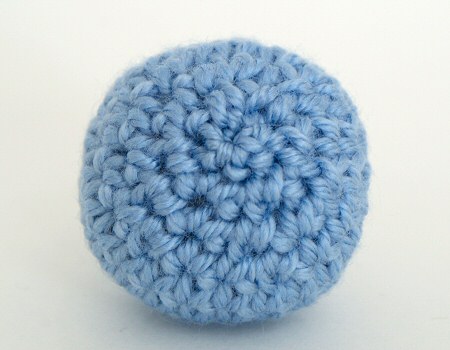
Where’s the hole? This is the beauty of the Ultimate Finish
(Of course, to get the best finish, you’ll also want to use the Invisible Decrease instead of sc2tog for all your decreases – but that goes without saying, right?)
It’s nothing revolutionary, but this method really does give the best finish I’ve found. Give it a go and let me know what you think of my Ultimate Finish!


Lani said
Wow.. this worked perfectly! My little Body looks great on botg ends now. Thank you again for sharing. It made a huge diffrence on the finnished end.
Thanks
Lani
Lani said
Thank you for sharing this info… I’ve just muttled thru at the ends… I’m very excited to try this on my next project. Thank you again.
Lani
geetha vijaya raghavan said
Imwant the instruction how to do as i am a begineer in crochet, like to learn.
June said
Geetha, please see my beginner’s advice at www.planetjune.com/beginner 🙂
Cara said
Oh my goodness, thank you so much for this!
Mar said
June, thank you for this blog. It’s awesome!
fantastiquae said
Magic !
Thank you
Dayna said
Hey there –
Thank you so much for sharing this! It really helped to close in my ends tighter on my amigurumi creations. I also wanted to let you know that I did a round up of amigurumi tutorials and added yours as a reference!
matilda said
grazie, semplice e geniale!!!
mAtilda
Gail Freeman said
This & your invisible decrease tutorial are brilliant! So clearly explained & photographed. I’m pretty new to amamigurumi & I think I’ll be back here often. Thank you.
NgocThom said
Thanks so much for your sharing. That’s a great way!
Karie {Girl Going Country} said
Love this! Sometimes the simplest tip packs the most effective punch. Can’t wait to try this on my next amigurumi!
Debbie said
Wow! Just wow! I have just tried this method out and I am so impressed- will use this method from now on. I have found your site so helpful, all your tips are fantastic. Thank you so much for taking the time to share your knowledge.
Jen said
Very clever. I was never happy with the traditional ways. I’m glad I found this.
Ann said
Thank you for this! I am a beginner at all things crochet and before your tutorials I was making inside-out amis with gaping holes.
The invisible decrease and the ultimate finish are ami-savers!
Rachel H said
This is sooo helpful. Thank you so much June. I really love this method – The Ultimate Finish. Really appreciate you for sharing this detailed tutorial with all of us. 😀 you are amazing! <3 <3 <3
Karen said
I’ve always used this method, it seemed like the obvious choice, but my results aren’t always flat enough, and for the life of me I can’t figure out why they’re so different sometimes.
June said
Suggestions:
Meg P said
Thanks so much, June, for the great advice. Is there a way to search your blog? I know I’ve missed other great tips!
June said
Meg, you can find a list of all my crochet tutorials at www.planetjune.com/help (or just click ‘Amigurumi Help’ in the right sidebar) 🙂
gelesan said
Thanks for this great tutorial, its very clear and helpfull, now my amigurumis will look much nicer.
Jeannine said
I’ve already been doing that! I didn’t know that it was so special and unique! And you posted the technique with great instructions and photos. Thanks a bunch!
Kathleen said
I just used this about thirty seconds ago to finish off a little ami owl, and I was so pleased with the “pull the yarn taut and close the ring” step that I actually exclaimed that’s awesome! out loud! My finishing skills are definitely one of the areas I need to work on, so having a new (and awesome) technique in my aresenal makes today a good day. Thanks so much for sharing!
ale said
Increíble tus diseños me encantaron, simples y originales….
felicitaciones !!!! y gracias por compartir tus datos ..
Ale
Lora said
June, I love you! I’m a fairly novice crocheter and while I had few problems with the bigger pieces of my amigurumi, the little narrow arms and legs were ending up all elongated and pointy when I tried to decrease and finish them (6 stitches down to three). This works perfectly, even when I just leave it at 6 stitches and use this finish. Your invisible decrease is great too, and without you I’d’ve never figured out which was the right side of the work. I pretty much just leave both my current pattern and your amigurumi help page open in my browser all the time now! I’m sure I’ll be back to check out your joining and color change tutorials when I encounter those. You’ve saved me (and tons of other people, I’m sure) a LOT of frustration. Thanks!
Victoria Lynne Carpenter said
Thanks so much for both this and the magic circle!!!
I am making my own amigurumi dolls…and although I am following no pattern its really nice to be able to start and finish them so cleanly!!
Abbi said
Thank you so much for this tutorial! I have tried and failed to make a neat finish several times, but with this method it was perfect!
Bri said
This is amazing! I’ve tried a lot of methods for decreasing and this is my favorite. It makes it look like the first round of crocheting–very cool.
Silvina said
Great! June, you save my life with this, and others of your tutorials… Love your blog! I’ve just made my ultimate finish for amigurumi… ja
Greetings from Argentina
pixelatedmushroom said
Great! thanks for posting this 🙂
Jewelry Making Tools said
I found this from the Craft blog, what a neat idea overall of amigurumi, and then such a great idea for hiding the hole!
Molly said
love this, thanks for sharing!
Sherri said
Thank you very much for sharing. For me, I can get better result thru’ your previous version (weaving through the front loops from outside to middle). I usually start fastening up when there are 12 stitches left and so there is no bump.
Michal said
You are a genious! Thanks a lot!!
curegirl0421 said
Hey June! You got on the Craft: blog! 🙂 It’s a life goal for me to get on there but for now I am content to live vicariously through you. 🙂
Jan said
Beautiful pictures, excellent technique! I’m going to use this from now on for all of my amigurumi! Thanks June!
Susan said
Thank you so much! It’s going to definitely improve my amigurumi.
Susan
June said
Thanks, all! I love sharing my discoveries with you – I want everyone to be able to make beautiful amigurumi 🙂
madebykate said
Thanks for sharing!!!
With this tip i’ll solve all my problem with amigurumi and particularly with my stress ball, an amigurumi filled with rice.
Wonderful!!!
Silmu said
Thanks for sharing! The finishing looks great. I’ll try that next time when finishing amigurumi parts.
Christine said
Thank you very much for sharing your wonderful technique, I can’t wait to try it out. I also love the photos as they are so clear and match perfectly with your written text. Christine
deanne said
fantastic! i can’t wait to try this technique! seems so obvious, and yet i’ve done it a million ways and not this one!
Rebecca said
Love it! Thanks for sharing!
Sarah in Houston said
Ultimate is right. This looks terrific. I can’t wait to see how it works. You are a genius.
Ashley said
Great tip! Thanks! =D
Lisa N. said
Thanks so much for this–and all your fantastic amigurumi help. I just tried this last night, and it is absolutely FABULOUS! I love how it looks!
curegirl0421 said
Awesome! I’ve experimented with that a little myself (mainly because I get frustrated and half-blind trying to do those last few stitches), but I never thought of doing the front loop only thing…
And that’s why you’re in charge! 🙂
melissa said
hi june!
oh this is wonderful! i cannot wait to try it!
i was on the lionbrand blog this morning and saw this post. i thought of you right away! xoxoxo
blog.lionbrand.com/2010/04/05/imagine-a-creature-make-it-and-win/
June said
Oh, that’s funny – I saw that contest too, Melissa! I’ve entered my crocheted orangutan – it seems like the perfect fit for the Critter Contest, don’t you think? Thanks for thinking of me 😀
carola said
i like this!!!!!!!!!!…. is possible to make a video and upload to youtube? pleeeease 🙂
Karen B. said
Brilliant! It’s like a Kitchener stitch for crochet – except a lot easier.
Jennie said
The pictures are marvelous, and I can’t wait to try it. Thanks for sharing!
yarnpr0n said
Fantastic! I’ve been experimenting a bit on this very topic but I think your methods are always the best I’ve seen. A good finish can make all the difference in the world! 😀
Nice work!
Rachel said
Great tip June! Thanks for sharing it 🙂