Looking for options for eyes and noses? Or online eye sources? If not, read on:
Judging the best eye positions for amigurumi is a skill that doesn’t come easily to most people. I know from talking to my customers that it can be very frustrating when you’ve worked hard to make an amigurumi but it ends up with an unusual looking face and you’re not quite sure why…
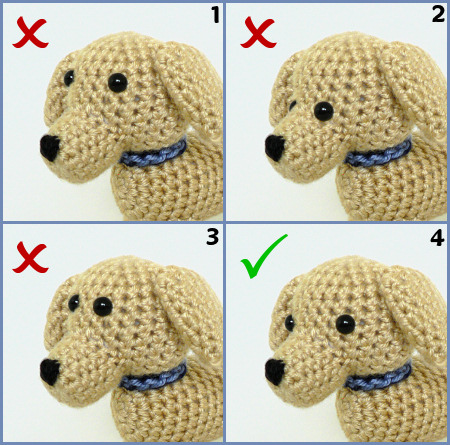
Examples of eye positions for a realistic amigurumi dog
Before you permanently attach amigurumi eyes, as well as checking that the eyes are level with each other and not wonky, it’s also worth playing with them to make sure they are in the position you like best. In my patterns, I give guidelines for positioning the facial features to look right for each animal, but I thought I’d give a little lesson today in facial proportion that will give you a place to start for any animal (including humans).
Tip: If you’re having problems with the eye positions for an animal with a separate muzzle, it can be helpful to attach the muzzle before positioning the eyes, or at least hold the muzzle up to the face so you can judge the eye placement more carefully. As you’ll see below, the muzzle and eye positions are often closely related.
Here are my rule-of-thumb guidelines for positioning eyes on your amigurumi animals to give a realistic result. They aren’t 100% accurate for every animal, but are generally a good starting point. This is useful to know even if you aren’t looking to create realistic animals: once you know what the realistic position should be, you can easily modify it to make your animal cuter in a cartoony or kawaii way.
Eye Height
The number one mistake that most people instinctively make is to place the eyes too high (see examples 1 and 3 above). In children’s drawings of people, the eyes are usually drawn about a third of the way down the head, and this perception generally carries through into adulthood unless you’ve studied art or anatomy. Here are some rules-of-thumb to remember:
- Place the eyes roughly halfway up the head, or very slightly higher.
- If the animal has a muzzle, place the eyes level with the top of the muzzle.
Let’s look at these principles in action with photos of myself and my helpful assistant Maui, and then see how they look in amigurumi:
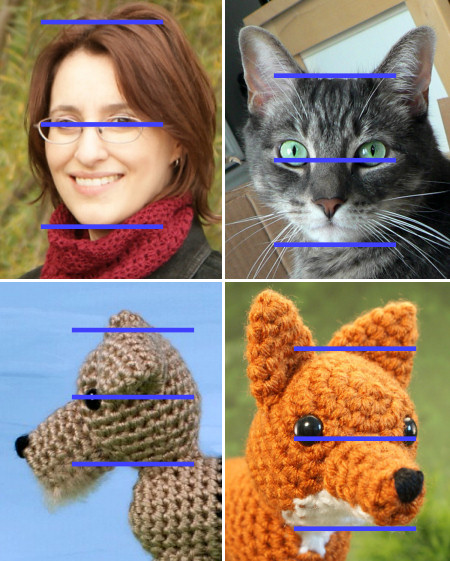
The top and bottom blue lines mark the top and bottom of the head. The middle blue line is halfway between them. You can see that the eyes are always at, or slightly above, the middle blue line, and the top of the muzzle (or ‘nose’ in my case!) is also at that same level.
Eye Spacing
This is more variable: some animals have forward-facing eyes, while others have sideways-facing eyes. A pattern should tell you if you need to place the eyes on either side of the head (i.e. facing out to each side), like these:
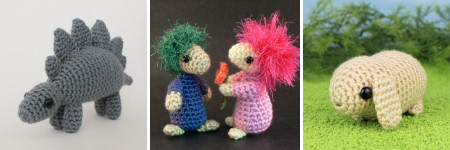
In these cases, the exact positioning is less critical, but, as you can’t easily see both eyes at once, check your animal from both the front and the top to make sure the eyes are level both horizontally and vertically before you commit to attaching the backs of your safety eyes.
If the eyes aren’t sideways-facing, there’s more chance of a positioning error. Here are the rules-of-thumb to avoid spacing problems:
- The most common mistake is to place the eyes too close together (see examples 2 and 3 at the top of this post) – this will give your animal a confused or cross-eyed look, which doesn’t (usually) look cute. The centres of the eyes should always be separated by at least half the width of the face.
- If the animal has a muzzle, place the eyes approximately level with each edge of the muzzle.
Let’s see some examples of these principles too:
General Spacing:
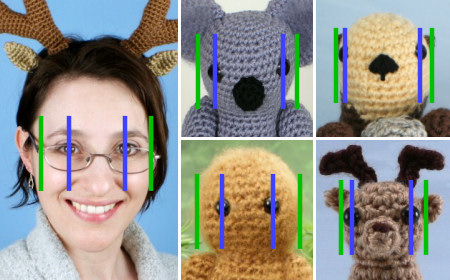
Here the blue lines show the centre of each eye, and the green lines show the edges of the face. Note the spacing between the eyes (the distance between the blue lines) is never less than half the width of the face (the distance between the green lines).
Muzzles:
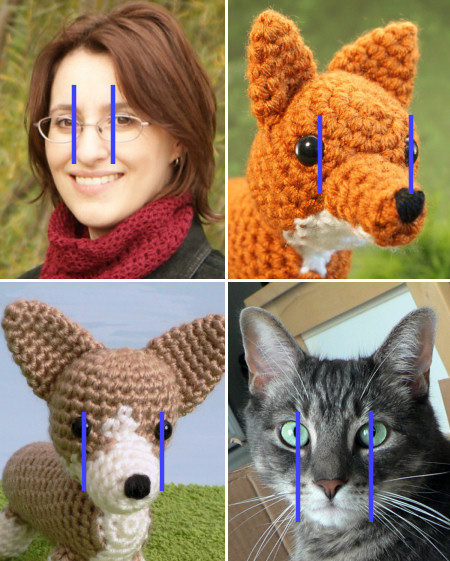
Here the blue lines show the approximate eye spacing, which is also equal to the width of the muzzle. (I obviously don’t have a muzzle, but my eyes are spaced apart by the width of my nose, so the principle still applies!)
Adding Cuteness
Of course, you don’t have to aim for the most realistic result – you can modify the general principles to give your animals a cuter, more cartoony look. The simplest way to go from realistic to extra-cute is to use larger eyes than recommended. You can also try positioning the eyes a little lower and/or the nose a little higher. (Taking this to extremes, the Japanese ‘kawaii’ look often places the nose higher than the eyes, but you don’t have to go that far to get a cute result!)
Go and Play!
Just to be clear: it’s never wrong if you choose to make your ami differently; it’s only a problem if you’re not happy with the end result. Avoiding unhappiness is what I’m trying to achieve with these ‘rules’, but, as I said at the start, they’re only general guidelines. If a pattern has different instructions for eye placement, you should follow those instead. And, of course, if you prefer the look of the eyes in a different position, you should always feel free to do things differently.
Eyes are so important to the look of the finished amigurumi – they give it expression and personality. Positioning the eyes so their animals look their best can be tricky, and I hope the guidelines in this post will help reduce that frustration. If you haven’t been happy with your amigurumis’ faces in the past, hopefully you’ll now have an idea where you may have been going wrong, so you can try a different eye placement next time.
Take an extra minute to make sure you’re happy with your ami’s eyes before you commit to the placement: it can make all the difference between an ami that’s just not quite right and one you can be proud of!

Loved this tutorial? I have so many more amigurumi tips and tricks to share with you!
Boost your amigurumi skills with my latest book, The Essential Guide to Amigurumi, your comprehensive guide to amigurumi techniques and tips.
Do you find my tutorials helpful? If so, please consider making a contribution towards my time so I can continue to create clear and concise tutorials for you:
Thank you so much for your support! Now click below for loads more crochet video and photo tutorials (and do let me know what else you’d like me to cover in future tutorials…)


Marilyn said
Hi June! Thank you for explaining WHY this spacing looks the best, Nature always gets it right! Now I have a no fail eye placement method🙌🏻
Glenys said
You are awesome! Several ago I learned from you how to do a magic circle. After that, (I was hooked) You have helped me many times since! You made ami fun for me. I have now made and given over 200 “animals”. I am disabled and Amigurumi has given me a happy purpose. I was sick of making afghans. I now help other learn this wonderful art. Thank you June!! You are talented lady and you keep sharing those talents with the rest of us ☺️
Shelley said
Thank you . This tutorial is helpful . When a pattern suggests spacing the eyes ” 6 stitches apart ” , for example , do they mean 6 stitches from eye post to post , or 6 stitches between the two inside edges of the eyes once inserted ?
June said
Shelley, if the eyes are “6 stitches apart”, that means there’ll be 6 stitches between the two eye posts*, no matter how large the eye. This keeps the eyes in the correct position on the head, even if you choose to make a cuter face with slightly larger eyes, or a more serious face with slightly smaller eyes.
* A caveat: this is what I mean when I say “6 stitches apart” in a PlanetJune pattern, and I assume that holds true for all amigurumi designers, but if it looks wrong when you follow a pattern by another designer, please contact the designer directly to verify it with them!
How to Use Safety Eyes | Shiny Happy World said
[…] Guide to positioning eyes from Planet June […]
Yvonne said
I REALLY needed this. Thank you!
Barbara Johnston said
Thank you so much for your tutorial. You have given so much helpful advice in such an understandable way. I will print it out so that I have it to hand. Many thanks.
Patricia bib said
Thank you for this tutorial.
Rita Silveira said
Thanks for the valuable information which I was longing for. God Bless You.
sarah said
Essential information! Thanks a ton!
sally said
Hi June thanks for all your tutorials they’re brilliant helps to understand why some look good and others don’t. thank you also for all your free patterns as i’m just on a crochet marathon for www.justgiving.com/ArchieHewitt tea party. best wishes sally
pam said
Thank you 1,000 times!
This will not only be a huge help with amigurumi creatures, but also fiber creatures of all kinds.
GREAT tutorial.
Again, thank you so much.
Sandee Ritter said
I have always appreciated designers who specified which round on which to place the eyes. Unfortunately, very few do this. So your tutorial is very helpful and I thank you for such a detailed explanation along with these great photos. In your “amigurumi dog” photos, number 4 is definitely the cutest, due to the ideal eye placement. You are the best!
Cocuklacocuk said
Thank you, this is wonderful, very useful for us
Barbara said
Thank you so much for this post! I am really looking forward to use your tips on a self-designed amigurumi 🙂
Gillian McMullen said
I’m dying to make an amigurumi June and place the eyes just right …
Sandy G. said
June, you and your helpful assistant Maui and your reindeer antlers, you make me laugh so much! You are such a special person. I will definitely keep this in mind when I am making creatures. Thank you for being you!
June said
I do try not to take myself too seriously – comparing myself with a crocheted toy made me laugh too! 🙂
Shannon Lewis said
Awesome post!! Thank you so much. I did know some of the information from my drawing days in the past, but (I don’t know why) it hadn’t dawned on me to use the same thing for amigurumi eye placement. I just kept placing the eyes til I found a spot I liked. This will save a lot of time. 🙂
Chrisie said
Thank you! It’s very helpful to see it explained like this.
Monica Ballinger said
Thank you so much for this! It helps a lot! I’ve always had some issues with the eyes, even using your in pattern help/tips. Being able to visualize this helps even more! Thanks June! I will use this blog entry several times to come! 😀