I’m going through a bit of a rough time at the moment, trying to sort through all my stuff to sell/donate/pack so we can make the house look uncluttered and get it on the market before we make the big move to South Africa. Although I have about 10 blog posts’ worth of tutorials and information inside my head, it’s proving difficult to find the time to actually write any of them! If anyone tells you that moving to another country (that uses a different voltage, so everything electrical will have to be sold and re-bought at the other end) is easy and non-stressful, they are lying…
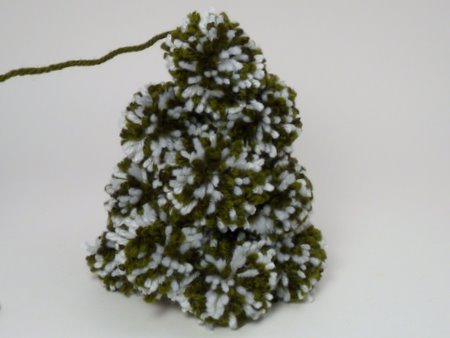
But anyway. I’ve managed to squeeze in the time to make an easy Christmas craft: a Pom-pom Christmas tree!

A few weeks ago, I picked up some Clover Pom-Pom Makers, for no reason at all except they look like fun and I doubt I’d be able to find them in South Africa. They are very clever, by the way: very fast and so much easier than having to pass the yarn through the centre of a ring each time! I’ll review them properly in another post when I have more time…
And now to the Pom-Pom Christmas tree tutorial:
This tutorial is Donationware – the instructions are available for free, but if you like it please consider sending me a donation to show your appreciation:
Send me a donation and receive the easy-to-print PDF version of the tutorial as a thank you!
Donations of any size are much appreciated. Just add the amount you wish to donate, and, once you have checked out and paid, your PDF will instantly be available to download from your PlanetJune account.
The complete instructions are available below, regardless of whether or not you choose to pay for them 🙂
This is a PlanetJune original tutorial. Please do not share or reproduce this tutorial; instead post a link to www.planetjune.com/pompomtree
Pom-Pom Christmas Tree Tutorial
You will need:
- Yarn in any colour(s) of your choice – I used worsted weight
- Pom-pom maker – I used a 45mm (1 5/8″) size. See Notes below for alternatives.
- Scissors – a small, sharp pair to cut the pom-poms, and a regular pair to cut the cardboard
- Yarn needle
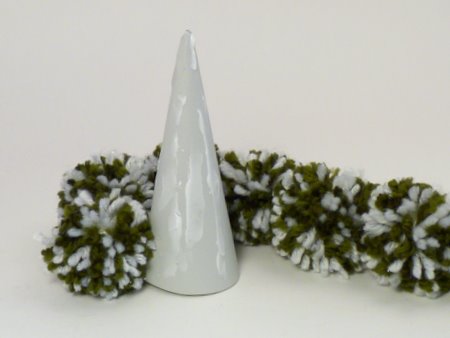
- Cardstock – a square of thin card to form the base of the tree; I used an 11cm (~4.5″) square
- Tape
- Craft glue (any white glue will do)
Notes:
- I wanted to make a snow-covered tree, so I held two strands of yarn together to make my pom-poms: one green and one white. (My white yarn is actually a ‘Christmas’ yarn with a decorative silver thread running through it, but don’t bother with fancy yarns like that because only the cut tips show, so I could have got the same effect with a plain white yarn!)
- If you don’t have a Clover Pom-Pom Maker like mine, you can still make my pom-pom tree, using either the traditional cardboard circle technique or the finger-wrap technique to make the pom-poms.
Method:
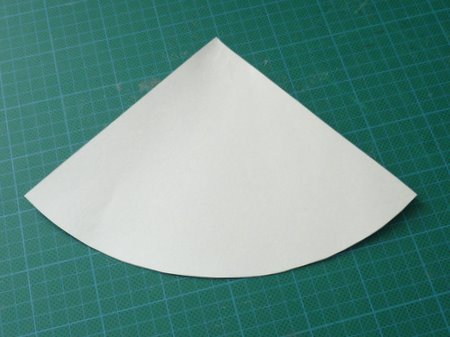
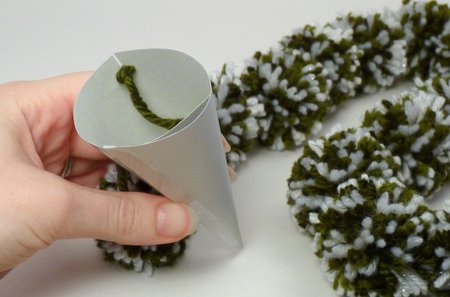
1. Cut the card. You need to make the square into a quarter-circle by cutting off one corner as shown by the curved dotted line below. (It doesn’t have to be exact – it’ll all be hidden by the pom-poms – so you can just eyeball the curve.)

Here’s what you’ll end up with:
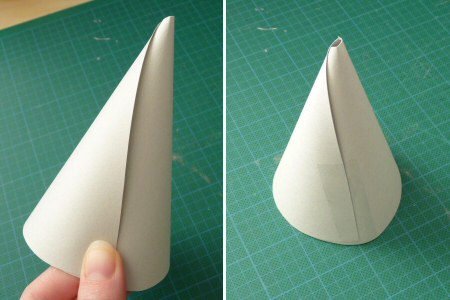
2. Bring the two straight sides together to roll the quarter-circle into a cone, so the two straight edges meet and then overlap. You see the little hole at the tip of the cone? That’s absolutely fine (in fact, we’ll use it later) so really, don’t worry about being neat with this. Tape in place.
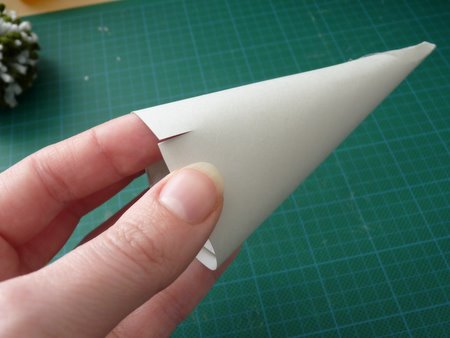
3. Make a little slit (about 1cm long) at the bottom of the cone.
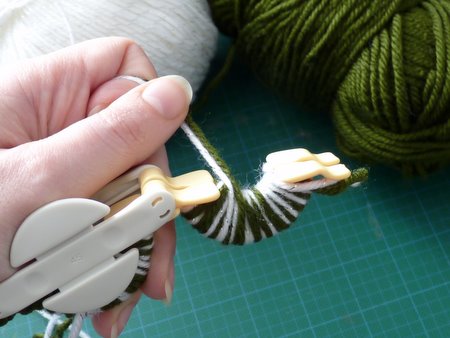
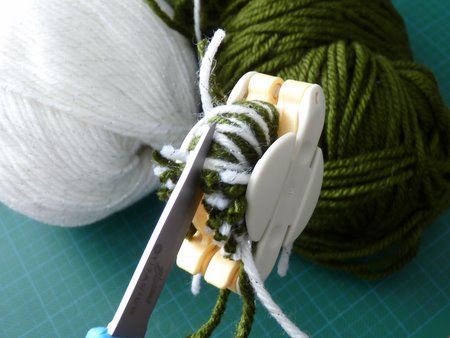
4. Make pom-poms! (use the instructions for your pom-pom maker, or one of the two alternatives I linked to in the notes above). Wind the yarn on…
Snip apart with sharp scissors…
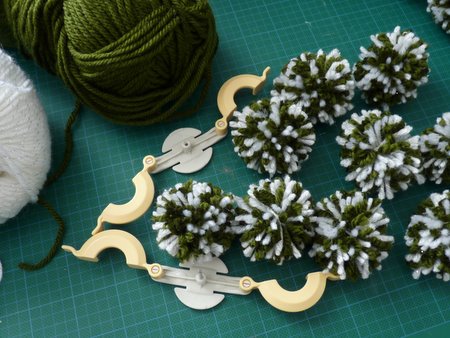
Repeat until you have as many as you think you’ll need. (I started with a dozen and ended up needing 16. The exact number will depend on the size of your cone, the size of your pom-poms, and how closely you space them. You can make more later if you find you don’t have enough, so don’t worry too much about the number at this stage.)
5. Cut a long length of yarn – I cut about 1m to make sure it would be long enough – and thread it onto a yarn needle. Pass the needle through the centre of each pom-pom in turn, so you end up with a long chain of pom-poms. (Don’t cut off the excess yarn yet – you may need to add more poms shortly…)

6. Tie a large knot in one end of the yarn and slide the yarn into the slit at the bottom of your cardboard cone, with the knot on the inside.
7. Slide all the pom-poms down the yarn until the first pom touches the cone and each pom touches the next. Unless you want to be making poms constantly until Christmas Eve, don’t scrunch all the poms together, as shown here (look at the bunched up poms on the right):

Each pom should instead just touch its neighbour, as shown here:

8. Now wrap the string of pom-poms around the cone in a spiral. They should cover the cone completely. You may find that you need more poms than you imagined; here, I’d only made 12:

If this happens, just make more pom-poms and add them to the string. When you have enough (I used 16) the final pom-pom should sit on the top of the cone, so it’s completely covered:
9. When you’re happy with the number and positioning of the pom-poms, carefully unwrap the string from the cone and slather the cone with craft glue. Yes, I said slather and I mean slather – the amount in the photo below is not enough! While the glue is still wet, re-wrap the pom-pom string and then give the tree a gentle hug with your hands on all sides, to help the poms adhere to the cone. It doesn’t matter if they don’t all stick as long as most of them do!
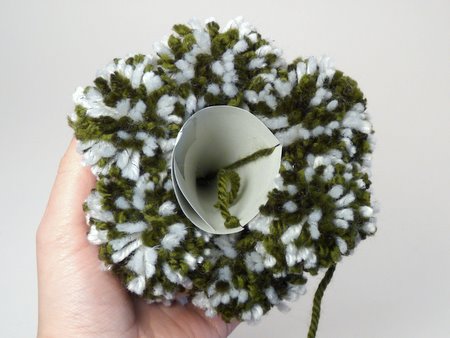
10. When the glue has dried, lift up the top pom-pom (it won’t be stuck down unless you’re a gluing genius) and drop the yarn needle through the hole in the top of the cone.
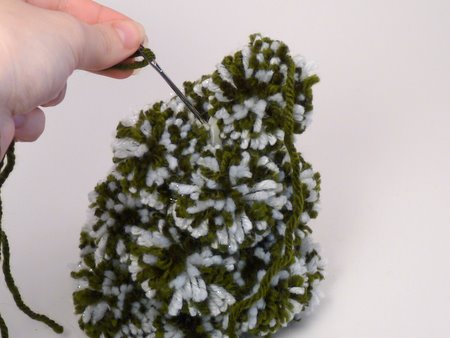
11. Pull the excess yarn down through the bottom of the cone, cut another slit in the bottom of the cone and slide the yarn into it. This will help keep the tree together. Tie a knot in the yarn, to keep the yarn from slipping out of the slit., then snip off the excess yarn. Glue the knots down to the cone if you think your tree may get knocked about by kids or pets!
12. Decorate! In my ‘less is more’ style, I decided to just make a mini-pom (25mm) as a star for the top of the tree. You could decorate yours with bead garlands, mini-pom baubles, or anything else you want.
I hope you enjoyed this tutorial! Please leave me a comment if you did, and consider leaving me a donation. Thanks!
And if you make one, feel free to add it to the PlanetJune Tutorials flickr group 🙂


Sherry said
Thank you for this lovely idea, June! The local charity knit & crochet group I’m in is always looking for different things to make for our special Christmas projects. Last year it was amigurumi turtles and dolls for inmates to give their children.
Cathy said
This is adorable. I’m thinking of making a set possibly in green, red, gold, and silver metallic yarn, maybe in graduating sizes. With some other decorations like ‘snow’ and pinecones and small animal ornaments, this could be a novel centerpiece. Will be back to make a donation as I’m interested in several patterns.
Jeannine said
Your creativity is enviable and wonderful! Thank you for sharing your talent with the world!
emily said
Amazing idea! I made one for my brother last Christmas and he loved it! Thank you so much for this amazing tutorial!
grace said
very nice it is simple to keep children going on their holidays i hope that they can do it
ssbsel said
its very cute and the instructions are so clear.. thank you for sharing.. 🙂
Chrystal said
So cute! My kids need these. I’m a finger-wrappin kind of girl.
Kaylynne said
I can’t wait to make a darling tree like yours!!! I am going to go and buy a pom-pom maker. I have wanted one for a long time but just haven’t had enough inspiration to actually follow through with it. You are such a great example for me to follow, you are so organized. Good luck with your move. My daughter lived in South Africa for 18 months about 5 years ago. She loved it.
Meg P said
This tree makes a great companion to the crocheted bobble tree pattern you published last year — thanks for another great idea!
And I can’t believe you are accomplishing ANYTHING in the midst of this move! Congrats! peace, meg
Amanda said
HAHAHA! What a cute little poofy tree! <3 I love this!
Cora Shaw said
That is too cute! Love it!
Sister Diane said
This is adorable, June, and thank you so much for giving us a tutorial in the midst of your moving madness. I could see this little guy in so many cute color schemes!
Louise said
Wow what a lovely isea. I think you could do that with even young children. Thankyou.
Lindy said
That’s a lovely pom-pom Christmas tree! It looks easy to make and is a great tutorial. Thanks!