We all (I hope) know by now about the invisible decrease, to smooth out your amigurumi decreases and make your amigurumi look much neater. But what about increasing? Increasing doesn’t have as much of a problem as decreasing, but forcing 2 stitches into one hole does stretch out the hole and leave a slight gap beneath it compared with the surrounding stitches.
Is there any way to reduce this gap and make your increases less visible? Let’s do an experiment to find out…
The Setup
A standard increase consists of two single crochet stitches, both worked into both loops of the stitch below. But either or both of those single crochets could instead be worked into the front loop (FL) or back loop (BL) of the stitch below. Here are all the possible permutations of loops to work into to make a sc increase:
| Option | 1st stitch | 2nd stitch |
| 1 | both | both |
| 2 | FL | both |
| 3 | BL | both |
| 4 | FL | FL |
| 5 | FL | BL |
| 6 | BL | FL |
| 7 | both | FL |
| 8 | both | BL |
| 9 | BL | BL |
Option 1 is the standard increase, included for reference as the control: the yardstick to compare against, to see if we find a better option.
We’ll omit Option 9 (both stitches in BL only) from the remainder of the experiment, as I already know that the unworked front loop will leave a visible bar on the surface, so it clearly isn’t an ‘invisible’ candidate. That leaves us with 8 candidates, including the control, to include in our experiment…
The Experiment
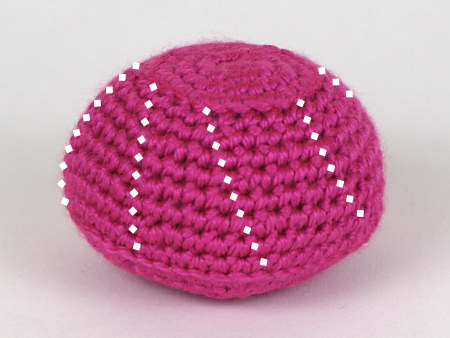
I crocheted an amigurumi-style shape with a flat top and bottom, and 8 columns of increases around the sides (one column for each option 1-8). Each column includes 3 sample increase stitches, separated by a non-increased round above and below each increase so I could isolate each specific increase stitch. I noted any difficulty with creating each stitch combination as I crocheted.
Then I stuffed and finished the test piece as though it were a regular amigurumi, and then inspected the finished piece to see which columns of increases were least visible.
Results
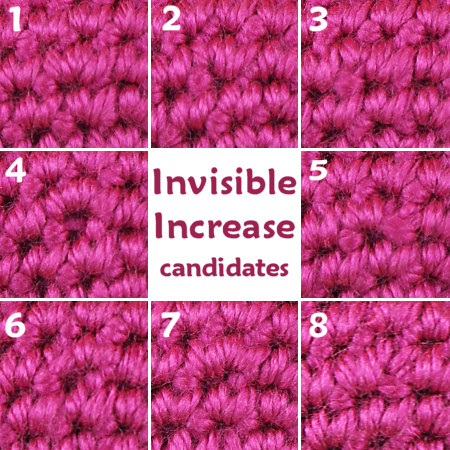
You may not be able to see the differences clearly here – my observed results (below) are far easier to see by eye than by looking at the photos.
| Option | Difficulty | Hole Size | Appearance |
| 1 | easy | standard | standard increase |
| 2 | easy | smaller | stitches nestle together; 1st stitch sits slightly higher |
| 3 | harder than #2 | smaller | slight bar in front of 1st stitch |
| 4 | easy | larger | hole mostly filled by bar clearly visible inside hole |
| 5 | easy | standard | very obvious bar in front of 2nd stitch |
| 6 | (#5 reversed) harder than #5 |
standard | bar in front of 1st stitch |
| 7 | (#2 reversed) harder than #2 |
smaller | stitches nestle together; 2nd stitch sits slightly higher |
| 8 | (#3 reversed) harder than #3 |
smaller | bar in front of 2nd stitch |
Conclusions
- To reduce the hole size, one of the stitches must be made through both loops. => #4, #5, #6 rejected
- If either stitch is made through the back loop only, it will leave a visible bar on the front of the work. (Note: Those visible bars may not look too bad in my sample, but would be far more prominent if the increase round and previous round are worked in different colours, as they’d show up as a bar of the wrong colour.) => #3, #8 rejected
- It is easier to work the FL/BL stitch first followed by the both loops stitch than vice versa. => #2 is better than #7
#2 and #7 had the best appearance, but #2 is easier to work than #7, so that gives it the edge and makes it the winner in this competition. But, hang on, is there a genuine improvement over a standard increase?
Introducing… the Invisible Increase!
I know it’s hard to see the differences between all the options in the above photo – they’re much more noticeable when you look at the piece in 3D. To make it clearer that there really is a difference, I’ve drawn around the edges of the ‘hole’ beneath a standard increase and the new invisible increase:

You can see that the hole is much smaller if you use the invisible increase; in fact, if anything, I’d say it’s smaller than the hole beneath a normal sc stitch. Mission accomplished!
So, if you’re looking for a less visible increase for your amigurumi, here’s your answer:
Invisible increase: sc in front loop only of next stitch, sc in both loops of same stitch.
Unlike the invisible decrease, which I recommend you always use for amigurumi (unless there’s a specific reason not to, e.g. turning your work between rounds), I’d definitely call the invisible increase an optional technique, but if you ever notice that the holes below your increases look too large, give my invisible increase method a try and see if it alleviates the problem!

Loved this tutorial? I have so many more amigurumi tips and tricks to share with you!
Boost your amigurumi skills with my latest book, The Essential Guide to Amigurumi, your comprehensive guide to amigurumi techniques and tips.
Do you find my tutorials helpful? If so, please consider making a contribution towards my time so I can continue to create clear and concise tutorials for you:
Thank you so much for your support! Now click below for loads more crochet video and photo tutorials (and do let me know what else you’d like me to cover in future tutorials…)


crimson said
Amazing that you take the time to post your findings for us when you experiment! These are things I’m curious of too. I was getting a bit confused by the pictures though bC they seemed backwards, and then I thought about your left-handed tutorials and wondered, are you left-handed? It would explain my confusion with the pictures lol
June said
You’re exactly right! I always make my tutorials available with both right- and left-handed photos, but there’s no point in making a right-handed version when I’m just showing you how I came up with my conclusions (which hold true equally well for right-handers!) 🙂
Angee said
Thank you so much for this awesome comparison and explanation! I’m going to try your method right now on a commission because my hole is too noticable.
Desley Millar said
hi June. thank you so much for explaining the invisible decrease. i have been making amigurumi toys for a long time to give to foster children.i learnt the invisible increase from you as well as many other techniques i allways had a hole in my decreases. you are such a kind lady to put so much time into all of this work for us. hope you are very well now.
love and hugs. Desley.:revolving_hearts:
Elisa said
I love how you documented your solution!! Thanks ❤
Debi Schuhow said
Brilliant! I appreciate how you used the scientific method to arrive at your conclusion. It took a lot of work.
What a brilliant mind!
.: petrOlly :. said
This is THE method for decreases! I use it since you posted this tutorial. It is simply perfect. The only “problem” with it is that it is not as easy anymore to find the increased spots (when I have to frog more than one row). Thanks for the fantastic detective work! Hercules Poirot wouldn’t do it better 😉
Rina said
Thank you, I have used ur invisible decrease for awhile now, it is great. Busily crocheting n thought “I bet June has an invisible increase too” and Lo and behold there it is. U are wonderful. ?
RAJSRI SANDERS said
It is very interesting. Great research n explanations & demonstrations. I am going to use this immediately for the Amigurumis which is on the way for Guinness Record during this December. Thank you.
Tammy said
Awesome tip, June! I tried it and love it! Sharing your info in today’s post. Many thanks, T.
Le crochet d'Evano said
Hi June, Thank you very much 🙂
Katerina Peraki said
Thank you so much! I have learned amazing techniques from you over time and I am soooooo grateful!
Love from Crete, Greece!!!!
Sarah said
Thanks so much! I learned to crochet when I was about 8, and that’s more than half a century ago, now. I’ve done a fair amount over the years, primarily in thread, but I’d never heard of the concept of “invisible” increase or decrease until I did a search on Ravelry. The thread was several years old, and they couldn’t remember how to do it. I Googled and found your instructions. Boy that works great.! I added a link to your page here on the Ravelry thread so the next time someone finds it, they can come here. Learn something new every day!
Paola said
Thanks June, I’ll try few options and let you know 🙂
Paola said
June, this is just brilliant!
Just a question: how about increases of three stitches?
Thanks a lot!
Paola
June said
I don’t use 3-stitch increases in my designs, Paola, so I’m afraid I haven’t investigated those!
Shorty said
I just completed a 3-stitch increase in a project, what I did was sc in front loop, sc in front loop and then sc in both loops all in the same stitch, and now you have the 3-stitch increase.
Jylsis said
Could you write out a simple pattern using the directions for the inv-increase? I am just a beginner and a little confused. Thank you!!
June said
You can use the invinc in any amigurumi pattern that has an increase – just replace every “2 sc in next st” with “invinc” 🙂
Mathilde said
Thank you so much for this brilliant bit of research.
I love your methodic approach, and my increases have never looked so neat! Now with the invisible decrease tutorial you published, the look of my crocheted objects have greatly improved.
Thanks for all your work!
Mathilde
ChiWei said
Brilliant! Yay for the scientific method in crocheting 🙂 Thank you so much for this tutorial. But the reason I found your page was because of the shape itself, with the flat top and flat bottom. I know how to create a flat bottom if I work upwards by crocheting in the back loop, but can you tell me how to create the flat top? Do I use the invdec in the back loop to give me that direction change? Thanks!
June said
Almost, ChiWei! You can’t invdec in back loops (as invisible decreases are worked into the front loops) so, to change from vertical to horizontal, you’d typically do a decrease round like this:
(where X depends on the size of your piece).
Jennifer said
June,
I started Crocheting (I’m teaching myself.) 2 nights ago and we clearly think alike! I’m trying to make some tiny dog toys and I wanted fewer holes in my finished work. I had concluded the trick lay in which loops I used to increase and I was trying to do your exact experiment above. However, as I’m still working on consistent tension and other issues, I was never sure how accurate my results were. I can’t wait to explore the rest of your website!
Jennifer
Kristi said
I started incorporating this method to my non-flat shapes. At first I didn’t see a difference, but when I went to stuff the project…WOW! It really makes a difference in fluff peeking out!
Thank you again for sharing ^^
Kateryn said
I like how you didn’t just give the answer, but showed us the candidates and tested it. It’s much longer for you to post this way, but SO much better. Thank you for the effort you put in your tutorials. And for the extra stimulation to our brains! (clearly, yours gets all the right pokes!)
Glenda Rendell said
I think you have just solved one very complex problem for me: How to increase while using two colours for each stitch. I am doing bird feathers where the first pass of the sc is black and the final loop is green (the black feather has to have a green tip). This does not translate well for increases. After spending over an hour in the train this morning experimenting with it, I come to work and find you’ve you’ve already done the hard yards. How funny. And thank you.
June said
That sounds like a fascinating technique, Glenda – I hope you’ll send me a photo when you finish your bird!
Katerina Peraki said
Oh, I would love to see a picture of your feather too!!!!
Jemma said
I’m really impressed at the amount of research and thought you put into this experiment, thank you for your work! I may yet use this technique in the future. x
Vashti said
I love the way you explained it!
Yarnitect said
Wow, another amazing and indepth look at stitches. I’ve bookmarked this page (on pinterest). I will definitely be adding this to my bag of crochet tricks!
Judy Carlson said
I’m going to have to try this! And here I thought the gap was unavoidable. Amazing!
Carmen said
Hi June,
thank you for this great improvement for crochet 🙂 and the time you spend for discovering it and in particular illustrating it to us.
I just have 2 questions to you:
1. Can the invisible increase be used in any case, or shouldn’t it be used when turning the work between rounds?
2. Furthermore, which other reasons are there not to use the invisible decrease apart from turning the work between rounds?
Thank you in advance!
June said
Okay Carmen, let’s see:
1. Yes, just like the invdec, because of the back loop being visible on the back of the work when you only work into the front loop, I wouldn’t recommend this technique for turned rounds, especially for a striped pattern. If the piece is something worked in turned rounds but that still has an inside and an outside, e.g. a non-reversible hat or a sweater, you could work the invinc on the right side rounds, and option #3 (BL, then both loops) on the wrong side rounds to alleviate that.
2. If the pattern you’re using specifies to work into FL or BL only (in a certain round or throughout), you shouldn’t use an invdec (or invinc) in those rounds, as it would change the look of the resulting stitches. Also, in a pattern with complex colour changes where there’s a colour change between the two stitches that form the increase (or decrease), you shouldn’t use invdec or invinc there unless the pattern specifies it.
June said
I agree with Ana! It’s awesome how you broke down the options and examined them to find the very best solution to the problem.
I must say you have a lovely name, too!
Monica Ballinger said
WOW! You are always coming up with amazing yet simple ways to make crocheting amigurumi so much easier!!! Thanks for sharing!!! I will have to try this on my next amigurumi!!! THANKS!
magsiesss said
Lovely … I need to make some more boobs (needed for end of June) and will try this method of increasing ..
Thank you 🙂
Giodina said
Hi June!!! Thank you so much for sharing your experiments! 😀
Can you make a video-tutorial about this invisible-decrease?
I have understood your instructions, but for the Italians amigurumi-addicted could be helpful seeing all the steps in a video tutorial!
Bye! 🙂
June said
Giodina, there is only one step to this technique, so it really doesn’t need a video! You just make the first stitch of the increase into the front loop only – it’s very simple.
If you’d like to share this with your Italian friends, please feel free to leave another comment with a translation of “sc in front loop only of next st, sc in both loops of same st” into Italian, so they can also understand it 🙂
Giodina said
Ok!!! ^^
Can I make a little tutorial with photos for the users of the italian amigurumi-forum? Because some of them need it (I have already translate your instructions but they ask for a little tutorial)… I will give the credits to you -obviously- and I will not post the photos on my blog -or other site- , but ONLY on the forum.
June said
Provided you give me credit and a link back to PlanetJune, that’s fine 🙂
Giodina said
Thank you!!!! :DDDDDDDD
Audrey said
Thank you for taking the time to do these kinds of tutorials, you have no idea how helpful they end up being! (I’ve switched to the invisible decrease as soon as I saw your post on them and I’ve never looked back!)
THANK YOU!
Birdie said
woah! I’ll have to try this!!!!
Jennifer said
I will definitely try this on my next project!
Silverlotus said
Very interesting, June. I’ll give it a try on my next amigurumi project.
Toni Nicole Douglas said
Thank you, June! This is a huge help to me right now as I am working on a couple of amigurumis! This couldn’t have come at a better time!
Sunny said
Thanks June! This will be a great help!!
🙂
Ana said
Amazing research! Will definitely try it! 🙂