I have a little trick that I use when I’m embroidering noses etc onto amigurumi faces, to easily hide the starting and ending tails of my thread and to keep my stitches secure. I thought you might like to see it in action in a new video tutorial.
It’s easy to hide the ends in the exposed stuffing if you’re stitching onto an open-ended piece, but not as obvious when you have to embroider onto a piece that’s already closed up, leaving you with no hidden place to start from. It’s especially important to fasten the ends securely if your amigurumi will be played with – you don’t want that cute face to get snagged on something and unravel!
If you’re using non-safety eyes, this is also how you can stitch them on after you finish crocheting and stuffing the piece, so you can make sure they’ll be in the right place and give the cutest expression. (Crocheted 3D pieces change their shape when you stuff them: they stretch widthwise as the stitches expand into position, but not lengthwise. That’s why I recommend stuffing the head before placing the eyes, nose, and any other features – even if that then means pulling out the stuffing so you can attach the backs of safety eyes before re-stuffing!)
You can also use my secure stitching technique for attaching other embellishments onto your amigurumi – buttons, beads, sequins, felt patches, etc – it’s perfect for hiding thread ends of any type, whether you’re using worsted weight yarn with a large yarn needle, embroidery thread with an embroidery/tapestry needle, or even fine sewing thread or invisible nylon thread with a hand-sewing needle.
And now to the video tutorial (in right- and left-handed versions, of course, and I’ve also included a text-only version at the end of the page):
Amigurumi Faces: Secure Stitching (right-handed)
Click to watch this video on YouTube.
Amigurumi Faces: Secure Stitching (left-handed)
Click to watch this video on YouTube.
Note: The videos may look a little small embedded in the blog: if so, you can fullscreen them or click through to YouTube to watch them full-sized 🙂
If you enjoy my crochet tutorial videos, please help to spread the word about them, and/or subscribe to the PlanetJune YouTube channel.

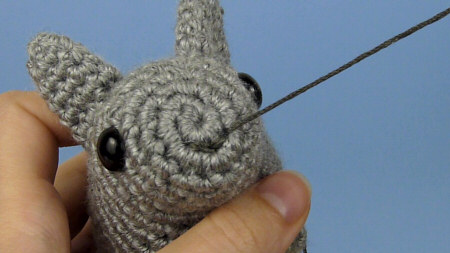
FYI, I’m demonstrating the technique in this video using one of my Baby Bunnies designs – the crochet pattern is now available in my shop and includes the patterns for 3 varieties of realistically adorable baby rabbits: Dwarf, Angora and Lop. 🙂
Basic Text Instructions
- Start by inserting the needle into a gap between stitches some distance away from where you want to place the embellishment, bringing it up at the starting point. Pull it through, leaving a tail of a few inches.
- When you reach your final stitch, insert the needle to make your stitch, bringing it out at the same gap between stitches as your starting point, so both thread strands emerge from the same gap.
- Knot the ends together with a basic square knot, pulling the ends taut so the knot is flush to the surface, but not so tight that you distort the stitches you’ve made.
- Thread both ends back onto the needle, then insert the needle into the same hole where both ends emerge, and bring it out at a different point.
- Pull the thread ends tightly to draw the knot inside so it disappears, then snip them off. The ends will retract back inside so you can’t see them.
Note: If the knot is still slightly visible, insert the needle a few stitches away, and wiggle the tip of the needle to reposition the knot so it doesn’t show any more.

Loved this tutorial? I have so many more amigurumi tips and tricks to share with you!
Boost your amigurumi skills with my latest book, The Essential Guide to Amigurumi, your comprehensive guide to amigurumi techniques and tips.
Do you find my tutorials helpful? If so, please consider making a contribution towards my time so I can continue to create clear and concise tutorials for you:
Thank you so much for your support! Now click below for loads more crochet video and photo tutorials (and do let me know what else you’d like me to cover in future tutorials…)


Katrina said
So simple, but such a game changer for me! I have been avoiding embroidering faces and now I feel I have the confidence to go forth making super kawaii amigurumi creatures! Thank you. <3
Karen said
Thank you so much for this tutorial! I see many more amigurumi in my future now that I no longer dread the thought of embroidering the face.
Cindi said
June,
Thanks so much for the tutorial about securing embroidery stitches on knit/crochet toys.
So simple, but yet so effective! 🙂
Joy said
Thank you so much for these tutorials! I am fairly new to amigurumi but totally addicted and with your help I am making a much more professional job of my little cuddly creatures. Cheers!
Dianne said
Thanks so much for this tutorial. I have had such problems trying to embroider the faces onto my amigurumi pcs. that I’ve nearly given up trying. This explains it so well, and makes it so easy. Almost makes me slap myself for not thinking of it on my own…..but I’m grateful to have found your ingenius method. On to making more toys for the grand-baby!
Kate said
Hi June!
Thank you for this tutorial — definitely very helpful in terms of how to keep little noses and mouths where they’re supposed to be. My toddler-age nephews are really good at finding those loose ends!
I was wondering if you have any special advice for stitching over fuzzy or brushed yarn. I understand brushing the yarn before I put the eyes in, but shouldn’t I stitch the nose and mouth right on the crocheted ‘surface’ before I brush out the yarn? (the pattern I’m using says to brush it out and *then* stitch on the features) Any advice would be appreciated!
June said
Hi Kate, it’s actually very important that you do the brushing before you stitch on the features. Brushing over your embroidered stitches will ruin them – it will either make them fluff up too (not the look you want) or actually break the fibres and rip out your features! So I definitely recommend you finish the brushing and then attach any embellishments – whether eyes, embroidery, or anything else 🙂
C.A.S. said
This tutorial has changed my life. I’m always apprehensive about the embroidery when I start to get to the end of an ami. No more! A new era of secure and adorable faces are in my future. Thank you!
MorganAdel said
Great tutorial June! I would also be interested in a tutorial that shows how to do the various embroidery stitches for noses and mouths, etc.
Pooie said
Such a simple but great tip… thanks very much.. I always worry that the stitching will unravel…. I would never have thought of it …. x
Rachael Barman said
Personally, I wouldn’t trust so called safety eyes on either a knitted or crocheted fabric. I’m sure some people add a strong backing to them to help prevent them being pulled through the fabric but I’m sure many more don’t.They just look like a choking hazard waiting to happen to me.
Meg P said
As usual, June, you’ve given us clear, easy-to-follow instructions that will help make our amigurumi even more adorable — and you’ve done it for free! Thanks for the great advice!
Chrisie Merriman said
Really helpful and clear instructions as always! Thanks June! I can’t wait to make a bunny and try it now!
Carissa said
What a timely tutorial! I struggled with embroidering a mouth on a doll yesterday and wondered if there was a better way. Thank you so very much for showing me that there is, indeed, a better way!
Carissa
Yarnitect said
Great tip. On a small project like this, I generally came in from the completely opposite end. But I like your tip of starting closer and adding a knot with an extra ending point!
FlowerFairy said
I’ve been looking for a tutorial exactly like this for so long! Just like all of your tutorials, it’s very clear and makes something I stress over completely stress free! Thanks so much! 🙂
Jana said
Yay! Great tut! I already begin as you do except for the tail and I only pull the yarn out somewhere else and snip. This looks a LOT more secure! Thanks!