Flattened shapes are a basic in amigurumi for creating rigid, flat elements like ears, beaks, wings, hands, feet, flower petals, leaves, etc. Here are a few examples from some of my patterns that use flattened shapes:
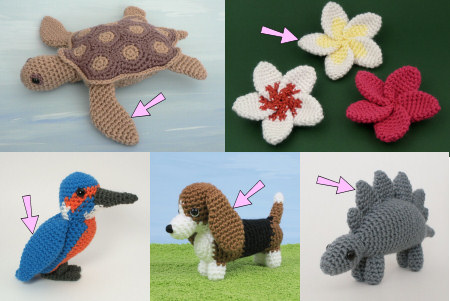
All these amigurumi use flattened pieces in different shapes and sizes (marked here by arrows). Clockwise from top left: flipper, petal, plate, ear, wing.
There seems to be some confusion about how to flatten the shapes after crocheting them (see the comments left on my Plumeria pattern for an example of this!) so I thought I’d spell it out with this tutorial so I can refer back to it whenever people email me for help in future.
For any shape that will be flattened, it’ll start out looking like a cone or cup shape. The exact shape and dimensions depend on the pattern and the required shape for the finished piece; it may be:
- very long and thin or short and wide
- pointy tip or rounded tip
- tube-shaped or cone-shaped or widening and then narrowing
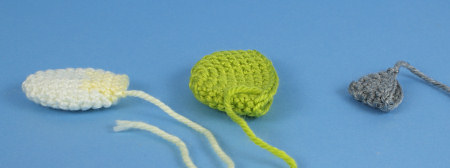
… or something in between! Here are a few examples:
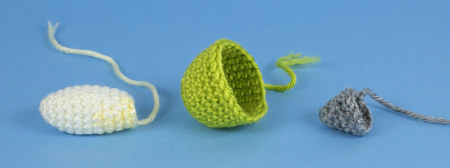
All the pre-flattened shapes in this picture have the magic ring on the left and the open edge on the right.
But, whatever the specific shape, it will always have the magic ring at the bottom, and an open edge (which you crochet around) at the top:
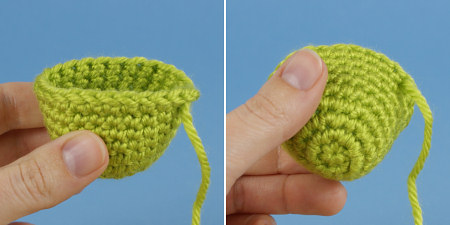
Before flattening – note how the open edge runs around the top and the magic ring is at the bottom.
When you flatten it, you’ll always bring the two sides of that open edge together:

Squash the front and back of the open edge together to flatten the piece.
And then continue to flatten the entire piece, right down to the magic ring.
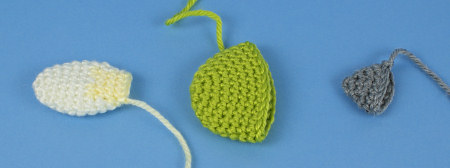
All the flattened pieces from the top…
…and from the side. Note that, in these pictures, the magic rings are all still on the left, and the open edges on the right.
The magic ring will form the tip of the item (ear, petal etc), and you’ll stitch it to the base piece (head, flower, etc) by the open edge – which now looks like two parallel rows of stitches.
That’s all there is to it! I hope this clears up any remaining confusion about how to flatten and attach these pieces to your amigurumi.

Loved this tutorial? I have so many more amigurumi tips and tricks to share with you!
Boost your amigurumi skills with my latest book, The Essential Guide to Amigurumi, your comprehensive guide to amigurumi techniques and tips.
Do you find my tutorials helpful? If so, please consider making a contribution towards my time so I can continue to create clear and concise tutorials for you:
Thank you so much for your support! Now click below for loads more crochet video and photo tutorials (and do let me know what else you’d like me to cover in future tutorials…)


Rita Silveira said
Thanks for the tip on flattened pieces. While flattening do the beginning-ending edge go to the side or centre.
June said
Rita, if you make a piece, then hold it and flatten it exactly as I show in my photos, it should all become clear 🙂
Melissa said
I like using flattened pieces because it makes the edges look neater than if it was one shaped layer.
Also, I just wanted to let you know that I finally started tinkering with my blog and I no longer have that giant background image up! I’m playing with a cleaner layout.
Simone said
For patterns like the Stegosaurus, this technique is brilliant! The plates stay just where they are intended to be, looking fabulous. Thank you for sharing!
Birdie said
How helpful! Will be using this in the dinosaur patterns! Thanks soo much! ;D