PlanetJune Craft Blog

Latest news and updates from June

Archive for January, 2021

crocheted Bagpuss

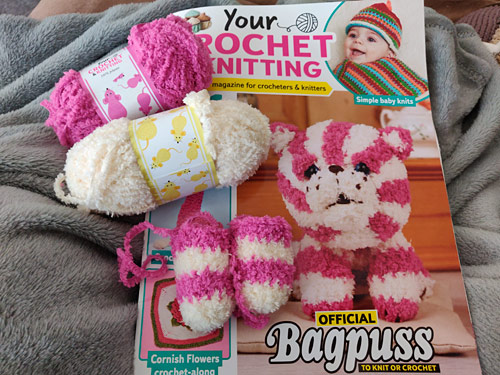
I saw on Twitter that there was a UK magazine with a super-cute knit Bagpuss kit on the cover (Your Crochet & Knitting, Issue 17)… and then my Mum bought it and sent it to me!

crochet bagpuss

For the uninitiated, Bagpuss was a charming UK kid’s TV show from the 70s that, despite only having 13 episodes, was repeated endlessly on the BBC throughout my early-80s childhood, and was one of my all-time favourite TV shows.

I was prepared to tackle a new adventure in my knitting journey – I’ve never followed a knitting pattern before, or worked with multiple colours, but I do like a challenge! In fact, though, the magazine included both knit and crochet patterns for Bagpuss. After looking at the photos, I could see that they all showed the crocheted version – how strange! Without even a single photo for reference, I didn’t want to take a chance that the knit version wouldn’t be as cute, so I decided to go with the crochet pattern.

I don’t actually remember the last time I crocheted something I hadn’t designed myself (maybe this panda, over a decade ago?), so this would be a novel experience too!

Crocheting

There were two things I really didn’t enjoy about the crocheting :

  1. The yarn. Ugh, now I remember why all my fuzzy patterns are worked inside out in back loops only – it’s impossible to see your stitches when you work normally with a fuzzy yarn. I was just guessing where to insert my hook the entire time, counting carefully, and ripping out the round (slowly – frogging fuzzy yarn isn’t easy!) every time I was off by more than one stitch in my count for the round.
  2. The kit yarn quantity. I was so happy to have the perfect Bagpuss yarns included in this kit, but with only 16g of each colour, I knew from the beginning that the quantities would be tight. I made the back legs, then weighed them and the remaining yarn and calculated how much more yarn I’d need to complete the project. The answer: exactly as much yarn as provided, with no wiggle room at all! I kept all my yarn ends as short as possible and replaced all the decreases with invdecs to try to save yarn anywhere I could.

Both those factors meant this was far from the relaxing project I anticipated when following a pattern! I had to count constantly as I crocheted – checking the stitch count at the end of the round is impossible when you can’t see the stitches to count them – and always kept a worried eye on the rapidly dwindling balls of yarn…

It all worked out though, and I breathed a sigh of relief when I finished crocheting the final piece and still had about a yard of each yarn colour remaining – it couldn’t have been much closer!

crochet bagpuss
All pieces crocheted, with the tiny bits of remaining yarn at the top left.

Assembly (part 1)

Now to the assembly… I found the single paragraph of assembly instructions (“sew legs to body”, “embroider nose and mouth” etc) to be a little brief, especially when the magazine only included 2 photos of the finished Bagpuss – one from the front and one from a slight angle – so there’s no reference for the back legs or tail, or to see where the body should meet the head at the back.

I guess this is a downside of magazine patterns, where space is at a premium so instructions are brief. I’m used to my PDF patterns where I can include pages of detailed assembly instructions with step-by-step photos – quite a difference! I think the magazine format is far better suited for patterns that don’t need much (or any) assembly.

I didn’t really know how to tackle this stage – the pieces didn’t really look like they’d go together with such large openings at the top of each limb and such a tiny body, so I tried getting in touch with first the designer and then customer support at the magazine, to see if they could provide any additional photos to aid in the assembly. I moved onto the eyes while I waited for a response…

Eyes

The pattern called for 10mm blue eyes. I don’t have any coloured eyes but I do keep some clear eyes on hand, just in case – that way I can paint them to whatever colour I need!

I tried some 10mm eyes on my Bagpuss’ head but they looked too small, so I decided to go with 12mm instead.

I painted the back of the eyes with a blue acrylic paint, let them dry overnight, then added a second coat of silver. As a Bagpuss fan, I know the original Bagpuss’ eyes were painted with blue backed by silver to make them sparkle, so I thought it’d be a fun detail to replicate that! Also, I didn’t want any of the pink yarn colour to show through the translucent blue paint and dull the colour, so silver seemed like a good idea.

crochet bagpuss
L-R: 3 stages: clear eye, painted with blue acrylic, overpainted with silver 

crochet bagpuss
Look how effective the silver backing is to bring out the blue! Left: the eye painted blue. Right: the eye with the silver backing.

Assembly (part 2)

I stitched the muzzle down before placing the eyes and closing the head, to make sure I got the eyes in the right place.

No customer support yet, so I thought I’d finish the head while I continued to wait. This was tricky – there was no guidance on how to turn a flat white circle into the pictured shaped muzzle. I couldn’t pull the yarn of my brown embroidered stitches tightly enough to indent the muzzle without making the stitches look terrible, so I kept pulling them all out and trying again.

crochet bagpuss
This white circle doesn’t look anything like the pattern photo…

After several failed attempts, I decided to cheat by needlesculpting the muzzle with a sharp needle and white sewing thread before adding the embroidery (see my article on needlesculpting if you’re not familiar with this technique!) to define the cheeks and chin.

crochet bagpuss
After needlesculpting, the face looked much better.

Assembly (part 3)

After a few weeks, I realised I shouldn’t expect to ever hear back from the designer or the magazine, so I just squished all the parts together and stitched them down wherever they met. First I attached each piece by just one stitch to keep them together:

crochet bagpuss

Then I posed the body, squished each limb in towards the body and then stitched them together wherever they touched, to hold them in position at the right angles.
crochet bagpuss

I’m still not sure if I’ve positioned everything the way it’s suppose to be, but I think it looks okay.

Embellishment

Then it was onto to the final stage – embroidering the nose, mouth, whisker points and claws! I abandoned the recommend yarn for the embroidery in favour of dark brown embroidery floss. Just this part took about two hours to get right – I’m not that experienced with embroidery, and I am very particular about the faces of my toys! I pulled everything out at least twice before I was somewhat satisfied.

crochet bagpuss
Maggie supervised this stage…

All done? I was fairly happy with him, but the big white misshapen circle at the back of his head looked ugly to me:

crochet bagpuss

I used (literally) the final yard of the pink yarn to stitch over the lower part of the white area, where the head met the body, to tidy up the colouring there.

crochet bagpuss

And now here we are – the finished Bagpuss!

crochet bagpuss

I feel like – with all my years of design experience – I probably could have done a better job of crocheting a Bagpuss from scratch, instead of trying to follow such a frustratingly brief pattern. I tried so hard to match everything to the photos, but I feel like every single part turned out looking different from the photo, and I couldn’t match the placements of the parts to the photo, no matter how many times I tried.

(And to anyone who doesn’t think amigurumi patterns are worth paying for, I can promise you there’s a world of difference between the vague single-paragraph assembly instructions in a magazine pattern and the pages of detailed step by step instructions, photos and diagrams you’ll find in my patterns where needed! Plus customer support by email comes as standard with every PlanetJune pattern licence…)

Still, the yarn was a perfect match for Bagpuss, so I’m glad to have got the magazine and kit just for that (thanks Mum)! And it all worked out in the end for this project – I do love my cute little baby Bagpuss 🙂

crochet bagpuss

Comments (9)

Designer Toolkit: Yarn Colour Swatch Box

Over the holidays, I decided to give myself a fun organisation project: creating a box of yarn swatches for all my amigurumi yarns, so it’ll be easy to see all my options and make choices.

Being able to see at a glance all the yarns I have available for my designs is so handy – this could be a really useful project for you too, if you make a lot of amigurumi and have a large yarn stash!

Here is the glorious result:

worsted weight yarn colour swatches

Isn’t it wonderful?! It’s like looking at a selection box of chocolates, but calorie-free and without the one that nobody likes.

worsted weight yarn colour swatches

There’s so much pretty colour here, and so much potential for what those colours could become… I feel like I’m an artist and this is my paint box.

Why Make a Swatch Box?

As a professional amigurumi designer, I have a lot of yarn in my stash. More specifically, a lot of worsted weight acrylic from several brands. Some are close enough in weight and appearance to be mixed within a project, and others aren’t (just look at my worsted weight yarn comparison to see how broad a category ‘worsted weight acrylic yarn’ really is!)

worsted weight yarn colour swatches

All my ami yarns are filed in plastic drawers, and every time I need to pull yarn options for a new project, I have to open several drawers, grab multiple balls of yarn, and then select the best combination of shades that could work for what I have in mind and also match in weight, sheen and texture.

worsted weight yarn colour swatches

This often leaves me with 10 or more balls of yarn scattered around and the hassle of cramming all the rejected yarns back into their appropriate (and usually overstuffed) drawers. Not ideal.

worsted weight yarn colour swatches

Making the Swatch Box

I bought lots of the plastic bobbins that are usually used for storing embroidery floss, and wrapped each one with a single layer of yarn, leaving a small space at the top to write the colour name. I used the slits at the bottom of the bobbin to hold the yarn ends in place. To finish each bobbin, I used a yarn needle to pass the yarn ends beneath the wrapped yarn on the back of each bobbin, then trimmed the excess.

worsted weight yarn colour swatches

I labelled each bobbin with a simple code (due to lack of space):

  • top left corner : brand (e.g. B = Bernat)
  • top right corner: yarn line (e.g. S = Satin)

And then wrote out the full colour name below that.

I found a plastic divided box that had sections large enough to hold several bobbins, and organised the swatches first by brand and yarn line, then by colour family.

worsted weight yarn colour swatches

Do you think I have enough yarn options? (Trick question: of course I don’t! That’s what the extra space and spare bobbins are for…)

After the Swatch Box

This box has changed everything for me. Today I pulled shades for a potential upcoming design, and I just opened the box and could see all my options at once. Within a couple of minutes, I had a selection ready to go, and now I can just go to the appropriate yarn drawer (as indicated from the bobbin) and grab only the shades I need to use.

worsted weight yarn colour swatches

I can use the holes at the top of each bobbin to clip the collection together while I use them so none go astray.

worsted weight yarn colour swatches

And, when I’m finished, I can easily refile the swatch bobbins in the box.

worsted weight yarn colour swatches

Yes, I ‘wasted’ about 2ft of each yarn in making these bobbins, but it was definitely worth it to me – just opening the box and looking at my yarn palette is so inspiring!

worsted weight yarn colour swatches

Now I can’t wait to grab my hook and get ‘painting’ (well, ‘sculpting’ would be more accurate) with some of these pretties…

Comments (8)

2020: year in review

Every year, I write a wrap-up to see how far I’ve come over the past year and set a direction for the year ahead.

I don’t think anyone in the world can say that 2020 turned out the way they’d planned, and I’m no exception!

I’ve been very fortunate to not have been directly impacted by COVID-19, other than isolating, social distancing, mask wearing, etc since March. But despite that, I haven’t had the best year, healthwise: I’m still struggling with fatigue problems, and the bad fall I suffered in July left me with a couple of months of post-concussion symptoms (and brain injuries aren’t exactly conducive to productive work…)

2020 Achievements

Thanks to the pandemic and my head injury, this year has been a bust for me, in terms of quantity of new work. I’ve only published 6 new patterns, and I’ve made little or no headway on my bigger plans and ambitions. But it’s not all bad news!

2019 PlanetJune crochet patterns

I think that any progress in 2020 counts as a win, and I’ve definitely made progress. 2020 marks a huge milestone for me: I now have over 300 self-published PDF patterns, ebooks and craft tutorials – isn’t that amazing?!

And I succeeded in completing my most complex design to date. Designing that tortoise shell was an achievement in itself, but figuring out how to explain it clearly in pattern form was a huge undertaking, and, with hindsight, 2020 wasn’t the best year to push myself into such innovation…

Tortoise crochet pattern by PlanetJune

I could have been much more productive in terms of quantity if I’d stuck to tried-and-true ‘safe’ ideas. But where’s the fun in that?! I’ve been designing amigurumi for 14 years now, and I have to follow my curiosity and keep trying new things, otherwise I’d be completely bored by now. (And, btw, I’m not bored at all – I still have so many ideas that I haven’t explored yet!)

I also followed up on my plan to post more crafts (not just crochet) on my blog this year with a few tutorials:

2020 PlanetJune tutorials

And some other craft projects:

2020 PlanetJune craft projects

(Plus there’ll be a few more projects – knitting, crochet, weaving – that I haven’t finished writing up yet.)

Spending time writing all these craft posts was a bit of a gamble in this age of digital distraction, but I was so happy with the response the non-pattern posts received! I love posting about what I’m making and hopefully inspiring people to try more crafty ideas along the way, and it’s really rewarding to know I still have interested blog readers who find value in my longer-form content in this fast-scrolling social media-filled world. (By the way, huge thanks to everyone who took the time to leave a comment this year and let me know you’re enjoying my posts – I really appreciate it!)

Business Report

My bestselling patterns this year were the Turtle Blanket and Baby Sea Turtles, Bearded Dragon, and Love Hearts (thanks to their repurposing by healthcare professionals and caring crocheters as COVID-19 comfort hearts). Pine Cones, Farmyard Goats and Mushrooms pushed the usual cats, dinosaurs, succulents etc further down in the PlanetJune charts – a bit of a surprise there, but I’m very happy to see different patterns gaining in popularity and joining the bestseller ranks.

2020 bestselling PlanetJune crochet patterns

And, once my brain was back to firing on all cylinders, I managed to complete a massive behind-the-scenes project last month that had been on hold since March: a much-needed upgrade of my shop. Although the difference won’t be visible to you, I started over and rebuilt the entire shop from scratch with the latest code updates to keep it safe and secure. It was a lot of work, but if the shop code is clean and simple, it’ll be easier to keep things updated and make improvements in the future.

Personal Report

I decided at the start of 2020 to officially ‘retire’ from being an amateur wildlife photographer. That seems like a shame on the face of it, but the pressure of having to take my camera everywhere and try to get ‘good’ photos had started to spoil the relaxation of appreciating the environment and enjoying the wildlife I see. Now I can just enjoy time outside in nature with Dave and Maggie without being stuck behind a lens or worried that my photos won’t be good enough – just appreciating it in the moment is enough.

My biggest personal breakthrough in 2020 was to finally seek therapy for my PTSD and anxiety disorder. After many months of counselling and learning CBT techniques, I not only feel much calmer, but also better equipped to deal with new stressful situations whenever they come up.

And my biggest joy of 2020 (and one with the most serendipitous timing, just before the lockdowns etc began) was adopting my rescue dog Maggie at the end of January. As a first time dog mama, I’d been so nervous to take this step, but it only took one look at her to know that she and I were meant to be together.

contented Maggie dog

I’ve already written about how much she’s helping me, and I’ve devoted a lot of time this year to helping her blossom: from a timid, neglected, skin-and-bone scrap who didn’t know any commands and cried whenever I left her side, to a happy, healthy pup who recognizes dozens of words and knows she’s part of a loving forever family. That’s my most important and rewarding accomplishment of the year.

Looking Forward

I have so many things I want to make: videos! ebooks! new designs! new techniques! new products! but even in writing this list I realise that sounds exhausting.

I know I’m not capable of doing things by halves, so there’s no such thing as a “quick” video or blog post for me – it just doesn’t fit with my detail-oriented personality, for better or worse. And I know my energy reserves are limited; pushing myself today just means I’ll be too tired to do anything tomorrow, so I have to try to respect my limits.

So I’m looking to be strategic with where I spend my energy. I’m trying to make it easier for people to find PlanetJune and discover my huge back catalogue of treasures. If that could completely support me financially on an ongoing basis, like a successful author living on the royalties on their past books, it’d give me the time to follow my inspiration without any pressure.

Last year, my wishes were for acceptance of the things I can’t control (like my fatigue problem, and the bigger problems in the world), appreciation for all the good stuff in my life (I’m so fortunate in many ways), and inspiration (a new decade is a perfect time to try new things, and I have a feeling I have some great ideas coming!)

And, although I couldn’t have guessed the global challenges the year would present, those goals turned out to be an excellent 2020 coping strategy, and, in re-reading them, I realize that they still ring completely true for me today.

So, my wishes for 2021 are for:

  • acceptance of the things I can’t control
  • appreciation of all the good things in my life, no matter how small
  • inspiration to keep moving forwards and trying new things

For me, these are calm, centred guiding principles to live by. They stood me in good stead last year, and I want to keep going on this path and keep making slow, steady progress this year.

If my wishes sound good to you too, I hope you’ll also be able to find a way to apply them to your life this year. I wish you a very Happy New Year, and a safe and happy 2021!

Comments (8)

  • Quick Links: Crochet

    navigation: arrow

    buy crochet patterns and accessories from my online store

    'Everyday Crochet' and 'The Essential Guide to Amigurumi' crochet books by June Gilbank

    Crochet video tutorials and step-by-step photo tutorials

    Free PlanetJune crochet patterns

    Frequently Asked Questions

    Quick Links: Crafts

    navigation: arrow

    Punchneedle Embroidery information, ebook & patterns

    Papercraft ebook & tutorials

    Free PlanetJune craft projects & tutorials

  • Blog Post Categories

  • Blog Archives

  • Welcome to PlanetJune!

    June Gilbank

    Hi, I'm June. Welcome to my world of nature-inspired crochet and crafting. I hope you enjoy your visit!

    If you'd like to get in touch, you can contact me here.
    crocheted Canadian flag by PlanetJune
  • A fanned-out pile of the books Everyday Crochet and The Essential Guide to Amigurumi, with text 'The answers to all your crochet questions at your fingertips - find out more'
  • Support PlanetJune!

    Want to say thanks? You can send me money in seconds at paypal.me/planetjune (over $20) or paypal.me/planetjune2 (under $20) or send me a donation through my shop.

    Or simply click through from my links before you shop at Amazon, Etsy, KnitPicks, LoveCrafts or Crochet.com, and I'll make a small commission on your purchase, at no cost to you! Start here:

    ♥ Support PlanetJune ♥

    Tip: This link is also in the footer of every page!

    Thank you so much for your support!