PlanetJune Craft Blog

Latest news and updates from June

Archive for February, 2020

PlanetJune Stories: crochet with kids

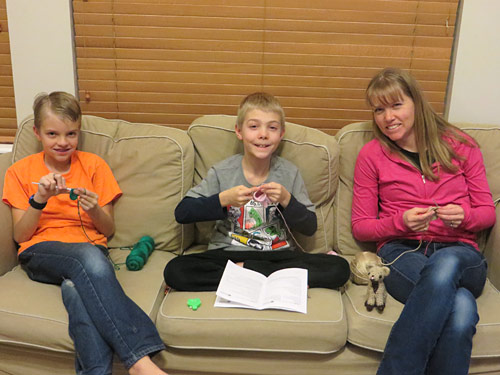
Today’s PlanetJune Story is a follow-up from last month’s story of 10-year old Seth and his crocheted dinosaurs. Seth’s mom Amy and brother Benjamin have contributed this month, to tell us about their family’s crochet time, and Amy shares her tips for teaching kids to crochet.

I think she knows what she’s talking about – the crochet force is strong in this family 😉

PlanetJune Stories: crochet with kids
Benjamin, Seth and Amy crocheting together!

And now over to Amy and Benjamin:


Amy’s Story

I learned to crochet twenty years ago, but after making one baby blanket, I quit. I didn’t like the tedium of doing the same stitch endlessly back and forth.

When we gave my son Seth a crochet kit for Christmas last year, I knew I would have to learn in order to help him. We spent two days straight of crocheting, unpicking, recrocheting, counting, and celebrating anytime we miraculously had the correct number of stitches at the end of a round. We laugh at Seth’s lion now, crocheted wrong-side out with messy seams, but we love him for the victory he represents.

Before too long, I was in love with crocheting as much as Seth was. I started making critters in random colors to use up whatever yarn I had. Making amigurumi was much more enjoyable than the boring baby blanket of my youth.

PlanetJune Stories: crochet with kids
Amy’s horses

By April, my oldest son wanted to learn to crochet as well, and my youngest two sons wanted me to teach them how to chain.

Now, a neighbor comes over weekly for a crochet party, and several neighborhood kids have asked us to teach them. For me, crocheting began as an attempt to help my son and use up a few random balls of yarn. Crochet has become a full-blown hobby, not just for myself, but for my children and our friends too.

Benjamin’s Story

Hi, I’m Benjamin, age twelve, and I love to crochet!

When my brother started crocheting, I saw the cute little animals he made and wanted to make some too! He and my mom taught me how. Then one day, my mom bought the horse pattern from PlanetJune, and made two cute little horses for my grandma. When I saw the finished result, I wanted to make my own horse, modeled after Black Beauty from the book.

PlanetJune Stories: crochet with kids
Benjamin with his Black Beauty – good work, Benjamin!

Recently, I showed some of my critters to a neighbor and she wanted to buy one from me. She said she wanted a sloth, but it was tricky to find a good pattern until I looked at PlanetJune’s sloth. I loved the cute face markings, and the ability to hang! It was so cute I almost didn’t want to part with it!

I think my favorite part of PlanetJune is the tutorials. The tutorial about sewing pieces of animals together really helped my critters go from good to excellent! I have also helped some people learn how to crochet, and the magic ring tutorial helps them remember how to do it when they get home!

PlanetJune Stories: crochet with kids
Benjamin with his Black Beauty and Sloth, and Seth with some of his AmiCats

Amy’s tips for teaching kids how to crochet

  1. Watch the tutorials on PlanetJune. There are tons of tutorials out there, but you may as well start with the best.
  2. Choose a pattern your child really wants to make… the motivation is crucial. My boys especially like PlanetJune patterns because they are realistic, and I like them because they have pictures and very clear instructions so that the kids can easily follow them. If you are going to spend the time making a critter, you want to be very sure that the pattern is a good one. June has also been super helpful and responded quickly whenever we have had a question. [June: I’m so happy to hear that, Amy!]
  3. Don’t be afraid to do the hard parts for your children when they are starting out. You won’t cripple them. When Seth started, I usually did the magic ring and the first few rounds for him. When he would get too overwhelmed or if we had to undo stitches, I would fix what was broken. This kept his enthusiasm high, and before I knew it, he surprised me by making his first magic ring. I don’t think I have crocheted anything for him since, even bobble stitches, picots and back post single crochet.

PlanetJune Stories: crochet with kids
Even Amy’s youngest sons are learning how to chain

Amy and sons’ life lessons learned from crochet

  1. Everyone has a different way of doing things. It’s okay to do what you like, and let others do what they like.
  2. Mixing our own creativity with what we learn from others is fun!
  3. Patience and work are necessary to create something you like. Innovation and flexibility are too, because mom won’t buy a whole skein of yarn for just a few stitches. Sometimes you just have to work with what you have.
  4. Self-compassion is important, especially when your item doesn’t look like the picture in the pattern.
  5. Most things don’t look exactly like the picture, but they can still look fantastic in their own way.
  6. Taking the time to fix a mistake, even very painful ones, is worth the effort.
  7. Mom can help fix a lot of mistakes, and it is okay to ask for help.
  8. Step away and take a deep breath (or many) before trying to fix any mistakes. A calm brain is much more effective at problem solving.
  9. Everyone makes mistakes and has to try again sometimes… even mom.
  10. Everyone has something to offer the world… even kids.

PlanetJune Stories: crochet with kids
It’s a happy family that crochets together…


(Back to me, June, again!)

Amy has shared such good advice here – and those life lessons also apply to much more than just crocheting with kids! I hope this may motivate some of you to see if your kids (or other children you know) might like to have a go at our favourite hobby..? Even crocheting a simple chain from a colourful yarn can provide hours of fun, plus it builds hand-eye coordination and dexterity, and encourages creativity.

Thank you so much, Amy, Benjamin (and Seth), for sharing your story with us today. Aren’t they an inspiring and talented family?
Please leave them a comment if you’ve enjoyed this post!

Do you have a PlanetJune Story you’d like to share? I’d love to hear it! Please email your story to june@planetjune.com, together with one or more high quality photos showing what you’ve made from PlanetJune patterns. If I choose your story to feature here on the blog, I’ll send you your choice of pattern from my shop to say thank you!


PS – If you’re looking for the PlanetJune patterns featured above, here are the links to the patterns in my shop: Horse, Sloth, AmiCats 🙂

Comments (9)

fixing a dog sweater with crochet

Today is the 3-week anniversary of adopting my adorable dog Maggie, and I’m more sure than ever that we made the right decision! I’m so happy I found such a special little lamb – she’s so small and sweet, and she loves me so much. And she’s such a clever girl – our training is progressing well, and she’s learning new things practically every day!

We’ve been visiting all the local pet stores to look for small toys and training treats and other essentials:

maggie dog

Now, it’s pretty cold in Canada and Maggie doesn’t have a lot of fur, so getting a sweater immediately was crucial. I bought her this cute little argyle sweater in her favourite colours – pink and grey – and doesn’t she look adorable in it?!

fixing an unravelling dog sweater with crochet

But, less than a week after buying it, it looked more like this:

fixing an unravelling dog sweater with crochet

Not only was it coming apart at the seams, but the knitting was actually unravelling at the exposed edges:

fixing an unravelling dog sweater with crochet

This is the first and last time I buy a dog sweater – now I know how a dog sweater works and have this well-fitting example to take measurements from, I’ll be able to crochet or knit all her sweaters in future (yay!)

But, I wasn’t about to let this cute sweater go to waste quite so soon. I found a perfect pink baby yarn in my stash (I knew I’d find a use for it one day!), grabbed a crochet hook, and got to work.

I passed the yarn end through all the loose knitted loops I could see, to prevent further runs, and then single crocheted over the last couple of knitted rows to bind all the loose ends in place. I added a ch 1 between each sc to add a little stretch to my new edging, which makes the edging look very slightly ruffled, but it worked like a charm:

fixing an unravelling dog sweater with crochet

In a few minutes, the sweater was saved! The new leg edgings don’t show much in use, but occasionally you can see a flash of pink crochet, and it looks pretty stylish, and not obviously like a repair.

fixing an unravelling dog sweater with crochet

The yarn colour matches incredibly well, and, most importantly, Maggie is happy to have her sweater back so she can stay cosy while we’re exploring the neighbourhood!

fixing an unravelling dog sweater with crochet

This just goes to show how most mass-market clothes pale in comparison to the care and quality of handmade. I doubt I’ll be knitting argyle sweaters for Maggie, but I’m sure she’ll be equally happy with single-coloured handmade sweaters in future, don’t you think? 🙂

Comments (14)

first machine-knitted sweater!

This is my first FO of the year, and I’m completely thrilled by it!

machine/hand knitted periwinkle sweater by planetjune

It’s a combination of machine and hand knitting, and to explain how that came about, let’s start with some backstory…

Despite having filled my wardrobe with handknits, I haven’t finished knitting a sweater for over a year now. With hindsight, I think the reason is that knitting kept me going through the worst of my PTSD. When I couldn’t do anything else, I could still move my needles, loop my yarn, and make one neat stitch after another to pass the time in a constructive way. Knitting became my therapy, and it did that job so well that it ruined knitting for me as a fun hobby.

I’d started on a simple project that should have been easy and fun – remaking my simplest sweater design in a different colour (the lovely periwinkle you see above). I got most of the way through the sleeves, and then… I stalled.

I put the project away and hadn’t been tempted to knit another sweater for ages, until I bought my knitting machine. I used the rag hems I told you about in my previous post as guides to try to match my gauge to the sleeves I’d already knitted by hand, and then got started trying to machine knit the missing parts (the front and back) of the sweater.

The back went so well that I got a little too enthusiastic (or too confident!) when I knitted the front – I got over-tired and didn’t notice I’d skipped the whole section from waist to underarms!

It’s hard to see what’s going on while you’re knitting, as the work is weighted down and completely stretched out of shape, so I didn’t notice my mistake until I’d finished and laid the sweater front out flat…

machine/hand knitted periwinkle sweater by planetjune

Bet you’ve never seen a sweater with this shape before! (Ignore the green rows at the bottom – those are my rag hem and won’t be part of the final sweater.)

Haha! Disaster! I fed a lifeline (the yellow yarn across the photo above) through the row below the point where I went wrong – there should be an extra 32 rows of knitting at that point!

But I wasn’t too discouraged by my mistake – it was good practice for following my at-the-same-time armhole decreases and neck decreases, and I was encouraged by how neat the stitches looked.

I frogged all the way back to the lifeline, hooked it all back onto the machine, and tried again (without making any stupid mistakes this time).

Once I’d finished, it was just a matter of seaming the front, back and sleeves together, then picking up stitches to knit the bottom band and neckband by hand. And it seems I’ve got my knitting mojo back! I really enjoyed hand-knitting the ribbing so I could see how the sweater would turn out.

machine/hand knitted periwinkle sweater by planetjune

There are some minor flaws in my knitting, where the yarn must have caught on something and so the tension of the whole row is too tight, but I’m delighted with this as my first attempt. The gauge is exactly what I was aiming for, and it’s a perfectly cosy sweater for this time of year!

I’m so impressed with how well the stitches match between my hand knit sleeves and the machine knit body – if you didn’t know, would you be even able to tell there was a difference?!

machine/hand knitted periwinkle sweater by planetjune

Concept proven, and now I’m back in the knitting game with lots of ideas for what to knit next with my combination of machine- and hand-knitting – I think it’s the best of both worlds. So exciting!

Comments (15)

  • Quick Links: Crochet

    navigation: arrow

    buy crochet patterns and accessories from my online store

    'Everyday Crochet' and 'The Essential Guide to Amigurumi' crochet books by June Gilbank

    Crochet video tutorials and step-by-step photo tutorials

    Free PlanetJune crochet patterns

    Frequently Asked Questions

    Quick Links: Crafts

    navigation: arrow

    Punchneedle Embroidery information, ebook & patterns

    Papercraft ebook & tutorials

    Free PlanetJune craft projects & tutorials

  • Blog Post Categories

  • Blog Archives

  • Welcome to PlanetJune!

    June Gilbank

    Hi, I'm June. Welcome to my world of nature-inspired crochet and crafting. I hope you enjoy your visit!

    If you'd like to get in touch, you can contact me here.
    crocheted Canadian flag by PlanetJune
  • A fanned-out pile of the books Everyday Crochet and The Essential Guide to Amigurumi, with text 'The answers to all your crochet questions at your fingertips - find out more'
  • Support PlanetJune!

    Want to say thanks? You can send me money in seconds at paypal.me/planetjune (over $20) or paypal.me/planetjune2 (under $20) or send me a donation through my shop.

    Or simply click through from my links before you shop at Amazon, Etsy, KnitPicks, LoveCrafts or Crochet.com, and I'll make a small commission on your purchase, at no cost to you! Start here:

    ♥ Support PlanetJune ♥

    Tip: This link is also in the footer of every page!

    Thank you so much for your support!