I’ve been growing my own sprouts for about a year now, and I thought now would be the perfect time to share the process with you. Even if it’s not practical to get out to buy fresh fruit and vegetables, you can still have nutrient-packed fresh and crunchy sprouts every day.
(And it’d be a great project for kids – it’s so fun to watch the sprouts grow over a few days and then be ready to eat!)
This is my almost-daily lunch:
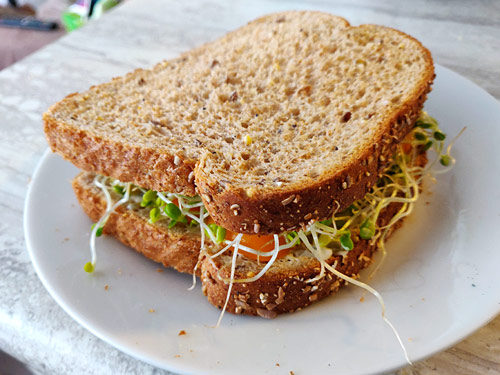
Mmm, yummy! The act of germinating the seed unlocks all the nutrients contained within it, and the resulting sprout gives you a boost of fresh plant goodness.
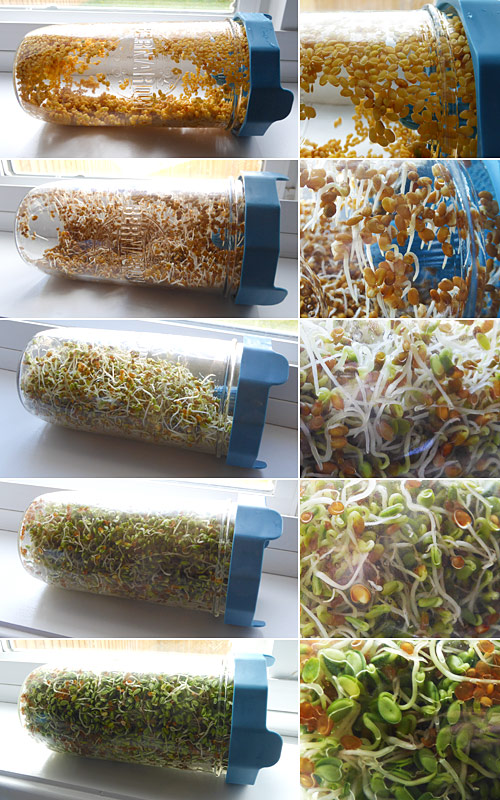
And look how much fun it is to watch the seeds sprout – from seed to food in just 5 days!
My Favourite Sprouts
There are lots of seeds you can sprout, depending on what you enjoy. I started out with broccoli sprouts, because they have loads of health benefits, but I found their flavour overpowering unless I paired it with a spicy condiment in my sandwich (mustard or horseradish are perfect choices).
After some experimentation, I decided on my favourite sprouts – these would both be a great starting point if you’d like to make your own, as they are easy to grow and have a mild flavour that you can easily add to your food without overwhelming it.
Clover
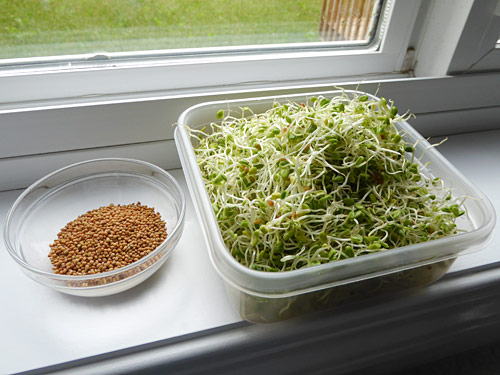
Clover sprouts have a mild, fresh flavour. They are perfect in a sandwich or wrap, added to salads, or anywhere else you might use lettuce. I also like to pile them on top of burgers.
(If you can’t find clover sprouting seeds, I hear that alfalfa is similar.)
Mung Beans (Bean Sprouts)
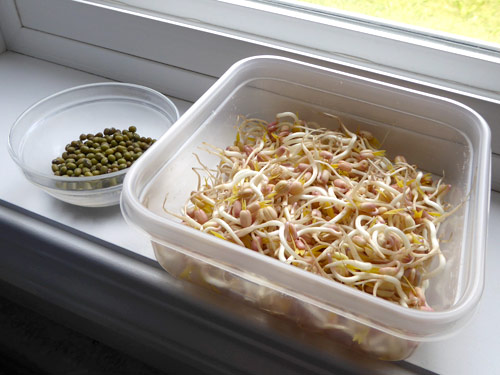
I’m sure you’re familiar with bean sprouts, most commonly used in Chinese cooking. Growing them at home in a jar means you don’t end up with the long straight sprouts you find in the supermarket, but they taste just as good and it’s incredibly easy to toss a handful into your stir fries and sauces when you’re about to serve them, and add a tasty crunch to your dish.
Supplies
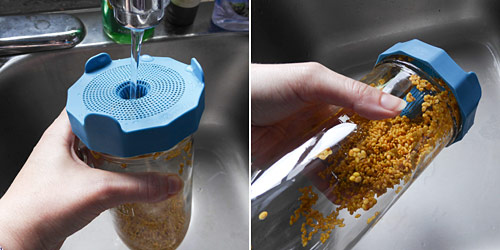
To get started, you’ll need some seeds, a wide-mouthed jar and some sort of screen to cover the top of the jar with.
I started my sprouting adventures with the no-cost method: a well-cleaned pasta sauce jar with a doubled layer of cheesecloth across the top, held in place with a rubber band.
Once I knew I’d be keeping this hobby going, I invested in a set of wide-mouthed mason jars and screw-on sprouting lids (there are lots of options – if you buy some, just make sure the width of the top is the same as the mouth of your jars.)
And then, you’ll need some seeds! You can buy these from health food stores or online. Just make sure you search for sprouting seeds that are intended for consumption – regular seeds that are intended to be planted in the ground to grow into plants are usually treated with a fungicide, so the seeds are not edible.
Get Sprouting!
Here are my notes for sprouting clover. The process is the same for other sprouts; the only differences would be a) how much seed to use, b) how long to soak the seed for, and c) how many days until the sprouts are ready.
But these instructions will give you an idea of how easy it is to grow your own sprouts…
- Measure 2 tbsp of seed into the jar, then screw on the lid.
- Fill with water and soak for 8-12 hours.
- Tip out the soaking water.
- Without removing the lid, add water, swirl the seeds around and tip out the water.
- Repeat step 4, making sure to shake out all the water so the seeds won’t be sitting in water.
- Shake the seeds down away from the jar lid so air can circulate.
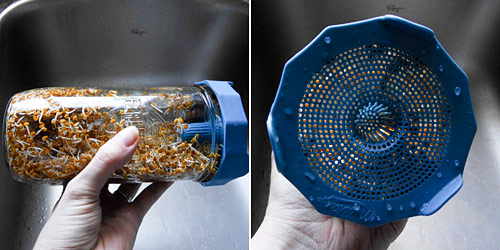
- Lay the jar on its side, out of direct sunlight.
- Every morning and evening, repeat steps 4-7.
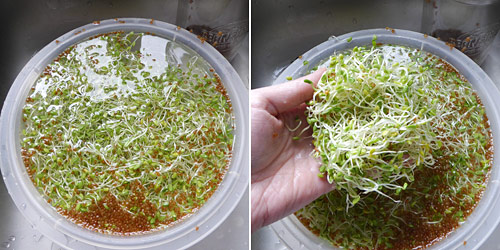
- When the jar is fairly full (3-5 days) and the sprouts have leaves, leave the jar on a sunny windowsill for a day for the leaves to green up.
- Tip the sprouts into a large bowl and fill it with water.
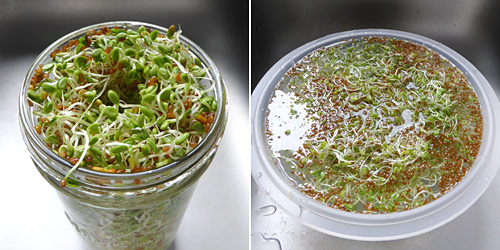
- Swish the sprouts around so the hulls float to the top.
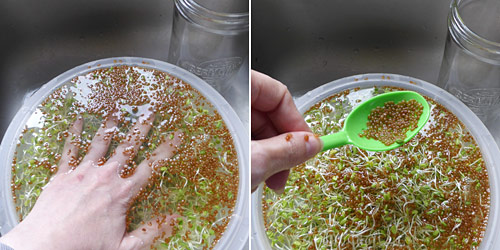
- Skim off the hulls or push them to the sides of the bowl, then grab a handful of sprouts and pull them out of the bowl.
- Place into a salad spinner or onto a kitchen towel-covered plate.
- Repeat to get all the rest of the sprouts out (leaving a few hulls with them is fine).
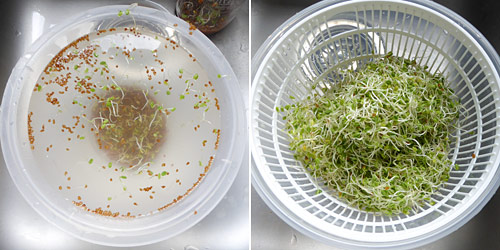
- Spin the sprouts to dry them, or leave them on the counter for a couple of hours to dry out.
- Put the sprouts in a plastic container and refrigerate for up to a week.
- Enjoy!
I hope this has inspired you to think about growing your own fresh sprouts!
And, if you’ve tried growing sprouting seeds before, which varieties are your favourites? I’d love to try some different seeds – do let me know your recommendations in the comments below…


Jenny said
I’ll second the chickpeas! I once accidentally sprouted some while we were travelling…the method was totally not probably correct (they just soaked in water in our pack for 2 days), but I ate one and didn’t get sick, then ate several and still didn’t get sick, so we had some! I don’t remember if we finished them or if we gave up on them…I think we gave up on them because after another couple days, they went sour. But with rrfeigeration and better sprouting technique, I’m sure they’d be great!
June said
I’m convinced! I’ve just ordered some dried chickpeas to sprout.
(I’ve also just found a recipe for chickpea brownies, so I may have to try making sprouted chickpea brownies – sprouting the chickpeas will negate all the calories from the chocolate, right? :wink:)
Ladka said
I grew sprouts decades ago but stopped cause I was the only one to like them in a family of five. I remember I liked ckickpeas sprouts best.
June said
Ooh, interesting, Ladka! I hadn’t thought of trying chickpeas. (I did try sprouting green peas but I didn’t like the flavour of the raw pea.) Thanks for the suggestion!
Miriam P. said
Wow, does this post bring back memories!! I remember friends and family doing this in the 1970s and 1980s. So great to see!!
June said
That’s so cool, Miriam! I’d heard of alfalfa sprouts as a ‘health food’ in the 80s, and that didn’t sound very appealing to me as a kid… Now I know better – just because it’s healthy doesn’t mean it’s not also delicious! I think I’ll have to try sprouting some alfalfa, to finally prove 80s-June wrong once and for all 🙂
Shas Cho said
Thank you for posting this sprouting tutorial. We have been sprouting since the 1970s (though you may have nudged us to finally try some of the more modern lids),
but this article emphasizes again some of the attributes that we admire in you. Your tutorials are always interesting and accessible, and everything you publish is wholesome and helpful . You really are one of the truly positive voices in our increasingly stressful, chaotic world .
Namaste, dear June.
Thank you for sharing the bright light of yourself .
Shas
June said
Wow, thank you so much for posting this message, Shas – it means a lot to me. I’m finding life quite stressful and overwhelming at the moment – as I’m sure most people are – so I’m trying to add a little light to the world in my own way. I’m so happy to know it’s appreciated! That encourages me to keep moving forwards (at whatever pace I can manage right now – slow and steady is better than nothing!)
MJ said
awesome post! I’ve often thought about growing my own sprouts, which my mom used to do when I was a little kid. I believe she grew alfalfa sprouts … not sure though.
I’ll definitely have to give this a go.
June said
Yay! I think alfalfa was the most popular sprout of the 70s and 80s – it’s definitely the only one I’d heard of prior to starting on this adventure myself.
Susan said
Thank You, June, for another Awesome tutorial! I believe I’ll give growing sprouts a try! I do Love sprouts but am always leary about purchasing them to consume uncooked. Growing my own will be the perfect option!
June said
Yes, there can be problems with bacterial growth in storebought sprouts, but you don’t need to worry if you grow your own and follow the rinsing process so bacteria don’t have a chance to build up – you know they are fresh and clean and safe to eat! I hope you do give it a go :blush: