Thank you to everyone who requested a shrinkydinks ring tutorial! This tutorial is an experimental method, not an exact science – you should have fun playing with it…
UPDATE: Since posting this very popular tutorial in 2008, I’ve answered every question imaginable in the comments of this post. If you have questions, you’re welcome to trawl back through the hundreds of comments to find my answers, or, to make things easier, I’ve compiled a 3-page shrinky rings FAQ, which is available exclusively when you donate $2 or more towards my tutorial (this also entitles you to further help from me by email, should you need it). Please see the end of this post for more details about this policy 🙂
Please note: if you’ve come here via the lovely bird ‘ring’ picture on Pinterest, read this post to answer your questions.
This tutorial is Donationware – the instructions are available for free, but if you like it please consider sending me a donation to show your appreciation:
Send me a donation and receive the easy-to-print PDF version of the tutorial as a thank you! The PDF also includes a bonus 3-page FAQ compiled from all the tips I’ve shared in the comments since creating this tutorial.
Donations of any size are much appreciated. Just add the amount you wish to donate, and, once you have checked out and paid, your PDF will instantly be available to download from your PlanetJune account.
The complete instructions are available below, regardless of whether or not you choose to pay for them 🙂
This is a PlanetJune original tutorial. Please do not share or reproduce this tutorial; instead post a link to www.planetjune.com/shrinkydinks
I’ll answer some questions from the comments on my previous shrinky rings post before I get started, and add more hints and tips throughout the tutorial.
Shrink plastic, for the uninitiated, was originally marketed as a toy for kids. It starts life thin and flexible. You draw on it and then bake it in the oven, and it shrinks to become about 1/3 of the starting size, but 9 times as thick. This thickness makes it strong and hard. It will not bend after baking, so if you try to pull your ring open, or stand on it, it may snap, but it is strong enough to withstand regular use as a ring.
The last step (bending the ring into shape) is the most difficult, so I highly recommend that 1) you read through all the instructions before starting, and 2) practice on a blank piece of shrink plastic so you can get a feel for it and test your size and bending technique before putting too much effort into your design!
Full tutorial instructions are after the jump…
1. Find your shrink plastic
I use Shrinky Dinks Frosted Ruff N’ Ready, which accepts rubber stamped images beautifully. Any transparent shrink plastic will work. If you use the coloured opaque shrink plastic, you would have to decorate the outside of your ring instead of the inside. You could also use the inkjet printable type of shrink plastic.
An alternative source for shrinkable plastic is #6 plastic, commonly used in food packaging. Look for the ‘6’ recycling symbol to make sure you’re using the right type! You’ll have to sand one side before use, as the plastic needs a rough (not shiny) surface so the ink won’t smudge and rub off.
Note: If you are looking for sources, search for “shrink plastic” (generic term) not “shrinkydinks” (brand name) and you may have more luck. For example, if you’re in the UK, googling ‘Shrink Plastic UK’ (without the quotes) will give you lots of online stores that sell it. You’re looking for large sheets of it, not pre-cut shapes.
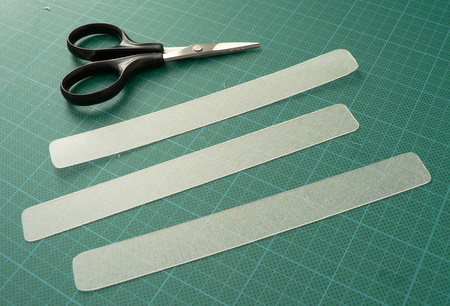
2. Measure and cut to size
Note: Different brand of shrink plastic may shrink by different amounts, so you might want to try baking a plain test piece to make sure you’ve got the size right before spending time on decoration.
Measure: The best method to find the right length for your strip of plastic is by trial and error.
- A: Simple Method: Use my measurements for your first attempt, then modify the length if they turn out too small or big! My rings fit small ladies’ fingers, and are 6mm (1/4″) tall.
My starting dimensions were 14.2 x 1.6cm (5 5/8 x 5/8″). - B: Attempt to Calculate Size: If you know your ring size, you could calculate the desired circumference of your ring with a ring size converter. (The circumference would be equal to the length of your strip of plastic after shrinking.) However, I found that, although Shrinkydinks is supposed to shrink by ~3 times, my strips needed to be ~10% longer than the length I calculated in this way.
This isn’t an exact science. I recommend you just use your best guess to make a test ring; you’ll soon find out if your strip should have been longer or shorter!
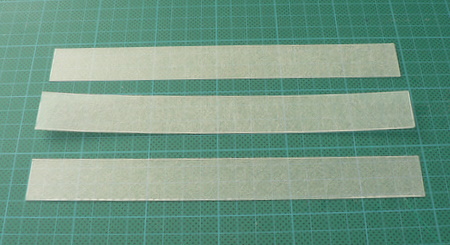
Cut to Size: To cut the plastic, I like to use a guillotine (paper cutter) to get straight lines, but it’s probably not good for the cutter blade (I use an old cutter blade). You could also use an xacto knife and metal ruler, or just cut the plastic with scissors.
The corners can be very sharp, so I like to round them off slightly with scissors before baking (don’t worry if you forget this step; you can file or sand them down after baking).
3. Decorate shrink plastic
Follow the decorating instructions that come with your shrink plastic. Here are some ideas:
- Rubber stamps + alcohol-based permanent inks (be warned: other types of stamp ink will smudge)
- Fine-point permanent marker (e.g. Sharpie) to draw or trace your designs
- Coloured pencils (use in combination with the above to add colour)
- Print designs directly onto your plastic (inkjet shrink plastic ONLY)
If you’re using the frosted type, remember to decorate the rough (frosted) side. For other types, consult your instructions.
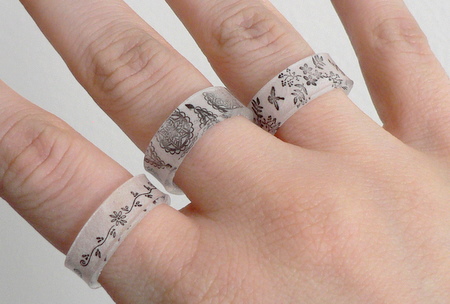
I used peg stamps to decorate my first rings. The designs are only 1cm tall so fit my rings perfectly. Below I have also tried some other rubber stamps:
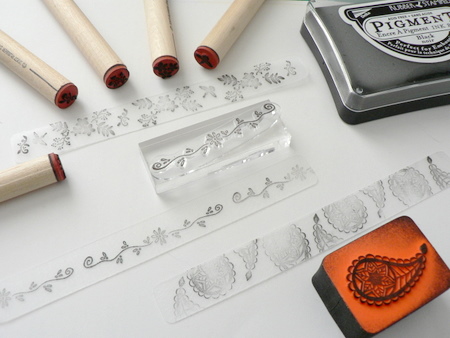
Don’t forget to let your ink dry before adding any coloured pencil embellishments, and remember that colours will become more saturated and vibrant after baking, so less is more in this case.
4. Find a suitable form to bend plastic around
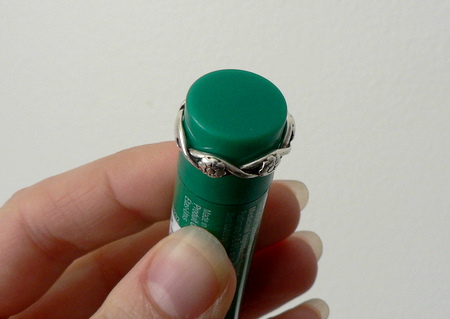
Here’s a useful tip to find an object of the right size to create your ring: take an existing ring, and try to slip it over various thin cylindrical household objects, e.g. marker pen barrel, wooden spoon handle, lip balm tube. You are looking for an object that is a tight fit inside your ring. If you don’t have anything suitable, you could buy a short length of wooden dowel of the right diameter. Your object will come into contact with hot plastic, so don’t use any treasured possessions for this step.
5. Shrink your plastic
This is the fun part!
Preheat a toaster oven or conventional oven to the temperature specified on your packaging. Make sure you are in a well-ventilated area so any fumes don’t build up.
Note: Please read the instructions below all the way to the end before baking your ring – the shaping happens very quickly after baking so you need to be ready…
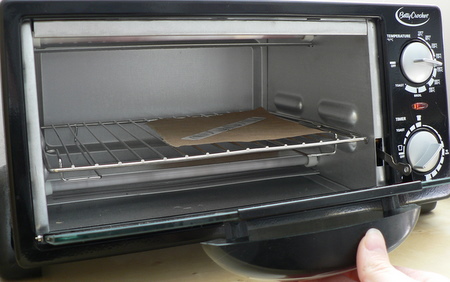
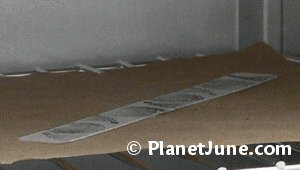
Place your strip (decorated side up) on a piece of brown paper on an oven tray, and put it in the oven. Keep watching… this is where the magic happens. Your strip will begin to curl up and wiggle about as some parts heat more quickly than others and so begin to shrink more quickly. Don’t worry if it looks like it’s stuck together – in my experience it always flattens out as it continues to shrink. When it has finished shrinking, leave it in the oven for another 30 seconds to heat through evenly.
Here’s an animation of the shrinking process:
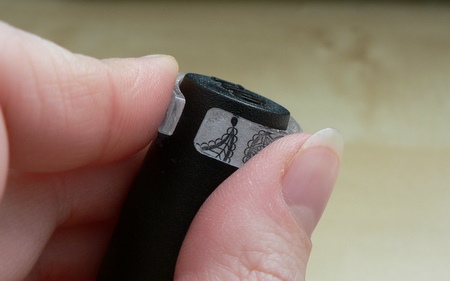
6. Shape your ring
When your strip comes out of the oven, you’ll have to work quickly – you only have about 10 seconds before it has cooled and becomes rigid. Disclaimer: to protect your hands from the hot plastic, you should probably wear a thin glove (for more control) or an oven mitt (for better protection against the heat) but I don’t bother – it is very hot, but the plastic doesn’t stay hot for long enough to burn my skin.
Remove the brown paper from the oven. Wait for about 2 seconds (so it’s not too hot to touch), then carefully wrap the strip around your forming tool, with your decorated side facing in towards the tool. Hold it in place for a few seconds until it becomes cool and rigid.
I’m not going to lie, this step is tricky. You really do have to work quickly, and not make any mistakes, otherwise you won’t have time to wrap the entire strip around your object before it cools. But don’t lose hope! There is a magic fix for a badly-formed ring like the one below…
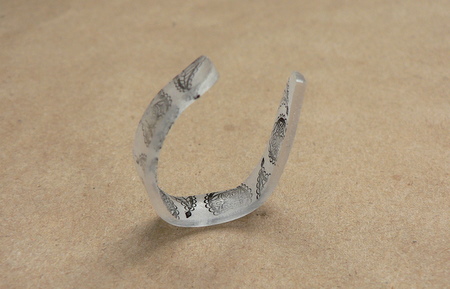
Pop your misshapen ring back into the oven on the brown paper, balancing it upright on its curved surface so the join is at the top (as in the picture above). After a minute or so, the plastic will relax back out of its shape, and revert back into a flat strip… I told you this stuff was magic! Let it heat through for about 20-30 seconds, then try to form the ring around your tool again.
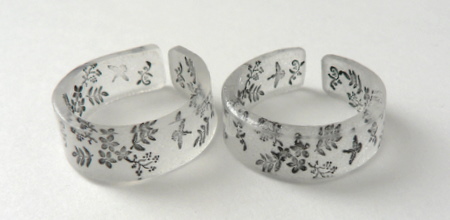
Left: unsanded edges; Right: sanded edges
That’s it! You can sand down the edges to give a smoother finish, but this may partially obscure your design. You could also paint the edges after forming for a different effect. For more durability of your design, use a clear coat to carefully varnish the inside of the ring (one coat should be enough).
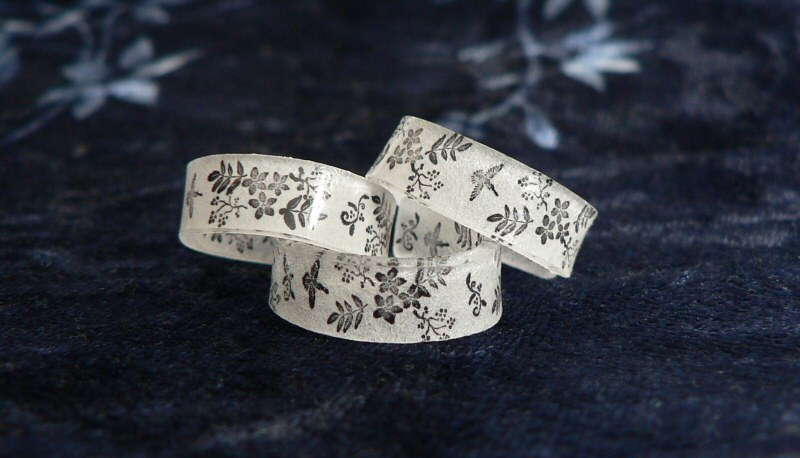
You can make matching earrings, charm bracelets or necklace pendants – just punch holes for the jewellery findings before shrinking the plastic, and remember that the holes will also shrink, so don’t worry that they’ll be too large.
Enjoy your new jewellery!
Please note: if you’ve donated for this tutorial and read the included 3-page FAQ, and still have problems or questions relating to the instructions in my tutorial, you’re very welcome to email me for further help; please include your order number in your email.
I do not have time to respond to any other questions – if you look back through my many past answers to questions left in the comments here, you’ll probably find the answer anyway, or you can just donate $2 or more and receive the PDF version of this tutorial together with a 3-page FAQ which should answer any remaining questions 🙂
Happy shrinky ring making!
Please leave me a comment if you enjoyed this tutorial, and consider leaving me a donation. Thanks!


starr said
My jaw is hanging open from how beautiful these rings are.. they look like frosted glass! You rock June 😀
Anita said
This is wonderful! I love shrinky dink, and you make the rings look really simple. I’m going to do a ring this weekend!
Rachel said
wooowwww….. I’ve had about a zillion sheets of this stuff for YEARS that my grandmother gave to me when this stuff was real popular, and all I ever made was kiddy stuff. I didn’t know you could make something so elegant and simple with it! I’m definitely going to try this out.
Heidi said
I, too, found your instructions after seeing the beauties on Etsy. Thanks so much for posting them! I had the frosted plastic in my drawer and stamping fabric paint that is well over 10 years old, but it worked fine. I did have an issue with the piece turning on its side while baking. I’ll have to work on that. I tried resting the wooden spoon handle over the piece, but even though it doesn’t touch, the part under the handle doesn’t heat as fast.
I baked mine on baking parchment. When it’s done, you can use the paper to start wrapping around your dowel or form. Just make sure you complete with the ends wrapped and trapped under the dowel so they end up flattened and level.
This is a great reason to haul out those old tiny stamps! Thanks again.
June said
nat: it should be safe to use the oven for food after shrinking your plastic. Just make sure the plastic only touches the brown paper – don’t put it directly on a tray you will then put food on.
afrolunatika: there is a special type of shrink plastic you can buy that is safe for putting through your printer. The packet will say if it is the right type. This type has a special coating that allow the inkjet ink to stick to the shrinkydinks – if you use regular shrinkydinks, the ink will smudge.
afrolunatika said
hello friends well a saw this tutorial. i wanna put artwork in the shrink using the printer what paper i need to use clear or translucid? because i print a artwork in clear shrink and the paper dont absorb the tint of the printer what i cant do to put image of my computer in shrink? (sorry for my english)
nat said
Cool!thanks for your tutorial. im going to try that soon.
do you use your normal toaster oven? will it be safe to
use (for food) after baking those plastic?
elowezil said
Wonderful tutorial and your results are awesome! Thanks so much for sharing the instructions. Am off to play …!
Hopie said
Hi! Just saw your post on acrylic glaze sealer – thanks again for the great tutorial.
Hopie said
Hi There! Thanks for sharing your tutorial!
What a great little idea there – I do have a query:
Do you glaze your work?
If yes, before or after you have baked?
Super stuff – thanks again!
Hopie
June said
Potiron, some of my rings get closer to joining than others – ideally you want the ends to just about touch but not overlap, but as long as the gap is quite small, it’s not a problem to have a gap. You can wear the ring with the gap on the inside and it looks fine and isn’t uncomfortable.
It’s all a bit of a trial and error method – it gets easier with practice!
potiron said
I just tried my first ring -not easy calculating the correct lengths….
Anyway, your rings never join, do they???? There’s a space??? or am I understanding this wrong
Thanks for your help,
Potiron in France
potiron said
Thank you for your idea!!! I love shrink plastic and am always looking for ways to do better than the little stuff I’ve done and not worth showing!!!
The tricky part will be to find something my finger size (as I have very small fingers)
I’m going to look up your other tutorials. I’m happy I found your blog!!!
Take care
June said
Riechan, I can’t tell you the exact measurement you’ll need, as different brands shrink by different amounts, plus they shrink a slightly different amount in each direction. I would say start with your best guess and shrink a test piece without decorating it to see if it’s the right size (that way you haven’t wasted your time decorating it if it’s wrong).
Isabel, you could still make rings with the opaque shrinkydinks – just decorate the OUTSIDE 😉 Otherwise earrings, napkin rings, wine glass charms… You have tons of options!
Isabel said
I love The Dinks and have been doing fun craft projects with them for years. But I never thought about doing this with them. I love it.
Okay, so what do I do with the pack of opaque dink paper I have? I can’t figure out what it’s good for! Any suggestion?
Giulia said
Genial!
Riechan said
Hello, Thankyou sooooo very much, I just love them !!!!!
But I don’t understand one thing very well, how big does it has to be when you measure it on your plastic. If I measure my finger and than take that measurement and enlarge it 3 times it should be the right measurement + 10% ??
June said
Mary Lou, I haven’t applied a coating to the inside of my rings, and I haven’t noticed any problems – how permanent it really is probably depends on the type of ink you use. If you do want to seal the inked surface to be safe, you could use any brush-on acrylic glaze/sealer (not a spray as you wouldn’t be able to coat the inside evenly) – just don’t use clear nail polish as it may eat into the shrink plastic!
Aly, if they are really stuck together and don’t uncurl when you reheat them, when they are hot you can use a chopstick (not fingers!) to help free them, and then they will straighten out again 🙂
Aly said
You are a genius; I now mourn the loss of all the projects I tossed out because they fused together. But now I know to wait longer so they’ll fold back out =)
Katie said
I had a party yesterday and I got this kit with that stuff in it and it is such a fun thing to play around with.
Mary Lou said
Hi,
My question is this…do I have to apply a coating to the inside ? and what kind would that be ?
The rings are awesome !
Mary Lou
Ella said
These are beautiful! Hey anyone else tried to make them? Id love to see what their’s looked like!
Foodaholic said
Those are beautiful! I can’t wait to try making some rings. I love customizing my own accessories. Thanks for the great instructions.
Nicole said
I tried making these years ago, but i didnt think to find something to wrap it around. Instead i used the finger in question. Ouch. another tip, forming it in the blast of a hot hair dryer or heat gun will give you some extra time. I sometimes use my heat gun instead of the oven for more control to shape while shrinking.
Tahnee said
Oh wow this is awesome– just started getting back into shrink plastic and was wondering if making rings was even possible. Nice tutorial 😀
den2 said
hey! ive been looking everywhere for a tutorial like this! good stuff! ^_^ now i just need to find the stuff.
Jill said
I just found a great site with the ‘rough’ shrinky plastic super cheap! $5 for 10 8×10 sheets
www.goestores.com/catalog.aspx?storename=shrinkydinks&DeptID=34365&ItemID=695466&detail=1
SewDelish said
Thanks, Just what I was looking for!
Didi said
Wow love the idea.
Thanks for sharing it, I will try for sure =)
Lori said
I’ve seen your beautiful rings highlighted on the Craft blog and so I was so excited to see that you put up a tutorial!! Thank you!! Now to get some shrink plastic…
vanna said
i want to make these so bad, it brings tears to my eyes!! i will have to wait til i shovel out my craft room to find my shrink plastic… i have all kinds of ideas to make rings to match my outfits!
Cindy said
Thanks so much for sharing this helpful tutorial! I have some shrinky dinks at home that I can’t wait to try this with now!
Jacqueline said
I just love it , thanks !!!! 🙂
June said
Heather, you could use a heat gun to shrink the plastic, but you have to take more care, and it is more dangerous. As you can’t regulate the temperature, you’ll have to judge how far away to hold the heat gun from your ring to get it to shrink. If it gets too hot, shrink plastic can melt – not the effect you are looking for!
To use a heat gun, put the shrink plastic on a piece of brown paper on a heatproof surface – you don’t want to burn your tabletop. Aim the heat gun at the plastic and wait. You’ll have to move the heat gun over the surface to get the entire strip to shrink, but don’t worry if one end shrinks before the other – it will all shrink eventually when given enough heat. Once it’s all shrunk, keep the heat gun moving over the surface to make sure the entire strip is evenly heated through.
It is somewhat dangerous – you’ll have to judge when it’s warm enough to bend into the ring shape without being too hot to handle or to start to melt the plastic. I would recommend you definitely wear gloves if you’re going to do this – if you have overheated the plastic, you could burn your fingertips by touching it without protection.
If you find it’s not pliable enough to bend into the ring shape, heat it some more and then try again. I would definitely recommend you use a toaster oven, or even your regular oven, before you try using a heat gun. Please take care if you try this method!
Heather said
Can you also use a heat tool (embossing gun) to do these and what would be the process for that? I don’t have a toaster oven so I am looking for a baking alternative.
Stephanie said
Oh thats awesome!!
msHandiworks said
My son’s girlfriend makes necklaces and earrings from Shrinky Dink. She inspired me to buy SD and try it. Have to say, your rings are so pretty and easy to make. Thanks.
kim said
I’m thinking about doing something like that only roll it up so theres a smaller hole then overlap the rest(like how you make paper beads) the stamping is a good idea
June said
sarahhh, as long as you’re quick after letting it cool for a couple of seconds, it should be okay. Otherwise, I recommend finding some thin gloves to wear so they don’t get in your way too much but do offer some protection for your fingertips!
sarahhh said
thanks for this!
I tried to do this about a year ago, and I burned the bejeezus out of my fingertips…. if the plastic sits for the couple of cooling seconds that you recommend, does this increase the chances of malformed rings?
Jaime said
Thanks June! I was wondering how to do that… I wondered how to get started so that was a great tutorial!!
Marlies Cohen said
This is so cool, now I can experiment with my shrink plastic and make something else. Thank you so much for your tutorial. I will add a link to my site to this.
Marlies
www.mcuniverse.com
elowezil said
Thank you SOOO much for doing this tutorial. I can’t wait to try some rings and will also a bangle. You’re a star! Thanks.
kara said
Thank you!! I have a TON of shrinky dink material (I never got to play with it as a kid so now I do!) I am excited to try this:)
lulu said
wow, you make this look so easy I really want to give it a try. Thanks so much for showing us how to…. even if I do think mine wont look a bit like yours
; )
futuregirl said
Great tutorial! I’m going to have to try this now … you make it look so easy. 🙂
laurakate said
thank you!!
actually going to try it right now, i’ve had a mini packet sitting around for ages, i hope they’re big enough pieces.
x laura
Amy said
This looks like so much fun, I will have to try and find some shrink plastic and brush up on my stamping skills.
sue said
you so rock!!!
thanks for your talent and time too.
sue
Jessica said
Thanks so much for getting this tutorial up for us. It all looks like great fun, I think I shall go now and buy some shrinky plastic so that I can have a play.