A few weeks ago I was browsing the time-suck known as Pinterest and this caught my eye:

Faux wood grain polymer clay tutorial from art-rukodelie
I loved the wood-grain effect and it gave me an idea: I had a shawl that needed photographing, and I hadn’t played with my polymer clay for months, so it seemed like a good use of my time to see if I could make my own polymer clay shawl pin.
Now, in case you’re expecting a highly-skilled project from me, I should probably preface my results by saying that I like to use polymer clay in a similar way to how I crochet amigurumi: I combine shaped pieces into 3D sculptures. Patterned clay isn’t something I’m good with – you have to get the shape right immediately, because you lose the colour pattern if you try to do much reshaping or add/remove pieces. Okay, now onto my pin…
I made a ring shape from leftover scrap clay, and covered it with a sheet of faux wood clay that I made by (loosely) following the tutorial, which was written in Russian but you can easily get the gist of it from the photos. Here’s the result, on my Rippled Lace shawl:
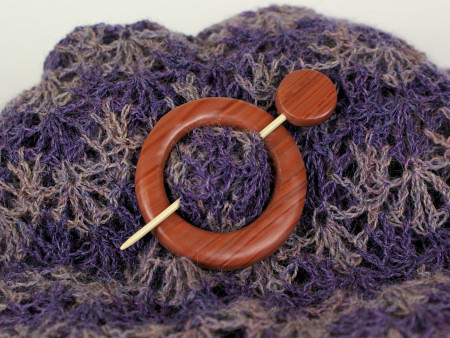
I’m fairly pleased with how it turned out – it polished up nicely, although it doesn’t have the warmth and depth of real wood. I was a bit disappointed to see that the pattern I ended up with on my ring doesn’t really show any of the concentric ring grain alignment from the tutorial(!), but it’s still an interesting pattern and fairly realistic.
I had to scrap my original idea for the actual pin (I was planning to make it from clay-covered wire) as I couldn’t get the clay to form around the wire without completely smooshing my wood-grain pattern into a murky brown mess. So, before my clay veneer got too brittle to work with, I cut two more small disks from it and baked them at the same time as the main piece so I could try to figure out a solution for a matching pin later.
(I couldn’t wait any longer to release my shawl pattern, so I had to stage the photos without the aid of a shawl pin. So much for my justification for embarking on this project, but at least it’ll be ready for my next shawl design!)
In the end, I figured out what to do to make the pin: I found a single ivory-coloured knitting needle in a thrift shop that complemented the natural look of my ‘wood’ quite well. I cut the needle in half, then carved a groove into the back of each of my baked disks and sandwiched them together around the cut end of the needle with some more clay smoothed into the join. After baking, it made a secure and decorative pinhead, so the pin matches the ring.
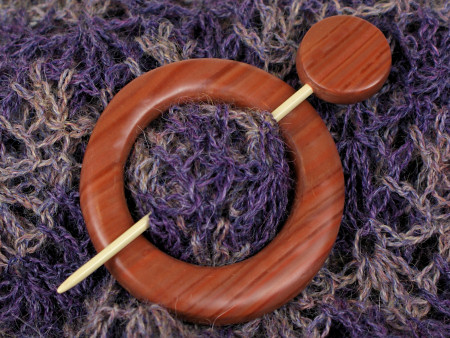
I enjoyed making this, and it works exactly as I’d hoped it would – it holds my shawls securely in place without damaging them. Hopefully it’ll look photogenic enough to use in future pattern photography too – if not, I’ll just have to treat myself to a real one 😉
I think my handmade pin looks pretty good for a first attempt, but this project has reminded me why I prefer sculpting to patterning, and I think I’ll stick with what I’m good at for future clay projects. Hopefully I won’t wait so long before I play with the clay again… I wonder what I’ll be inspired to make next time!


Mary Kaye Waterson said
June – pretty darned good for an off the cuff attempt. If you want to make your shawl stick out of wire covered with polymer clay, the first thing to do is cover the wire with some scrap clay – just enough to give it the shape you want but not as thick as you’d like the stick to be. Then bake it. After it cools, then you can just wrap the veneer around it, smooth out the seam, bake it again and ta da! You have a nice stick with your wood grain veneer.
I’m currently making some shawl pins out of polymer clay and didn’t really care much for the wire armature – the polymer clay still flexes and the wire is too soft. It’s okay but not what I had in mind. I’m getting ready to try out cut down bamboo skewers covered in clay :).
marie said
Your initial plan to cover wire with clay can work if you do it this way: first, with scrap clay, form the shape over the wire. Bake it as directed. Next you want to take a very thin clay sheet with the wood ‘veneer’ pattern and apply it to the baked shape. To start, take white craft glue (elmer’s) or liquid polymer clay and put a thin, but complete coating over the surface to be covered. If using glue, let it dry. Then lay down the ‘veneer’, starting in the middle (if there is one), and working out, making sure to remove ALL bubbles between the layer. If you miss a bubble, gently poke it with a sewing pin, release the air, and smooth ‘veneer’ down, while sealing the pin poked spot.
If you find the wood grain is smearing, several things can help. You can cool the clay a bit first in fridge/freezer, as it isn’t as smooshable when it is cooler than warmer. You can also use latex gloves to reduce the heat transfer from your fingers to the clay. Letting it ‘rest’ after creating it can also help to harden it a bit. You don’t want it so stiff that it breaks.
A great resource for polymerclay info is www.glassattic.com. I’m not affiliated with the website, but I’ve used it a lot!
June said
Thanks for the great advice, Marie!
Karen (Foxtrot400) said
I’ve not seen the polymer “wood” before. They both look very authentic, but I like the rich “stain” colour of yours better.
Dawn Human said
Wow, beautiful job! I wouldn’t have known it was your first time except that you said so!
Monica Ballinger said
It looks great for a first time!!! It complements your shawl really well, love it! You’ve inspired me to try my own hand at it! 😀
CrochetBlogger said
Terrific wood grain effect – love it!
Walden121 said
That is awesome! I love this idea and just might have to try it out in the future.
Lindy said
Your shawl pin is lovely and goes beautifully with your gorgeous shawl.
Love, Lindy