I have a new tutorial for you today that you’ll probably find especially useful if you’re working on a Temperature Snake (although it isn’t just for snakes!)
Is your stuffing less smooth and even than you’d like? I can help with that!

With my ‘pinch-and-push’ technique, you can manipulate the stuffing of an amigurumi from the outside of the piece, by using both hands to encourage the stuffing to shift into the desired area. This method will save you from having to pull out all the stuffing and start again (which may not even be possible if you have a snake that’s already several feet long!)
I’m demonstrating on a snake because it’s easiest to see what’s happening with a long thin tube, but you can also use this method to pinch-and-push stuffing into a different area of any long or large amigurumi, as long as you still have an opening so you can add extra stuffing to replace the quantity you move.
The Problem
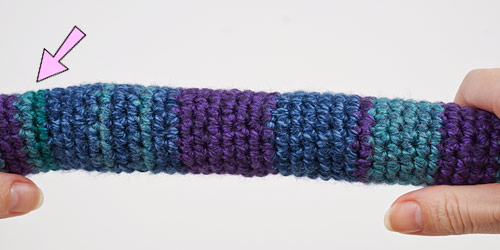
For the purposes of this demonstration, I’ve intentionally under-stuffed my in-progress Temperature Snake in a couple of places.
Below, you can see both dark blue sections aren’t stuffed as much as the rest of the body, giving my poor snake a bit of a lumpy, uneven appearance when straight:
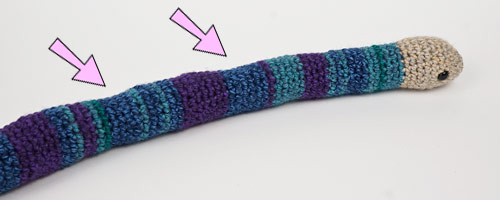
It’s especially important to try to even out the stuffing in something long and thin like an amigurumi snake. You need enough stuffing inside to fully support the crocheted fabric in any position you’ll use it, as these areas will tend to crease or buckle when you try to curve the snake’s body, and that’s definitely not the look you want!
Method
The idea of the pinch-and-push process is to move stuffing forward (away from the open end – i.e. toward the head in this case) to fill any under-stuffed areas.
Note: In all the photos below, the snake’s head is on the right, and the open end of the snake on the left, so we’ll be shifting the stuffing from the left to the right.
Here’s the first under-stuffed area:
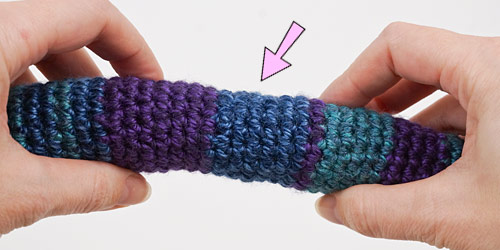
We’re going to move some of the stuffing forward from the well-stuffed purple area to the under-stuffed dark blue area.
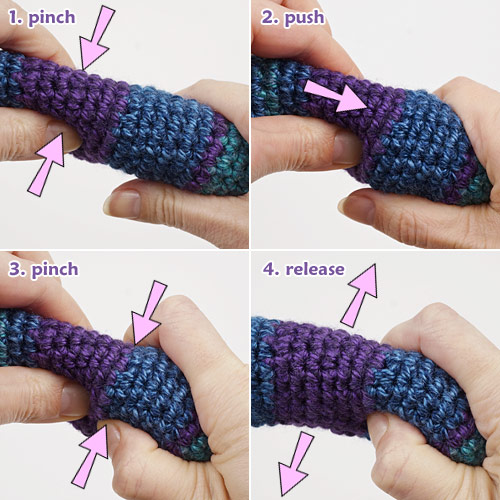
Pinch-and-Push Instructions:
- Grasp the work loosely in front of the under-stuffed part, leaving your thumb and forefinger free, and pinch the piece firmly behind the under-stuffed part.
- Push the pinched part forward. (The rounds of your crochet will be forced closer together, and all the stuffing in that part will be squashed together more firmly.)
- Pinch the squashed part with your other hand to hold the squashed stuffing in place.
- Release your push.
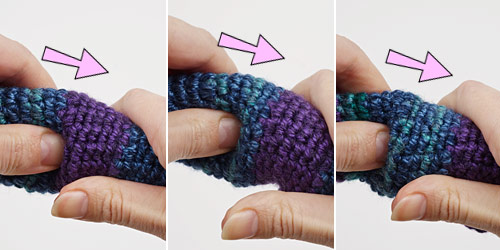
As you can see below, after just one pinch-and-push, some of the stuffing has been moved a little further forward (to the right in this photo), leaving most of the dark blue section nicely stuffed and a new under-stuffed section (marked by arrow) a little closer to the open end.

But you won’t be doing this just once! Repeat the pinch-and-push process over and over, as many times as necessary, inching your way back toward the open end as you persuade the stuffing to move forward with each push:
Note: You can’t shift stuffing forward from an area that’s already under-stuffed – if you end up with an empty section, move further back and pinch-and-push more stuffing forward to fill the gap.
Once you get close enough to the open end, you can add more stuffing through the opening to replace the quantity you’ve shifted forward.
Below, you can see that I’ve shifted the under-stuffed section to be much further back. Now it’s close enough to the open end of my snake that I can add additional stuffing to fill that area properly, instead of continuing with more pinch-and-push movements.
Confused?
Don’t worry, this method is easier to do than to explain! Once you’ve tried it a couple of times, you should understand how it works and be able to do it instinctively.
If you’re still having trouble grasping the concept, imagine dropping an orange into a sack. You can grip the orange through the sack fabric, and then use both hands to move the sack fabric around the orange from the outside, allowing you to shift the position of the orange inside the sack.
This is basically what we’re doing here – moving the stuffing (the orange) around through the crocheted fabric (the sack).
Finishing Touches
When you’ve finished shifting the stuffing, squeeze and squash the amigurumi to further even out the stuffing. For something long like a snake, you can also combine that with bending it back and forwards in several directions a few times, to encourage the stuffing to compress and settle into its final state. Repeat until you’re happy with how your amigurumi looks and feels.
Here’s the result – fairly smooth, with no lumps or under-stuffed areas!

I hope you’ll find this technique useful, whether you’re participating in the Temperature Snake CAL, or making a different long/large amigurumi where you realize that you haven’t stuffed the front end of your amigurumi enough.
Give my pinch-and-push technique a go before you resort to removing all the stuffing to start again, or decide to put up with an unevenly-stuffed amigurumi – with a bit of patience, you can probably fix it!


Michal said
Should the snake be really full of stuffing or just lightly full?
My snake is coming out really straight and I was wondering if it will be able to curl when it’s long enough.
Thanks!
June said
In the pattern, I advise that the body should be stuffed less firmly than a regular amigurumi – a snake that won’t bend won’t look very lifelike! But no matter how much you stuff it, if your crocheted fabric is really stiff and tight, your snake will be harder to bend. You want enough stuffing to support the body in a smooth curve when you bend it, but not so much that it won’t bend at all!
By the end of March, you should be able to curve your snake into a smooth semi-circle, so use that as a test:
If you decide you really have over-stuffed your snake, you can use the pinch-and-push technique in reverse to back some of the stuffing out of the body – just don’t go too far!
Julie G Weber said
Thank you so much for this! I thought I’d be stuck with a lumpy snake because it’s too long to pull out all the stuffing.
RuthL said
Thanks for sharing this technique June, much appreciated. I haven’t made the temperature snake, but I made a large doll a few months back, and getting the stuffing even and lump free in her arms and legs was quite a challenge. I’ll be right now the next time. Thank you.😊👏