Pumpkin crochet pattern
© June Gilbank 2008
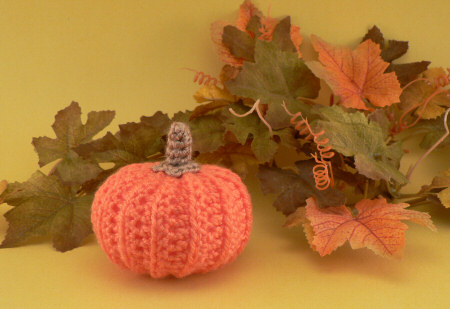
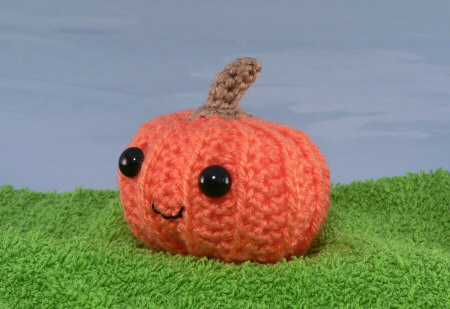
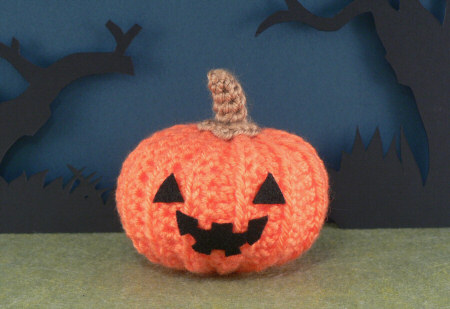
Crochet yourself a pumpkin – the perfect pattern for autumn! With this one basic pattern, you can create a realistic pumpkin for your Fall table, a cute amigurumi-style pumpkin for the kids, or a spooooooooooooooky pumpkin for Halloween.
This pumpkin pattern is Donationware – the pattern is available for free, but if you like it please consider sending me a donation to show your appreciation:
Send me a donation and receive the easy-to-print PDF version of the pattern as a thank you!
Donations of any size are much appreciated. Just add the amount you wish to donate, and, once you have checked out and paid, your pattern will instantly be available to download from your PlanetJune account.
The complete pattern and instructions are available below, regardless of whether or not you choose to pay for them 🙂
This is a PlanetJune original crochet pattern. Feel free to use items made from this pattern however you wish, but I’d appreciate credit as the pattern designer. Please do not reproduce the pattern anywhere else; instead post a link to www.planetjune.com/pumpkin
Not ready to make it yet? Add it to your Ravelry queue: 
Terminology
| ch | chain |
| sc | single crochet (double crochet for UK/Aus) |
| hdc | half double crochet (half treble crochet for UK/Aus) |
| sl st | slip stitch |
| st | stitch |
You will need…
- E US/3.5mm crochet hook
- Small amount of worsted weight yarn in orange, plus brown or green for stalk
- Yarn needle
Pumpkin
Note: The main part of the pumpkin is worked in rows. All stitches are worked in back loops only.
Ch 16.
Row 1: sc in 2nd ch from hook, sc in next 2 ch, hdc in next 9 ch, sc in last 3 ch. (15 st)
Row 2: ch 1, turn, sc in next 5 st, hdc in next 5 st, sc in next 5 st. (15 st)
Row 3: ch 1, turn, sc in next 3 st, hdc in next 9 st, sc in next 3 st. (15 st)
Rows 4-25: repeat Rows 2 and 3 eleven times more. (15 st)
Row 26: Repeat Row 2 once more (15 st).
Fold the rectangle in half so that Row 26 is matched up with the starting chain. Sl st through both layers (Row 26 and the starting chain) to form a tube. Fasten off, leaving a long yarn end to close the ends of the pumpkin.
To form the bottom of the pumpkin, use a yarn needle and the long yarn end to weave through a loop at the end of every ridge around one of the open edges. Draw the stitches tightly together to form the base of the pumpkin, then knot the yarn to keep the end closed. Note: if you are using animal eyes for your pumpkin, insert them now, about halfway up the pumpkin, and attach the backs.
Make sure the yarn end and needle are on the outside of the base of the pumpkin, then stuff the pumpkin through the top opening. Pass the yarn end up through the middle of the pumpkin to the open edge, then weave through all the loops around the top edge. Draw up the stitches around the top to close it, then knot the yarn in this position.
Shaping (optional)
If the pumpkin is too tall, you can shape it by passing the yarn from the top middle down through the pumpkin to the centre hole at the bottom, then inserting the yarn needle at the bottom, one stitch away from where it exited the pumpkin, and passing the yarn end back up through the pumpkin to the top. Draw the yarn tighter until you like the shape. Knot the yarn in this position (the knot will be covered by the stalk).
Stalk
Make a magic ring, ch 1.
Rnd 1: 5 sc in magic ring. (5 st)
Rnds 2-5: sc in each st around. (5 st)
Rnd 6: (sc in next st, ch 2, sc in same st) four times, sc in next st, ch 2, sl st in same st.
The base of the stalk should flare out into a star/pentagon shape. Fasten off, leaving a long yarn end to attach the stalk to the pumpkin.
Use a yarn needle and the long yarn end from the stalk to sew the base of the stalk to the centre top of the pumpkin.
Embellishment Ideas
Keep your pumpkin realistic, or embellish it with a cute face (round black eyes and an embroidered smiley mouth) or a scary Halloween face (cut eye and mouth shapes from black felt and glue to the pumpkin).
Happy Halloween! I hope you enjoy this pattern. Please leave me a comment below if you do, and consider leaving me a donation. Thanks!
If you like this pattern, you may also like my PocketAmi Set 3: Halloween patterns!


Carol A. S. said
Would this be a good pattern for someone who needs to move on from making square & rectangular lapghans/ afghans? Thank you!
June said
Yes, it would! The main part of the pumpkin is worked in rows so it should be straightforward for you. The stalk uses a magic ring, so that may be new to you, but you can learn that from my Magic Ring tutorial!
M-E CLARK said
Last year I tried different patterns of pumpkins and this year I need to make some more. This time, no need to look at all kinds of ideas because your pattern and the one from Lucy’s Attic 24, which adds some color, are my favorites, including the stem. Thank you for sharing this easy pattern to follow.
Barbara Kobayashi said
Thank you for sharing this cute pumpkin idea!
Daphne said
Thank you for sharing. Just made 2 of these
pumpkins so easy and fast to make, they look so cute.
Love the design.
Ruth said
Love your little pumpkin, thank you for sharing this idea. Happy Fall
Jennifer said
Would love some help on how you stitched it together! I can crochet but can’t sew! The pumpkin itself whipped up quickly and now I can’t close it up! Lol
June said
No problem, Jennifer! All you need to do is insert the needle under the edge of each ridge in turn around the edge of the pumpkin, then pull the yarn tight to gather the whole edge together at the centre bottom of the pumpkin. (Then you’ll do the same around the top edge once you’ve stuffed the pumpkin, as explained in the instructions above.)
Holly said
This is such a lovely and ingenious little pumpkin pattern! I’ve made several this fall. Thank you!
Pam said
Easy and super cute pumpkin, good directions – I made a little pumpkin from start to finish in an hour!
Abbey said
I love the pattern for the pumpkin and I love the cute stalk!!????
Here’s my blog post about it!! threecatsandagirl.wordpress.com/2018/09/23/crocheted-pumpkins/
Carol pino said
Love you patterns,just made a couple of pumpkins thank you
Abbey said
Just made this pumpkin and I love it!!?? It was delightfully easy and turned out super cute! The instructions were easy to read and understand too! Which is always a plus:) I’ll be sharing the link to this pattern on my blog soon!
nikki said
Made the pumkin but struggling with the stalk, what is meant by putting the 5 sc into the ring?
June said
If you follow my magic ring tutorial (also linked in the pattern above) it shows how to work all the stitches of Round 1 into the magic ring before you pull the ring closed.
(In the tutorial, I demonstrate by making 6 sc into the magic ring – in this case, you’ll follow the tutorial, but only make 5 sc instead of 6!)
Christina said
Made this today. My favorite crocheted pumpkin pattern ever! Great texture, shape & design. Thanks so much for sharing your pattern with us. Found it through Lucy’s Attic 24 Blog.