Pumpkin crochet pattern
© June Gilbank 2008
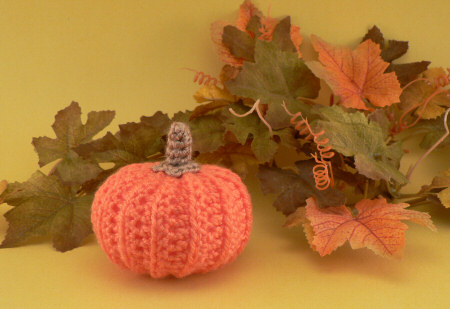
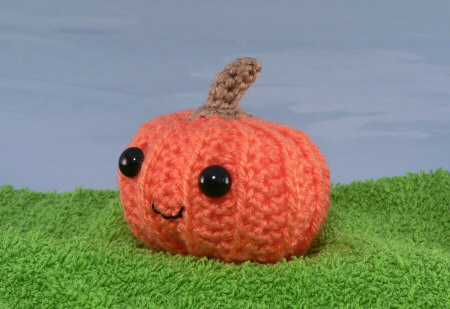
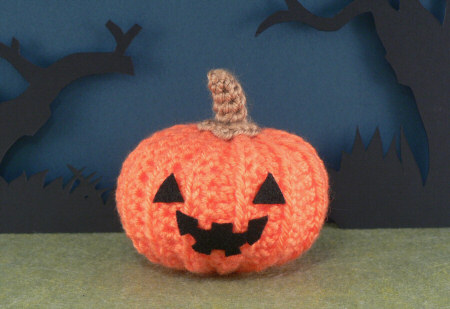
Crochet yourself a pumpkin – the perfect pattern for autumn! With this one basic pattern, you can create a realistic pumpkin for your Fall table, a cute amigurumi-style pumpkin for the kids, or a spooooooooooooooky pumpkin for Halloween.
This pumpkin pattern is Donationware – the pattern is available for free, but if you like it please consider sending me a donation to show your appreciation:
Send me a donation and receive the easy-to-print PDF version of the pattern as a thank you!
Donations of any size are much appreciated. Just add the amount you wish to donate, and, once you have checked out and paid, your pattern will instantly be available to download from your PlanetJune account.
The complete pattern and instructions are available below, regardless of whether or not you choose to pay for them 🙂
This is a PlanetJune original crochet pattern. Feel free to use items made from this pattern however you wish, but I’d appreciate credit as the pattern designer. Please do not reproduce the pattern anywhere else; instead post a link to www.planetjune.com/pumpkin
Not ready to make it yet? Add it to your Ravelry queue: 
Terminology
| ch | chain |
| sc | single crochet (double crochet for UK/Aus) |
| hdc | half double crochet (half treble crochet for UK/Aus) |
| sl st | slip stitch |
| st | stitch |
You will need…
- E US/3.5mm crochet hook
- Small amount of worsted weight yarn in orange, plus brown or green for stalk
- Yarn needle
Pumpkin
Note: The main part of the pumpkin is worked in rows. All stitches are worked in back loops only.
Ch 16.
Row 1: sc in 2nd ch from hook, sc in next 2 ch, hdc in next 9 ch, sc in last 3 ch. (15 st)
Row 2: ch 1, turn, sc in next 5 st, hdc in next 5 st, sc in next 5 st. (15 st)
Row 3: ch 1, turn, sc in next 3 st, hdc in next 9 st, sc in next 3 st. (15 st)
Rows 4-25: repeat Rows 2 and 3 eleven times more. (15 st)
Row 26: Repeat Row 2 once more (15 st).
Fold the rectangle in half so that Row 26 is matched up with the starting chain. Sl st through both layers (Row 26 and the starting chain) to form a tube. Fasten off, leaving a long yarn end to close the ends of the pumpkin.
To form the bottom of the pumpkin, use a yarn needle and the long yarn end to weave through a loop at the end of every ridge around one of the open edges. Draw the stitches tightly together to form the base of the pumpkin, then knot the yarn to keep the end closed. Note: if you are using animal eyes for your pumpkin, insert them now, about halfway up the pumpkin, and attach the backs.
Make sure the yarn end and needle are on the outside of the base of the pumpkin, then stuff the pumpkin through the top opening. Pass the yarn end up through the middle of the pumpkin to the open edge, then weave through all the loops around the top edge. Draw up the stitches around the top to close it, then knot the yarn in this position.
Shaping (optional)
If the pumpkin is too tall, you can shape it by passing the yarn from the top middle down through the pumpkin to the centre hole at the bottom, then inserting the yarn needle at the bottom, one stitch away from where it exited the pumpkin, and passing the yarn end back up through the pumpkin to the top. Draw the yarn tighter until you like the shape. Knot the yarn in this position (the knot will be covered by the stalk).
Stalk
Make a magic ring, ch 1.
Rnd 1: 5 sc in magic ring. (5 st)
Rnds 2-5: sc in each st around. (5 st)
Rnd 6: (sc in next st, ch 2, sc in same st) four times, sc in next st, ch 2, sl st in same st.
The base of the stalk should flare out into a star/pentagon shape. Fasten off, leaving a long yarn end to attach the stalk to the pumpkin.
Use a yarn needle and the long yarn end from the stalk to sew the base of the stalk to the centre top of the pumpkin.
Embellishment Ideas
Keep your pumpkin realistic, or embellish it with a cute face (round black eyes and an embroidered smiley mouth) or a scary Halloween face (cut eye and mouth shapes from black felt and glue to the pumpkin).
Happy Halloween! I hope you enjoy this pattern. Please leave me a comment below if you do, and consider leaving me a donation. Thanks!
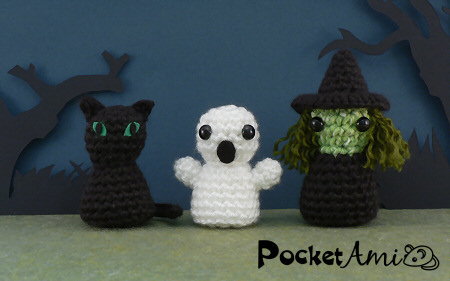
If you like this pattern, you may also like my PocketAmi Set 3: Halloween patterns!


Lucy@Attic24 said
This is such a fantastic little pattern, very well written and the ribbed effect is so lovely and pumpkinish!
I’ll be linking to your pattern from my blog xxxxxxxxxx
Hooked Goodies said
It is a very cute pumpkin pattern. explained really well 🙂 We have listed it on our website for 45 free easy patterns for Halloween Ornaments.
Karin Delsignore said
LOVE THIS PATTERN and am making it with two yarns for a two-toned effect and a larger hook. Thank you for posting it oh so many years ago!
June BeN said
How big is the pumpkin?
June said
June, please see my previous reply to this question, here 🙂
Erika said
Hi-
For the stalk, do u join after each round or do you work in a continuous circle? You did not mention it.
Thank you!
Erika
June said
Erika, the stalk is worked in a continuous spiral, so there’s nothing to mention!
A good way to tell: if a piece worked in the round isn’t worked continuously, there should be instructions for: 1) how to join at the end of each round; 2) how many stitches to chain at the start of the next; and possibly 3) when to turn the work (if applicable). The pattern would be incomplete without these details. As there aren’t any instructions like that in this pattern, you should just move straight onto the instructions of the next round and continue crocheting as indicated.
Erica said
I just finish making this pumpkin and I love it. Thank you so much for the pattern. It was one of the easiest I have found and it looks great!
Lisa Balsan said
Hello June, I would love to buy one of your patterns for my daughter, a new crocheter. Not sure from looking at the free patterns or elsewhere on your site how your patterns accommodate a left handed crafter. Can you clarify? thanks, LB
June said
Hi Lisa, I’m actually left-handed myself! My patterns all work equally well for left- and right-handed crocheters – the only difference is that the finished result will be a mirror-image depending on which hand you hold your hook in 🙂
Angela said
I love your pattern. It worked up quickly and perfectly and I can’t wait to make more. I do have a question though. Id love to make this into a bigger size…for the couch. I’m thinking its a more complicated process than just adding stitches. Do you have instructions for bigger one? Thanks so much!
June said
You’re right, Angela – if you add more stitches and more rows you’ll end up with lots of very narrow ribs around the pumpkin, so this pattern isn’t really suited for scaling up to a huge size. But you can make it larger by using two (or more!) strands of yarn held together, and a larger hook – see my example of how that turns out, with the regular pumpkins for scale, in this photo. 🙂
sue said
Hi June
I made a donation for your acorn pattern a little while ago and I just wanted to tell you that I taught some of my newbie crocheters how to make your lovely pumpkin last week. We had great fun and all enjoyed admiring the lovely finished results. Thank you so much for sharing your patterns.
I am just about to make a donation for the use of your pumpkin pattern with my group
Sue x
Denise Zumbano said
When making the stalk for your pumpkin pattern what do you mean by “make a magic ring”? Is this a certain number of chain stitches joined together th form a ring?
June said
Denise, you’ll always find any techniques not explained in the pattern itself on my crochet tutorials page – in this case you can jump straight to my magic ring tutorial for the answer to your question 🙂
Kayleigh Arneson said
I was just wondering about how tall these little guys are per following the pattern as is? I want to make some for my mom’s kiddos, but they do better with smaller amigurumi things.
June said
Kayleigh, mine are about 3.5″ across, but you can easily scale it down by using a finer yarn and smaller hook, if you wish.
Charlotte said
I don’t know what I’m doing wrong but I did 16 chain then turn it around, chained in the 2nd hole the sc chain thin the next two, I then chained hdc in the next 9. But then I only have 2 more chains that leaves me with only 14 chains for the next row. What am I doing wrong. If any of this makes sence 🙂
June said
Charlotte, I’m not quite sure what you mean by “chained in the 2nd hole the sc chain” but that sounds like your problem. You need to make a sc in the 2nd chain from the hook, but it sounds like you must be skipping an extra chain at that point (so your first sc is going into the 3rd chain from the hook) if you’re ending up one stitch short at the end of the row. Try redoing it and crocheting your first stitch into the chain that’s 1 chain closer to your hook, and it should all work out. If you’ve done it right, you should have 15 stitches in every row.
Aurelia Eglantine said
Thanks so much for this lovely pattern! I found it really clear and easy to understand. I made mine a pincushion and used #10 crochet thread 🙂
Rachell said
Love it! An audio book stopped me concentrating and crocheting into the BL, but it’s fine and some little ones knew it was a pumpkin so all ok. TY for the pattern.
Allegra said
I am kind of confused about how the ridges are supposed to appear. I may have done mine too tightly or something, I don’t know. I know I dropped a stitch or two along the way, and I will probably try again, but I have a bit of an oddly shaped pumpkin at the moment. I managed to salvage it though, and it’s uneven proportions make it look more like a real pumpkin.
Rachell said
Allegra- you crochet into the back loops only, this is how the ridged effect appears. Instead of going through the whole stitch on top as usual for a sc (or dc as it’s called in England), just go into the one loop furthest away from you. Easy peasy!
Jacquelyn Pooley said
Love this! very easy to follow along 🙂
Lisa said
Hi June, these look so cute and I’ve just gotten to the point where I have to use the running stitch and I’m confused. I read your explanation above and I do understand how to do this when sewing fabric together, but I can’t see how to sew the two edges together. Would it be possible to get a picture of the bottom of a pumpkin and possibly a picture of a running stitch in progress on one on of these pumpkins? I have tried youtube but for some reason every video of a running stitch demonstration (which I’m not sure will be helpful because none of them are for this type of thing, they’re all for sewing fabric together which I already understand how to do) says that it’s unavailable. Thanks!
Lisa.
June said
Lisa, seeing the running stitches wouldn’t actually help you – even if you could see the stitches against the yarn, they’d just look like a dashed line around the edge of the tube. The key to it is that you shouldn’t be trying to sew the two edges together at all – each stitch just goes through the edge of the pumpkin. After you’ve finished the stitches, you’ll pull on the yarn so the entire edge will be drawn together, the same way you pull a drawstring to close the top of a bag by scrunching all the fabric together in the middle. Until you pull the yarn tight, the running stitches do nothing at all. Maybe the words ‘running stitch’ are confusing you: it doesn’t matter what the stitch is called; just insert the needle under the edge of each ridge in turn, then pull the yarn tight to draw the edge together at the centre bottom of the pumpkin.
Lisa said
Ah, the key piece of information I wasn’t getting was that you don’t sew the edges together when you do the stitch, you just weave in and out of each individual stitch. Thanks!
Bubeto said
Thank you for the great pattern! I’ve made it in different colours and it turned out purfect. It helped me to prepare my projects for Halloween decoration in my crochet class. I’m gonna show my studens how to make it themselves. Happy Halloween and God bless you :)))
Lauren said
^ – ^ I tried to make one a few hours ago. I think it turned out rather nice, I just need to make a few more before I’ve got myself a pumpkin patch.
LletyaStar said
Aww, it’s sooo cute. Very clear instructions. :[) Thanks alot June.
Alicia Brink said
so cute and easy. This was the pattern that led me to your site. I’ve fallen in love! I made this in purple for epilepsy awareness.
The Captain said
Hi! Someone I know made me this pumpkin and I’m so in love with him I want to use him as the mascot for my Etsy shop! I don’t crochet or anything but I plan on putting him in one of the mini top hats I do make but I thought it would be prudent to ask first.
June said
I have no problem with you doing that, provided that, if anyone asks about your mascot, you tell them where they can find the pattern 🙂
Tiffany said
Thank you so much for this free pattern. I used the pattern to make mini pumpkins for my son’s class as part of the party favors. I made them in blue, green, tan and orange using crochet cotton. The kids loved it especially my son. He pestered me all weekend to give him one and practically snatched the bag from my daughter when she was passing them out. 🙂 Really this was the best pattern I found on the internet. Thank you again.
Mei said
I wanted to thank you as it was your book that first got me started on amigurumi. I had never crocheted in my life and I couldn’t make heads or tails of the patterns. Even youtube was a bit hard to follow. After I bought your book, everything became perfectly clear! And I love how you add on tips on your website. Thanks for sharing! By the way, I’m addicted to amigurumis now.
Theresa said
Thanks for the great pumpkin pattern! Finished it in a couple of hours. Love your clear instructions!!
Rachel said
I have 2 questions for you on this pattern, first on row 4-25 it says to repeat rows 2 and 3 does 11 times does that mean you do 2 then 3 then 2 then 3 and so on or do you do 11 rows of 2 then 11 rows of 3? Also what is a running stitch? Thank you for the pattern I have started it but I am lost after row 3 lol, any advice would be greatly appreciated:)
Rachel
June said
Rachel, yes, repeat the combination (row 2 and then row 3) 11 times, so you’ll do 2, 3, 2, 3, 2, 3, etc. As for running stitch, I just explained that to Megan (the comment above yours) so I’ll let you read my explanation there 🙂
Megan said
Hi June,
Thank you so much for the pattern! I saw your pear pattern and decided to make a bowlful of pears for my boyfriend’s mum for Christmas; I could not get enough of your simple and adorable patterns!
I already donated for the pears and apples, but am ‘trying before I buy’ with the pumpkin because I don’t trust my very new crochet skills to manage it. As feared, I haven’t a clue how to do the ‘running stitch’ to draw the bottom together; I already checked your tutorials, and Google can’t help. Could you please please please link me to a tutorial? Thanks so much,
Megan
xoxox
June said
Megan, don’t worry! I think you may be confused and thinking that a running stitch is some type of crochet stitch? It’s not – its the most basic stitch you can make in sewing (it looks like a dashed line).
In this case you’d bring the needle up from back to front through one stitch, then down from front to back through the next stitch. Repeat all along the edge, going up through one stitch and down through the next. When you’ve finished, draw the yarn tight and the running stitches will all gather together like a drawstring so the pumpkin will close up at the bottom.
I hope that makes more sense now 🙂
Elva said
Thank you a lot. This is a really clever pattern. I made two so far and it’s really kinda fun!
Kate said
Thank you for the pattern!! It is adorable!!! Wonderful job!!
donna walker said
I love the pattern, but unable to crochet, do you have this pattern in knitting on the flat? Thanks for the help in advance.
June said
Donna, I only design crochet patterns at present – sorry I can’t help!
Judy Jones said
This looks too cute. I recently made a pincushion that was a teacup. Even had the strand for the teabag attached! Everyone loves it.
The first thing I thought of when I saw your pumpkin was that this would make an adorable pincushion. How big around & tall is it?
Thanks.
June said
Judy, the exact size would depend on your yarn, how tightly you crochet, and how firmly you stuff it, but my pumpkins turned out to be about 3.5″ wide by 2.5″ tall (not including the stalk!)
Danis said
That’s so cute, I hope to make several of those for the next Halloween, if I will still be in US, I wonder is Halloween celebrated in Canada?
Megan said
June, I am currently running a crochet along on my blog. Your pattern is the one we are using. You should see all of the gorgeous pumpkins that people are creating. Thanks so much!
crocheteveryday.blogspot.com/2010/10/october-crochet-along-pumpkin.html
Lili said
hello. this pattern is really cute and i really enjoyed making it. however, i am having trouble putting it all together. i don’t understand how you assembled it. for some reason, it keeps coming out box-shaped. can you show me how you sewed it together?
June said
Lili, you should end up with an open cylinder shape after slip stitching the two ends together. You have to stitch all around the bottom edge of the pumpkin with a running stitch, and then pull all those stitches tight to gather that whole edge into one point at the bottom middle of the pumpkin. After stuffing, you’ll do the same with the top edge to close it up. If you’re still having problems, email a photo of yours to me and I’ll tell you what you’re doing wrong.
Lili said
oh! okay. i see now. thank you very much.
Saru-chan Amigurumi said
Thanks June for the perfect pumpkin pattern! I find its the best one out there because of your specific texture on the pumpkin! ^_^
Laura said
Just finished this pattern! Its adorable and oh so easy! I made a little story on my blog and everything b/c the little pumpkin was just too cute to go without one. lauracruz.wordpress.com/2010/10/09/little-pumpkin/
jennifer said
Hi, I love the pumpkin pattern but I notice it doesn’t give a pattern for a stem. In the pumpkin picture it shows it with a stem.
June said
Jennifer, you’ll find the stem is called the stalk in my pattern – same thing 🙂
Corgiiscute said
Thank you, so much! This is the most realistic-looking pumpkin that I could find. All of the others were just like a ball, but this one has the ridges!
I already made one, and I’ll be making a lot more 🙂 I love how easy it was to make.
Thank you! 🙂
Veronica said
Hi!
I absolutely love this pattern. I´m wondering if I can translate It to swedish on my blog. Of course I will link to your pattern and give you all the credits for making it.
Thank you so muck for sharing.
Lots of love /Veronica
http://www.crochet-doilies.com/free-crochet-instructions-and-patterns-online/ said
Your pumpkin is adorable. I’m glad to find it just in time for the fall season. Can’t wait to get out my yarn and give it a try.
AlysiaJ said
this pattern looks sooo cute!!! the only thing is i dont understand what a magic ring is. could you please email me how to do it? im looking forward to making this for everyone i know!!!
June said
Alysia, I have a tutorial for the magic ring here: www.planetjune.com/magicring
DianaG said
A friend and I have been trying to find free patterns to make playfood for our daughters, she will be so happy taht I found this! I really like it, thank you so much for sharing * hugs *
Carmen said
hola, te saludo y te mando un link en mi pagina.
Carmen
Akua said
This is the best designed pattern I’ve read yet. Your pumpkin is lovely! Thanks for sharing!
I will try it tonight— I want to hang some pumpkins on my porch rail.
andrea said
thanks so much! this is fantastic
Tracy said
Very sweet! Doesn’t look to hard to make, may give it a try. :>
Jenny said
Very cute 🙂 I love your patterns. Have a great day!
Rabbit9 said
Very very cute. Thank you for the pattern.
marit said
ESTUVE MIRANDO TU PATRON DE CALABAZA Y NO SE SI SERA PORQUE SOY ESPAÑOLA Y AQUISE LEEN DE OTRA FORMA PORQUE NO ENTIENDO MUY BIEN TUS EXPLICACIONES. ME GUSTA MUCHO LAS MUESTRAS QUE TIENES EN LA PAGINA, PIENSO EN HACERME CON ALGUNA.
adminnie said
just wanted to let you know that i’ve featured your halloween and pumpkin patterns on the daily chum. too cute!