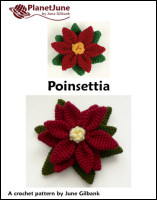
Poinsettia crochet pattern
© June Gilbank 2007
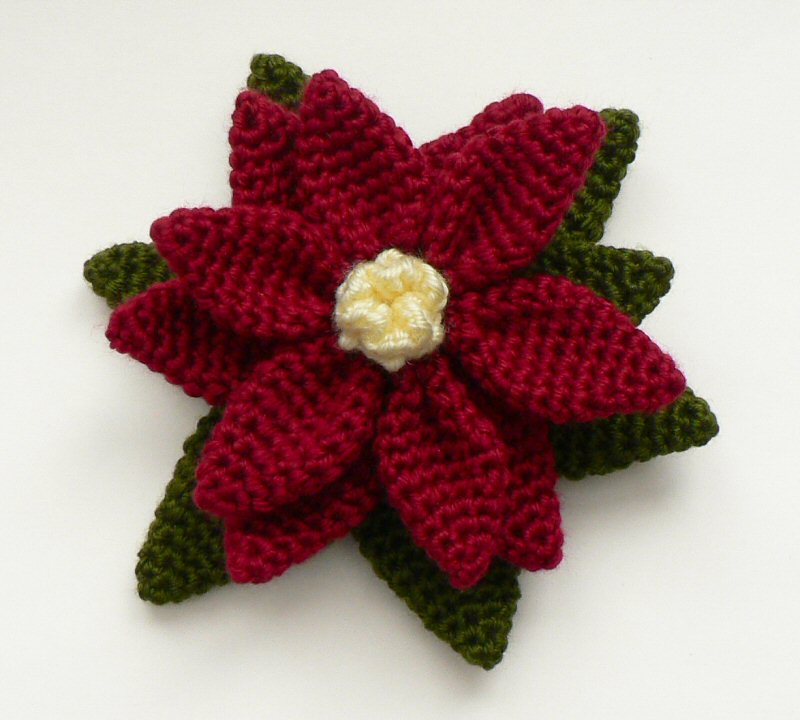
Crochet a large poinsettia flower for Christmas – perfect as a table centrepiece or as a decoration. Or make a smaller one in fine yarn or thread to wear as a pin on your coat, a Christmas tree decoration, or anything else you can think of!
This Poinsettia pattern is Donationware – the pattern is available for free, but if you like it please consider sending me a donation to show your appreciation:
Send me a donation and receive the easy-to-print PDF version of the pattern as a thank you!
Donations of any size are much appreciated. Just add the amount you wish to donate, and, once you have checked out and paid, your pattern will instantly be available to download from your PlanetJune account.
The complete pattern and instructions are available below, regardless of whether or not you choose to pay for them 🙂
This is a PlanetJune original crochet pattern. Feel free to use items made from this pattern however you wish, but I’d appreciate credit as the pattern designer. Please do not reproduce the pattern anywhere else; instead post a link to www.planetjune.com/poinsettia
Not ready to make it yet? Add it to your Ravelry queue: 
Terminology
| ch | chain |
| invdec | invisible decrease Note: If you prefer, you may use a standard sc2tog decrease in place of each invdec. |
| sc | single crochet (double crochet for UK/Aus) |
| sl st | slip stitch |
| st | stitch |
Notes
- Do not join at the end of each round; rounds are worked in continuous spirals.
- Use a stitch marker to mark the beginning of each round. Move the marker up each time you start a new round.
You will need…
- E US/3.5mm crochet hook
- Small amount of worsted weight yarn in red, green and yellow
- Yarn needle to weave in ends
- Stitch marker
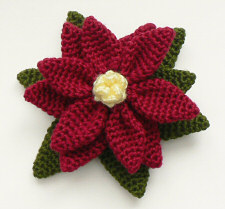
I used worsted weight yarn and a size E hook, which produced a large 6.5″ diameter flower (approx 5″ diameter for the small poinsettia). Try using a finer yarn or crochet thread with a correspondingly smaller hook to give a more compact flower.
Ingredients
Large Poinsettia:
- 6 of Style A in red
- 6 of Style B in red or green
- 6 of Style C in green
- 1 centre in yellow
Small Poinsettia:
- 6 of Style A in red
- 6 of Style B in green
- 1 centre in yellow
Crochet Instructions
Style A
Make a magic ring, ch 1.
Rnd 1: 4 sc in magic ring. (4 st)
Rnd 2: (2 sc in next st, sc in next st) twice. (6 st)
Rnd 3: (2 sc in next st, sc in next 2 st) twice. (8 st)
Rnd 4: (2 sc in next st, sc in next 3 st) twice. (10 st)
Rnd 5: (2 sc in next st, sc in next 4 st) twice. (12 st)
Rnd 6: (2 sc in next st, sc in next 5 st) twice. (14 st)
Rnds 7-8: sc in each st around. (14 st)
Rnd 9: (invdec, sc in next 5 st) twice. (12 st)
Rnd 10: (invdec, sc in next 4 st) twice. (10 st)
Rnd 11: (invdec, sc in next 3 st) twice. (8 st)
Join with sl st to next st. Fasten off, leaving long end of yarn.
Style B
Make a magic ring, ch 1.
Rnd 1: 4 sc in magic ring. (4 st)
Rnd 2: (2 sc in next st, sc in next st) twice. (6 st)
Rnd 3: (2 sc in next st, sc in next 2 st) twice. (8 st)
Rnd 4: (2 sc in next st, sc in next 3 st) twice. (10 st)
Rnd 5: (2 sc in next st, sc in next 4 st) twice. (12 st)
Rnd 6: (2 sc in next st, sc in next 5 st) twice. (14 st)
Rnd 7: (2 sc in next st, sc in next 6 st) twice. (16 st)
Rnd 8: sc in each st around. (16 st)
Rnd 9: (invdec, sc in next 6 st) twice. (14 st)
Rnd 10: (invdec, sc in next 5 st) twice. (12 st)
Rnd 11: (invdec, sc in next 4 st) twice. (10 st)
Rnd 12: (invdec, sc in next 3 st) twice. (8 st)
Join with sl st to next st. Fasten off, leaving long end of yarn.
Style C
Make a magic ring, ch 1.
Rnd 1: 4 sc in magic ring. (4 st)
Rnd 2: (2 sc in next st, sc in next st) twice. (6 st)
Rnd 3: (2 sc in next st, sc in next 2 st) twice. (8 st)
Rnd 4: (2 sc in next st, sc in next 3 st) twice. (10 st)
Rnd 5: (2 sc in next st, sc in next 4 st) twice. (12 st)
Rnd 6: (2 sc in next st, sc in next 5 st) twice. (14 st)
Rnd 7: (2 sc in next st, sc in next 6 st) twice. (16 st)
Rnd 8: (2 sc in next st, sc in next 7 st) twice. (18 st)
Rnds 9-10: sc in each st around. (18 st)
Rnd 11: (invdec, sc in next 7 st) twice. (16 st)
Rnd 12: (invdec, sc in next 6 st) twice. (14 st)
Rnd 13: (invdec, sc in next 5 st) twice. (12 st)
Rnd 14: (invdec, sc in next 4 st) twice. (10 st)
Rnd 15: (invdec, sc in next 3 st) twice. (8 st)
Join with sl st to next st. Fasten off, leaving long end of yarn.
Centre
Make a magic ring, ch 1.
Rnd 1: 6 sc in magic ring. (6 st)
Rnd 2: in front loops only, (sc, ch2, sc) in each st around. (6 loops formed)
Rnd 3: in remaining back loops of Rnd 1, 5 sc in each st around. (30 st)
The stitches of Rnd 3 will want to crinkle up into a loopy ruffle – let them do this! You want them to stick up to form the centre flowers of the poinsettia.
Assembly Instructions
Style A
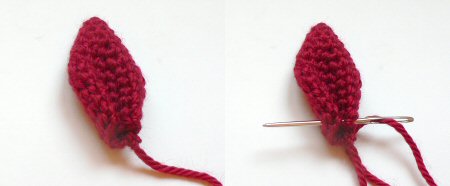
- Flatten out each petal/leaf.

- Fold the petal up along the centre line, so the two ends of the open edge meet. Using a yarn needle and the long yarn end, make a couple of stitches at the open edge between the two ends, to keep them together.
- String all 6 petals together by running a length of yarn on a yarn needle (you can use one of the yarn ends or cut a new length) through the folded edge of each petal.
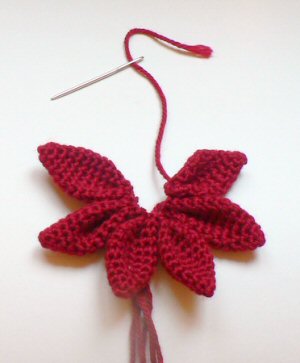
- Run the yarn through the first petal again to form a circle, pull tight and knot to keep it in position.
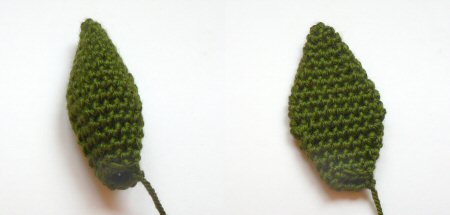
Styles B and C
- Flatten out each petal/leaf.
- Arrange one leaf over a second, so that one side of the open end of one is over the midpoint of the open end of the next, and they are arranged at approx 60 degrees (think snowflakes or slices of pie to judge the angle – you don’t have to be accurate).
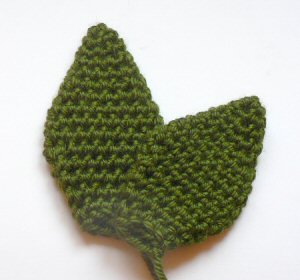
- Use a yarn needle and the long yarn end from one of the leaves to stitch them together, joining the two leaves with small stitches at the end and about a third of the way up the leaves.
- Arrange another leaf over the top leaf, in the same position and angle, and stitch in the same way.
- Continue until all 6 leaves are joined, and each leaf overlaps over one leaf and under another. There should be a small gap in the centre.
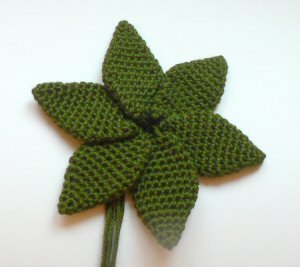
- Pull any loose yarn ends through to the back.
Final Assembly
You should now have two (or three) rings of petals/leaves and one yellow centre. To finish assembling, arrange each layer by pulling the loose yarn ends through the centre hole of the previous layers, so they are all at the back of the flower. The layer order is (bottom to top):
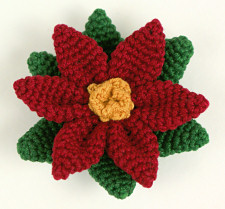
Large poinsettia: C-B-A-centre
Small poinsettia: B-A-centre
Rotate the layers so their angles are offset and all the leaves are visible.
Divide the yarn ends at the back into two groups and tie the two groups in a secure knot. Depending on what you’d like to do with your flower, you can weave in all the yarn ends, leave them long to tie it onto something, or trim them down.
I hope you enjoy this pattern. Please leave me a comment below if you do!


SALLY PATTERSON said
GOD HAS BLESSED YOU WITH A GIFT FOR USING YARN. I WOULD LOVE TO PAY A LITTLE SOMETHING BUT AT 71 I DONT BELONG TO PAY PAL. HOW ESLE CAN I DONATE? MY FAMILY IS GOING TO LOVE GETTING THESE FOR CHRISTMAS THIS YEAR HUGS SALLY
June said
alaa, st = stitch. The stitches are single crochet. Hope that helps!
alaa tharwat said
what is st can you show me by photos?
Nutjaree said
So great idea, your flower very nice. I love it. I just start to crochet.
This is really really pretty!!!!
Berline said
Hi Jen!
Thank you for the beautiful poinsettia pattern. I would like to do this flower.
God Bless You
Doreen Cordell said
Dear June:
A colored picture of your gorgeous poinsettia appeared in the Dec. 8-9 Home & Design page of our Examiner newspaper. I’ve been carrying it around with me ever since. With little hope that I could find it on line, I typed “crocheted poinsettia” into Google, and there it was (pattern and all). I love to crochet small projects, because I never seem to have enough patience to complete the big ones. This is the type of project that can inspire a person to be patient and persistent. Thanks for sharing your talent and pattern with all of us. Doreen
mystikpixi said
I’ve been looking for many flower patterns. I think yours is extremely beautiful and can’t wait to try it. However, I’m not sure how big the magic ring is suppose to be? I’m sure going to try!!!
noor said
wow, it’s a very very nice flower
I like it very very much
thaaaaaaaaaaaaaaaaaaaaaaaaaanks
debbie said
i just found your pattern today 1-11-08 i love to crochet and can’t wait to try your flower.i’m hopeing to add it to a placemat for gifts.As with the person Donna Sullivan 12-20-07 I too love the victorian look as my house is decorated that way . I would love to see some of what she has made too!
June said
Regina, I’ll try to explain Rnd 2 of the centre more clearly for you:
Single crochet into the front loop of the first stitch. Chain 2, and then make another single crochet into the front loop of the SAME stitch you single crocheted into already. This will make a loop. You then repeat all of that for the other 5 stitches in the round, so you will end up with 6 loops.
Regina said
Hi!!
I’m Spanish and for me it’s really difficult to understand all of this instructions, but I hope that in the end I will be able to make this beautifull flower.
Congratulations because you did a really good job and a goog explanation.
I’ve got just one question. I don’t know how to do the centre. Because I can’t understand the second round. What is sc, chain 2, sc ?
I know the meaning of abreviatures but I don’t know how apply them.
If you are so nice to explain me I will be so happy!
Thanks for all and Happy Christmas to everyone!!!
Feliz Navidaaaad
Kimberly M. Conrad said
I just got finished crochet some Christmas Stockings for my grandchildren, this poinsetta will make a lovely touch to the Christmas Stockings. The poinsetta is beutiful Thanks
Donna Sullivan said
Happy Holidays! Just found your wonderful and generous site. Will gladly send a donation and give you credit for your wonderful pattern.
May I use your patter to develop several other patterns–such as a candle ring and several other ideas that are running through my mind?
I always decorate candles with rings but the new ones just do not suit my old-fashioned and victorian taste so I set out today to find a way to make them myself and make them not only unusual, but different from anything anyone else has ever had–will let you know how my mission turns out. Thank you again for this site.
Louise Daoust said
This is certainly the most beautiful flower I have seen made in crochet.
I knit, but do not crochet but I may just give it a try in the future.
I booked marked your site to return for more visits.
Thank You for sharing
Louise
jenny said
finally I got the pattern printed out.I sent a donation a few weeks ago but I couldn’t get my printer to print from your website until today.It’s truly beautiful.
Gail E said
Even my husband loves the pattern. Thank you so much for sharing your fantastic artwork with everyone. You have a true Gift~
~~~crochet hugs~~~
gail e aka the Stitch ‘n Frog
Gisela said
I LOVE it! It’s absolutely beautiful. I’m planning to make a few in thread to use as ornaments, I’ll let you know how they turn out. Thanks for the pattern!
Lallee said
This is beautiful. I look forward to making it and will report back when I do. I need to go yarn shopping for the right colors. I left a donation for you. Thank you!
Tricia said
Thank you for a wonderful pattern! I made one up this weekend and the pattern was written perfectly. I am going to attach it to a grapevine wreath and it will be Mom’s Christmas present!!
melanie said
i just wanted to thank you very much for this pattern and that i just love it, it is verry kind of you to share with us all thanks again.
melanie
Mary Lou said
I just love this pattern and thank you for sharing it with us. You do beautiful work and I am looking formard to anything else that you offer.
syeda said
this is very nice. please send me this pattern
Rita said
A friend and I make things for residents of local nursing homes. This will be perfect for the ladies. Maybe if we start early enough next year we can make some to put on wreaths for each residents door…would be non-denominational.
THANK YOU
Lora said
It took my breath away. I think is is too complicated for me right now, but I sure do love it.
apaola said
very very beautiful….
and beautiful gadget for Noel..
bravissima
ciao
ciao
anna paola
Stacy said
What a beautiful poinsetta, I cant wait to make it.
June said
To Charmaine and anyone else who doesn’t wish to use PayPal – please e-mail me and I will send you my mailing address 🙂
Charmaine Caesar said
Don’t do charge on the computer. Payment should be able to be made in another fashion as well.
Jacklyn Kowal (Mrs) said
Best crocheted poinsettia I have ever seen! As I crochet about 98% in thread, I’m going to do this in thread & make several very small flowers to make a tiny bouquet or spray & put in a tiny crocheted vase that I made. Thanks so much for sharing this pattern.
Tina said
That is beautiful. Thank you for sharing the photos with us.
iris said
Hi.
i really like your flower.
this is quite a cute idea.
i hope you have good luck with your site.
I found it through www.stitchwhimsy.com
JoAnn Trenary said
Thanks for the pattern! It’s lovely! I like having the opportunity to donate too.
Barbara Canaan said
THANK YOU!!!!!!!!!!!
Your work is beautiful. I do not have or want PAY PAL but would you consider giving me your mailing address, I will gladly sent a donation.
Thank you again.
Barb.
crochet fool said
Just lovely!!!! I have it saved and will let you know how mine turns out.Thanks for sharing
thata said
I really like your design. Great work.
suni said
I saved this to my journal but it’s only visible to me. I hope that’s okay. It’s a beautiful pattern. I will give a link back on my craft blog tomorrow 😉
Carol said
This is the most beautiful Poinsettia I have ever seen.
June said
Hi Brandi, I have a magic ring tutorial available here: www.planetjune.com/blog/magic-ring-for-amigurumi/
Hope that answers your question 🙂
Brandi Miller said
What is a magic ring????
I would be very interested in knowing this.
rosina said
thank u so much.. il def try to make it nw. 🙂
Dee said
What a beautiful poinsetta! The best one I have seen! Thanks you for sharing!
sara said
so cute, what an excellent job you did in explaining how to make one
elizabeth said
Nice job, I am going to try it out.It would look great on a wreath
thank you for sharing
liz
Stitchin'Tricia said
Thanks, June~
The poinsettia is lovely and the timing is perfect! I hope you do well with the donation plan– and that you have a wonderful holiday season!
roz said
Thank You for the poiisettia pattern. This well be a lovely ornament on my grandkid’s Christmas tree. Something they well have to share with children.
Thanks again. Looking for more of your great project that I hope are coming soon.
Lydia said
Really pretty! I think I’ll try them! Thanks for sharing a great pattern!
June said
Saloni, yes you can sell the finished flowers, but please remember to credit me as the designer! Thanks 🙂
saloni said
i was wandering can i sell the finish prodect???
not the pattern..but finish flower??
btw its BEAutifull..
Good job..
June said
Jen, thank you! I used the following:
Bernat Satin in Burgundy (red) and Banana (yellow)
Red Heart Soft Touch in #9523 (green – for some reason my ball band doesn’t have a colour name, only the number)
Jen said
I found your pattern through ravelry.com I just wanted to say that’s beautiful! What ‘brand’ or type yarn did you use?