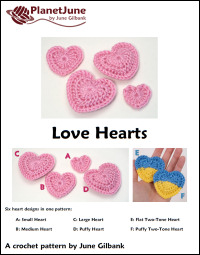
Love Hearts crochet pattern
© June Gilbank 2011
This is a clever little pattern to make sweet hearts in three sizes – each heart builds on the pattern of the previous heart. You can also make a bonus puffy heart to give a total of 4 different designs in this one pattern! String them into a garland, add a pin back to make a cute brooch, or fill a bowl with pretty hearts for Valentine’s Day decorating.
UPDATE April 2020: If you’re making pairs of matching hearts for COVID-19 patients and their families, use the Puffy Heart (D) pattern, preferably in pink or red. I thank you for offering some comfort to those who are suffering.
UPDATE March 2022: If you’d like to make hearts to support the current Ukraine crisis, please see my new Two-Tone Heart versions of this pattern, to make hearts in the colours of the Ukranian flag.
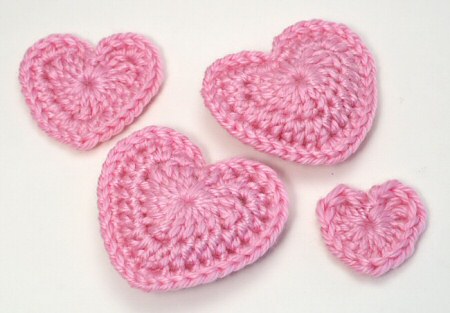
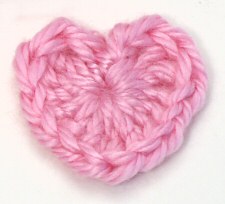
A: Small Heart; B: Medium Heart; C: Large Heart; D: Puffy Heart

This pattern is Donationware – the pattern is available for free, but if you like it please consider sending me a donation to show your appreciation:
Send me a donation and receive the easy-to-print PDF version of the pattern as a thank you!
NEW! Now, in addition to the standard (US) terminology PDF pattern, with your donation you’ll also receive a second PDF file with a version of the pattern in UK crochet terminology.
NEW! Both the US and UK versions of the pattern have been updated again to include the complete Two-Tone Heart pattern (flat and puffy versions) and colour change tips.
Donations of any size are much appreciated. Just add the amount you wish to donate, and, once you have checked out and paid, your pattern will instantly be available to download from your PlanetJune account.
The complete pattern and instructions are available below, regardless of whether or not you choose to pay for them 🙂
This is a PlanetJune original crochet pattern. Feel free to use items made from this pattern however you wish, but I’d appreciate credit as the pattern designer. Please do not reproduce the pattern anywhere else; instead post a link to www.planetjune.com/hearts
Not ready to make it yet? Add it to your Ravelry queue: 
Terminology
| ch | chain |
| ch-sp | chain space |
| dc | double crochet (treble crochet for UK/Aus) |
| hdc | half double crochet (half treble crochet for UK/Aus) |
| sc | single crochet (double crochet for UK/Aus) |
| sl st | slip stitch |
| st | stitch |
| tr | triple (treble) crochet (double treble crochet for UK/Aus) |
You will need…
- E US/3.5mm crochet hook
- Small quantity of worsted weight yarn in red, pink, or the colour of your choice
- Yarn needle to weave in ends
- Optional: small amount of polyester fibrefill stuffing for the puffy heart
Gauge
Gauge is unimportant for this pattern. I like to crochet the hearts with a small hook so they are rigid and there are no gaps between the stitches; if you prefer a looser, floppier heart, use a G or H hook instead.
Notes for all hearts
To make these hearts, you must be comfortable with the magic ring technique. Instead of single crocheting into the magic ring, the entire first round (Heart A) is crocheted directly into the ring, and then the ring is pulled tight to complete the round. This same pattern also forms Rnd 1 of all the other hearts, so read these instructions before beginning any of the hearts!
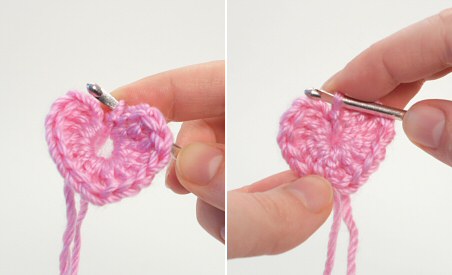
- As you crochet Rnd 1, you may need to stop and snug together the bases of the stitches you’ve already made, so that you can fit all the stitches into the magic ring.
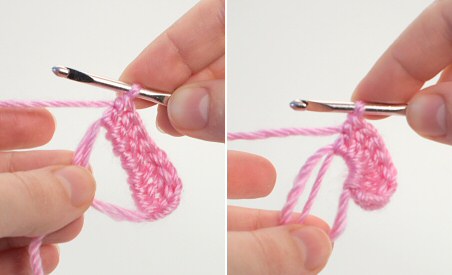
Left: Halfway through Rnd 1. Right: The same stage after pushing the bases of the stitches together. - When you reach the end of Rnd 1, pull the magic ring almost closed, leaving a small hole in the middle.
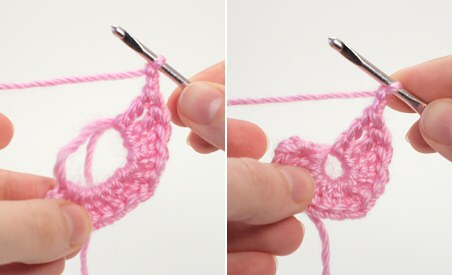
Left: Rnd 1 finished. Right: Magic ring pulled almost closed with a small hole remaining. - To complete Rnd 1, make the final sl st into the remaining hole, and then pull the magic ring tightly closed.
Left: Final sl st made. Right: Magic ring pulled tightly closed.
A: Small Heart
Make a magic ring, ch 2.
Rnd 1: (3 tr, 4 dc, tr, 4 dc, 3 tr) into magic ring.
Pull the magic ring mostly closed, leaving a small space in the middle, ch 2, sl st into the remaining hole in the magic ring. Pull the magic ring tightly closed.
Fasten off. To complete the heart, see Finishing (below).
B: Medium Heart

Make a magic ring, ch 2.
Rnd 1: (3 tr, 4 dc, tr, 4 dc, 3 tr) into magic ring.
Pull the magic ring mostly closed, leaving a small space in the middle, ch 2, sl st into the remaining hole in the magic ring. Pull the magic ring tightly closed.
Note: do not turn work, continue working anti-clockwise (clockwise for left-handers) around the heart, working into the stitches of Rnd 1, and starting by working into the ch-sp formed by the ch 2 you made after the magic ring.
Rnd 2: sc in ch-sp, 2 hdc in next st, 3 hdc in next st, 2 hdc in next st, hdc in next 3 st, 2 hdc in next st, (hdc, dc, hdc) in next st, 2 hdc in next st, hdc in next 3 st, 2 hdc in next st, 3 hdc in next st, 2 hdc in next st, (sc, sl st) in ch-sp.
Fasten off. To complete the heart, see Finishing (below).
C: Large Heart

Make a magic ring, ch 2.
Rnd 1: (3 tr, 4 dc, tr, 4 dc, 3 tr) into magic ring.
Pull the magic ring mostly closed, leaving a small space in the middle, ch 2, sl st into the remaining hole in the magic ring. Pull the magic ring tightly closed.
Note: do not turn work, continue working anti-clockwise (clockwise for left-handers) around the heart, working into the stitches of Rnd 1, and starting by working into the ch-sp formed by the ch 2 you made after the magic ring.
Rnd 2: sc in ch-sp, 2 hdc in next st, 3 hdc in next st, 2 hdc in next st, hdc in next 3 st, 2 hdc in next st, (hdc, dc, hdc) in next st, 2 hdc in next st, hdc in next 3 st, 2 hdc in next st, 3 hdc in next st, 2 hdc in next st, (sc, sl st) in ch-sp.
Note: do not turn work, continue working anti-clockwise (clockwise for left-handers) around the heart, working into the stitches of Rnd 2.
Rnd 3: sc in next 2 st, (sc in next st, 2 sc in next st) three times, sc in next 6 st, 3 sc in next st, sc in next 6 st, (2 sc in next st, sc in next st) three times, sc in next 2 st.
Join with sl st into first st.
Fasten off. To complete the heart, see Finishing (below).
Finishing (Hearts A, B ,C)
As Hearts A, B, and C are flat, you’ll need to weave in the yarn ends.
Starting tail
Note: Make sure your magic ring is pulled tightly closed before you begin weaving in the ends – this is your last chance to avoid having a hole in the middle!
This yarn end should already be at the back of the work (the side facing away from you as you crochet). Using a yarn needle, weave the end, a few stitches at a time, underneath the backs of the stitches of Rnd 1.
End tail
If you’d like to make a hanging loop to string your hearts into a garland, keep the end tail long and use it to form the hanging loop. If not, draw the yarn end to the back of the heart (the side facing away from you as you crochet). Using a yarn needle, weave the end under the backs of the stitches of Rnd 1, as you did for the other end.
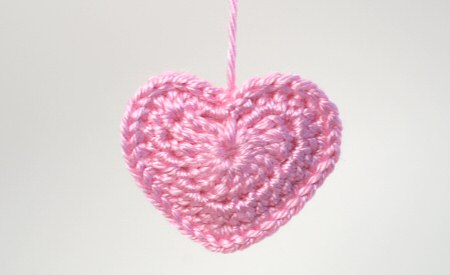
D: Puffy Heart

Heart D is a puffy version of Heart C, made by crocheting 2 hearts together with a small amount of stuffing in between them.
- Begin by crocheting 2 x Heart B, but do not fasten off the yarn when you have completed the second heart.
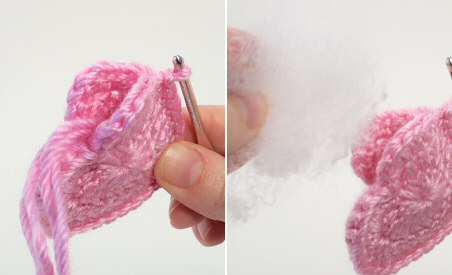
- Holding both hearts with wrong sides together, begin to work Rnd 3 of Heart C, inserting the hook through both layers to begin each stitch (see picture below).
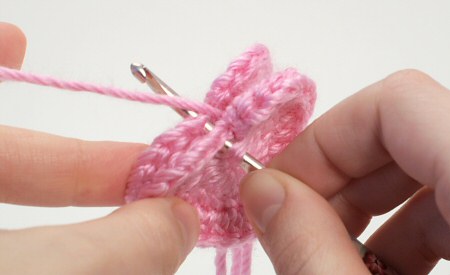
- When you have one lobe of the heart left to crochet together, stuff all the yarn ends into the heart, then add a small wisp of stuffing to puff up the heart a little (see pictures below).
- Complete Rnd 3, again crocheting through both layers.
- Fasten off. If you’d like to make a hanging loop to string your hearts into a garland, keep the yarn tail long and use it to form the hanging loop. If not, use a yarn needle to lose the end between the two layers of the heart.
I hope you enjoy this pattern. Please leave me a comment below if you do, and consider leaving me a donation. Thanks!


Laura said
I’ve read through all the questions and comments but I too need to ask where the chain space is at the beginning of round 2. I can’t seem to find your answer to Tina. Thanks , especially for the Magic Ring video!
June said
Laura, working into a chain space simply means you work into the space beneath the entire length of chain, instead of inserting your hook into one of the individual chain stitches. In this case, instead of inserting your hook into either the 1st or 2nd chain of the ‘ch 2’, you’ll insert it into the larger gap beneath both chains.
Liz said
Thank you so much for the opportunity to help, Covid 19 patients and their families. I was admitted last week but luckily allowed home as they said id be safer home( luckily my son had put my phone in a carrier bag, so i could contact him ti ket him know what was going in as he wasn’t allowed in the anbulance with me)
i need to order crochet hooks and wool ( im hoping from amazon) what exactly would be the sizes id need from uk Amazon. Thank you again. stay safe everyone ❤
Alicia said
Im more than happy to make some hearts for this great cause. This maybe an obvious question but do you only want the hearts to be pink? Weve been making some to hang in our windows locally but have done them in the rainbow colours x
June said
From what I’ve seen from nurses who are requesting hearts, pink or red are preferred, but any colours are accepted provided they’re in matching pairs.
Ann kader said
Thank you June for letting us use this pattern particularly at this time.
our local hospital has aked for hearts, one to be given to the coronavirus patient and one to be sent in a card to family. so there is still that connection even though they are not allowed to visit.
Yvonne HAWKINS said
Thank you so much for the pattern – I thought it would be nice to make some for a care home in lock-down as well as patients in hospital.
Elizabeth said
I too am doing hearts for the victims of Covid-19 in response to the nurse who appealed for them at the Great Western Hospital in Swindon. I began by using a different heart pattern, from a different designer, but these look rather simpler, therefore a little more pretty, in my view. The bonus is, that they will also be quicker! Thank you!
Sarah-Jane said
Thank you June, I’m making these in pairs to give one to bereaved families to keep, and the other to leave with their loved one in hospital during Covid-19 pandemic.
Jen Blohowiak said
:innocent:I would love to have the pattern in pdf it would make it easier to make these to donate to hospitals for patients and their families of covid-19 being that the patients can’t have families present when they are dieing these hearts would hopfully ease theirs and their families
Jen Blohowiak
Pragna said
Thank you so mych, am a beginner to crochet and wanted to learn “heart”. This is very helpful. Thanks once again.
Karen said
These are such beautiful hearts! I’m using them to decorate preemie caps for the hospital. Thank you for sharing!!
??????
Sandy G said
Thank you so much for this easy to follow pattern. I’m making red hats with white hearts for our children’s hospital for babies born on Valentine’s Day.
Chriss Lambe said
Hi, I love your work. Please could you tell me, the heart pattern written in US or UK crochet terms?
June said
All PlanetJune patterns use standard (US) terminology. The ‘Terminology’ section at the top of each pattern explains all the abbreviations I use in the pattern, and gives conversions to UK terminology, so you can make my patterns no matter which terminology you’re most familiar with 🙂
Margaret Belam said
Thank you for sharing this – we have adopted our village phone box in the UK and I’m going to decorate it with hearts
Marianna said
Absolutely adorable ????
Teri Penry said
Did a bit of oopies, at the first, started again. the second time was the hit. This was really fun. I want to try and make a bigger one. Thank you for the pattern.
Ann Marie said
LOVE, LOVE, LOVE your hearts! I would love to make them into a quilt. Does anyone have a pattern (or patterns) to turn these hearts into squares or circles to create a quilt? Thanks!
Tammy said
Round 2 isn’t lining up. I’ve tried 3 times and it’s always stitch off (the 1st half has an extra st)
June said
Tammy, please see my reply to Nicole for my suggestion on how to solve your problem 🙂
Anna Plummer said
Thank You so very much for this pattern – I’ve been trying many diiferent small heart patterns for this Valentine’s Day, and your pattern is the one I’m most happy with, its easy to do, does not take much time, and looks the best – Im glad I found a pattern I can stick with so Im not constantly looking for something better. I’ve made many of these little hearts in different sizes, colors and yarns – no matter what yarn or hook size I use, they come out great. Thanks Again!
Siany said
Thank you for a fab article and a good quality blog. Wading through so much rubbish on the Internet and finding your blog has been like finding a happy crafting oasis! Thanks!
Judy Knudsen said
Love creating your hearts. I make and donate Chemo Hats to our confusion Room at Mercy Hospital.
Will add small hearts to hats.
Thank you for sharing.
Will share your site also.
Have a good day.
Sara said
Thank you so much for the pattern I am making a quantity to give as prayer hearts for the women in our family as gifts to show love and support after the sudden loss of a family member.
Annette Frater said
Wonderful site June, I can’t understand why I haven’t come across it before now! Many thanks for the excellent tutorial for the lovely little hearts. I have been searching for one for a while and this, for me is excellent. Thank you so much.
Tiffany said
At the beginning do I have to do a magic ring or would a slip knot work as well? I just can’t get the magic ring down. So frustrating.
June said
You could, provided you take care to make an adjustable slip knot (so that pulling the starting tail tightens the knot, unlike a regular slip knot where pulling the working yarn tightens the knot), and then knot the yarn or weave it in securely after pulling it closed, so it won’t work open again.
However, I’d recommend that you practice the magic ring by making 6 sc in the ring as I show in my video tutorial until you get the technique down – it gives such a a good result, it’s well worth persevering!
Serena said
Thank you very much for this pretty and awesomely well explained pattern!
Lynda Buckley said
The first row is in UK terms, while rows 2 and 3 are in US terms …
June said
I’m not sure why you think this, Lynda – this pattern is written entirely in US terms (as are all my PlanetJune patterns). I give all the UK conversions in the Terminology section at the top of the pattern.
Round 1 uses taller stitches than the subsequent rounds (as it sets the shape for the following rounds) – perhaps that’s why you were confused? Please follow the pattern exactly as I wrote it (all in US terms) and you’ll end up with hearts shaped the way I designed them! 🙂
mandydandy said
hello miss june..i was wondering is this pattern in u.s terms? ive seen it done in a youtube video but i guess she didnt use us termology and it confused me a little bit. this such a cute pattern. i saw ur carnation picture i might give that a try. it also looks super cute!!! happy hookin!!!
June said
All PlanetJune patterns use standard (US) terminology. The ‘Terminology’ section at the top of each pattern explains all the abbreviations I use in the pattern, and gives conversions to UK terminology, so you can make my patterns no matter which terminology you’re most familiar with 🙂
Pam said
Just tried this and have to say this is one of the prettiest-shaped hearts I have ever crocheted. And it is so easy. Thank you!
Nancy said
Like to have videos on making hearts.thanks
June said
Nancy, the technique is exactly the same as I demonstrate in my Magic Ring video – the only difference is that, instead of the 6 sc I demonstrate in the video, you make all the stitches of Rnd 1 of the heart into the ring before you pull it closed!
Rosalie McCreary said
Thank you June for sharing your talent and patterns. I learned to make the magic circle from your website a couple years ago and I’ve shared your website with others who wanted to learn this great technique. I love these hearts! They are easy and quick to make. Thank you for your time and I hope you have a great year!
Srujana said
Very nice , I want to make greeting card for my husband , it helps me a lot… U made it clear ? thanks for the pattern
Rebecca W. said
Thank you for all your work on these wonderful patterns 🙂
Nannyknitsandcrochetstoo said
This is a very neat and easy to follow pattern.
I embellished mine with picot edging . Thank you .
Suenene said
I just love this pattern. Is it possible to make it a bit bigger by one or two rows ? Please, I would really love that for the baby blanket I am making. I want to put it on a granny square.
Thank you so much
June said
Suenene, adding extra rounds would involve creating a whole new pattern, but you can make the heart larger by using a larger hook (which would make the heart larger and floppier, but that shouldn’t be a problem on a granny square) or by increasing both the hook size and yarn weight (see www.planetjune.com/resizing for details).
Suenene said
Hello June
Thank you so much for your detailed increase instructions. Wow, it is realy helpful. I will explore the options to see which one sattisfies my needs.
Blessings
Michelle Atchley said
I don’t know where I messed up, I counted all of my stitches correctly on the third row, but for some reason I only needed 1 sc then 1 ss at the end instead of sc in next two st then 1 ss. I think where I got confused was at the beginning of round 3 where the first stitch begins after the round 2 ch-sp. If I do the sc in next two st then ss at the end of round 3 it starts looking more like a triangle than a heart 🙁
ANGELA BRIGGS said
Hi this is the first pattern for hearts ive been able to follow and complete the large heart would it be easy enough to add a white border to to this heart? p.s absolute beginner 7 days crocheting
June said
Yes, Angela, the easiest way would be to make a new heart and change colour to white before you make Rnd 3 🙂
ANGELA BRIGGS said
thats exactly what i did thanks
Fabiola said
Always beautiful!!!
Teresa Kant said
I make these little hearts and use them for barefoot sandals. They are absolutely adorable!
Helen said
What a sweet and simple pattern! Thank you for the different sizes. They were so fun to make that I want to make many more, even though I don’t need them for anything right now!
Melanie said
I love your little hearts! Just getting into crocheting and wanted to make hearts for valentines. Your’s is my favorite pattern I have found so far! Thank you so much for sharing! I am linking to your site on my blog today.
vanillateas said
Much love for your pattern. So much nicer than chaining 3 to complete curve. This is the second heart I’ve ever made (newbie) and I prefer your pattern. (especially over ones which look spot-on like ice cream cones) Thanks for the free pattern and sorry I cannot contribute.
3in2years said
Thanks for this pattern! It’s so easy (I’m brand new at crocheting) and absolutely darling!! I made several as valentines gifts for teachers. Thank you!!
Lydia Fast said
Thank you so much for the pattern. I am confused about where the ch-sp is for starting the second round.
June said
Lydia, please see my reply to Tina for my answer to this 🙂
Heather - Mexirishrose (Ravelry) said
Thank you for allowing the use of this pattern. It is adorable and so easy to make .. very versatile with the different sizes. This will come in handy for my projects .. especially for the children .. and my grandbabies 😀 . Thanks again so much! You have so many Awesome designs!
Blanche Mulligan said
I don’t understand how to make the magic ring to start with?
June said
Blanche, see my magic ring tutorial (www.planetjune.com/magicring) but note that instead of making 6 sc into the ring (as I show in the magic ring tutorial), you’ll be making all the stitches of Rnd 1 into the ring before you pull it closed, as shown in the ‘Notes for all hearts’ section at the start of this pattern.
Jackie Lee said
Thank You so very much June for sharing this pattern. It was very easy to understand.
Theresa Zmrzly said
Thank you for allowing me to use your pattern. Must say explained in detail and easy to follow. I am from Namibia and at this end of the world we do battle with not having outlets for patterns. Not all of us is fortunate enough to own computers/I-pads etc
Sarah said
Thankyou for this lovely pattern. Very pretty and very easy to follow. ?
genise greene said
Thank you your instructions were excellent.
Maria said
Thank you for this lovely pattern I am making bunting for my great grandaughters I am from Australia
Madhumathi said
Thank you !! Beautifully explained ????????????????????????