Crocheted Wreath Base crochet pattern
© June Gilbank 2019
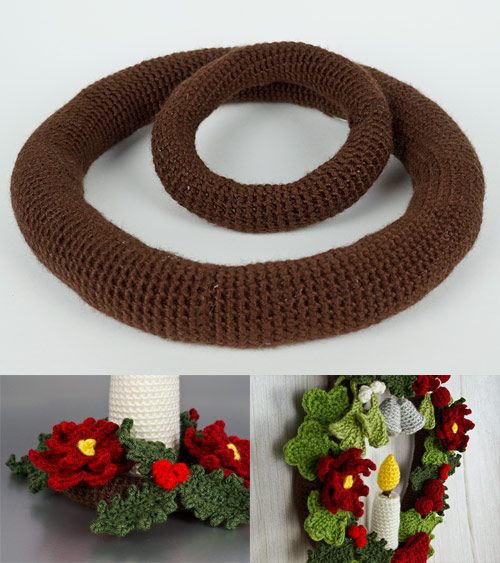
Use this stuffed crocheted ring as a base for a crocheted wreath, candle ring, or other round decoration (e.g. a centrepiece). You can make the ring in any size depending on the desired size of your decorative piece, and choose yarn colours to match your decor and the theme of the components you’ll be covering it with.
This pattern is Donationware – the pattern is available for free, but if you like it please consider sending me a donation to show your appreciation:

Send me a donation and receive the easy-to-print PDF version of the pattern as a thank you! It includes some additional info that you’ll only find in the PDF version:
– Tips on choosing yarn colours for your wreath base
– The exact recipes and layout diagrams for my Christmas wreath and candle ring (patterns sold separately)
Donations of any size are much appreciated. Just add the amount you wish to donate, and, once you have checked out and paid, your pattern will instantly be available to download from your PlanetJune account.
The complete pattern and instructions for two sizes of wreath base are available below, regardless of whether or not you choose to pay for them 🙂
(The seasonal patterns pictured adorning my wreath bases are all available separately in my Christmas Decor Collection.)
This is a PlanetJune original crochet pattern. Feel free to use items made from this pattern however you wish, but I’d appreciate credit as the pattern designer. Please do not reproduce the pattern anywhere else; instead post a link to www.planetjune.com/wreathbase
Not ready to make it yet? Add it to your Ravelry queue: 
Terminology
| ch | chain |
| sc | single crochet (double crochet for UK/Aus) |
| sl st | slip stitch |
| st | stitch |
Notes
- Do not join at the end of each round; rounds are worked in continuous spirals.
- This is a forgiving pattern and you don’t need to count your stitches and rounds exactly! (If you want to make exactly the same number of rounds as my samples, use a stitch marker to mark the beginning of each round, and move the marker up as you start each new round.)
You will need…
- E US/3.5mm crochet hook
- Worsted weight yarn in dark brown, or any other colour(s) of your choice (approx 125yd/115m for the wreath; 40yd/35m for the candle ring)
- Polyester fibrefill stuffing
- Recommended: sturdy floral wire, armature wire, or other stiff wire
- Optional: tape to protect the ends of the wire
- Yarn needle to weave in ends
- Stitch marker
Size
Any size you wish.
- Sample wreath size: approx. 10″ (26cm) diameter; tube thickness approx. 1.5″ (4cm)
- Sample candle ring size: approx. 5.5″ (14cm) diameter; tube thickness approx. 1″ (2.5cm)
(Your gauge and yarn choice will affect the finished size slightly.)
Gauge
Gauge is unimportant for this pattern, provided the pieces are crocheted sufficiently tightly that they will not gape visibly when stuffed. To test a swatch, crochet the first 3 rounds and then push a piece of fibrefill behind it:
- If the stitches stretch open too much and the fibrefill is clearly visible, reduce the hook size.
- If you cannot insert the hook into the previous stitches, reduce your tension (crochet more loosely) or increase the hook size.
Before You Start…
To keep your wreath from sagging, you can reinforce it with wire (as I recommend later) but it’s not a requirement. Here are your options:
- If you don’t want to use wire: stuff the wreath as you crochet, pausing every couple of inches to add some more stuffing, then continue.
- If you want to add wire after stuffing: stuffing the wreath is easiest if you stuff as you crochet, but, depending on your stuffing and the size of your wreath base, pushing the wire through after adding the stuffing may be difficult, and I wouldn’t recommend it.
- If you want to follow my recommendation: complete the crocheting without stuffing as you go. The following tutorial will explain how to add the wire and stuffing after you complete all the crocheting.
Patterns
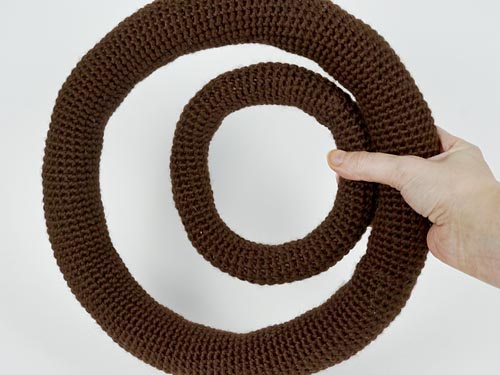
The wreath base is a simple crocheted tube that will be joined into a ring. I’ll give you the patterns for the exact sizes I used for my wreath and candle ring, but feel free to modify them to give you a different size and shape of wreath base:
- The starting chain length controls the diameter of the tube. Add more chains to form a wider tube.
- The number of rounds controls the diameter of the ring. Add more rounds to form a larger ring.
The two complete patterns included here should give you an idea of how much to increase/decrease the length/width of your tube to achieve the size you want.
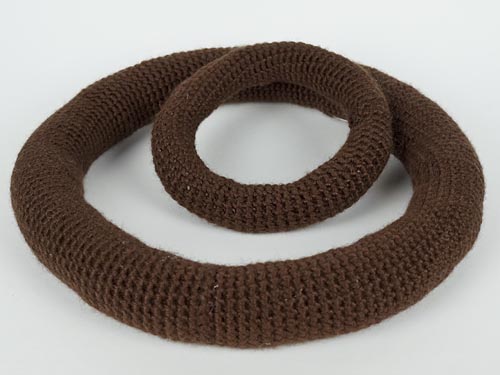
Inside: Candle Ring Base; Outside: Wreath Base
Candle Ring (1″/2.5cm tube formed into a 5.5″/14cm ring)
Ch 12.
Rnd 1: Without twisting the starting chain, sc into the first chain you made to join it into a circle, sc in each remaining chain around. (12 st)
Rnd 2: sc in each st around. (12 st)
Repeat Rnd 2 a further 73 times, or until the tube measures approx. 15″/38cm long.
Join with sl st to next st. Fasten off, leaving a long yarn end to stitch the ends of the ring together.
Continue to Assembly.
Wreath (1.5″/4cm tube formed into a 10″/26cm ring)
Ch 20.
Rnd 1: Without twisting the starting chain, sc into the first chain you made to join it into a circle, sc in each remaining chain around. (20 st)
Rnd 2: sc in each st around. (20 st)
Repeat Rnd 2 a further 148 times, or until the tube measures approx. 30″/76cm long.
Join with sl st to next st. Fasten off, leaving a long yarn end to stitch the ends of the ring together.
Continue to Assembly.
Assembly
To keep your wreath from sagging, you can reinforce it with wire. This is easiest to do if you add the wire before stuffing, but it does make stuffing a little trickier! Here’s how I recommend you do it:
Step 1.
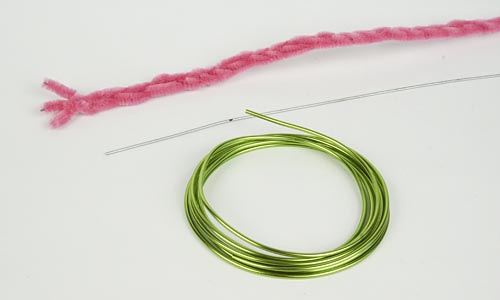
Cut a length of wire so it’s a couple of inches longer at each end than your crocheted tube.
I found this roll of stiff green floral wire at a dollar store (front), but you can also find floral wire in lengths (middle) or on spools. If your wire is too short and/or too flexible, you can twist or braid multiple strands together, as I did here with these pink pipe cleaners (back).
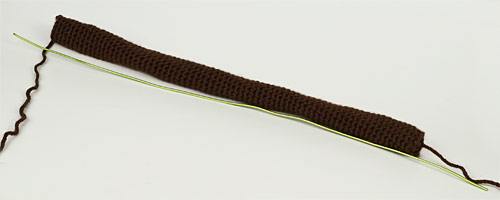
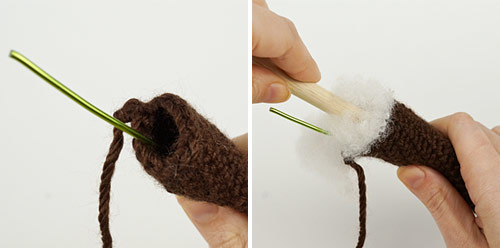
Step 2.
Insert the wire all the way through the crocheted tube.
Tip: To stop the wire from falling out while you stuff the tube, add a ball of stuffing at the far end of the tube to act as a ‘plug’ to hold the wire in place against the side of the tube.
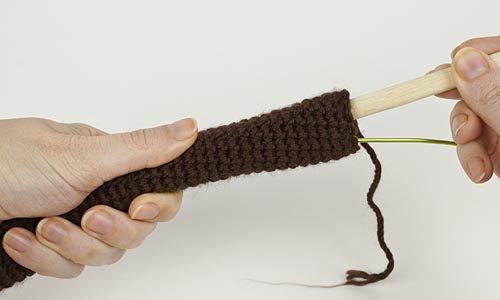
Step 3.
Start stuffing the tube from the other end, using a long tool (I used the handle of a wooden spoon) to push a piece of stuffing along as far as the middle of the tube, and then working back towards the end, pushing more pieces of stuffing in to fill up the first half of the tube.
Don’t use too much stuffing at once, or it’ll clump into a tight ball as you push it down and force the stitches of the tube open at that point, instead of passing along the tube.
I find it easiest to loosely grip the section of tube that contains the latest clump of stuffing, then push gently with the tool so the stuffing slides further down the tube past your hand as you hold the tube in place. Move your hand along to the new position of the stuffing clump and repeat.
For a large wreath base, don’t worry if your tool isn’t long enough to reach the middle of the tube – keep pushing with the tool, and the tube will scrunch up so you can get the stuffing through to the middle.

Note: You won’t have as much control with your stuffing as usual using this method, so it’ll probably end up looking a bit lumpy, but don’t worry – I have a technique for that too, coming in Step 6!
Step 4.
Continue stuffing until the first half of the tube is full (leaving the open end understuffed).
Step 5.
Turn the tube around, remove the plug of stuffing (fluff it up and you can reuse it), and repeat the stuffing process to stuff the other half of the tube.
Step 6.
If you have an overstuffed lump next to an understuffed section, you can even out the stuffing by inserting the tip of a yarn needle midway between the two sections, so the tip points towards the overstuffed area. Without withdrawing the needle, rotate it so the tip moves through the inside of the tube, towards the understuffed area, dragging some stuffing with it.

Repeat as necessary to even out the stuffing.
Note: Remember that your wreath will be covered, so the base doesn’t need to look perfectly smooth!
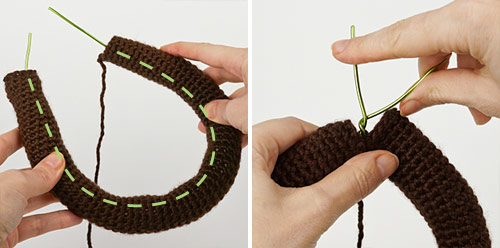
Step 7.
Bend the ends of the tube towards each other so the wire runs around the inner edge (as shown by dotted line). Continue bending the tube until the ends of the crochet meet and the ends of the wire overlap. Twist the overlapping ends of the wire together securely.
Step 8.
Trim off any excess wire and bend the sharp ends of the wire over for safety. If you wish, you can further secure the sharp ends of the wire by covering the join with floral tape as I did here, or any strong tape (duct tape or electrical tape would work well).
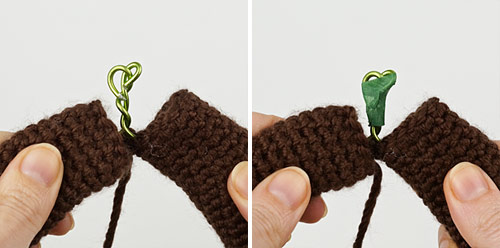
Step 9.
Pull one end of the tube back away from the join, then fold the twisted ends down flat against the rest of the wire.

Step 10.
Pull the ends of the crocheted tube to meet so the wires are completely covered.
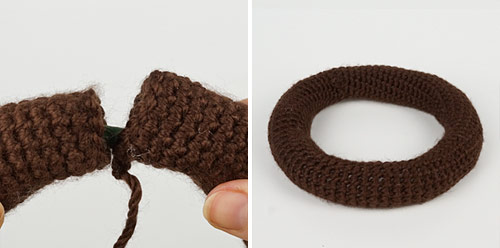
Step 11.
Using a yarn needle and the long yarn end from the crocheted tube, stitch the ends of the tube together, all around the open ends.
Before you finish stitching, add more stuffing through the remaining hole to stuff the join area.
Finish stitching the ends of the tube together, then fasten off and weave in the yarn end.
Step 12.
Reshape the wreath base into a circle. The wire will make it much easier to shape.
Covering the Base
To attach pieces to the wreath base, you can either stitch them in place using long yarn ends from the components you’re adding (or a new length of matching yarn if you don’t have a long yarn end to use), or simply pin the pieces in place.
I use one or more sewing pins to attach each piece. I aim to position the pins in unobtrusive places, e.g. beneath berries or at the back of the piece, wherever possible, to keep them hidden. If your elements won’t stay in place with a single pin, simply add more pins to stabilise them against the wreath base:
- For wide, flat pieces, add pins near the ends to keep them from flopping.
- For stuffed or heavier pieces, add more pins, angled towards each other, to trap the element in place against the wreath so it won’t drop off under its own weight.
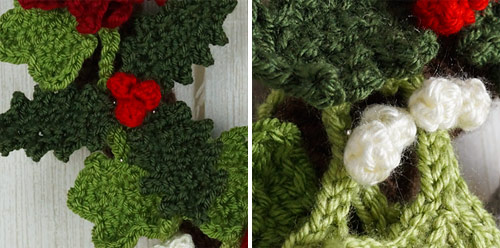
Look carefully and you can spot the glint of the pinheads!
You can use this wreath base pattern in any size or colour and cover it with any crocheted components you like – use your imagination, and please share photos with me when you’ve made anything from this pattern (I’m @planetjune on all the social media, so tag me!)
I hope you enjoy this pattern. Please leave me a comment below if you do, and consider leaving me a donation. Thanks!


Denise Grenfell said
Hello June. I have made your base wreath pattern and have not needed to insert wire. I stuffed it very tight and it has held its shape well, no collapsing. Thanks again for a really beautiful and easy to follow patter.
Regards
Denise Grenfell
South Africa
Denise Grenfell said
I’m making your beautiful Christmas wreath. Is it mecessary to sew the leaves and flowers on or can I put them on with a hot glue gun? Look forward to your reply. Thanks. Regards Denise Grenfell Johannesburg South Africa.
June said
Yes, you can absolutely use hot glue if you want to. (I don’t personally like hot glue because it’s messy and permanent, but there’s no reason why you shouldn’t use it for your own projects!)
Susi said
I am not sure if I admire you more as a crocheteer or as a teacher, so grateful to you!
Erica said
What a genius idea! Thank you!
Kim Marazita said
Love these. Can’t to start.