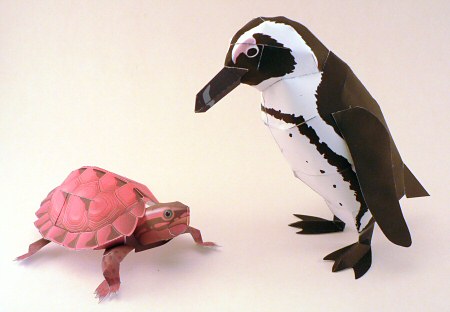
This weekend, I made these paper models. They are made from PDF files that you print, cut, fold and glue together. The models are very well designed; cutting out all the parts is time-consuming, but it’s amazing that you can make something so realistic from a couple of sheets of paper!
You can now see my tutorial below with tips on how to cut and assemble models like these – as the instructions are all written in Japanese it helps to know them before you get started!
Tutorial: Cut & Fold Paper Models
This tutorial was originally published on my old papercraft site, Folding Trees.
If you look around on the internet, there are a multitude of printable cut-out-and-fold paper models available to download. They look amazing, but how easy are they to actually put together? How accurate do you have to be for them to look good? And, as a lot of them have instructions in Japanese, how easy is it to follow the instructions without understanding the text? In this tutorial, I’ll give you some hints and tips to make the process a bit easier!
My sample paper models are the Cape Penguin and Japanese Leaf Turtle models from the Konica Minolta Environmental Papercraft site. I like these models because they only use 2 sheets of paper each, and the animals are realistically designed. (For reference, the penguin is 6″ tall, and the turtle is 6″ long.) Check the end of this post for other paper model resources.
Printing the patterns
The instructions on my models say to use paper of between 0.20 and 0.24mm thickness (that’s about twice the thickness of regular copy paper). I think thin cardstock would be the best choice, if you have it available, but I used the thickest copy paper I could find (marked 28lb) and it was fine. Also, please note that these Japanese PDF files are designed to print on A4 size paper. North Americans with letter-size paper: remember to set the PDF Page Scaling to Shrink to Printable Area. If you forget this, the top and bottom of each page will be missing from your printouts. Not that I would ever make a mistake like that (ahem).
Understanding the line markings
Before you start cutting, you should make sure you understand where to cut! Below, I have annotated the legend for the cutting lines on the patterns I used – the line markings may vary on different diagrams, but the Japanese text should be the same for each type of cut or fold, so you should be able to match them up using my legend:
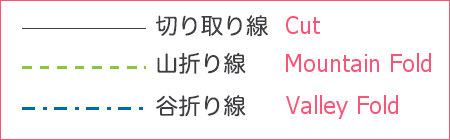
The fine dotted lines are positioning lines for attaching the pieces later – do not fold or cut along these lines.
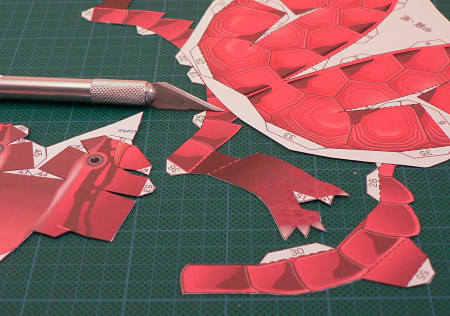
Cutting the pieces
Use a sharp craft/xacto knife and a self-healing mat (or some thick scrap cardboard to rest your work on) to cut along all the ‘cut’ lines for each piece. You do have to cut accurately for the piece to come together properly, so cut slowly and carefully. If you haven’t tried papercutting before, you can use a metal ruler along the line you want to cut to guide you. I did this for my first model, then braved freehand cutting, which is much faster. The easiest way I have found to control the knife is to rotate the work so you make all your cuts in the same direction – from left to right (right-handers) or right to left (left-handers).
Folding
Refer back to the instructions to see where you need to fold the pieces. I recommend you score each line first – this makes it much easier to make your fold in the right place. To do this, use a blunt pointed tool (e.g. a bone folder or a darning needle) and a ruler to ‘draw’ along each line. You don’t need to press hard – you don’t want to cut into the paper, just dent it so it will naturally crease along that line when you fold the paper. I scored all the lines on the front side of the paper, and then mountain- or valley- folded each line as shown in the instructions.
Assembly
Once everything is cut and folded, it’s time for the fun part: assembling the model! The tabs are all numbered in the order you need to stick them down. Refer back to the diagrams in the instructions if you aren’t sure where to stick the tabs – it is not always obvious, but the instructions have diagrams with arrows showing where each tab should be stuck.
A note on adhesives: Don’t use a glue stick! It doesn’t grab the paper tightly enough, and your model won’t stay together. A general purpose white glue (I used Tacky Glue), applied sparingly to each tab, works very well. Apply glue to the first tab and position it. Hold the two layers of paper in place for a few seconds until the glue ‘grabs’ the paper and it stays in position when you release your pressure. Then apply glue to the next numbered tab, and repeat the process until all the tabs are glued down and the model is complete!
Conclusion
Making paper models is time-consuming and precise, but the end results can be quite amazing. Seeing your model come together at the end is worth all the effort of painstakingly cutting out all those pieces. Just take your time and enjoy the process 🙂
Here are some of my favourite sites where you can find paper models to print and assemble:
- Konica Minolta Environmental Papercraft (the models above are from this site)
- Canon 3D Papercraft
- Yamaha Paper Crafts


Robyn said
OMG! Those are so cool. I can’t believe those are paper! You amaze me again june! Maybe you can do more animals and callit paper-ami’s or something like that.
Lisa said
Wow. This is pretty amazing. I’ve never done anything like this before. I’ll check your tutorial. Adorable figures.
kris said
wow!!!! those are amazing – can’t show the penguin to mia though she’ll want one. hehehe
Donna said
That is just awesome! Thanks for posting it here as well, as I don